0:00but welcome to another fiber laser
0:02Learning Lab we finished off the last
0:05session with a quick sort of scattergun
0:08approach to checking whether or not we
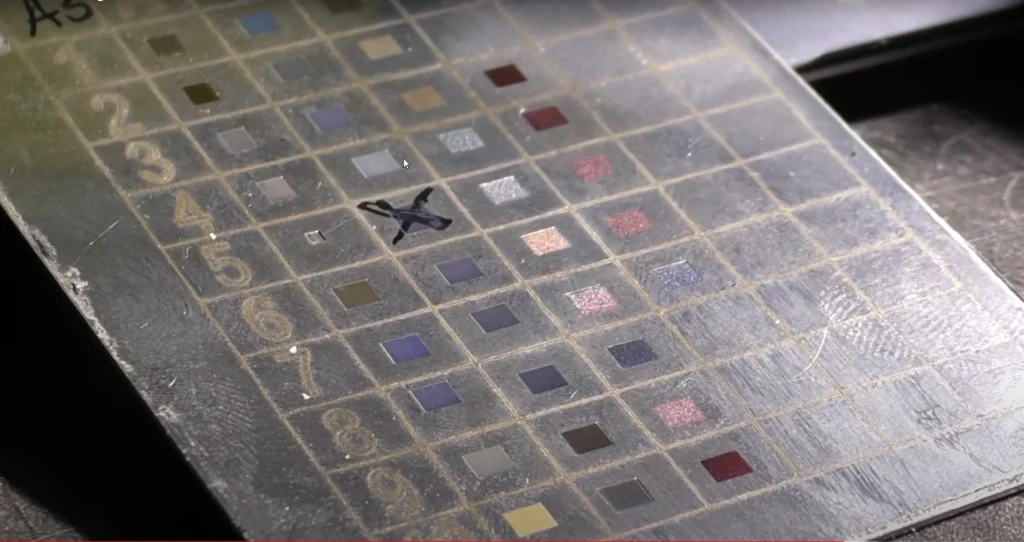
0:11could get any sort of colors on
0:12stainless steel we got these results but
0:16these are an enhanced Photoshop picture
0:20of my photograph and they exaggerate the
0:22colors quite considerably I mean I
0:25looked at all these speeds and
0:26frequencies to see whether or not there
0:29was any pulse rate or on/off ratio that
0:35I could mix together to get some sort of
0:38idea of whether or not I was getting
0:41into the right sort of region to get
0:45between these colors here I mean the
0:47gold and the blue after a lot of time
0:50spent hunting for some magic numbers
0:52everything was common here except the
0:55speed and at a speed of 500 I got gold
0:59and a speed of 200 I got blue ish as I
1:04said this is a gross exaggeration of
1:06reality but it was a bluey hue that I
1:10got so it seemed as though speed was the
1:15magic number now have to also add that
1:19for six nanoseconds which was the
1:22critical factor that I was using I
1:24wasn’t actually using the correct peak
1:26power I should have actually been using
1:28320 kilohertz for peak power so 400
1:32kilohertz means I’m running faster than
1:35I should do so that probably means that
1:36are not allowing all the electrons to be
1:39promoted to their excited state before I
1:42push the pulse through and try and try
1:45and get to peak power so that probably
1:47gives me another way of controlling the
1:49power into each pulse so we’ve got
1:53several strategies that we can adopt I
1:57think the last time we looked at it we
1:59found that this gold one here was
Transcript for The Hunt for Colours – Color Fiber Laser Engraver (Cont…)
2:03actually caused by lines and in the
2:08lines we were finding gold pattern
2:12so what this tends to indicate is that
2:15my little pattern of interference colors
2:17which is you can surf managed to get
2:19them back by using not daylight but the
2:24halogen work lamps as opposed to LED
2:26work lamps have got a wider spectral
2:29range and I can see the real colors in
2:32this light but what this does mean is
2:35that the pattern that you’ve just seen
2:38has caused by a variation in the
2:40thickness of this as we said before T
2:43which is the thickness of the oxide film
2:47now there’s no doubt that the thickness
2:50of the oxide film is the cause of the
2:52colors but but what these tests show is
2:56that because we’ve got lines with colors
2:59in them we must be forming this oxide
3:03layer in a different way than what I’d
3:05originally anticipated
3:06and whereas I thought that we might have
3:10to fiddle around with this surface here
3:12and build the layers up and down I think
3:15that what we’re doing we’re cutting into
3:18the surface and melting the surface so
3:21we could either be melting the surface
3:23and when the surface resolidify x’ we’re
3:27getting this oxide fill on the surface
3:29or we’re vaporizing this area and we’re
3:34leaving an oxide film on the surface
3:36within the groove that’s what it looks
3:39like from the pictures under the
3:40microscope this second situation this
3:43opens up many possibilities first of all
3:46if we’re doing deep grooves like this
3:49we’re into one sort of heating situation
3:52and that is very possible because
3:54remember the beam that we’re firing at
3:58the work although it is only somewhere
Transcript for The Hunt for Colours – Color Fiber Laser Engraver (Cont…)
4:01in the region of about 0.06 five
4:04millimeters diameter it is not 0.065 of
4:09uniform energy the energy distribution
4:12in that beam
4:15is Gaussian in other words we’ve got a
4:17high power right in the center of the
4:20beam and it drops away to nothing
4:22towards the outside so that would
4:24account for why we’ve got a bit of a
4:26groove when we do our burn and why we
4:30see these patterns of speckles which
4:34tend to be along the edge rather than
4:37the center and we tend to get a bit of a
4:39black mark along the center of our line
4:42so observation tells me that we’ve got
4:44lots and lots of strategies to play with
4:47here now as we found out from here there
4:50are rules that govern these colors and
4:53those rules are these very simple
4:55temperatures so what we’ve got to do is
4:59find a way of somehow inducing these
5:03sorts of temperatures into the surface
5:05now if we’re melting then mm that’s a
5:09bit interesting because you remember
5:12that when we heated this surface up in
5:14the middle here to red hot it cooled
5:15down to blue so I don’t know where the
5:19melting I don’t know how melting is
5:21going to give us this yellow color I
5:22suspect we’ve got a very large thermal
5:24gradient away from where the actual beam
5:27is to the very small area around it so
5:33I’ve got this problem of trying to work
5:35out how to keep the heat energy into a
5:39specific area we’ve got to raise the
5:42temperature quite high to get some of
5:44these colors now from some of the colors
5:48that I’ve seen other people achieve
5:50they’re not on this spectrum but I
5:53suspect if we’ve got careful control we
5:55may well have them somewhere in this
5:57spectrum so the first thing I’m going to
5:59do is to see if I can replicate this
Transcript for The Hunt for Colours – Color Fiber Laser Engraver (Cont…)
6:03approximate pattern now as I said it
6:05didn’t go from gold to a lovely pale
6:07blue like this it was quite a reasonable
6:10gold to a blue hue we’re not going to
6:15carry it out in a scattergun approach
6:16we’re going to be in we’re going to
6:18adopt a lot more logical approach and a
6:21recording approach to all the results
6:24and data that are finding
6:26so I’m using my 304 elf stainless steel
6:28and I’m going to be using that grid
6:30pattern and recording the data aha now
6:34what have I done here I’ve got a
6:37temperature measuring system which will
6:40record the maximum temperature that I
6:43see and just here we’ve got a k-type
6:48thermocouple which I’m going to set in
6:52the center of my engraving pattern now
6:57that looks thermocouple bead there are
6:58sitting up above the surface so when I
7:02put my pattern there the thermocouple is
7:09touching under the center of that square
7:12so that means that I will now be able to
7:15record not the surface temperature but I
7:18shall have an idea of the amount of heat
7:22energy that’s going into each one of
7:23these tests by virtue of the conducted
7:27temperature onto the back surface now
7:30the reason I’m doing this is because
7:31it’s not obvious sometimes that when you
7:35change the pulse width the frequency the
7:40speed exactly what you’re doing you have
7:43to sit down and think about it very
7:45carefully because it’s quite a complex
7:47combination of data and then you’ve got
7:49the other thing which is the line width
7:52spacing between the scans and the
7:55pattern of the scans as well so
7:57hopefully with the aid of the
7:58temperature data we may be able to home
Transcript for The Hunt for Colours – Color Fiber Laser Engraver (Cont…)
8:01in on some of these colors because the
8:03colors around the outside the yellows
8:05and the Browns around the outside are
8:08relatively low temperatures and the
8:10Blues in the center are high
8:12temperatures so that would imply that we
8:15need to have a fairly high temperature
8:17in our scan to produce a blue so the
8:22first test that we’re going to do is the
8:24gold to blue test so we’ll jump down
8:28probably in intervals of 20 millimeters
8:33a second to see if we can find a pattern
8:35of change in the color
8:38so we do the first one or two just to
8:41show you the method and what I’m doing
8:42and then after that I would just plot
8:45away on my own and see what I could find
8:48recording the data as I go and then
8:50coming back to you from time to time if
8:53I can find something that’s interesting
9:02I think it’s pretty obvious we’ve gone
9:06from a very very pale gold silvery color
9:08almost through Browns to sort of a
9:13purpley color and eventually down into a
9:17blue it’s not a strong blue you have to
9:20catch in the right light to see as a
9:22blue but that may well be because I’ve
9:25got the line spacing at the moment at
9:27point one
9:28I’ve got gaps between the lines we’ll
9:31repeat this test but with a line spacing
9:34of 0.05 which is just below supposedly
9:38the thickness of the beam spot size even
9:42in this halogen light it’s still not as
9:45good as daylight well if I hold it in
9:47the light right I’ve got a range of
9:50colors there but they’re to be honest
9:52they’re pretty pathetic and weak colors
9:55most of them the golds and the Browns
9:58are fairly positive but it seems as
Transcript for The Hunt for Colours – Color Fiber Laser Engraver (Cont…)
10:01though almost everything comes out gold
10:03or brown so at the moment I’m not
10:05producing huge temperatures you can see
10:08they’re 31 36 38 48 when I get to this
10:13latter set here which was point zero one
10:16in other words the spacing between the
10:18lines was very close so I was over
10:21writing several times the same spot
10:25almost then the temperature started to
10:28go up it was 83 up to 132 and by the
10:33time we finished the test at 200
10:35millimeters a second rocked 199 degrees
10:41C you think Oh 199 I should get a little
10:46bit of color there I’m sure as I fail it
10:49with my fingernail both of these colors
10:52d1 and d2 have suffered surface damage I
10:57can feel a real depth to that cut okay
11:02it’s not very much it might only be
11:03about 0.2 0.3 of a millimeter but
11:06there’s definitely material missing from
11:08the surface now so the only reason
11:10material can be missing from the surface
11:12is because we’ve evaporated it
11:14and if we’ve evaporated we must have put
11:16a very very high surface temperature
11:18into there and in doing so is I suspect
11:21that we’ve gone beyond melting the
11:23surface and just allowing it to reform
11:26we may well have messed around with the
11:27chemistry of the material itself and in
11:31which case that would account for why
11:33these particular colors are more solid
11:37more pigment like than the others I mean
11:40the others are definitely they change
11:43very much with the light now got to be a
11:46little bit careful here because it’s
11:48possible that when we come across these
11:50matte blacks and browns we’re actually
11:53messing with the chemical composition of
11:55the steel itself we’re melting it and
11:58causing some elements to vaporize away
Transcript for The Hunt for Colours – Color Fiber Laser Engraver (Cont…)
12:02and change the chemical composition of
12:04the surface of hence the color I don’t
12:06think that these are representative of
12:08the colors that we’re looking for so we
12:11need to go hunting in a different area
12:13we’ve found the golds and the Browns and
12:15a hint of blue but we haven’t got any
12:18other colors not entirely true if we
12:22take a look at on my grid pattern there
12:25this is the top of the a that I’ve drawn
12:28in and here we can clearly see what I
12:30was speaking about earlier the thin line
12:33down the center where we’ve got maximum
12:35power at the centre of the beam and then
12:37around the edge here we’ve got the lower
12:39power which has given us the yellow or
12:42the Goldy color very distinct Brown a
12:44yellow color this is a 6 no no second
12:47pulse 400 kill Urtz appoint one line
12:52spacing so the line spacing is bigger
12:54than the spot size and it was done at
12:59460 millimeters a second now you can
13:03clearly see there some of the out some
13:05of the things that I’ve described to you
13:07before was I was expecting we’ve got
13:09yellow spots on the side and we’ve got a
13:12black line down the center where maximum
13:16power seems to exist so there’s our
13:19yellow grid line
13:22and here’s what’s supposed to be blue
13:26we’ve got this black line right along
13:29the center again which is the dick cut
13:31right at the center of the beam I don’t
13:34see any blue in there and then we’ve got
13:36these markings on either side which if
13:38anything are a sort of a bit of a hint
13:41of yellow on them still and that’s a
13:45scan at point zero five where the lines
13:49are probably just beginning to overlap
13:52but you could still see the black lines
13:54there which are the center of the beam
13:56the burn line on the beam
13:58so we’re burning into the material so
Transcript for The Hunt for Colours – Color Fiber Laser Engraver (Cont…)
14:00that’s 10 microns spacing and all of a
14:03sudden we’ve lost the center of the
14:05lines because I suspect that what we’re
14:07doing there we’re melting the surface
14:09and it’s just flowing together for the
14:12steel to melt it’s got to be up to
14:13something like about 1,400 degrees C and
14:16we’ve got to burn through the the oxide
14:19layer to start with which has got a
14:21melting point of about 3,000 degrees C
14:23now we’re not seeing anywhere near those
14:26sorts of temperatures projecting through
14:29to the back of a half mil sheet of
14:31material but we are getting up quite
14:33high at 199 degrees C when we do
14:36something like this yeah this is all
14:38interesting stuff but it’s not getting
14:40me pinks and reds and greens got good
14:43yellows good golds they seem easy to get
14:46well here I am in the office at the
14:48moment because it’s a bit cold out in
14:50the workshop and I thought well I’ll
14:51I’ll find an excuse to go inside in the
14:53warm and maybe I’ll edit the material
14:55I’ve done so far it’s sometimes great to
14:59stop and have a bit of a think because
15:01when your brain is running in a straight
15:03line
15:04sometimes it’s got its own momentum and
15:07it can’t stop well this is a natural
15:10break and it gives me an opportunity to
15:12look and review what I’ve found so far
15:15now it’s interesting when I look back
15:18and say this little shape here which is
15:23the cut seems to produce some sparkles
15:28on the side we seem to get color down
15:31the center and as you have watched this
15:32video already you’ll understand what I
15:34me as I move through the video I
15:37mentioned some of the fact that these
15:41colors here and the ones down here which
15:44were done and a much finer resolution
15:47first of all they deeper which means we
15:50have evaporated material will remove
15:52material but we’ve also probably it
15:56looks as though we have destroyed the
15:58surface of the material as well when I
Transcript for The Hunt for Colours – Color Fiber Laser Engraver (Cont…)
16:00get towards the end here and we start
16:02looking at the different line spacing
16:04that I’ve been using for some of these
16:06we find it there’s my point one cut with
16:11the black heavy line down the center but
16:14you can see the live of glittering bits
16:16on the side that are producing some
16:18color my thought was that that color was
16:22being produced on the side by the thin
16:24film effect because obviously we’re not
16:29getting this thin film effect on a flat
16:31surface as I was getting with my oxide
16:34films when I heated the material up with
16:38we might have the same mechanism but
16:40it’s not happening in the same way so
16:42for me to try and copy that thin film on
16:45the surface is not going to give me what
16:48we’re looking for so I’ve got to look
16:50for some other mechanism and I’m finding
16:54the clues here now as I look back
16:55through these results so there we go
16:58look I’ve now moved on to a point O 5
17:01pitch so the lines are so much closer
17:04together that’s supposed to be a sort of
17:08a a bit of a blue and in the right light
17:11it does show up as a pale blue a bit of
17:14a weak pathetic blue but it’s still blue
17:18but then all of us have now change the
17:21that pitch between the lines 2.01 10
17:27microns and I get this weird effect
17:30which looks like a mat you know a piece
17:34of fabric or something
17:36it’s very strangely textured the surface
17:41now that does not look like melting it
17:45doesn’t look like
17:47anything that I can imagine except a
17:50piece of fabric as I sit here I think to
17:53be some fabric my wife loves iridescent
17:58fabrics iridescent butterfly wings
Transcript for The Hunt for Colours – Color Fiber Laser Engraver (Cont…)
18:05scales I remember back to watching some
18:11very interesting scientific programs on
18:13that the color is not coming from the
18:16reflection of two surfaces it’s coming
18:20from maybe two surfaces but a pattern of
18:25surfaces not just a single flat surface
18:29scales peacock feathers butterfly wings
18:34they’re all made up of micro structures
18:37nano structures of material which
18:41reflect the light in different ways so
18:44maybe as I sit here and look at that
18:46picture I’m looking at a clue to how
18:50these colors actually exist so we’ve
18:53gone beyond the possibility of producing
18:54these colors by a thin film interference
18:57pattern from a flat surface to maybe the
19:02same mechanism appearing on earth
19:04geometrically repeating rough surface
19:08okay I’m live on the screen at the
19:10moment let me do a little bit of
19:11googling and see what we can find
19:13interesting you look iridescent it’s
19:17still caused by thin film interference
19:19patterns we’ve got oil on water and
19:22we’ve got soap bubbles and here we look
19:28as though we’ve got butterfly wings or
19:30peacock feathers now I don’t know what
19:32they are
19:32oh there’s a peacock feather but this is
19:35what I’m interested in particularly this
19:37is what I do remember butterfly wings
19:39and over here look we’ve got this
19:40pattern which is a repeating pattern
19:44that causes iridescent it’s reflections
19:50off of repeating surfaces so we’ve got
19:54not only one destructive or constructive
19:59and
Transcript for The Hunt for Colours – Color Fiber Laser Engraver (Cont…)
20:00reflection we’ve got lots and lots of
20:02them mixed together so here we’ve got
20:06some interesting data this looks to be a
20:10a scale of about on this basis ten
20:14microns point zero one which is exactly
20:18the area where I’m working at at the
20:20moment with that yellow gold pattern
20:22that all of a sudden appeared I’m trying
20:25to get an idea now of what sort of
20:29surface we require to produce this
20:32effect because we’ve got a machine here
20:34which is capable of producing some very
20:36accurate and repeatable patterns on the
20:39surface the real answer to how we can
20:41get colors they’ll still be iridescent
20:44and changing colors but they will be
20:47more solid than the strange colors that
20:49I’ve been able to get so far so there’s
20:54even a bit of a description here about
20:55how we’re able to get color from our
20:58little V grooves it’s no longer a matter
21:02of reflection off of a shiny top surface
21:05but how can we produce a structured
21:09surface to reflect the light in the same
21:11way that these feathers and these
21:14butterfly wings do right let’s get to it
21:17so I’ve gone for some extremes we do do
21:19we’re going to do a speed of 2000 pulse
21:22of 2 nanoseconds 850 kilohertz and a
21:26pitch of 1 micron very very fine pitch
21:38speckled but it’s gold one of those easy
21:41colors to find two thousand millimeters
21:45a second means I’m actually spacing the
21:48dots out quite a lot so although they
21:50are tight
21:52this way I’m spreading them out that way
21:55here I’ve got my calculation my pulse
21:58rate chart which tells me to stand speed
Transcript for The Hunt for Colours – Color Fiber Laser Engraver (Cont…)
22:01against the number of pulses per minute
22:04the pulses per millimeter holster I’ve
22:06got the scan set to 1 micron which is a
22:08thousand increments per millimeter or a
22:11thousand scans per millimeter so I did a
22:18quick test at a thousand scans in the
22:21other direction as well which is 800
22:23speed and that got me from gold to
22:28copper so maybe let’s go right to the
22:32other extreme and go down to something
22:34like about 300 so now I’m doing nearly
22:373,000 pulses per millimeter across so
22:42now thought you’re so very brave you
22:43certainly didn’t want to sit around and
22:45watch me doing all this stuff but hey
22:47look at see one there that’s a sort of
22:51olive green with a blue and a pink and a
22:59dark magenta gold blues pinks for a
23:04change I’m hand holding the camera
23:05because I need to pan around this
23:08picture we’re looking at it in
23:10artificial light I want you to watch
23:12these colors here and I want to watch
23:14these Pink’s here these blues as I move
23:21around them
23:25or changing
23:32but the Pink’s are not and some of the
23:36other colors are not changing well it
23:43means there’s a definite difference in
23:45the surface texture of the material I
23:49think we’re getting somewhere
23:52now I have just remembered a very very
23:55old friend I’m gonna have to go crawling
23:59around in my loft space and see if I can
Transcript for The Hunt for Colours – Color Fiber Laser Engraver (Cont…)
24:03find it look at this rust dust this is a
24:15piece of junk that I recovered from the
24:18scrap bin of a company that I work for
24:21in Southern Ireland it’s a big American
24:25company and they use these on their
24:28production line and when something went
24:29wrong with them they literally just used
24:31to unclip them and throw them in the bin
24:36when the spillage was full it would be
24:38given to the scrap man well I recovered
24:40several of them from the scrap bin and
24:42made this Franken microscope and then I
24:45built my own base this was 40 years ago
24:49remember 1980 I thought it was too good
24:52to throw out at the time because the
24:54kids would make use of it looking for
24:55looking at bugs and various other things
24:57mmm they weren’t particularly interested
24:59in it so it’s that up in the loft for
25:01years and years and years hey whoever
25:05thought that I would be recalling the
25:08services of this good old friend even a
25:11silly little like work they didn’t have
25:13LEDs in those days this is just a
25:16filament lamp now the interesting
25:18difference between these colors and the
25:20ones that I’d been finding previously
25:22most of these colors do not change as
25:25you put the light in two different
25:27directions whatever is happening now is
25:29definitely on the surface of this
25:30material I’m hopeful that because this
25:32is a stereomicroscope I will be able to
25:34see exactly what the difference is
25:37between some of these surface textures
25:39are
25:40oh it’s not an LED so that light
25:43actually gets hot now the problem with
25:45this wonderful microscope is you can’t
25:47see what I can see I can only give you a
25:50little clue as to what I can see if you
25:53take a look at the corner of that D
25:55there that’s just about what I can see
25:58in the microscope that just gives you an
26:00idea of the magnification that I’ve got
Transcript for The Hunt for Colours – Color Fiber Laser Engraver (Cont…)
26:02it’s not a huge magnification it’s
26:04probably only about somewhere between 40
26:06maybe 60 at the most magnification now
26:10this might not be very exciting video
26:12for you but all I can say is Wow and now
26:18I’m going to take a look at one of the
26:20colors looking at the dark red mark
26:22we’ve just got a few sparkly stars in
26:26the sky just a few with some green ones
26:29when I moved to this one which is the
26:32slightly lighter movi pink all I can say
26:37is look this is my white phone cover
26:39that’s what I’m seeing now I’m afraid I
26:42don’t have an electron scanning
26:43microscope in my workshop that allows me
26:46to examine the surface of this in great
26:47detail this stone age technology is
26:51about as close as I can get at the
26:53moment but what we can do is to try and
26:56upgrade this with the aid of an HD
26:59camera so that you can see what I can
27:03see but at 40 maybe 60 at the most
27:07magnifications with this lovely piece of
27:10kit it’s not enough for me to see the
27:13granular structure right on the surface
27:15of the material where the damage is
27:16taking place now this looks like at the
27:20moment a crystalline structure but I
27:24have got a little toy a plastic toy
27:26microscope which I’ve also used which I
27:32won’t even show you because I’m
27:33embarrassed about it but it does show me
27:35that maybe there’s a different picture
27:38to the one I’m seeing here with this
27:41device at the moment I’m seeing what
27:43looks like a crystal type
27:45reflection but it might not be that when
27:48we get down and have a real look at the
27:49surface and to do that I’m gonna have to
27:51purchase a proper compound microscope
27:53that allows me to get to anything maybe
27:56between 200 400 600 or even a thousand
28:00times magnification so that we can
Transcript for The Hunt for Colours – Color Fiber Laser Engraver (Cont…)
28:02really examine the surface and work out
28:04what damage this beam of light that
28:08we’re able to control is doing to the
28:11surface so we’ll stop there for today
28:13now thank you for your time and we’ll
28:16catch up with you in a future session
28:18when we suitably kitted up to reveal the
28:20secrets of this surface
 Skip to content