 Skip to content
 Acrylic is one of the best materials to process with a CO₂ laser. With the right combination of power, speed, focus and airflow, it is possible to produce accurate parts with smooth, almost polished edges straight from the machine. For general material screening and safety checks, use the CO2 Laser Material Safety Database.
There is no single set of acrylic cutting settings that works on every laser. The result depends on the type and thickness of acrylic, the actual laser power reaching the material, focal length, focus position, air assist, extraction, beam alignment and the condition of the optics.
I originally put this guide together while producing samples from 8mm clear acrylic that needed both a good polished cut edge and engraving. That exercise highlighted just how much conflicting advice there is about laser cutting acrylic. The settings below are therefore real working values from my own 50W CO₂ machine, not theoretical figures.
For a longer practical video on the subject, see Lightblade Learning Lab 46 – Acrylic Laser Cutting and Engraving.
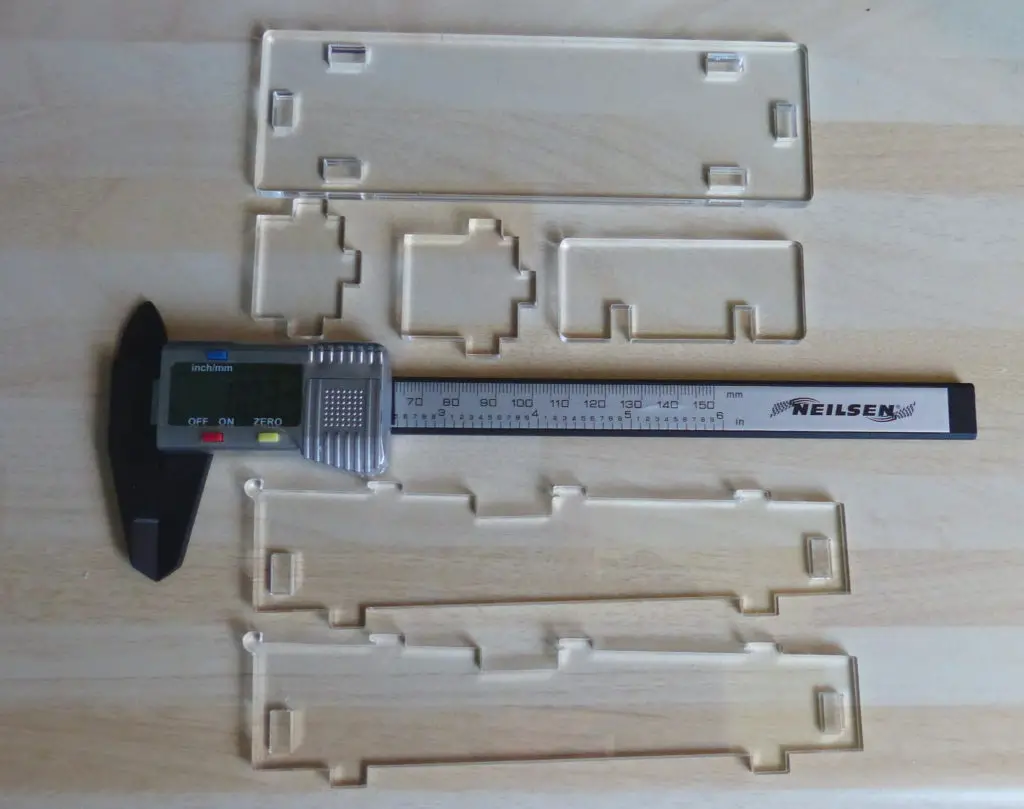
Quick answer: how do you get a good laser-cut acrylic edge?
For clear acrylic, a CO₂ laser is normally the most suitable laser source. Use enough power to cut completely through the material in one pass, then use the fastest speed that still gives the edge finish you need. Keep nozzle air assist relatively low compared with materials such as wood, while maintaining strong extraction and good airflow across the sheet. Make sure the beam is correctly focused and treat any published speed and power figures as starting points rather than universal settings.
Laser cutting acrylic settings: 3mm to 8mm reference values
Based on using my 50W CO₂ laser, with the focus set at the surface of the acrylic, low-to-medium air assist and good airflow across the sheet, I use the following starting values:
| Acrylic thickness | Cutting speed | Controller power |
|---|---|---|
| 3mm | 17mm/s | 58% |
| 4mm | 13mm/s | 58% |
| 5mm | 10mm/s | 58% |
| 6mm | 8.5mm/s | 58% |
| 8mm | 6.5mm/s | 58% |
Important: on my machine, 58% is approximately the maximum power level I am comfortable running the tube at and equates to about 46W measured at the workpiece. That does not mean that 58% on another machine equals 46W.
Controller percentages are not calibrated watts. Tube condition, power supply, mirrors, lenses, alignment and controller configuration can all change the relationship between the percentage shown on screen and the actual optical power reaching the material. Run a test cut before committing an expensive sheet of acrylic.
Cast vs extruded acrylic for laser cutting
There are two main forms of acrylic sheet: cast acrylic and extruded acrylic. Chemically they are both PMMA, but the manufacturing processes are different and this affects how they behave when laser cut or engraved.
Cast acrylic is produced by casting liquid acrylic between sheets or into moulds. Its thickness can vary more across a sheet, although higher-tolerance grades are available. Extruded acrylic is produced through a forming die and normally has a tighter and more consistent sheet thickness.
Neither material is automatically the best choice for every laser-cutting job. Extruded acrylic is useful where thickness consistency and repeatable fitted parts are important, and it can produce an excellent flame-polished cut edge. Cast acrylic is usually preferred where engraving contrast and premium presentation quality matter, particularly when the same component will also be engraved.
If the quality of the finished edge is critical, test a sample from the actual sheet and supplier you intend to use. Acrylic from different manufacturers can behave differently even when the nominal specification appears identical.
How acrylic behaves under a CO₂ laser
Acrylic absorbs the 10.6µm wavelength from a conventional CO₂ laser very effectively. In the cutting zone the material is heated rapidly, melts and vaporises, while some of the polymer also thermally decomposes. The surrounding acrylic receives heat as well.
That surrounding heat is important. If the balance between power, speed and cooling is correct, the surface at the edge of the cut can soften and reflow. As it cools, this produces the smooth glossy edge commonly described as a flame-polished laser cut.
Too little energy and the laser may not cut through. Too much energy, or travelling too slowly, can increase the kerf width, cause excessive melting and increase the risk of flare-ups. Too much cooling from the air assist can also produce a duller or milkier edge.
General-purpose parts vs presentation parts
General-purpose acrylic parts
For brackets, covers, prototypes, locating jigs and other functional components, appearance may not be the main requirement. In this situation I normally want to cut as quickly as possible while still cutting reliably through the complete sheet.
Material thickness tolerance can also become important if parts slot together. This is one reason extruded acrylic can be attractive for fitted assemblies. There is little benefit in slowing the laser down simply to produce a highly polished edge if nobody will ever see it.
Presentation acrylic parts
Signs, display pieces, awards and visible enclosures may need a clear glossy edge straight from the laser. Here I am prepared to sacrifice some cutting speed for better edge quality.
The aim is to retain enough heat around the cut to allow the edge to smooth as it cools, without putting so much energy into the material that the kerf becomes excessive or the acrylic starts to distort. Power, speed, focus and air assist need to be considered together.
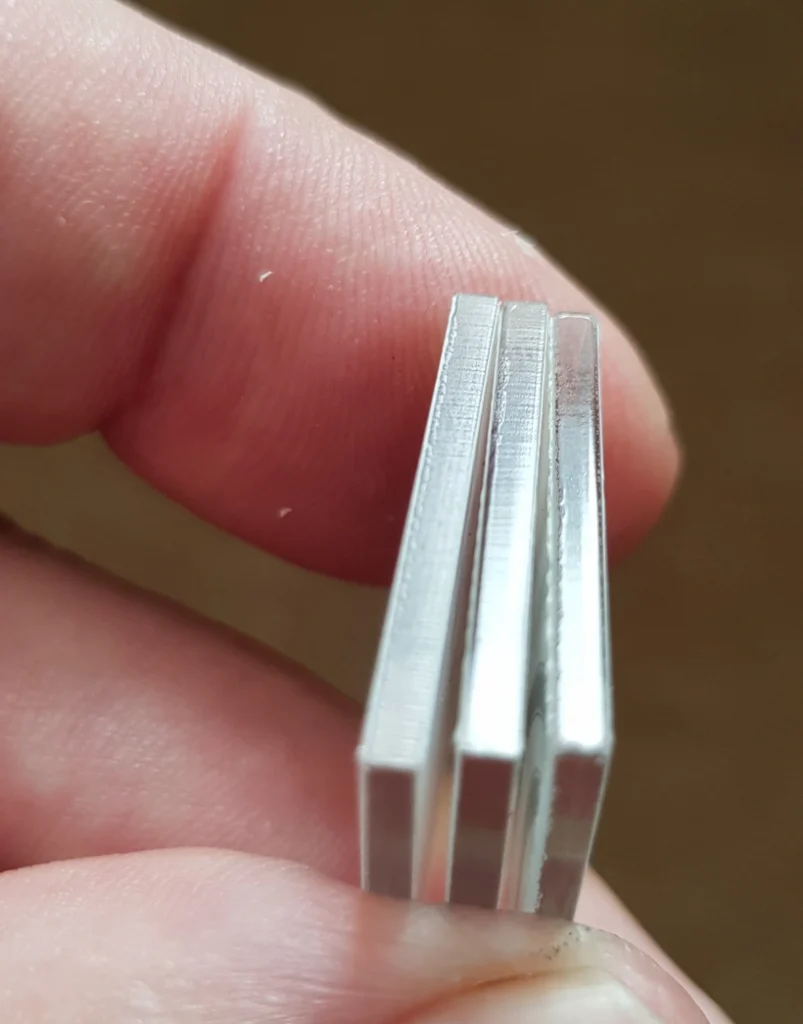
How to get a clean, polished acrylic edge
If the edge looks rough or heavily striated, there is a temptation simply to keep reducing the speed. That is not always the answer.
Start by checking the basics: make sure the optics are clean, the beam is properly aligned, the laser is actually producing the power you expect and the focus position is correct. Then adjust speed and power until you are comfortably cutting through the material in one pass.
For polished presentation edges, slowing the cutting speed can increase the heat available to smooth the wall of the cut. Going too slowly, however, increases the amount of material removed and can widen or distort the kerf. Acrylic processing therefore has a usable window rather than one perfect setting.
Some visible vertical marks on a laser-cut acrylic edge are inherent in the way the moving beam removes material. Mechanical problems such as loose belts or poor motion control can certainly make them worse, but not every visible striation is caused by stepper motors or belt teeth.
Air assist and extraction for acrylic
Acrylic normally requires less nozzle air than materials such as timber. Too much air can cool the cutting zone rapidly and reduce the glossy finish you are trying to achieve.
That does not mean switching the air assist off. Some airflow through the nozzle helps protect the lens from vapour and contamination. Acrylic vapour is also flammable; if it accumulates around the nozzle it can ignite and produce the familiar flare or “comet tail” following the cutting head.
The practical answer is usually modest nozzle air combined with strong extraction and good cross-flow through the cutting area. Low air assist does not mean low extraction.
Focus and lens choice
The focal length of the lens affects both the focused spot size and the depth of focus, so a longer focal-length lens is not automatically better for thicker acrylic.
For most acrylic cutting on lower-power CO₂ systems, particularly machines below around 80W, a 2-inch lens is a good general-purpose choice.
A 2.5-inch lens can be useful as the acrylic gets thicker because it provides a little more depth of focus while still maintaining a sufficiently concentrated beam for effective cutting.
I would not normally recommend a 4-inch lens for acrylic cutting on this class of machine. Although it provides much greater depth of focus, the larger focused spot reduces power density. On a lower-power system that can be counterproductive when trying to cut acrylic efficiently.
I cannot remember the last time I used a 4-inch lens for acrylic. These days I would reserve one for specialist applications where the extended depth of focus is genuinely useful — for example cutting very thick, low-density material such as 30mm foam.
Avoiding flashback and marks underneath acrylic
Flashback occurs when the laser beam passes through the acrylic and strikes a metal part of the bed. Some of that energy can be reflected back towards the underside of the acrylic, leaving marks. Honeycomb beds can also leave a pattern underneath the material as vapour and reflected energy interact with the surface.
One of the easiest improvements is to raise the acrylic away from the cutting bed. On a honeycomb bed, ball bearings or small T-shaped supports can work well. On a flat metal or slat bed, dome nuts can also be useful because only the top of the dome touches the acrylic.
Whatever support you use, make sure it is not positioned directly underneath the cutting path. Once the acrylic has been raised, any reflected beam has more distance over which to diverge before reaching the sheet again, reducing the chance of marking.
Keeping acrylic clean during cutting
Acrylic can be frustrating because static attracts fine particles and vapour deposits. Prevention is easier than cleaning afterwards.
- Remove static and dust before cutting.
- Decide whether to leave the protective film on according to the job and the type of film.
- Maintain good airflow across both surfaces so vapour is removed before it condenses.
- If contamination remains, use a cleaning method known to be compatible with acrylic.
- Be particularly careful with solvents, which can cause crazing or cracking in stressed acrylic.
Common acrylic cutting problems and fixes
| Problem | Likely causes | First things to check |
|---|---|---|
| Will not cut through | Insufficient power at the workpiece, speed too high, poor focus, dirty or misaligned optics | Check optics, alignment, focus and actual laser output before simply increasing power |
| Cloudy or dull edge | Too much cooling, poor focus or unsuitable speed/power balance | Reduce nozzle air cautiously and optimise speed/power while maintaining extraction |
| Heavy striations | Focus, optics, mechanical condition or unsuitable cutting parameters | Check beam alignment, optics and motion system before changing several parameters at once |
| Wide or melted kerf | Travelling too slowly or delivering more energy than required | Increase speed or reduce energy input |
| Marks underneath | Flashback, smoke deposition or bed contact | Raise the acrylic from the bed and improve airflow below the sheet |
| Persistent flame | Vapour accumulation or inadequate airflow/extraction | Stop the job and review air assist, cross-flow and extraction |
Can diode and fibre lasers cut acrylic?
Visible-light diode lasers can process some coloured and opaque acrylics because the material absorbs the wavelength. Clear acrylic is much more problematic because much of the visible diode light passes through rather than being absorbed efficiently.
A conventional near-infrared fibre laser is generally not the appropriate tool for cutting clear acrylic. For normal workshop cutting of clear PMMA, CO₂ remains the practical choice.
What about laser engraving acrylic?
Laser engraving acrylic is a large subject in its own right. Cast and extruded acrylic engrave differently, and line engraving, raster engraving, photographs, edge-lit signs and 3D-style effects each need their own approach to artwork, power, speed and resolution.
Cast acrylic is generally the better choice where a strong frosted engraving is required, while extruded acrylic normally produces a clearer, lower-contrast mark. Rather than trying to cover all of that inside a cutting guide, I will deal with acrylic engraving in a dedicated guide.
Is acrylic safe to laser cut?
Known PMMA acrylic is widely processed with CO₂ lasers, but that does not mean the fumes should be breathed. Use effective extraction and discharge process fumes appropriately.
Acrylic is also flammable. Keep the machine clean, maintain effective airflow and never leave a laser cutter operating unattended.
Do not assume that every transparent plastic sheet is acrylic. Unknown plastics should be identified before laser processing. In particular, PVC and other chlorine-containing materials should not be put into a normal laser cutter because decomposition can generate highly corrosive and hazardous gases.
Frequently asked questions
What are good settings for 3mm acrylic on a CO₂ laser?
On my 50W CO₂ machine I use approximately 17mm/s at a controller setting of 58%, which corresponds to roughly 46W measured at the workpiece. Treat that as a starting point, not a universal setting.
Is cast or extruded acrylic better for laser cutting?
It depends on the job. Extruded acrylic offers tighter sheet-thickness tolerance and can produce an excellent cut edge, making it useful for repeatable fitted parts. Cast acrylic is normally the better choice when the same part also needs a strong frosted engraving or premium presentation finish.
Why does my acrylic edge look cloudy?
Common causes include too much air assist, incorrect focus, insufficient heat in the cutting zone or unsuitable speed and power settings. Check the optical setup first before changing multiple parameters at once.
Should I leave the protective film on acrylic?
There is no universal answer. Leaving the film in place can protect the surface and reduce deposits, but some films do not laser cleanly and small pieces can be difficult to remove after detailed work. Test the actual material first.
Why does acrylic catch fire when laser cutting?
The laser produces flammable acrylic vapour. If enough vapour accumulates around the cutting zone and is exposed to the beam, it can ignite. Good extraction, appropriate nozzle airflow and sensible cutting parameters reduce the risk.
Can I use a longer focal-length lens for acrylic?
Yes, but longer is not automatically better. On lower-power systems a 2-inch lens is a good general-purpose choice and a 2.5-inch lens can be useful as the acrylic gets thicker. I would not normally use a 4-inch lens for acrylic cutting on a sub-80W machine because the larger focused spot reduces power density.
What to read next
If you are trying to improve acrylic cutting performance rather than simply copying somebody else’s settings, the next subjects worth understanding are laser power, optical alignment, lens selection and measuring the actual output of the laser. You may also find the Acrylic Cutting Myths and Misunderstandings page useful for separating common advice from what actually affects the cut.
The key point is that acrylic cutting is a process rather than a magic settings table. Start with a correctly aligned and maintained machine, establish how much real laser power is reaching the material, then optimise power, speed, focus and airflow for the particular acrylic you are using.
What Next?
Did you enjoy this post? Why not check out some of our other posts:
Disclaimer
Last updated April 25, 2024
WEBSITE DISCLAIMER
The information provided by n-Deavor Limited, trading as Laseruser.com (“we,” “us” , or “our”) on (the “Site”) is for general informational purposes only. All information on the Site is provided in good faith, however we make no representation or warranty of any kind, express or implied, regarding the accuracy, adequacy, validity, reliability, availability or completeness of any information on the Site.
UNDER NO CIRCUMSTANCE SHALL WE HAVE ANY LIABILITY TO YOU FOR ANY LOSS OR DAMAGE OF ANY KIND INCURRED AS A RESULT OF THE USE OF THE SITE OR RELIANCE ON ANY INFORMATION PROVIDED ON THE SITE. YOUR USE OF THE SITE AND YOUR RELIANCE ON ANY INFORMATION ON THE SITE IS SOLELY AT YOUR OWN RISK.
EXTERNAL LINKS DISCLAIMER
The Site may contain (or you may be sent through the Site) links to other websites or content belonging to or originating from third parties or links to websites and features in banners or other advertising. Such external links are not investigated, monitored, or checked for accuracy, adequacy, validity, reliability, availability or completeness by us.
WE DO NOT WARRANT, ENDORSE, GUARANTEE, OR ASSUME RESPONSIBILITY FOR THE ACCURACY OR RELIABILITY OF ANY INFORMATION OFFERED BY THIRD-PARTY WEBSITES LINKED THROUGH THE SITE OR ANY WEBSITE OR FEATURE LINKED IN ANY BANNER OR OTHER ADVERTISING.
WE WILL NOT BE A PARTY TO OR IN ANY WAY BE RESPONSIBLE FOR MONITORING ANY TRANSACTION BETWEEN YOU AND THIRD-PARTY PROVIDERS OF PRODUCTS OR SERVICES.
AFFILIATES DISCLAIMER
The Site may contain links to affiliate websites, and we receive an affiliate commission for any purchases made by you on the affiliate website using such links. Our affiliates include the following:
- makeCNC who provide Downloadable Patterns, Software, Hardware and other content for Laser Cutters, CNC Routers, Plasma, WaterJets, CNC Milling Machines, and other Robotic Tools. They also provide Pattern Files in PDF format for Scroll Saw Users. They are known for their Friendly and Efficient Customer Service and have a comprehensive back catalogue as well as continually providing New Patterns and Content.
- Cloudray Laser: a world-leading laser parts and solutions provider, has established a whole series of laser product lines, range from CO2 engraving & cutting machine parts, fiber cutting machine parts and laser marking machine parts.
