 Skip to content
 While browsing at a local store, I picked up a couple of cheap slate placemats in order to carry out some engraving trials. I had not engraved slate previously, so I then had to learn how to laser engrave state.
How to laser engrave slate? Slate is a binary material when it comes to laser engraving, i.e. it will only laser engrave with one colour, even if you use multiple passes or different laser power settings. Therefore you need to ensure your image is set up for black and white only, dithered and converted to a negative. It is possible to engrave at low power settings and medium to high speed.
That’s a basic overview, but laser engraving does need some preparation work in order to determine the optimum settings. Read on for more information and tips to make the job easier for you.
There are two types of engraving you need to consider on your journey to learn how to laser engrave slate.
Vector Engraving
Vector engraving is generally more straightforward than raster engraving, and can take advantage of running at high engraving speeds. I have previously set up vector engraving on acrylic and started off with a small test rectangle of 5 x 20mm on the rear of the slate to check the coverage.
The test rectangle came out a consistent light grey and left no discernible depth to the engraving. So I stuck with those settings and went ahead to engrave the following image onto a 285 x 215mm place mat.
Don’t forget that as you are printing light onto dark, you may need the negative of the image.

The settings for vector engraving slate were:
- Speed 600mm/s
- Power 22%/18% (approx. 20 Watts)
- Scan Interval 0.15mm (approx. 170 lines per inch)
- Image size: 270 x 175mm
- Run on a true 50 watt laser machine.
- Time to complete: 7 minutes 37 seconds
Laser Engraving Speed Considerations
My laser machine is capable of running up to 1000mm/s. However, after doing some timing trials I determined there was no benefit in engraving faster than 600mm/s. This is why I accepted the first test settings as there was no point in trying to go faster.
Your machine may not be capable of running at 600mm/s, but whatever your maximum engraving speed is you should be able to mimic these results. You will just need to reduce the power or increase the scan interval.
Slowing down the speed without decreasing the power, will give you thicker lines. Overlapping lines are of no benefit with slate, so increasing the interval size will speed up the engraving process as there are less lines to engrave. Just be careful to make sure there are no gaps between the lines.
Raster Engraving / Photo Replication onto Slate
Raster engraving involves the engraving of an image or photo, to get as accurate a rendition as possible we use the photo replication process. Photo replication is basically ensuring that one pixel in the image relates to one dot from the laser. While you have some control over the dot size by using different lenses e.g. a 1.5″ lens. You are unlikely to get a dot size smaller than 0.15mm (170 pixels per inch), and more likely you will be working with a dot size of 0.2mm (127 ppi).
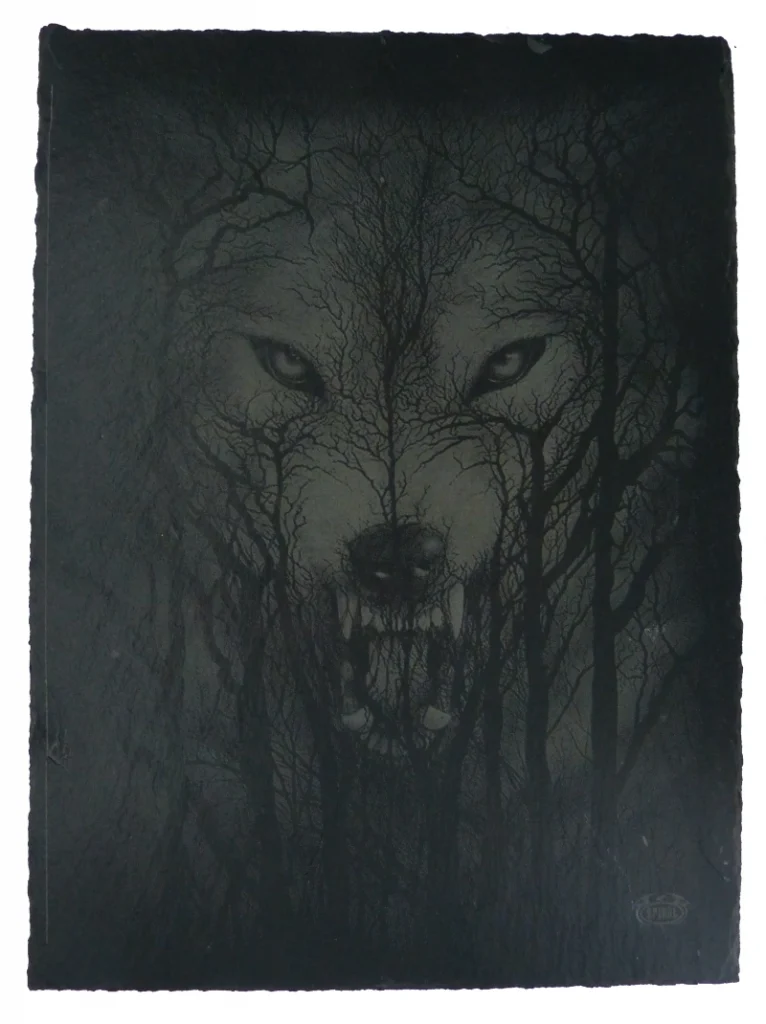
The Wolf image towards the top of this page was run at the following settings:
- Maximum Power 22% (approx. 24 watts)
- Minimum Power 18% (approx. 18 watts)
- Speed 400mm/s
- Scan Interval 0.2mm
- Image resolution: 127 dpi.
- Image size: 202 x 268mm
- Time to complete: 9 minutes 36 seconds
Below is a close up of the left eye. You can see the detail that is achievable even at what most people would consider a low resolution.

The Response Speed Of Your High Voltage Power Supply Unit
One of the limiting factors of raster engraving is that the response speed of your high voltage power supply unit (HV-PSU) can limit the speed of your engraving. To carry out true photo replication you need to replace 1 pixel with dot from the laser. The specified response time for a lot of HV-PSU’s is as follows:
≤1ms (Time from the TTL Signal is given to the output current up to 90% pre-setting current)
MYJG-40W HV-PSU from Cloudray
This basically means you will get 90% of the requested power in less than or equal to 1ms. This may seem fast but in practice, a 127 DPI image equates to a maximum raster speed of 200mm/s.
1 dot/ms = 1000 dots/s | 127DPI = 5 dots/mm | 1000 dots/5 = 200mm/s
Luckily, most A-Grade HV-PSU’s perform at least 50% better than the specification, as shown with my 400mm/s engraving speed. If you have a B-Grade HV-PSU, then you could find your self running at significantly slower engraving speeds
Setting Up The Artwork For Raster Engraving Slate
Before you even consider working on the artwork, you need to determine what size dot you are going to get when engraving slate.
Pro Tip: Determining the spot size needs to be done with every new material as it varies from material to material.
Using the Laser Dot Size artwork, which you can download below, carry out some marking tests to determine the best focal position, power and speed settings to achieve the clearest representation of the dot size image.
Interpreting The Dot Size Test results
Each of the dots on the bottom and middle row are 0.1 x 0.1mm in size.
- Bottom row: If you have engraved dots with equal sized spaces, then you have a dot size of 0.1mm diameter
- Bottom row: If you have dots that are just touching each other then you have a dot size of 0.15mm diameter
- Middle Row: If you have dots that are twice the size of the gaps, then you have a dot size of 0.2mm diameter
- Middle Row: If you have dots that are just touching each other then you have a dot size of 0.25mm diameter
- Top Row: Ideally you are looking for the dots and dashes to be same intensity. This means that you will get a consistent intensity across the whole image.
Optimising The Artwork
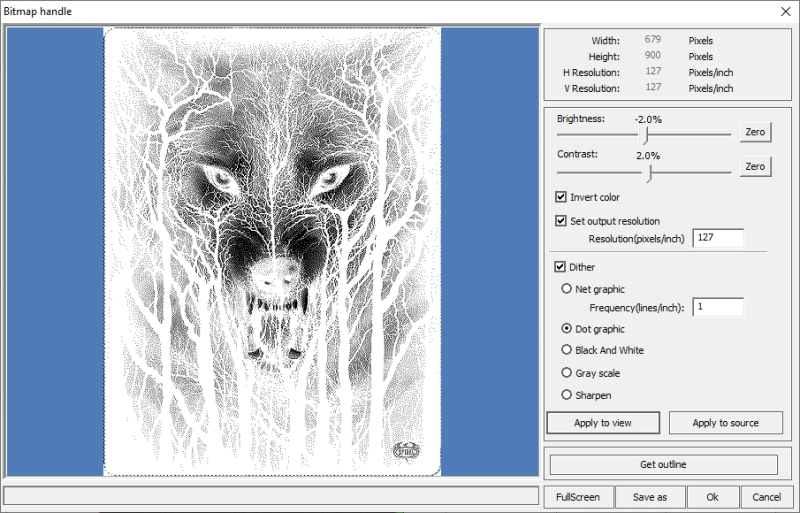
- Import your image into RDWorks or Lightburn
- Resize the image to fit your media. Don’t forget to preserve the aspect ratio.
- RDWorks:
- Select the image and click on the BMP icon
- Tick “Set output resolution” box
- Insert your resolution in pixels per inch (0.1mm dot=254ppi / 0.15mm dot=170dpi / 0.2mm dot=127dpi)
- Tick the “Dither” box.
- Select the “Dot Graphic” option
- Click “Apply to View”
- You can now adjust the image to improve the contrast/brightness of the image, this will be down your personal preferences and will need a little trial and error. However, you shouldn’t make huge changes. e.g. Brightness -2% / Contrast +2%.
- Tick “Invert Colour” as the image will be light on dark, rather than the normal dark on light
- Select “Apply to view” again and if happy with the results, click “Apply to Source”. Click “OK” to return to the main screen.
- Click outside the image to see the changes made to the original artwork.
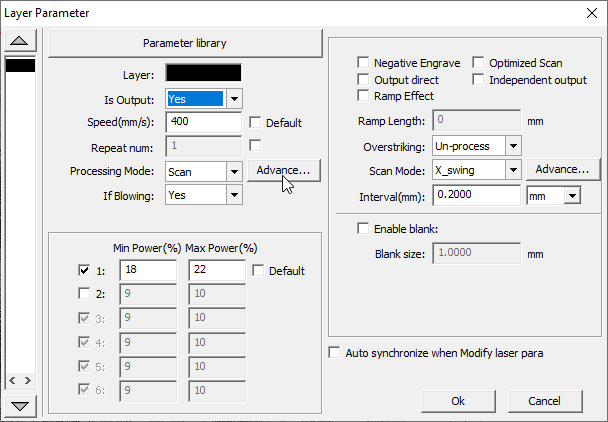
- Check your Layer parameter settings match those calculated from the HV-PSU and dot size tests.
- Lightburn
- Select and right click the image , select “Adjust Image”
- Set “Image Mode” to Dither
- Make sure “Negative Image” is selected (green)
- Insert your “Line Interval in mm (0.1mm dot=254ppi / 0.15mm dot=170dpi / 0.2mm dot=127dpi)
- Adjust Contrast, Brightness and Gamma accordingly
- Click ok when you are happy with the result.
- Double Click on the Image layer in the Cuts / Layer window.
- Unclick pass through and make sure line interval, negative image and Image mode match the settings used in the artwork adjustment.


Pro Tip: Rotate the image so that the longest edge is along the X-axis, this will speed up the engraving process.
Laser Engraving The Image Onto Slate
You should now be able to engrave your image. Just make sure you set the focus height correctly and the head is correctly positioned. If you are going to do multiple engravings, it may be worthwhile to set up a location jig for repeatability. It could be something as simple as a fixed right angle, to butt the material up to.
Conclusion On How To Laser Engrave Slate
Preparation is the key with laser engraving slate. The HV-PSU response time test only needs to be carried out once and can be used across all your photo replication work.
However, the Dot Size test should be carried out for each material you engrave. As slate is a natural material, it may mean you need to carry out the Dot Size test on each new batch of slate you receive.
Don’t forget, it’s also possible to mix Vector and Raster engraving onto the same workpiece for superb results.
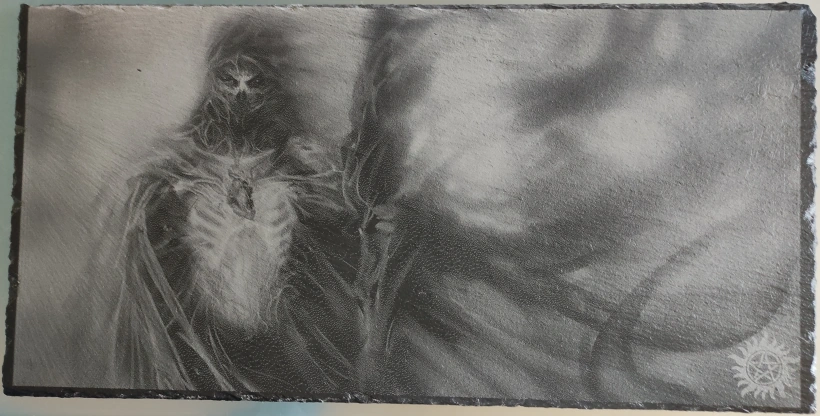
Example of Raster and Vector Engraved Slate
This is an image I engraved onto a piece of 500mm x 250mm slate that I picked up second hand. Carrying out the dot size test as described above, resulted in some unusual settings.
- 127dpi
- 134mm/s
- 58% power
- 74 minutes run time
These settings were significantly slower than I was expecting, and the power was significantly higher than previously used on any slate. My initial thought was that it was a harder piece of slate than I normally use and it needed a much higher power setting.
On further consideration, I believe the issue may be related to the fact that I washed the slate before laser engraving. As mentioned, it was a second hand product and had some debris and marks that I needed to clean off. I may not have dried the slate sufficiently, making it more difficult to laser engrave. This goes to show why it is so important to carry out the Dot Size test on each new batch of slate.
The image of the Ghoul is obviously raster engraved, the symbol in the bottom left hand corner (anti-possession tattoo from Supernatural) was vector engraved. I added the vector engraving because there was some surface staining that needed to be covered. I wasn’t sure the raster engraving would be sufficient to cover the stains. Overall I think it came out pretty well, especially the way the riven surface of the slate flows across the work surface from just below the top left hand corner.
What would I do Different? Next time I will adjust the artwork so that it is slightly oversized (502 x 252mm). This means there will not be a visible border on the image. While the edges will fall out of focus, it should give a slightly blurred / blended aspect to the edges.
What Next?
Did you enjoy this post? Why not check out some of our other posts:
Disclaimer
Last updated April 25, 2024
WEBSITE DISCLAIMER
The information provided by n-Deavor Limited, trading as Laseruser.com (“we,” “us” , or “our”) on (the “Site”) is for general informational purposes only. All information on the Site is provided in good faith, however we make no representation or warranty of any kind, express or implied, regarding the accuracy, adequacy, validity, reliability, availability or completeness of any information on the Site.
UNDER NO CIRCUMSTANCE SHALL WE HAVE ANY LIABILITY TO YOU FOR ANY LOSS OR DAMAGE OF ANY KIND INCURRED AS A RESULT OF THE USE OF THE SITE OR RELIANCE ON ANY INFORMATION PROVIDED ON THE SITE. YOUR USE OF THE SITE AND YOUR RELIANCE ON ANY INFORMATION ON THE SITE IS SOLELY AT YOUR OWN RISK.
EXTERNAL LINKS DISCLAIMER
The Site may contain (or you may be sent through the Site) links to other websites or content belonging to or originating from third parties or links to websites and features in banners or other advertising. Such external links are not investigated, monitored, or checked for accuracy, adequacy, validity, reliability, availability or completeness by us.
WE DO NOT WARRANT, ENDORSE, GUARANTEE, OR ASSUME RESPONSIBILITY FOR THE ACCURACY OR RELIABILITY OF ANY INFORMATION OFFERED BY THIRD-PARTY WEBSITES LINKED THROUGH THE SITE OR ANY WEBSITE OR FEATURE LINKED IN ANY BANNER OR OTHER ADVERTISING.
WE WILL NOT BE A PARTY TO OR IN ANY WAY BE RESPONSIBLE FOR MONITORING ANY TRANSACTION BETWEEN YOU AND THIRD-PARTY PROVIDERS OF PRODUCTS OR SERVICES.
AFFILIATES DISCLAIMER
The Site may contain links to affiliate websites, and we receive an affiliate commission for any purchases made by you on the affiliate website using such links. Our affiliates include the following:
- makeCNC who provide Downloadable Patterns, Software, Hardware and other content for Laser Cutters, CNC Routers, Plasma, WaterJets, CNC Milling Machines, and other Robotic Tools. They also provide Pattern Files in PDF format for Scroll Saw Users. They are known for their Friendly and Efficient Customer Service and have a comprehensive back catalogue as well as continually providing New Patterns and Content.
- Cloudray Laser: a world-leading laser parts and solutions provider, has established a whole series of laser product lines, range from CO2 engraving & cutting machine parts, fiber cutting machine parts and laser marking machine parts.

