 Skip to content
 A commonly asked question I hear is “Can you laser cut paper without burning it?” With a little bit of preparation and the correct settings, it is possible to get your laser cutting paper without any burn marks. Resulting in a great, clean, scorch-free laser cut on most types of paper and even cardboard stock.
So, how do you get your laser cutting paper without burning it? Get the basics right by making sure your mirrors and lens are clean and correctly focussed. Use the shortest focal length lens you have (1.5~2.5″) and use as much air assist as you can without disturbing the paper. Power should be low 10~17% and speed around 20~30mm/s depending on the laser used.
These settings will result in your laser cutting paper scorch free. You will need to do some additional testing to get the optimum results for your particular laser machine. I’ve put together some tips to make the job easier for all of you card makers out there.
Here’s What We Will Cover:
Laser Cutting Paper for a Wedding Invite
Optimizing The Laser Cutting Paper Settings
Everyone’s laser machine is different, there will be differences in power output at different levels even between the same models. So it is best you do some preparation and testing to determine the best results for your own particular machine.
Getting the correct focus distance:
This is easily the most important factor in attaining a clean laser cut with paper. An error of as little as 1mm can make a huge difference in your results, this becomes more acute when using a shorter focal length lens. Consider building yourself a focus ramp to accurately determine the correct focal position for each lens you use.
Levelling the work bed:
If your work bed is not level, then your focus will be out across the job, which can result in areas where the cut thickness (kerf) is thicker or even areas where the laser has failed to fully cut through. This becomes more important the larger the sheet size used.
Housekeeping:
Ensure your mirrors and lens are clean before starting the testing. While mirrors will need checking on a weekly basis, you should check and clean your lens each time you use the machine.
Flat material:
Unfortunately paper and card have a tendency to curl or bow, so it is necessary to make sure that you keep the material perfectly flat during cutting. If you are cutting on a honeycomb bed, you can use magnets to hold the paper in place. If you are doing high volume production runs, it may be worth building a pin table or jig to hold the paper in place.
- I generally use a pin table and place 9mm diameter neodymium magnets on the corner pins to hold the paper in position.
- Please note that if you are cutting on a honeycomb bed, there is a significant risk of laser flashback marking the rear of the paper. In many cases, this may not be important as the finished product may only be viewed from the top surface. It’s not easy to use stand-offs on flexible materials such as paper, so your best solution is to place the paper onto a sacrificial sheet of card.
Air Assist:
It is desirable to have your air assist set high in order to cool the cutting zone, but it shouldn’t be too high as it will blow fragments of paper back onto the surface, potentially affecting the cutting in different areas.
Fume extraction:
Good fume extraction will stop debris from falling back onto the surface of the paper. Ideally, you should have a flow of air across the surface of the paper taking away the smoke as soon as it is generated. It is worthwhile masking off unused areas of the work bed to maximise this airflow.
Power and speed settings:
Typically jobs involving laser cutting paper tend to be on small sheet sizes and have intricate sections. Trying to run at high speed and high power may work for large regular shapes as the laser has a chance to accelerate up to the specified speed. However, when you are looking at intricate work where the laser head is changing direction constantly, you will never attain the specified speed due to the acceleration limits on the machine. This results in too much laser energy being used on the material and why you get the burning.
Mixing Settings According to Application
I typically have two settings for when I’m cutting paper:
- Low speed / low power for intricate work
- Speed: 30mm/s | Power Max/Min: 11.5%/10% (approx. 9W)
- High Speed / Higher Power for the outer border or large regular objects
- Speed: 150mm/s | Power Max/Min: 18%/15% (approx. 18W)
Your testing will be to determine suitable high speed / high power settings and will involve cutting out squares to determine the power settings to achieve the fastest cut possible without there being any risk of burning. I would suggest you limit the squares to 20mm (0.8″) in size as any larger could give skewed results as the head may never reach the speed in an actual job.
Once you have a suitable high speed / high power setting it is worth checking the time taken to cut the test square and then repeating the job at a slightly slower speed. If the time taken is the same at the slower speed, it shows that the laser does not actually reach the specified speed during the job. Decrease the speed in steps to find the point where the job starts getting slower to cut. This is important because if you run a job with a run longer than 20mm you run the risk of the laser not cutting all the way through.
You can then start your trials for the low speed / low power settings at 50% of the higher settings and test using a 7.5mm (0.3″) square.
Unfortunately, it’s not possible to give you exact settings as it totally depends on the peculiarities of your laser machine.
Save the settings in your software package if this is available, otherwise set up a reference folder to store all your results for easy referral.
Prepare the laser artwork:
When setting up a job that has a combination of intricate work and long runs, you need to group all the intricate objects under the low settings and the long runs under the high settings. Just ensure the border is the last thing cut.

Frequency settings:
There are two main technologies for CO2 laser cutting machines, the glass DC CO2 laser tube and the RF “Metal” CO2 tube.
- Glass DC Co2 Laser tube: When cutting paper you want to be running the laser tube in its pre-ionisation stage, typically found between 9~17% power, although this does vary across tubes. It is characterised by a “hissing” noise during the cutting process.
- RF Metal CO2 tube: In this type of tube it is possible to vary the frequency and settings of 500~1200Hz are suggested for cutting paper.
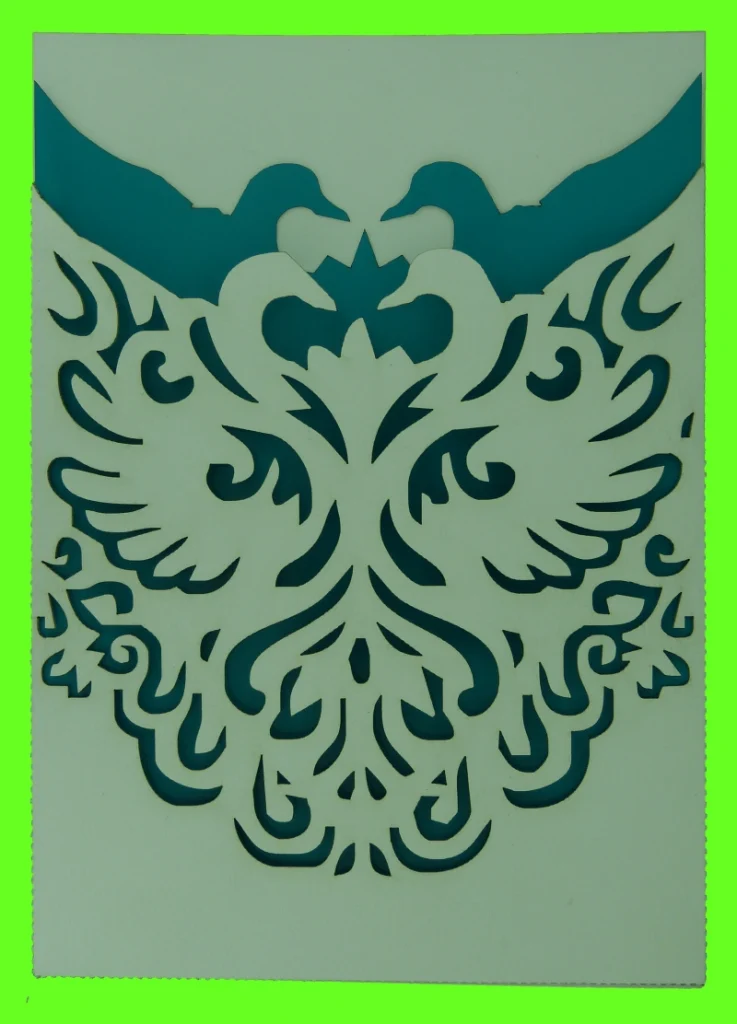
What Can Be Achieved By Using A Laser To Cut Paper?
Check out this great Christmas Card by my good friend Russ Sadler to see the detail that can be obtained by laser cutting paper.

Conclusion On Getting Your Laser Cutting Paper Without Burning
So that’s my advice on how to laser cut paper without burning. There are a number of key areas that will need to be covered, some of which are specific to your laser machine, but none of them are particularly difficult. Once sorted, you will have your own repeatable settings for cutting paper with your laser without having any burn marks.
How Do You Laser Cut Corrugated Cardboard?
So, how do you laser cut corrugated cardboard? You may think that cutting corrugated card is very similar to cutting paper or single layer cardboard and you just need more power because it is thicker. Consider the construction of corrugated cardboard. Two, three or even four flat layers or liners, each separated and joined by a wavy or corrugated layer called the fluting. The fluting traps smoke between the layers when laser cut, dispersing the laser beam and resulting in lower beam penetration into the cardboard. The usual reaction is to either increase the power or decrease the speed, but all this results in is a burned edge and if you are not careful, the product catching fire.
I Use “Dot Mode” as my preferred solution, rather than straightforward cutting. Dot Mode can have different names across different software platforms, but it is essentially pulsing the laser instead of having a continuous power output from the laser tube. Pulsing the laser means that you can use a high power to punch through the corrugated cardboard but not applying it long enough to affect the surrounding material.
You need to adjust four parameters; speed, dot time, dot length and dot interval. Settings will again vary depending on your particular laser, but a good starting point is:
- Dot Time = 0.1s
- Speed = 30mm/s
- Dot Interval = 0.07mm
- Dot Length = 0.1mm
You are aiming to get your 20mm (0.8″) test square to fall out with little or no charring on the edges. Be careful during your trials as it is easy to accidentally catch fire to the cardboard.
What Next?
Did you enjoy this post? Why not check out some of our other posts:
Disclaimer
Last updated April 25, 2024
WEBSITE DISCLAIMER
The information provided by n-Deavor Limited, trading as Laseruser.com (“we,” “us” , or “our”) on (the “Site”) is for general informational purposes only. All information on the Site is provided in good faith, however we make no representation or warranty of any kind, express or implied, regarding the accuracy, adequacy, validity, reliability, availability or completeness of any information on the Site.
UNDER NO CIRCUMSTANCE SHALL WE HAVE ANY LIABILITY TO YOU FOR ANY LOSS OR DAMAGE OF ANY KIND INCURRED AS A RESULT OF THE USE OF THE SITE OR RELIANCE ON ANY INFORMATION PROVIDED ON THE SITE. YOUR USE OF THE SITE AND YOUR RELIANCE ON ANY INFORMATION ON THE SITE IS SOLELY AT YOUR OWN RISK.
EXTERNAL LINKS DISCLAIMER
The Site may contain (or you may be sent through the Site) links to other websites or content belonging to or originating from third parties or links to websites and features in banners or other advertising. Such external links are not investigated, monitored, or checked for accuracy, adequacy, validity, reliability, availability or completeness by us.
WE DO NOT WARRANT, ENDORSE, GUARANTEE, OR ASSUME RESPONSIBILITY FOR THE ACCURACY OR RELIABILITY OF ANY INFORMATION OFFERED BY THIRD-PARTY WEBSITES LINKED THROUGH THE SITE OR ANY WEBSITE OR FEATURE LINKED IN ANY BANNER OR OTHER ADVERTISING.
WE WILL NOT BE A PARTY TO OR IN ANY WAY BE RESPONSIBLE FOR MONITORING ANY TRANSACTION BETWEEN YOU AND THIRD-PARTY PROVIDERS OF PRODUCTS OR SERVICES.
AFFILIATES DISCLAIMER
The Site may contain links to affiliate websites, and we receive an affiliate commission for any purchases made by you on the affiliate website using such links. Our affiliates include the following:
- makeCNC who provide Downloadable Patterns, Software, Hardware and other content for Laser Cutters, CNC Routers, Plasma, WaterJets, CNC Milling Machines, and other Robotic Tools. They also provide Pattern Files in PDF format for Scroll Saw Users. They are known for their Friendly and Efficient Customer Service and have a comprehensive back catalogue as well as continually providing New Patterns and Content.
- Cloudray Laser: a world-leading laser parts and solutions provider, has established a whole series of laser product lines, range from CO2 engraving & cutting machine parts, fiber cutting machine parts and laser marking machine parts.

