 Skip to content
 Or How to Align a Laser Beam
This special RDWorks Learning Lab Video takes you step by step through the stages of how to align a laser beam.
Contents
I recall the uncertainty I felt the first time I removed a mirror 7 years ago. Would the machine ever work correctly again?
Over an 18 month period I kept purposely upsetting my laser beam alignment in an attempt to understand the logic behind setting the beam perfectly and soon discovered that Chinese machine designers either didn’t understand the process or purposely made it difficult for “non-professionals”.
I suspect my first assumption is correct and naïve machine design is responsible for the MANY different laser beam alignment procedures people have proposed to overcome the mess Chinese designers have created.
This session deconstructs laser beam alignment and machine design. I have modified my machines to make beam setting simple with a series of logical and progressive actions that guarantee setting perfection. I have tackled this subject several times over the years but never in such all -encompassing detail.
As a young design engineer I was taught that “you must understand the problem before trying to design a solution”. It seems that very few people really understand what they are trying to achieve with a laser beam alignment guide beyond making sure the beam passes through the nozzle.
Russ Sadler, July 2022
Video Resource Files for the How to Align a Laser Beam
There are no more resource files associated with this video.

External Resource Links for How to Align a Laser Beam
There are no more external resource links associated with this video.

Transcript for How to Align a Laser Beam
Click the “Show More” button to reveal the transcript, and use your browsers Find function to search for specific sections of interest.
1
00:00:00,840 –> 00:00:08,280
Welcome to another article explaining that. Today I’m going to tackle a subject which I’ve played with several times before.
2
00:00:08,940 –> 00:00:19,170
I’ve seen so much. I’m going to be rude and say crap about how to set the beam up on one of these laser machines.
3
00:00:20,220 –> 00:00:29,820
Now, this session will finish up teaching exactly how to set a beam up, why you have to say it that way.
4
00:00:30,240 –> 00:00:35,310
And it’s a complete explanation. So you can choose to ignore if you wish,
5
00:00:35,670 –> 00:00:41,570
and just fiddle with the bits and pieces of screws forever and ever and ever and never get your machine set properly.
6
00:00:41,580 –> 00:00:46,980
So I’m going to show you how you must go about this task and why you have to go about it in a certain way.
7
00:00:47,820 –> 00:00:53,460
But before we do that, I’m going to create something that I’m going to call a beam simulator.
8
00:00:54,060 –> 00:01:02,550
It’s basically a dummy machine that allows me to show you in great detail how to set the beam up.
9
00:01:03,180 –> 00:01:08,430
So the first part of this video is all about creating that beam simulator.
10
00:01:08,760 –> 00:01:13,830
Now, if you don’t want to create a beam simulator for yourself, then just jump to halfway through.
11
00:01:14,550 –> 00:01:24,960
But if you’re interested in making something similar for yourself, the drawings will be available on the art on the WW R&D Works Lab Dotcom website.
12
00:01:25,290 –> 00:01:32,820
In this session, we’re going to take a look at a problem that somebody asked for my cooperation with a couple of weeks ago.
13
00:01:33,400 –> 00:01:45,180
They were trying to design a very simple beam simulation system that would enable teaching laser beam alignment without going anywhere near a machine.
14
00:01:46,110 –> 00:01:52,590
We’ve got a laser beam, I turn it off and on. And the idea that my correspondent had was a very simple idea.
15
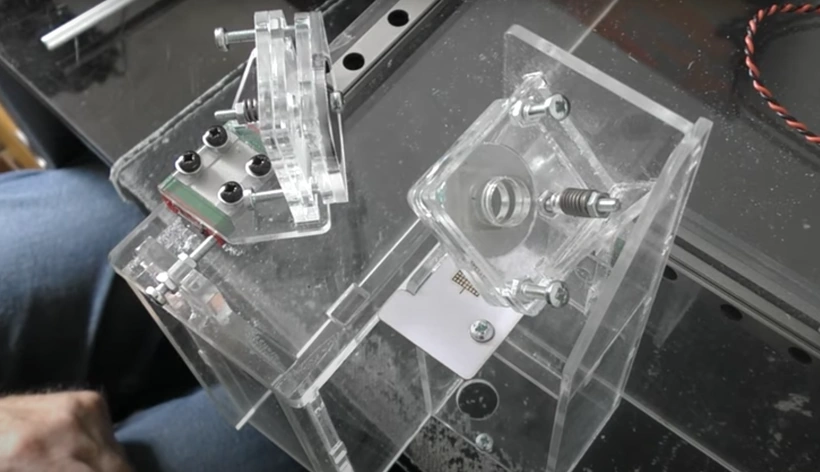
00:01:52,920 –> 00:01:57,780
Basically, he wanted to make something out of chewing gum and string. Okay, so I exaggerate slightly.
16
00:01:58,110 –> 00:02:03,900
That would enable him to very cheaply show how to set a laser beam.
Transcript for How to Align a CO2 Laser Beam (Cont…)
17
00:02:04,260 –> 00:02:13,710
And this is the basic principle that he was working on. And so I took it through to its conclusion to see just how far and how good it could be.
18
00:02:14,240 –> 00:02:23,490
Look, the idea is you’ve got a mirror at position mirror two at position one and mirror to that position, too.
19
00:02:23,850 –> 00:02:31,500
So, hey, we’ve got a pretty good simulation there of the Y axis movement and we should be able to set up the Y axis using this kit.
20
00:02:32,130 –> 00:02:38,370
And then in addition to that, once we’ve set up the Y axis, provided, we turn this kit around and hang it off the edge of the table.
21
00:02:39,180 –> 00:02:44,640
Look, we’ve got a half which we can plug in here as well.
22
00:02:45,570 –> 00:02:53,550
So we can simulate being close to mirror number two or distance from mirror number two, and we can set up the z-axis.
23
00:02:53,670 –> 00:02:59,910
When I first saw the design, I thought, well, the design is simple, but I could see all sorts of problems with it.
24
00:03:00,240 –> 00:03:10,020
So immediately I started working on this design. I ordered a couple of linear rails from China because I felt that the only way to simulate proper
25
00:03:10,020 –> 00:03:17,280
beam settings was to use linear rails because of the stability that’s required by stability.
26
00:03:17,400 –> 00:03:19,049
Let me just show you now.
27
00:03:19,050 –> 00:03:26,400
I think you should be able to see the beam in there, but because it’s got half a millimeter of clearance on it, it’s got a diagonal twist motion.
28
00:03:27,090 –> 00:03:32,850
And look, look, what the twist motion is doing is very difficult to get this thing stable.
29
00:03:33,210 –> 00:03:35,240
And of course, then in addition to that, look,
30
00:03:35,250 –> 00:03:41,070
you’ve only got a little bit of pressure on here and things start moving in this direction is difficult to set it.
31
00:03:41,730 –> 00:03:48,060
So you have to physically hold the thing down like this to make it stable.
32
00:03:51,240 –> 00:04:00,780
So that you can adjust to be. And then when we go and send a beam through mirror one, if we take a look what’s happening on mirror two.
Transcript for How to Align a Laser Beam (Cont…)
33
00:04:00,780 –> 00:04:06,600
Now, if I adjust the laser beam and now look what happens when I just mirror one.
34
00:04:07,800 –> 00:04:12,390
So twisting mirror one, this whole thing is totally unstable.
35
00:04:12,630 –> 00:04:18,460
There’s no way that you can ever set the be into a fixed position and be confident that it’s there.
36
00:04:18,750 –> 00:04:25,710
And of course, it gets even worse when you try and send a reflection off with mirror to when it’s at its extremity.
37
00:04:26,670 –> 00:04:32,340
This is not a full simulation of a machine because we have got no gantry moving backwards and forwards.
38
00:04:33,000 –> 00:04:40,680
Okay. But we’ve got enough of a machine here to simulate setting up the path perfectly.
39
00:04:42,030 –> 00:04:49,920
But we’re going to do it with this fitted kit. The only thing that was successful about this was this bit here.
40
00:04:51,000 –> 00:04:57,570
The laser beam itself. Every sort of laser pointer that you get has got a big beam on it.
41
00:04:57,870 –> 00:05:02,070
Yes, you can generally focus the beam down to a small point.
42
00:05:02,850 –> 00:05:05,610
But you know what happens when you focus the beam down to a small point?
43
00:05:05,610 –> 00:05:12,360
You’ve produced a conical beam, which means that the beam will be big at mirror number one,
44
00:05:13,590 –> 00:05:18,360
get smaller at mirror number two, and eventually it would be a pinpoint down at the work.
45
00:05:18,780 –> 00:05:23,940
That makes it very difficult to set mirrors one, two and three up because you haven’t got a small beam.
46
00:05:24,150 –> 00:05:27,960
This very, very cheap diode laser that I’ve got in here.
47
00:05:28,620 –> 00:05:33,690
It’s not very powerful. Look, it runs off a little battery pack like all laser beams.
48
00:05:34,440 –> 00:05:37,890
It has got a Gaussian intensity distribution.
49
00:05:39,030 –> 00:05:46,050
And what does that mean? That means that right at the center of the laser beam, we have maximum intensity.
50
00:05:46,380 –> 00:05:54,390
And so consequently, we can mask the laser beam and hide it behind a very small hole.
51
00:05:55,380 –> 00:06:05,370
And that very small hole means that we’ve got look, a little matching pinprick, pinprick size, very, very visible laser beam.
Transcript for How to Align a Laser Beam (Cont…)
52
00:06:06,330 –> 00:06:14,400
And as I move it further away, I’m now something in the region of about two feet away.
53
00:06:15,960 –> 00:06:24,300
It hasn’t changed at all. That’s how you can exploit the intensity profile of a diode laser.
54
00:06:24,660 –> 00:06:27,600
Just used the very intense central part of the beam.
55
00:06:27,750 –> 00:06:34,050
Now, after my first attempt, here we are with my pieces, my linear rails that have arrived from China.
56
00:06:34,500 –> 00:06:38,430
And I started to redesign this dummy machine.
57
00:06:38,550 –> 00:06:43,710
And you can see that it’s now a piece of 3D equipment rather than a flat sheet,
58
00:06:44,400 –> 00:06:49,500
and that’s necessary to give us total stability, everything nice and solid.
59
00:06:49,800 –> 00:07:03,630
So I’ve manufactured this strange shaped box out of five millimeter acrylic, and I’ve mounted my two linear x and y rails on here.
60
00:07:03,870 –> 00:07:11,399
So this is going to be wonderful. I can tell you that before I start now, I haven’t designed all the other pieces for this yet.
61
00:07:11,400 –> 00:07:15,630
I’ve had to design them little by little and gradually work my way round the system.
62
00:07:15,810 –> 00:07:19,709
So look, even as we go, I’ve discovered I’ve got to make a few small design changes.
63
00:07:19,710 –> 00:07:24,110
I’ve got a screw that’s going to fix through there, and I don’t want the nuts to twist because they’re underneath.
64
00:07:24,120 –> 00:07:29,400
So what I’ve got to do is to put a little nut play underneath there to stop the nuts from twisting.
65
00:07:30,300 –> 00:07:33,390
I’ve got another piece to go on the back there, but I won’t put it on for a minute.
66
00:07:33,510 –> 00:07:38,669
You see what I mean? I want a guide for this thing to slide backwards and forwards.
67
00:07:38,670 –> 00:07:44,970
What I really should have done has allowed these two tanks here to stand up an eighth of an each project through an eighth of an inch.
68
00:07:45,300 –> 00:07:50,570
And then I had my guide in there for free. Now, I didn’t show you how to assemble the main box up,
69
00:07:50,700 –> 00:07:56,550
because once you’ve got the pieces in your hand, you it’ll become obvious how the pieces fit together.
70
00:07:56,910 –> 00:08:01,680
The next set of pieces are slightly more complex, so I will go through the assembly of these with you.
Transcript for How to Align a Laser Beam (Cont…)
71
00:08:03,450 –> 00:08:11,880
If you note with these pieces with their long legs on, two of them have got hexagons in them and two of them have got holes in them.
72
00:08:12,540 –> 00:08:19,230
Well, what we’re going to do, we’re going to put the put the hexagon in front of the holes.
73
00:08:19,560 –> 00:08:28,170
So we want one of each plate. And on the right hand side, you’re going to have the two square holes.
74
00:08:28,390 –> 00:08:37,530
And they were going to pick up this funny piece here. I made a popper in the back and that plugs through both of those plates like that.
75
00:08:41,410 –> 00:08:49,040
And then we’ve got this one, which is exactly the same hexagon holes in front of the round holes and then you can pop that into.
76
00:08:50,710 –> 00:08:55,250
Yeah, I’m using my favorite PTG crew, which is also an acrylic cement.
77
00:08:55,900 –> 00:09:01,690
But because it runs, because it’s designed for PTG, it goes off slower.
78
00:09:02,050 –> 00:09:09,580
It doesn’t cure quite as quickly. And that’s great because it means you don’t get any cracking along the edges when you glue them.
79
00:09:10,060 –> 00:09:17,530
Whereas with normal acrylic cement, quite often you get stress cracks along the joints and I’m going to pop some glue.
80
00:09:20,020 –> 00:09:26,220
Damn these tongues. And along the back edge.
81
00:09:29,010 –> 00:09:33,880
Then these tongues. And on the back edge.
82
00:09:34,780 –> 00:09:37,390
Now you’ll see that it’s come through.
83
00:09:37,840 –> 00:09:46,959
So if we move it around just a little bit for a few seconds, then the excess glue on the underneath is not there.
84
00:09:46,960 –> 00:09:53,770
It’s dried. I’m also going to put a blob of glue down these bracket supports.
85
00:09:54,850 –> 00:10:00,610
Now, I’m also going to run a bit of glue across the top joint here because I don’t want these plates to come apart.
Transcript for How to Align a Laser Beam (Cont…)
86
00:10:00,940 –> 00:10:06,490
There is a possibility that I might have got something wrong when I calculated the height of this.
87
00:10:06,640 –> 00:10:15,880
This is made of ten millimeters thick material to take into account the fact that this bearing plate is ten millimeters thick, ten millimeters tall.
88
00:10:16,450 –> 00:10:19,490
And I want everything to line up ten millimeters off the deck.
89
00:10:19,510 –> 00:10:26,980
But when I look at this, I think I’ve made a small error in when I put my mirror on here,
90
00:10:27,820 –> 00:10:35,230
it’s probably going to be three millimeters too low because I’ve got an additional plate on there, which is used to fix to the bearing plate.
91
00:10:35,710 –> 00:10:40,810
So I may well have to add another three millimeter matching plate to the bottom of this.
92
00:10:40,960 –> 00:10:47,380
We’re just use a really 20 millimeter type screw package and we’ve got an 83 nut which
93
00:10:47,380 –> 00:10:52,420
will pull back into the hexagon housing and we do the same at the bottom there.
94
00:10:53,230 –> 00:10:56,230
Now, this is for mirror number one.
95
00:10:56,560 –> 00:11:03,490
This is typical for number one, two and three mirror holders themselves, not the frames,
96
00:11:03,490 –> 00:11:08,200
but the actual things that hold the mirrors and make it assemble them like that.
97
00:11:09,460 –> 00:11:16,990
We’ve got a 35 millimeter em three screw with a cross head, pan head will poke that through there.
98
00:11:19,400 –> 00:11:26,390
They’re going to put an m three nut on the back and the entry nut will disappear inside the hexagon.
99
00:11:27,890 –> 00:11:33,470
On the backplate just tighten up the screws. So the nut is actually only jamming the screw on the front plate.
100
00:11:33,710 –> 00:11:36,830
When you put the backplate on, it actually locates on the nut.
101
00:11:37,370 –> 00:11:42,169
So we need to make sure that when you tighten it, tighten up nice and square,
102
00:11:42,170 –> 00:11:48,500
and even so hold it by this back bottom corner by the screw, and then we’ll put some glue.
103
00:11:50,930 –> 00:11:57,620
In two or three places around there. And that would by capillary action, that would migrate between the plates.
104
00:11:59,000 –> 00:12:03,710
And then we can push the plates together and we’ll do this.
Transcript for How to Align a Laser Beam (Cont…)
105
00:12:04,430 –> 00:12:09,860
Just press it to make sure it’s flat for about 30 seconds.
106
00:12:11,520 –> 00:12:17,810
And then we can just hold it together and squeeze it. You only need two adjusting screws to swing this mirror around.
107
00:12:17,830 –> 00:12:26,370
That one is just a pivot point. And so I’ve set that pivot point to a fixed position, and that will leave a gap of about one and a half millimeters.
108
00:12:26,910 –> 00:12:36,480
When we plug this through here like this, there’s a hole in the bottom there into which that pin fits like that.
109
00:12:38,130 –> 00:12:45,900
The act as a pivot now for the mirror and then we put a spring on there and name three net and then I can just tighten up the nut.
110
00:12:46,230 –> 00:12:51,390
So we’ve tightened that spring up in there so that we’ve got about two or three millimeters of movement left on that spring.
111
00:12:52,380 –> 00:12:56,610
Okay, now we can tighten up these two screws on the back here.
112
00:12:57,090 –> 00:12:59,100
Now those screws drop into little pockets.
113
00:12:59,400 –> 00:13:09,300
And as we tighten the screws up, we get movement this way, which is basically directing the beam up and down by adjusting the top want.
114
00:13:10,200 –> 00:13:12,060
So as you can see, we’re now just the top one.
115
00:13:12,930 –> 00:13:21,780
What happens is this fixed pivot and this screw o’clock hinge and they cause this plate to move like that.
116
00:13:22,380 –> 00:13:28,440
And then when I want to move the being from left to right, well, it just this one because this one.
117
00:13:31,170 –> 00:13:35,820
Move the plate like that because it’s pivoted between there and that’s grew.
118
00:13:36,090 –> 00:13:39,720
So we’ve changed the hinge from that direction to that direction.
119
00:13:39,810 –> 00:13:45,780
So we get nice clean motion. We don’t get if you have a triangular system, you get strange motion.
120
00:13:46,050 –> 00:13:54,270
Now you’ll notice also that I’ve managed to get this mirror working with just one spring strategically put into the right place, I might add.
121
00:13:54,270 –> 00:13:58,500
But it’s only one spring that’s required to make this mirror system work.
122
00:13:58,830 –> 00:14:07,200
I’ve now got to manufacture some 25 millimeter acrylic mirrors, nice and cheap, to fit into this system.
Transcript for How to Align a Laser Beam (Cont…)
123
00:14:07,200 –> 00:14:09,210
I have got some molybdenum mirrors,
124
00:14:09,540 –> 00:14:17,160
but molybdenum mirrors will change the setup of the system because molybdenum mirrors will reflect off the front face of the mirror,
125
00:14:18,060 –> 00:14:24,570
whereas this mirror is sitting right at the back here and reflects three millimeters deeper.
126
00:14:24,630 –> 00:14:29,250
Now, that might not sound a lot, but it will make a big difference to the way in which the system sets up.
127
00:14:29,250 –> 00:14:33,600
We’ve got to make sure that the laser pointer is a snug fit.
128
00:14:36,150 –> 00:14:44,980
In this whole here. And it is too snug at the moment because I’ve purposely made that about 0.1 millimeter and the size to what it needs to be.
129
00:14:45,540 –> 00:14:52,380
So here I’ve got a six millimeter drill and I’m basically going to use that like a Rhema and I’m just going to put that through there.
130
00:14:52,410 –> 00:15:01,050
But you see how easy it went through. But I’ve got to rotate it several times to take just a little teeny weeny bit of material out of there.
131
00:15:11,900 –> 00:15:16,660
And hopefully that should be enough material removed to allow me to slide,
132
00:15:16,660 –> 00:15:20,320
not slide, but I’ve got to force now, make sure we put it in the right way round.
133
00:15:23,080 –> 00:15:24,750
So the Greenpeace goes on the front.
134
00:15:24,760 –> 00:15:31,060
There’s a little teeny weeny hole up there to round about 10:00, and that matches up on the center of that hole there.
135
00:15:31,780 –> 00:15:39,670
So again, we’ve got our screw to go through there, which will help line everything up.
136
00:15:40,690 –> 00:15:45,040
But before we do that, we’ve got to do two things.
137
00:15:45,040 –> 00:15:49,630
First of all, we must make sure that we put this through here to start with.
138
00:15:50,470 –> 00:15:55,660
Otherwise, we’re going to be in trouble. And then that should.
139
00:15:58,490 –> 00:16:01,370
If I’m lucky, I might have to use.
Transcript for How to Align a Laser Beam (Cont…)
140
00:16:03,710 –> 00:16:12,440
My electrical pliers, which have got a nice curve in the end there, just to hold onto part of that and give it a twist and a push.
141
00:16:13,100 –> 00:16:15,770
And there we are. That’s nearly flush with the front of the whole now.
142
00:16:16,850 –> 00:16:24,239
So what we do is just put this piece of black plastic on this piece of opaque plastic on, which is important for that whole game.
143
00:16:24,240 –> 00:16:30,050
We need to line these up before we lock this screw up again.
144
00:16:30,460 –> 00:16:40,470
We’ve got to put glue down between these plates. And that should be sufficiently loose that it almost comes out the bottom.
145
00:16:42,120 –> 00:16:48,840
We just turn it over and put a little bit in the bottom. Okay.
146
00:16:49,860 –> 00:16:53,110
Now we do that same trick that we did before. Make sure you keep your fingers dry.
147
00:16:53,130 –> 00:17:06,800
Otherwise, a stick. The edge is nice and square.
148
00:17:08,210 –> 00:17:15,240
Put that into its pocket. If we put that screw right through.
149
00:17:19,220 –> 00:17:27,420
Spring on the back. So would you set the plate up square?
150
00:17:27,870 –> 00:17:29,490
Although that’s not the right target.
151
00:17:30,000 –> 00:17:39,450
Do you see that the center line should be about here somewhere so we can adjust it left and right on to center, nice and smoothly.
152
00:17:39,540 –> 00:17:44,400
Now, one of the important aspects that I haven’t spoken about yet, but we will when we come to setting it up,
153
00:17:45,270 –> 00:17:51,820
is the reason why I’ve got the laser and mirror one on the same plate.
154
00:17:51,840 –> 00:17:59,450
They’re not separate. They’re together because you’ve just seen me set the beam up onto mirror one.
Transcript for How to Align a Laser Beam (Cont…)
155
00:17:59,460 –> 00:18:05,970
And look, no matter where I move the laser beam, it’s always in the middle of mirror one.
156
00:18:06,000 –> 00:18:10,140
You can’t do that with any of the laser machines that you’ve bought. I can guarantee that.
157
00:18:11,070 –> 00:18:17,040
Okay, so I’ve added my extra three millimeter plate on the bottom there and I’ve got to put this guide plate on the corner here.
158
00:18:17,430 –> 00:18:21,360
And I think what I’d do is just something like that, hold it against the edge,
159
00:18:21,360 –> 00:18:25,290
which is where I know it’s got to go and I’ll try and clamp it in that position.
160
00:18:32,150 –> 00:18:36,590
Make sure there’s none on the outside. Just make sure push it up against it tight.
161
00:18:36,950 –> 00:18:44,630
So that’s really just a reference age to keep this in a straight line and you’ll understand why I’m doing that at a later date.
162
00:18:45,470 –> 00:18:52,370
I also made two three millimeter acrylic mirrors. So the government target just sits in there.
163
00:18:54,890 –> 00:18:59,270
And regardless of how I move this around, the target doesn’t change.
164
00:19:01,340 –> 00:19:12,030
Now I’ve got an additional hole in here that passes right the way through and I’ll drop a screw into that because that represents the No.
165
00:19:12,030 –> 00:19:22,040
One to set up position for the mirror. Well, I have to say, things are going quite well so far because I’ve got my parallel here, parallel here.
166
00:19:22,760 –> 00:19:27,170
And my target is my laser beam is virtually in the center of the target.
167
00:19:27,770 –> 00:19:34,070
So I’ve only got the smallest adjustment to do on here to get it set right on the top spot on the center of the target.
168
00:19:34,100 –> 00:19:40,100
But what we have to remember is that this beam is not hitting the surface of the mirror.
169
00:19:40,280 –> 00:19:47,270
This beam is hitting the back surface of the mirror. So it’s not actually hitting the center of the mirror as that target indicates.
170
00:19:47,480 –> 00:19:51,890
Hit it. If it was a surface mounted mirror, it would be hitting the center of the mirror.
171
00:19:51,950 –> 00:19:56,659
Now, this is the frame of a mirror to it’s virtually exactly the same as everything else,
172
00:19:56,660 –> 00:20:01,820
except it’s on a different baseplate with four fixing holes on it to fix onto the bearing.
Transcript for How to Align a Laser Beam (Cont…)
173
00:20:02,360 –> 00:20:08,570
So we then clamp it down while it dries. And look, we make sure we don’t stick it to the plywood.
174
00:20:09,990 –> 00:20:14,750
We’ll move it around a few times and again, make sure everything is nice and square and uniform.
175
00:20:18,240 –> 00:20:24,420
No poke the mirror through the hole and locate the mirror on its pivot point at the front corner here.
176
00:20:24,420 –> 00:20:31,650
If you remember, we spring the name through, not the parallel gap there.
177
00:20:31,710 –> 00:20:39,660
Parallel gap there. We ready to assemble now acoustic the mirror zoom with a piece of double sided, strong, double sided tape.
178
00:20:41,280 –> 00:20:45,390
Well, that’s not going to come out double sided tape, but if I wanted to,
179
00:20:46,140 –> 00:20:49,200
I’ve got a hole through the back there so I can actually push the whole thing out.
180
00:20:49,980 –> 00:20:57,420
This is only three millimeters thick. The hole in the bearing is about three, maybe four millimeters thick.
181
00:20:57,870 –> 00:21:00,899
So really, I could do with an end three by six long.
182
00:21:00,900 –> 00:21:04,320
Well, I haven’t got that. I’ve got this eight millimeter long thread.
183
00:21:05,100 –> 00:21:13,140
So what I’m going to do is to put a washer and a critical washer underneath it, and that should take up the difference.
184
00:21:14,640 –> 00:21:24,220
Oh, yes. Perfect. That’s nice and snug. It’s a great feeling when a plan comes together.
185
00:21:28,390 –> 00:21:33,880
Look at that. These are the pieces for the heat. These are the pieces of the hate mounting bracket.
186
00:21:34,510 –> 00:21:38,290
And these pieces you’ll recognize here for the mirror that goes on, the hate.
187
00:21:39,070 –> 00:21:46,930
So I think we might start off by mounting a mirror on this st hate piece.
188
00:21:47,530 –> 00:21:53,350
So if you remember, we have the hexagon holes in front of the plain holes.
189
00:21:54,980 –> 00:22:03,480
And we need to squares and the right hand side. Then we can put this in the back.
Transcript for How to Align a Laser Beam (Cont…)
190
00:22:08,200 –> 00:22:13,720
Like that. And then that sits on there.
191
00:22:14,530 –> 00:22:17,560
So get my piece of estate material out. Piece of plywood.
192
00:22:17,920 –> 00:22:26,710
We put some glue down the edge of the bracket and along from the front.
193
00:22:29,580 –> 00:22:34,410
In the back. The plate.
194
00:22:35,880 –> 00:22:39,590
And while we’re here, we might as well. Sticks and glue.
195
00:22:42,140 –> 00:22:46,820
And between the plates as well. Okay, now you try and hold the whole thing together.
196
00:22:47,690 –> 00:22:50,690
Just move it around to make sure there’s no glue underneath it sticking.
197
00:22:51,470 –> 00:23:00,710
Okay, so now we can build the rest of the aid, and the sensible way to do this is to pick this piece up.
198
00:23:06,260 –> 00:23:11,210
Put it on its side. So put these two pieces to the top like that.
199
00:23:11,630 –> 00:23:18,360
Both the same way. Okay.
200
00:23:18,460 –> 00:23:22,510
So that’s fairly stable and then we can pop this side piece on.
201
00:23:22,840 –> 00:23:28,090
There is only one way for this to go. Square corner at the top here.
202
00:23:28,270 –> 00:23:34,310
All the others have got around the soft edge on the heat assembled, and it’s completely stable now.
203
00:23:34,600 –> 00:23:43,780
So it would kind of be rotated onto its front like that. And then we can hold this between the tongues.
204
00:23:43,900 –> 00:23:46,590
Don’t put your finger on the tongue because you’re getting stuck.
205
00:23:48,220 –> 00:23:54,790
This package and this front edge mean we can hold the whole thing together for around about 30 seconds.
206
00:23:55,420 –> 00:24:07,480
Now it’s reasonably stable. Okay, so what we can do now is we can pop glue round the top faces, these side pieces.
Transcript for How to Align a Laser Beam (Cont…)
207
00:24:07,690 –> 00:24:12,100
One, two, three and two, three.
208
00:24:12,370 –> 00:24:18,640
There we go. That’s done. Those tongues pass through the slots like that.
209
00:24:19,600 –> 00:24:25,360
And then this piece lays on the back, put the tongues upwards, and it’ll sit all flat on the back then.
210
00:24:26,200 –> 00:24:36,830
And we need to drop some glue. Into these four tongues, and you’ll see that the glue will actually run between the plates as well.
211
00:24:37,310 –> 00:24:42,170
Something I haven’t done. I’ve just noticed. I should have counted.
212
00:24:42,230 –> 00:24:49,520
Sunk these holes here. And if we’ve got that right, that should fit on their.
213
00:24:53,710 –> 00:24:57,600
And give us a nice vertical adjustment, is it?
214
00:24:58,150 –> 00:25:02,440
And then I find this is a difficult task to get this backing off.
215
00:25:02,440 –> 00:25:07,090
But I generally find that a pair of tweezers is one of the best things for lifting it off with.
216
00:25:09,260 –> 00:25:12,380
When? Okay.
217
00:25:16,540 –> 00:25:19,830
And there we go. That’s never going to come out of nowhere.
218
00:25:20,260 –> 00:25:23,370
These holes in them are going on to the bearing block.
219
00:25:23,380 –> 00:25:24,610
We’re nearly there now.
220
00:25:25,480 –> 00:25:39,400
We could have put the screw in the nut through those holes spring and a nut to hold on with some in three by 12 millimeter co two some screws.
221
00:25:39,820 –> 00:25:43,990
Hopefully they should be the right size to pass through here.
222
00:25:46,240 –> 00:25:51,740
You know, maybe they’re too long gone. Can grind a couple of millimeters off the end of the screws.
223
00:25:53,330 –> 00:25:58,500
So just fix our mounting plate. So we’ve got one more job to do.
224
00:25:59,100 –> 00:26:02,640
Taking the 25 millimeter long screw and I’m winding and not on.
Transcript for How to Align a Laser Beam (Cont…)
225
00:26:02,970 –> 00:26:07,470
And then we pass through that hole now and we’ve got another nut on the other side.
226
00:26:07,830 –> 00:26:14,400
Now, those two nuts, they form a solid a stop for this slide.
227
00:26:15,450 –> 00:26:19,020
You see the reason for having an adjustable. Why?
228
00:26:19,800 –> 00:26:23,300
Because all I’ve got on the head here as an adjustable Z.
229
00:26:24,540 –> 00:26:31,620
Whereas in the previous design, which we had, which was this one, remember, which climbed down to the top.
230
00:26:32,160 –> 00:26:38,190
What we had, we had an adjustable Y and an adjustable Z built into this bracket.
231
00:26:38,880 –> 00:26:43,590
Well, I’m pretty happy with that. It all feels lovely. No swap at all.
232
00:26:44,400 –> 00:26:53,460
So that’s a very good simulation of a machine. Not a complete machine, but enough to show and demonstrate how to set a beam accurately.
233
00:26:53,670 –> 00:27:03,210
Now, I’ve created these targets, and unlike normal targets, these are not going to get thrown away because we’ve got no lighter burning at Target.
234
00:27:04,350 –> 00:27:09,390
That little square reference in the center there is marked in one millimeter squares.
235
00:27:09,630 –> 00:27:13,580
And remember, the beam itself is about one millimeter diameter.
236
00:27:13,590 –> 00:27:19,630
So we should be able to get an idea pretty accurately of where the beam is at each end of the well.
237
00:27:19,650 –> 00:27:25,560
Before we go anywhere near the simulator, we need to understand what it is that we’re trying to achieve.
238
00:27:26,280 –> 00:27:34,470
Now, I have to admit, I was guilty of all sorts of misdemeanors about lenses when I first started playing with these laser machines.
239
00:27:34,650 –> 00:27:40,890
My ignorance was immense, and it’s only gradually decreased with time.
240
00:27:41,640 –> 00:27:50,910
So I’m going to give you guys a flying start. The first thing we will say is that a lens is manufactured with something called spherical geometry.
241
00:27:51,450 –> 00:28:01,800
Now, look, that means that it is part of a sphere, and a sphere has an axis about which it pivots and rotates.
Transcript for How to Align a Laser Beam (Cont…)
242
00:28:02,580 –> 00:28:06,840
And look, that axis passes right through the lens.
243
00:28:07,740 –> 00:28:17,190
So that is the axis of the lens. It is the axis that would pass through the center of the sphere if the rest of the sphere was there.
244
00:28:17,580 –> 00:28:20,940
But we’re only going to use this part at the top here as the lens.
245
00:28:21,360 –> 00:28:25,320
Here is what we are trying to achieve without being set up.
246
00:28:25,530 –> 00:28:34,020
The laser beam hitting mirror number three and bouncing downwards so that it passes right through the axis of the lens.
247
00:28:34,950 –> 00:28:41,790
Now the lens works because it has parallel rays of light hitting this curve surface.
248
00:28:42,180 –> 00:28:50,219
And those parallel rays of light get refracted off that curved surface in various degrees to come down to something called a focal point,
249
00:28:50,220 –> 00:28:53,940
which is just here. That is perfection. It is very,
250
00:28:53,940 –> 00:28:59,999
very difficult to achieve that condition because the Chinese don’t make it
251
00:29:00,000 –> 00:29:04,980
easy with the design of their machines to allow you to achieve that setting.
252
00:29:05,910 –> 00:29:09,450
I’m not saying it’s impossible. I’m just saying it’s close to impossible.
253
00:29:10,350 –> 00:29:18,480
Now, the most likely situation that you’re going to encounter is that your beam hits the mirror at somewhere other than the sweet spot.
254
00:29:19,290 –> 00:29:27,840
Now, the sweet spot is that point on the mirror, which will reflect the beam perfectly downwards and through the axis of the lens.
255
00:29:28,470 –> 00:29:36,060
As you can see in this case, we’ve hit another spot, which is not the sweet spot, and we’re not passing through the central axis of the lens now.
256
00:29:36,270 –> 00:29:41,400
But I’ve just drawn a single line for my beam. But as I said, the beam is this wide.
257
00:29:41,730 –> 00:29:46,080
But this is effectively the path of the most intense part of the beam.
258
00:29:46,710 –> 00:29:50,220
And it’s the intense part of the beam that does damage to material.
259
00:29:50,520 –> 00:29:57,899
So if we follow this beam, you’ll see that it is not passing through the axis of the lens and is actually being refracted towards the
260
00:29:57,900 –> 00:30:04,950
focal point because all parallel rays will pass through the lens and get refracted to this focal point.
Transcript for How to Align a CO2 Laser Beam (Cont…)
261
00:30:05,610 –> 00:30:11,880
But hey, look, this is the most powerful part of the beam, and it’s going to pass through the focal point at an angle.
262
00:30:13,050 –> 00:30:19,410
That means that your cut is going to be at an angle because this is the most powerful cutting part of the beam.
263
00:30:19,740 –> 00:30:21,840
This part here is relatively unimportant.
264
00:30:22,020 –> 00:30:27,600
And this bit here, well, it’s missed the lens altogether, and it’s probably heating up the inside of your lens tube.
265
00:30:28,740 –> 00:30:36,330
Now, here we’ve got another potential situation that happens, and that is that the beam.
266
00:30:37,530 –> 00:30:40,590
May not be coming in. Absolutely true.
267
00:30:40,920 –> 00:30:44,400
Although it’s running through the center of the lens at the contact point,
268
00:30:44,550 –> 00:30:51,540
although these rays are still coming in parallel, they’re not coming in at the correct angle to the face of the lens.
269
00:30:51,540 –> 00:30:54,000
They’re not parallel with the axis of the lens.
270
00:30:54,360 –> 00:31:01,200
And because they’re not parallel with the axis of the lens, they will fly off an angle like this and they will miss the focal point.
271
00:31:02,550 –> 00:31:07,860
So hey, you’ll probably find yourself hitting the inside of your nozzle if you’ve got a small home nozzle.
272
00:31:08,190 –> 00:31:12,900
And secondly, look, the most powerful rays are also running off at an angle.
273
00:31:13,170 –> 00:31:18,120
So again, there’s another reason why you produce an angled cut on the edge of your material.

274
00:31:18,630 –> 00:31:21,900
So these are the two things that we’re trying to overcome and ignore.
275
00:31:21,960 –> 00:31:25,110
This is what we’re after. This is setting perfection.
276
00:31:25,620 –> 00:31:33,180
If you get the beam passing through the central axis of the lens, it will pass through the center of your nozzle as well.
277
00:31:34,140 –> 00:31:38,700
You must not attempt to set the beam up through the center of the nozzle.
278
00:31:39,810 –> 00:31:43,650
You must attempt to set the beam up through the axis of the lens.
279
00:31:44,370 –> 00:31:48,870
Checking that it passes through the center of the nozzle is just a check.
280
00:31:49,740 –> 00:31:57,060
It’s not a setting point. Okay, now, here is a point that I was very ignorant of when I first started setting beams up.
281
00:31:58,050 –> 00:32:06,420
This is mirror number one. And here is the laser tube up here firing the beam at mirror number one.
Transcript for How to Align a CO2 Laser Beam (Cont…)
282
00:32:08,820 –> 00:32:21,180
I believed that probably the best way to say it was to make sure that my tube, oh, my beam was running absolutely parallel with my gantry rubbish.
283
00:32:21,390 –> 00:32:26,129
It turns out that it doesn’t matter what angle you set your tube at.
284
00:32:26,130 –> 00:32:34,890
Wherever you fire the beam at mirror one mirror one has the ability to rotate and be set so that you can even this beam here,
285
00:32:34,890 –> 00:32:41,970
which is incorrectly firing at mirror one, you can rotate mirror one and make it come out in this angle.
286
00:32:42,210 –> 00:32:45,840
So it doesn’t matter how you set the tube up.
287
00:32:46,680 –> 00:32:52,740
The only thing that’s important about setting mirror number one up is that the beam
288
00:32:52,980 –> 00:32:59,790
should hit the center of the mirror to give you the maximum scope of use of the mirror.
289
00:33:00,570 –> 00:33:07,260
Let me explain. You probably have a 20 probably a 25 millimeter mirror.
290
00:33:07,890 –> 00:33:15,300
Part of that will be masked by the frame. So you may well only have as much as 23 millimeters clear mirror.
291
00:33:15,780 –> 00:33:21,780
But when you fire the laser beam at it at 45 degrees, this is what the laser beam sees.
292
00:33:22,230 –> 00:33:30,180
It sees 23 millimeters top to bottom. But from side to side, that is round about 13 or 14 millimeters.
293
00:33:31,320 –> 00:33:37,230
So we’ve got to be reasonably accurate left to right when we come to set up our beam.
294
00:33:38,010 –> 00:33:43,350
And the ideal situation is to set the beam at mirror one right in the center.
295
00:33:43,920 –> 00:33:51,510
But if it’s a one or two millimeters high or low, as you can see, it isn’t really going to affect anything.
296
00:33:51,780 –> 00:33:56,790
So don’t get too anal about getting it perfectly on the center of the mirror.
297
00:33:57,390 –> 00:34:01,650
Lots of people believe that is the only place to set the be wrong.
Transcript for How to Align a CO2 Laser Beam (Cont…)
298
00:34:01,950 –> 00:34:05,790
You have some flexibility north and south when you set mirror number one.
299
00:34:07,140 –> 00:34:10,790
If you follow this through to mirror number two, it’s exactly the same picture.
300
00:34:10,800 –> 00:34:15,480
So you’ve got flexibility north and south for mirror number two.
301
00:34:16,380 –> 00:34:21,660
But of course, when we get to mirror number three, the situation is reversed.
302
00:34:22,170 –> 00:34:25,860
We’ve got a lot more horizontal flexibility.
303
00:34:26,110 –> 00:34:29,160
Mirror three and not much vertical.
304
00:34:30,670 –> 00:34:39,430
But on the other hand, as I just described to you when I spoke about lenses, there is something on this mirror called a sweet spot.
305
00:34:40,570 –> 00:34:45,970
You might normally be aiming for the center of the mirror when you set the beam up in this general direction.
306
00:34:47,020 –> 00:34:52,780
But what we really interested in is making sure the beam hits the so-called sweet spot that’s on that mirror.
307
00:34:53,740 –> 00:34:59,440
So let’s take a look at the first axis that we’re trying to align, which is the Y axis down side of the machine.
308
00:34:59,950 –> 00:35:07,660
The beam comes in, bounces off of mirror one, and ideally it passes along this line here,
309
00:35:08,230 –> 00:35:14,650
which is absolutely parallel and true to this white block here, which is the bearing rail.
310
00:35:15,940 –> 00:35:23,200
And that’s the aim of the exercise. We’ve got to get that beam running true to the axis bearing rail.
311
00:35:26,590 –> 00:35:36,370
And as you can see here, I’ve got absolute perfection. I’m bouncing off of mirror one and I’ve passing through mirror number two on its center point,
312
00:35:36,970 –> 00:35:44,350
both here with its close to mirror number one, and here when it’s furthest away from mirror number one.
313
00:35:44,650 –> 00:35:49,000
So that’s A and B are the two positions for mirror two.
314
00:35:51,880 –> 00:36:01,750
What chance have we got of doing that? Well, it’s a pretty difficult task that people just do not seem to understand.
Transcript for How to Align a CO2 Laser Beam (Cont…)
315
00:36:02,230 –> 00:36:07,420
And let me explain why it’s not a simple task.
316
00:36:08,170 –> 00:36:15,790
It’s a very tedious task that depends on a process of something called iteration,
317
00:36:16,390 –> 00:36:22,030
which means you don’t get it right first time you get it a little bit better than it was before.
318
00:36:22,270 –> 00:36:25,690
And then you try again and you get a little bit better again.
319
00:36:25,900 –> 00:36:30,730
And you try again and again and again. That’s what iteration is.
320
00:36:31,570 –> 00:36:36,820
And that’s what we’re going to show you here, how important that process of iteration is to setting the beam.
321
00:36:37,000 –> 00:36:42,820
You’re not going to set a beam up in one hit for the purpose of this exercise.
322
00:36:43,450 –> 00:36:47,410
I’m going to move my mirror one out of position.
323
00:36:48,010 –> 00:36:53,080
That’s where I had it set for perfection. And I’m now going to move it out of position.
324
00:36:53,410 –> 00:37:02,050
And this is this could easily be your machine. You don’t know the relative positions of Mirror one and mirror two.
325
00:37:02,080 –> 00:37:07,840
Hopefully, the Chinese have managed to get them reasonably close together, but you can’t be sure.
326
00:37:08,260 –> 00:37:11,560
So let’s tackle it from this position. Okay.
327
00:37:11,570 –> 00:37:18,400
The beam comes in batches of mirror one and reflects right down at the end of the stroke.
328
00:37:18,820 –> 00:37:29,770
Now this is not laser beam alignment, so we have to adjust mirror one so that our beam at least appears on mirror to at its extreme position.
329
00:37:30,340 –> 00:37:36,760
Okay, so we’ve got a target on here and we’ve probably just burned a little mark on the target.
330
00:37:37,210 –> 00:37:43,990
And when we move back to the beginning here, we’ll put a clean target on here and we will burn a mark.
331
00:37:44,350 –> 00:37:50,800
Now, if you look very closely, you’ll see that I have simulated a little burn mark on there with a circle.
332
00:37:51,250 –> 00:37:57,040
So that little burn mark there at a is what I will call the target mark.
333
00:37:57,460 –> 00:38:06,100
So when we move A to position B and there’s the target mark there, what we’ve now got to do,
Transcript for How to Align a CO2 Laser Beam (Cont…)
334
00:38:06,400 –> 00:38:13,090
we’ve got to adjust mirror one so that the beam hits the target mark.
335
00:38:13,420 –> 00:38:17,870
Let’s look what’s happened to the beam at Position A.
336
00:38:18,400 –> 00:38:25,170
So although we’ve moved this target mark to Position B and we’ve hit the target at position B because we’ve adjusted the mirror,
337
00:38:25,180 –> 00:38:30,250
look, it’s no longer on the target, mark. We’ve created a new mark here.
338
00:38:30,670 –> 00:38:37,840
We’ll move the mirror back to position A we’ll put a new target on and we’ll create a new target mark.
339
00:38:38,440 –> 00:38:45,100
Then we move from position to position B and look, our target is not matching the beam.
340
00:38:45,340 –> 00:38:47,740
We have to make the beam hit our target.
341
00:38:48,190 –> 00:38:55,269
But think about we’ve already been running this loop once because by adjusting mirror one, we’ve moved away from the target.
342
00:38:55,270 –> 00:39:00,700
Mark, bring the mirror back to position. We take a new target and we have to burn another target.
343
00:39:00,700 –> 00:39:11,850
Mark. And we move that target mark to position be look it means.
344
00:39:13,130 –> 00:39:17,750
So no, we’ve got to adjust the beam to hit this target.
345
00:39:17,990 –> 00:39:25,900
I have already seen as soon as we adjust the beam onto the target position, be look what we’ve done at position.
346
00:39:27,200 –> 00:39:37,400
We’ve missed the target again. We have not got the beam passing through the same point at A and B, so we’ve got to create yet another target.
347
00:39:37,970 –> 00:39:42,080
And we go through exactly the same process again and again and again.
348
00:39:42,230 –> 00:39:46,340
And eventually we get to this point where we’re getting a bit fed up and we still haven’t got it right.
349
00:39:46,370 –> 00:39:51,070
Look, there’s my final attempt. I’m going to say, damn, I’ve run out of patience.
350
00:39:51,650 –> 00:40:01,400
But look, I’ve run out of patience, but I still haven’t got absolute perfection between position A and position B,
Transcript for How to Align a CO2 Laser Beam (Cont…)
351
00:40:01,760 –> 00:40:08,150
which means that my beam is not perfectly aligned to the axis.
352
00:40:08,330 –> 00:40:13,190
It’s very nearly aligned to the axis, but not perfectly.
353
00:40:13,790 –> 00:40:23,510
And that can have an effect later on. The fact that we haven’t got that beam running exactly parallel to the axis, but you get the idea.
354
00:40:23,540 –> 00:40:32,990
Look, it’s taking me one, two, three, four, five, six attempts to get that beam parallel to the axis.
355
00:40:33,740 –> 00:40:36,920
I can’t cheat. It’s taking me six.
356
00:40:38,120 –> 00:40:42,170
If you can get it done in two. It means, well, you’re nearly there.
357
00:40:42,650 –> 00:40:47,570
But trust me, you can see that even with six attempts, I have not got perfection.
358
00:40:48,170 –> 00:40:53,930
You can’t see that degree of imperfection with a burnt beam.
359
00:40:54,920 –> 00:40:59,150
It’s very, very difficult to see that degree of perfection.
360
00:40:59,420 –> 00:41:06,080
So the chances are that after three, maybe four, possibly you will think, oh,
361
00:41:06,200 –> 00:41:13,400
I’ve now got perfection of demonstrated to you that six, seven, eight times, and you still have perfection.
362
00:41:13,790 –> 00:41:17,510
You’ve got near perfection three or four attempts.
363
00:41:18,440 –> 00:41:28,520
So this process of iteration is a very important point for you to remember when you’re setting up your be patients, patients, patients.
364
00:41:30,510 –> 00:41:34,890
Now, that process that I’ve just described there.
365
00:41:36,450 –> 00:41:40,390
Is from mirror one along the y axis.
366
00:41:41,010 –> 00:41:46,320
This could equally well be mirror two and this could be the x axis.
367
00:41:46,860 –> 00:41:52,260
This could equally well be mirror three. And this could be the Z axis.
368
00:41:53,910 –> 00:42:02,910
It doesn’t matter what axis you’re working on. This process of iteration is exactly the same for every axis.
Transcript for How to Align a CO2 Laser Beam (Cont…)
369
00:42:03,840 –> 00:42:11,460
Okay, so here we have beam simulator, laser tube out here with a beam coming out hitting mirror number one.
370
00:42:12,570 –> 00:42:16,980
Mirror number two, move backwards and forwards as per machine.
371
00:42:17,760 –> 00:42:21,690
And mirror number three, moves as a machine.
372
00:42:22,410 –> 00:42:27,120
Although there’s no gantry on here, this is a simulated position for the end of the gantry.
373
00:42:27,600 –> 00:42:30,030
So we should be able to simulate setting the beam up,
374
00:42:30,360 –> 00:42:36,810
passing through three mirrors and finishing up at this point here, which is the axis of the lens.
375
00:42:37,200 –> 00:42:40,769
I’m not going to be able to get that perfection that I’ve just described to you,
376
00:42:40,770 –> 00:42:47,610
that theoretical perfection that allows me to go five, six, seven or eight times to get the perfect beam.
377
00:42:47,970 –> 00:42:51,960
We’re going to find it after maybe three, maybe four attempts.
378
00:42:52,110 –> 00:43:00,960
And that’s about as much as we can go. And we just have to accept the fact that there is going to be a degree of imperfection in our settings.
379
00:43:01,320 –> 00:43:11,459
Now, the first thing that I must state is I’ve removed the acrylic mirrors because they were starting to become a bit of a nuisance.
380
00:43:11,460 –> 00:43:14,040
When I did a quick experimental test,
381
00:43:14,550 –> 00:43:22,740
bouncing off the back of the mirror is completely different to bouncing off the front face of these molybdenum mirrors that I’ve got in here now.
382
00:43:23,730 –> 00:43:28,950
So I’ve had to go for the real thing in the end, real bearings, real mirrors.
383
00:43:29,760 –> 00:43:33,959
So we’ve got a pretty good, real simulation, as you can probably see there.
384
00:43:33,960 –> 00:43:36,180
Look at switching the laser tube on and off.
385
00:43:36,180 –> 00:43:43,710
You see that this screw is not only the fixing for the spring on the back, but I’m using it as a location for the target as well.
386
00:43:44,040 –> 00:43:48,690
And I’m locating off the bottom here to keep everything nice and true and square.
387
00:43:48,750 –> 00:43:52,900
There is. It’s not in the center.
388
00:43:54,180 –> 00:43:58,409
So remember the way in which the laser beam worked?
389
00:43:58,410 –> 00:44:05,790
If I go to the top, I should be able to make it go up and down and I can do so.
Transcript for How to Align a CO2 Laser Beam (Cont…)
390
00:44:05,790 –> 00:44:12,060
Let’s put that on to center line. And now we go to the bottom one and that moves it left to right.
391
00:44:13,140 –> 00:44:17,250
And I can move it left to right, as you can see. So let’s put that on center as well.
392
00:44:17,250 –> 00:44:25,590
So there we go. That’s nice and easy. You can’t do that as easily with your beam, but that’s what you’ve got to ideally achieve.
393
00:44:27,870 –> 00:44:33,450
So now we backed the beam off of mirror one onto mirror number two.
394
00:44:34,560 –> 00:44:38,870
We’ve got a target there. And it’s way off.
395
00:44:39,410 –> 00:44:45,260
So let’s move it to position B and you can see that the beam is way off the center of the target.
396
00:44:45,380 –> 00:44:50,840
What we’ll do, we will set that so that it goes onto the center of the target like that.
397
00:44:51,140 –> 00:44:54,280
Okay. Job done. Or is it?
398
00:44:55,120 –> 00:44:59,710
Let’s move back to position. And you see that job is not done.
399
00:44:59,950 –> 00:45:03,489
We’re nowhere near parallel. Okay.
400
00:45:03,490 –> 00:45:11,380
So what we’ve got to do now is to say, well, look, if that is our target and it’s way off.
401
00:45:12,130 –> 00:45:16,080
But if that is our target, let’s just try and make a note of where it is.
402
00:45:16,090 –> 00:45:25,660
Look, it’s just above. It’s a bear on the end of the crosshair, and it’s just a single dot, maybe one millimeter above the crosshair.
403
00:45:25,960 –> 00:45:32,580
So it’s about one millimeter off the end of the crosshair and one millimeter above the end of the crosshair at position.
404
00:45:33,100 –> 00:45:41,770
Now, I mustn’t change that because that’s my target. So we know move to position B and of course it’s way off target.
405
00:45:42,190 –> 00:45:47,500
What we’ve got to do now is to move this beam about a millimeter above.
406
00:45:48,870 –> 00:45:54,450
Across here and a millimeter beyond the cross here about there.
407
00:45:55,350 –> 00:45:58,710
But let’s have a look what happens when we bring it back to position.
408
00:45:58,800 –> 00:46:02,640
A Well, we’re now about three millimeters.
409
00:46:04,360 –> 00:46:13,000
Off of our target. That’s our new target. So you’ve got to remember that one millimeter high and three millimeters wide.
410
00:46:13,480 –> 00:46:19,570
So we’re okay height wise, but width wise we’ve got to go to about three millimeters, which is about there.
411
00:46:19,750 –> 00:46:22,300
And that looks to be about right.
412
00:46:23,920 –> 00:46:33,400
So after three attempts, we’ve managed to get that about parallel, i.e. the target that A and the target a B are the same.
413
00:46:34,810 –> 00:46:43,800
Even though we know that they’re not. But within the scope of what we can see, they appear to be the same big problem.
414
00:46:44,310 –> 00:46:48,270
We’re not on the center of mirror number two. How can we deal with that problem?
415
00:46:48,540 –> 00:46:52,440
You cannot fiddle with the screws at mirror number one.
416
00:46:52,830 –> 00:47:00,870
You’ve just used those screws at mirror number one to set the beam parallel to the axis.
417
00:47:01,170 –> 00:47:07,050
You can’t ignore that and just twist those screws to make your being come to the center.
418
00:47:07,620 –> 00:47:11,670
It’s not going to work. So that’s another very important lesson.
419
00:47:12,210 –> 00:47:15,480
There are two parts to aligning a beam with a mirror.
420
00:47:15,990 –> 00:47:20,070
Number one, align the beam parallel with the axis,
421
00:47:20,700 –> 00:47:29,370
and then you have to make a physical mechanical adjustment to the mirror to put the beam onto the center of the mirror.
422
00:47:30,180 –> 00:47:33,600
You cannot steer the beam onto the center of the mirror.
423
00:47:34,200 –> 00:47:39,450
You’ve got to physically catch the beam by adjusting the mirror itself.
424
00:47:39,630 –> 00:47:45,990
In my case, the way that I’ve got my machine set up because I thought about this a long time ago,
425
00:47:46,530 –> 00:47:54,330
about how to best set a machine up and I haven’t yet seen any or me Chinese machines that adopt this process.
426
00:47:54,420 –> 00:47:59,670
I can loosen my screws off and let’s remove this nominal fixing screw.
427
00:48:00,090 –> 00:48:07,880
And this is why I want this reference edge along here, because I can now move this beam backwards and forwards like this.
428
00:48:08,370 –> 00:48:15,570
And hey, can you see the miraculous effect that is having on the position of the beam as it hits mirror number two.
429
00:48:16,020 –> 00:48:21,690
So I can now very accurately set onto the center of mirror to.
430
00:48:23,300 –> 00:48:32,640
Hopefully because I’ve made this a parallel motion along here, I will not have affected the settings on mirror number two.
431
00:48:33,170 –> 00:48:37,100
So technically, we can see there that it’s one millimeter high.
432
00:48:39,640 –> 00:48:44,410
I have made a slight difference because the beam was so far out here to start with.
433
00:48:45,340 –> 00:48:49,150
I was guessing where three millimeters was. I didn’t have an accurate assessment.
434
00:48:49,540 –> 00:48:57,760
So now I’ve got the beam back into the center again. So I’m one line high and half a square to the right.
435
00:48:58,090 –> 00:49:02,650
I’m one line high. And half a square to the right.
436
00:49:03,610 –> 00:49:11,020
The important thing here is that it’s parallel and it’s approximately in the center of the mirror.
437
00:49:11,440 –> 00:49:21,010
Okay. So now you are looking up at mirror number three and here we are at closest to mirror number two.
438
00:49:21,400 –> 00:49:31,270
So let’s first of all, make sure that the beam hits the target at its further most point.
439
00:49:32,050 –> 00:49:38,770
I must make sure that I keep my number two mirror jammed against its end stop.
440
00:49:39,460 –> 00:49:43,500
And to do that, what I’m going to do, I’m going to cheat slightly.
441
00:49:43,540 –> 00:49:48,460
I’m going to keep it against its end stop with a very powerful magnet on the rail.
442
00:49:49,090 –> 00:49:54,590
So I’m going to push that on there and that will keep that locked on to the end stop.
443
00:49:54,790 –> 00:49:57,790
There’s our target furthest away from mirror number two.
444
00:49:58,660 –> 00:50:03,730
And we could really do with adjusting it so that it’s nominally on center.
445
00:50:03,910 –> 00:50:08,290
That may or may not be the sweet spot.
446
00:50:08,320 –> 00:50:11,410
We’re not interested in getting the beam to the center of the mirror here.
447
00:50:11,770 –> 00:50:17,800
We’re more interested in making sure that the beam is running parallel to the x axis.
448
00:50:18,220 –> 00:50:22,209
So we’ve moved our target close to mirror number two.
449
00:50:22,210 –> 00:50:30,370
Now our laser beam is arriving at one square, one line to the right and one line above.
450
00:50:30,760 –> 00:50:35,710
So we’ve got to take that very slightly to make it one line above one line.
451
00:50:37,120 –> 00:50:42,250
To the right. Then we’ll check it again. That’s pretty well lined up now.
452
00:50:42,790 –> 00:50:50,110
We’ve got approximately right in the X-axis, but it’s not spot on centerline and there’s not spot on centerline in the Y axis either.
453
00:50:50,410 –> 00:50:55,690
But let’s not worry about that. We’ll deal with that at the next stage.
454
00:50:55,750 –> 00:51:02,470
The key point here is that we’ve got the beam running true to the x axis.
455
00:51:02,860 –> 00:51:09,310
Okay. So I’m now going to plug my target, the same target into this position here.
456
00:51:10,240 –> 00:51:13,390
Now, hopefully you can see the the red dot on there.
457
00:51:13,930 –> 00:51:22,360
It happens to be two squares to the front and one square to the left of the centerline.
458
00:51:23,140 –> 00:51:33,700
Now, if we’ve got our x axis set up correctly, then theoretically it should remain in this position here.
459
00:51:33,940 –> 00:51:37,060
As I move closer to the mirror.
460
00:51:37,090 –> 00:51:45,830
Number two. The dot is one square to the left and two squares to the front.
461
00:51:46,910 –> 00:51:47,490
So there we go.
462
00:51:47,510 –> 00:52:00,860
We’ve proved now that we’ve got our beam set correct to the x axis, but now we can see that the beam is not correct relative to this z axis.
463
00:52:01,430 –> 00:52:04,490
So here we are close to mirror number three.
464
00:52:04,910 –> 00:52:07,910
And as I said, we are what we are to forward.
465
00:52:08,270 –> 00:52:11,900
And one to the left, the beam is in the middle of that square.
466
00:52:12,710 –> 00:52:16,310
So let’s move that from the top to the bottom.
467
00:52:16,520 –> 00:52:21,290
The beam is a long way off. Exactly the same axis process.
468
00:52:21,860 –> 00:52:25,730
Closing, distant. Closing distant. Closing distant.
469
00:52:26,330 –> 00:52:32,809
So this is we’ve now got to match our target, remember, which was two forward and one to the left.
470
00:52:32,810 –> 00:52:36,020
So to forward, one to the left.
471
00:52:36,230 –> 00:52:42,470
Let’s put it on top again. We know one and a half forward.
472
00:52:44,440 –> 00:52:49,239
Then on centerline down to the bottom again on the centerline.
473
00:52:49,240 –> 00:52:54,850
And one and a half forward. Check. Check on the top on centerline.
474
00:52:55,570 –> 00:53:01,180
And close to one forward. You just tweak again and that’s one forward.
475
00:53:01,390 –> 00:53:07,210
And on centerline, we’ve now achieved the beam passing parallel.
476
00:53:08,590 –> 00:53:17,860
To the axis of the lens. It’s not on the axis of the lens because the beam is not passing through the crosshair.
477
00:53:18,250 –> 00:53:23,890
The problem is, how do we get. That on the cross here.
478
00:53:25,570 –> 00:53:29,200
Again, this is something that you will not have on your machine,
479
00:53:29,590 –> 00:53:34,600
but you really want it on your machine because the only way that you can achieve
480
00:53:34,600 –> 00:53:41,560
that perfection is to go all the way back to your laser beam and start fiddling.
481
00:53:41,680 –> 00:53:52,050
Let me just loosen the laser beam off and you’ll see that look, I can move the beam by adjusting the laser tube, but hey,
482
00:53:52,270 –> 00:54:00,940
that’s a nightmare, because as soon as you start adjusting your laser tube, you start adjusting everything else that you’ve just set up.
483
00:54:01,780 –> 00:54:08,200
So you’ve got to go all the way around the houses again to try and get the perfection that you’re looking for.
484
00:54:08,980 –> 00:54:12,250
But we’ve got two ways of correcting the error that’s on there.
485
00:54:13,240 –> 00:54:18,430
First of all, we’ve got to move it in that direction there, which is a Y direction.
486
00:54:18,670 –> 00:54:30,520
I pointed out to you before that I made my y axis adjustable, so it’s very easy for me to now adjust my y axis.
487
00:54:33,000 –> 00:54:39,480
To get rid of the error. I’ve made my Y-axis accurately adjustable, so I’ve got rid of the wire.
488
00:54:40,680 –> 00:54:47,910
This is. It happens. It’s pretty good in the other axes, which is, if you like, the x axis.
489
00:54:48,480 –> 00:54:57,720
But if it wasn’t, then I’ve got another form of adjustment to adjusting screws which allow me to adjust the height,
490
00:54:58,770 –> 00:55:02,100
the up down the z axis position of the head.
491
00:55:02,130 –> 00:55:10,950
As I move it up and down, I can move the position of the beam. So as you can see, I can adjust the height of that to bring the x axis onto centerline.
492
00:55:11,580 –> 00:55:16,240
And then as you can see at the bottom position, the beam is passing right through the crosshair.
493
00:55:16,830 –> 00:55:25,260
So we’ve set this up now so that the beam is passing down here and passing cleanly through the axis of the lens,
494
00:55:25,560 –> 00:55:30,390
which you get an upright cut with all the modifications that I’ve made to my machines,
495
00:55:30,780 –> 00:55:35,580
like linking the laser tube and mirror one together on a base frame,
496
00:55:36,060 –> 00:55:44,400
making the Y adjust all relative to the head and making the head adjust all up and down.
497
00:55:44,400 –> 00:55:49,590
So I catch the beam on this mirror. I catch the beam on this mirror.
498
00:55:50,190 –> 00:55:54,750
I don’t try to steer the beam by fiddling around with the laser beam.
499
00:55:55,170 –> 00:56:03,420
My machines have been like this for the past five or six years because I found out a long time ago the Chinese design was just unworkable.
500
00:56:03,690 –> 00:56:10,320
I notice as time has gone on, there are one or two machines out there now that have got adjustable seats.
501
00:56:10,740 –> 00:56:16,500
I mean, there may be one or two that have linked their tubes and mirror one together.
502
00:56:16,890 –> 00:56:25,170
This is a rarity. So you will find your machine is probably let me be crude and say an [INAUDIBLE] to set up.
503
00:56:25,710 –> 00:56:31,200
But you understand the principles now and you may wish to go forward and modify your machine
504
00:56:31,500 –> 00:56:37,590
to deal with some of the issues that I’ve demonstrated in this very interesting little up.
505
00:56:38,040 –> 00:56:40,559
It’s served its purpose extremely well.
506
00:56:40,560 –> 00:56:48,660
Even though it can’t do everything that a machine can do, it’s demonstrated to an immense degree how you have to set your machine up.
507
00:56:49,050 –> 00:56:52,680
So thank you for your time and good luck with your beam setting.
What Next?
Did you enjoy this post? Why not check out some of our other posts:
Disclaimer
Last updated April 25, 2024
WEBSITE DISCLAIMER
The information provided by n-Deavor Limited, trading as Laseruser.com (“we,” “us” , or “our”) on (the “Site”) is for general informational purposes only. All information on the Site is provided in good faith, however we make no representation or warranty of any kind, express or implied, regarding the accuracy, adequacy, validity, reliability, availability or completeness of any information on the Site.
UNDER NO CIRCUMSTANCE SHALL WE HAVE ANY LIABILITY TO YOU FOR ANY LOSS OR DAMAGE OF ANY KIND INCURRED AS A RESULT OF THE USE OF THE SITE OR RELIANCE ON ANY INFORMATION PROVIDED ON THE SITE. YOUR USE OF THE SITE AND YOUR RELIANCE ON ANY INFORMATION ON THE SITE IS SOLELY AT YOUR OWN RISK.
EXTERNAL LINKS DISCLAIMER
The Site may contain (or you may be sent through the Site) links to other websites or content belonging to or originating from third parties or links to websites and features in banners or other advertising. Such external links are not investigated, monitored, or checked for accuracy, adequacy, validity, reliability, availability or completeness by us.
WE DO NOT WARRANT, ENDORSE, GUARANTEE, OR ASSUME RESPONSIBILITY FOR THE ACCURACY OR RELIABILITY OF ANY INFORMATION OFFERED BY THIRD-PARTY WEBSITES LINKED THROUGH THE SITE OR ANY WEBSITE OR FEATURE LINKED IN ANY BANNER OR OTHER ADVERTISING.
WE WILL NOT BE A PARTY TO OR IN ANY WAY BE RESPONSIBLE FOR MONITORING ANY TRANSACTION BETWEEN YOU AND THIRD-PARTY PROVIDERS OF PRODUCTS OR SERVICES.
AFFILIATES DISCLAIMER
The Site may contain links to affiliate websites, and we receive an affiliate commission for any purchases made by you on the affiliate website using such links. Our affiliates include the following:
- makeCNC who provide Downloadable Patterns, Software, Hardware and other content for Laser Cutters, CNC Routers, Plasma, WaterJets, CNC Milling Machines, and other Robotic Tools. They also provide Pattern Files in PDF format for Scroll Saw Users. They are known for their Friendly and Efficient Customer Service and have a comprehensive back catalogue as well as continually providing New Patterns and Content.
- Cloudray Laser: a world-leading laser parts and solutions provider, has established a whole series of laser product lines, range from CO2 engraving & cutting machine parts, fiber cutting machine parts and laser marking machine parts.
