 Skip to content
 This article is part of the K40 Xtreeem: K40-Style Laser Cutter Upgrade Series with Russ Sadler (Session 2).
View the full upgrade index and session overview here:
https://laseruser.com/k40-xtreeem-laser-cutter-upgrade-menu/
K40 Xtreeem Laser Cutter Upgrade Series
Welcome to Session 2 of the all new K40 Xtreeem Laser Cutter Upgrade Series with Russ Sadler. In this Session, Russ rips out the original controller and pretty much all of the electrical circuit. He then fits a new Ruida controller, repositions the milliammeter, adds new stepper drivers and a new DC power supply.
Release Date: 16th May 2022
Over the last 6 years, Russ has built up a formidable YouTube following for his RDWorks Learning Lab series which currently has over 200 videos.
The original RDWorks Learning Lab series on his “Sarbar Multimedia” YouTube Channel, follows Russ as he tries to make sense of his new Chinese laser machine and to sort out the truths, half truths and outright misleading information that is available on the web.
Six years later with over 4.5 million YouTube Views under his belt, Russ has become the go to resource for everything related to the Chinese CO2 laser machine user or wannabe user.
In this new series, Russ has condensed his knowledge and experience of the last 6 years to provide valuable information and insights into his total remodelling of the K40 Xtreeem Laser cutter machine. Making it into a powerful, compact laser cutting and engraving solution for those on a budget.
| Previous Video | Next Video | Series Menu |
Podcast Download for K40 Xtreeem Laser Cutter – Changing The Controller
You can download the audio file for this video here, just click on the three dots to the right of the player:
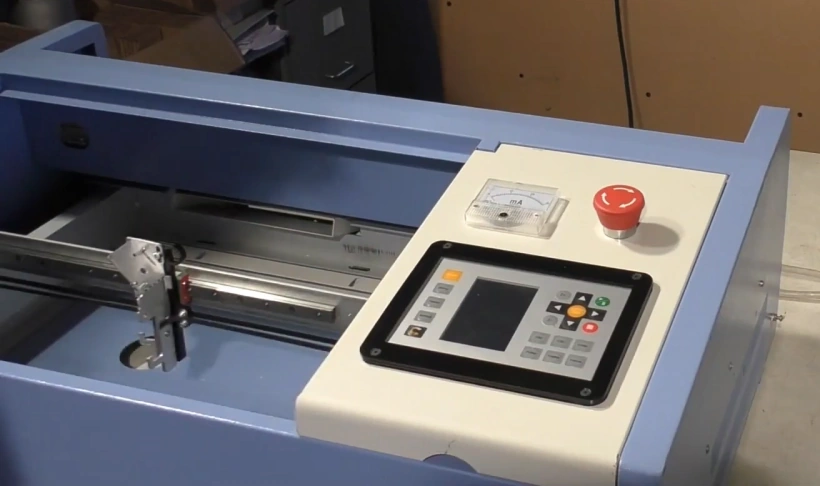
Video Resource Files for K40 Xtreeem Laser Cutter – Changing The Controller
The resource files for this K40 Xtreeem Laser Cutter Upgrade project can be found at the K40 Xtreeem Project Files Resource Page.
There are no additional resource files associated with this video.

External Resource Links for K40 Xtreeem Laser Cutter – Changing The Controller
COMING SOON!!!
There are no external resource links associated with this video.
Want To Make An Enquiry To Russ Regarding Parts Or You Have Questions About This Project?
Then Just click on the link below, which will open up an information request form.
Transcript for K40 Xtreeem Laser Cutter – Changing The Controller
Click the “Show More” button to reveal the transcript, and use your browsers Find function to search for specific sections of interest.
1
00:00:05,280 –> 00:00:11,720
The K40 Xtreeem Laser Cutter Upgrade series with Russ Sadler.
2
00:00:11,720 –> 00:00:28,860
Session Two: Changing the Controller. Well, welcome to this part two of remodelling the K40, we’ve basically done all the mechanical stuff in part one.
3
00:00:28,860 –> 00:00:35,790
And yeah, it’s this is all up and running and we’re all ready to.
4
00:00:35,790 –> 00:00:43,350
This is all nicely fitted in its nice and slide-able, as you can see, so that we can adjust it backwards and forwards when we come to set the mirrors up.
5
00:00:43,350 –> 00:00:48,180
Let’s get stuck into….. some rewiring.
6
00:00:48,180 –> 00:00:56,640
Well, it’s a little bit more than rewiring. We’re going to have to start from square one and basically redo the control system on this machine.
7
00:00:56,640 –> 00:01:04,050
Now I’ve got a basic kit of parts here supplied by CloudRay, you can buy this kit on Cloudray, as a kit.
8
00:01:04,050 –> 00:01:13,050
Which comes with a RDC6432, I believe it is, yeah, 6432 controller,
9
00:01:13,050 –> 00:01:20,490
a power supply for supplying the power to the stepper motors and the controller.
10
00:01:20,490 –> 00:01:26,580
And we’ve got a couple of little proper stepper drivers here. Now in the first instance,
11
00:01:26,580 –> 00:01:31,380
I’m going to use the existing stepper motors that are in this machine and we’re going
12
00:01:31,380 –> 00:01:35,880
to see how it performs. Just spin this round so that we can get to this bit here,
13
00:01:35,880 –> 00:01:44,520
which is the bit we want to play with. One of the things that we’re going to have to do is to change this.
14
00:01:44,520 –> 00:01:53,540
We’ve got to fit this on here. I think the sensible thing to do would be to just cut a new, a new panel to go in here, which because as you can see,
15
00:01:53,540 –> 00:02:00,570
we’ve got an ammeter to go in here as well as this and there just is not enough room to put all this stuff in here.
Transcript for K40 Xtreeem Laser Cutter – Changing The Controller (Cont…)
16
00:02:00,570 –> 00:02:08,980
There isn’t a lot in here, there’s a lot of space, so we’re not going to have any problem fitting these two items here.
17
00:02:08,980 –> 00:02:13,930
Inside here. Now, I think we should probably be able to use this existing power supply.
18
00:02:13,930 –> 00:02:24,670
Well I hope so anyway. It’s a 35 watt unit, which probably means it’s capable of delivering something like in excess of maybe 20 milliamps,
19
00:02:24,670 –> 00:02:30,190
which will be perfectly okay for running this 40 to 45 watt tube that we’ve got in here. Now
20
00:02:30,190 –> 00:02:36,130
I think the tube is pretty new. And it’s a CloudRay tube, which means it’s a nice A-grade quality tube.
21
00:02:36,130 –> 00:02:45,250
So I’m expecting some great things from this tube. You don’t need to be an electronics expert to rewire this machine.
22
00:02:45,250 –> 00:02:54,040
I certainly am nothing like that, but I’m not frightened of it because, hey, we’ve got drawings which tell us where the wires go.
23
00:02:54,040 –> 00:03:02,350
Well, I haven’t got to get any tools out because all these nuts here, they’re loose.
24
00:03:02,350 –> 00:03:08,170
So just for convenience, we will take this lid off so that it doesn’t get in the way.
25
00:03:08,170 –> 00:03:12,250
I’m not sure how many of these whys we need, but we’ll sort that out later.
26
00:03:12,250 –> 00:03:17,890
So I think we should just unwind all of this spiral wrap.
27
00:03:17,890 –> 00:03:24,790
So let’s remove this bird’s nest of wires, already to sort it out.
28
00:03:24,790 –> 00:03:32,080
I’m going to give you a very basic circuit diagram to explain how few wires we actually need.
29
00:03:32,080 –> 00:03:36,940
There looks to be thousands of wires here, but there isn’t in reality! What we’ve got,
30
00:03:36,940 –> 00:03:41,710
we got a controller. Let’s, let’s say along this side, and this isn’t the way that it really works.
31
00:03:41,710 –> 00:03:55,540
We’ve got “ins” and we’ve got “outs”. Two of the wires that come in here, are from a micro switch, and that’s the x axis micro switch.
32
00:03:55,540 –> 00:04:04,240
There’s another two wires that come in here, and that’s the. Y axis micro switch.
Transcript for K40 Xtreeem Laser Cutter – Changing The Controller (Cont…)
33
00:04:04,240 –> 00:04:08,790
So there’s your 0,0. So that accounts for four wires.
34
00:04:08,790 –> 00:04:15,640
Here we’ve got a PSU, a power supply unit. It says it’s 150 watts, 24 volts.
35
00:04:15,640 –> 00:04:22,180
Okay. And here we’ve got our mains in. So we’ve got three wires in which are from the mains.
36
00:04:22,180 –> 00:04:29,390
One of them being obviously the Earth wire and then coming out of here we’ve got,
37
00:04:29,390 –> 00:04:35,900
plus and minus 24 volts, DC, nothing dangerous.
38
00:04:35,900 –> 00:04:40,550
You’re not going to get killed with this stuff. That 24 votes DC goes to
39
00:04:40,550 –> 00:04:51,620
either drive. this box, and we’re going to use that same 24 volts to drive these two little boxes.
40
00:04:51,620 –> 00:04:55,350
Look, V+ / V-, so that’s it. 24 volts.
41
00:04:55,350 –> 00:05:05,480
Looks like lots of wires, but it’s actually only two wires which go to the same positions on each one of those. 24 volts, 24 volts, plus and minus.
42
00:05:05,480 –> 00:05:11,330
Okay. And it’s clearly marked on here, plus and minus. So you can’t get that wrong.
43
00:05:11,330 –> 00:05:20,390
You can’t get this wrong, either. This one says here power 24 volts and ground, so everything is pretty simple
44
00:05:20,390 –> 00:05:32,360
so far. We’ve got an X and a Y stepper motor. Now coming out of those stepper motors, we’ve got one two three four wires, one two three four wires.
45
00:05:32,360 –> 00:05:39,050
If you go to the Cloudray website and look at the stepper motors, you’ll see that it clearly tells you what the wire colors are; red,
46
00:05:39,050 –> 00:05:44,750
blue, green and black for A-plus, A-minus, B-plus B-minus.
47
00:05:44,750 –> 00:05:50,300
And that’s what those four lines are here. So.
48
00:05:50,300 –> 00:05:55,040
A-plus, A-minus, B-plus, B-minus.
49
00:05:55,040 –> 00:06:01,190
And they’re not in that order. But that’s all there is. There’s only those wires that come out of the stepper motor.
Transcript for K40 Xtreeem Laser Cutter – Changing The Controller (Cont…)
50
00:06:01,190 –> 00:06:04,880
Now those wires, I’m not going to I’m not going to do it completely.
51
00:06:04,880 –> 00:06:14,740
I’ll just draw them as one line. Going into there on one line going into there, there’s actually four ways that connect into here because look,
52
00:06:14,740 –> 00:06:20,050
you can clearly see on here it says A-plus, A- minus, B-plus, B-minus.
53
00:06:20,050 –> 00:06:26,290
So no rocket science so far is there. And then we’ve got these things here called signal wires.
54
00:06:26,290 –> 00:06:31,620
Well, these signal wires, are the wires that are coming from the controller.
55
00:06:31,620 –> 00:06:37,290
And I’ll just draw those in a different color. We’ll put those in red, so these are outs.
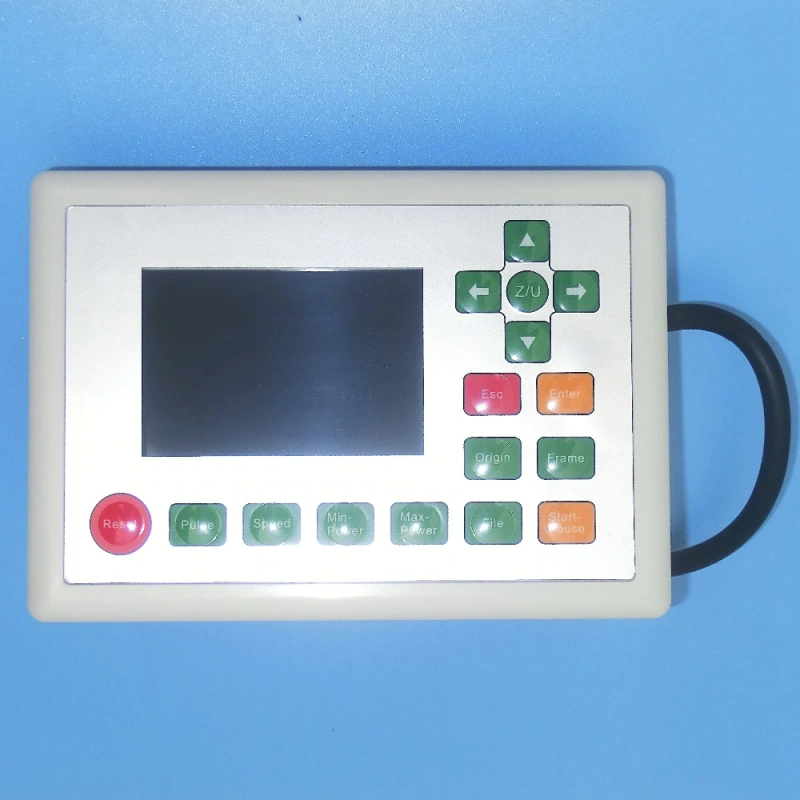
56
00:06:37,290 –> 00:06:45,360
Okay, so these outs, as I said, we’ve got three wires that come out here, one two three, one two three.
57
00:06:45,360 –> 00:06:55,000
And those three wires and I’ll just draw them as one, go into there and into there.
58
00:06:55,000 –> 00:06:59,710
So there’s no complexity here, because it clearly shows you what they are.
59
00:06:59,710 –> 00:07:03,670
And on the controller, it tells you as well.
60
00:07:03,670 –> 00:07:10,780
Look X- axis, Y-axis, direction, Pulse, +5 volts; direction, Pulse, +5 volts.
61
00:07:10,780 –> 00:07:17,350
And here it is Direction, Pulse. There is nothing really complicated in this so far.
62
00:07:17,350 –> 00:07:22,760
It’s just a matter of linking the right bits up to the right bits with a piece of wire.
63
00:07:22,760 –> 00:07:28,750
And the only other bit that we haven’t tackled at the moment is this bit here, which is the laser tube itself.
64
00:07:28,750 –> 00:07:36,910
The laser tube is controlled by this thing here called an HV power supply.
65
00:07:36,910 –> 00:07:40,730
And that’s where we’ve got a great big thick
66
00:07:40,730 –> 00:07:52,250
red cable that goes to one end of the tube, and then we’ve got a black wire that comes out the other end of the tube.
67
00:07:52,250 –> 00:08:06,090
Now that black wire that comes out, the other end of the tube passes through an amateur and goes back into the high voltage power supply.
Transcript for K40 Xtreeem Laser Cutter – Changing The Controller (Cont…)
68
00:08:06,090 –> 00:08:12,360
So if we take a look at the power supply, you’ll see there’s only these two wires, this black and a red wire.
69
00:08:12,360 –> 00:08:16,620
And then again, what we’ve got coming into here, we’ve got our mains.
70
00:08:16,620 –> 00:08:24,270
Remember, this is mains. M A I N S – 240 or 110, depending on what system you’re using?
71
00:08:24,270 –> 00:08:35,540
That mains also goes into here. There’s two wires that aren’t on here at the moment, and I’m going to draw one of them in green.
72
00:08:35,540 –> 00:08:46,110
Which goes into this power supply, and this is an out from here.
73
00:08:46,110 –> 00:08:53,200
And that Green Line there controls the percent power,
74
00:08:53,200 –> 00:09:04,270
into your tube. That allows the tube to put more or less Watts out, because that line is controlling the current flow through the tube.
75
00:09:04,270 –> 00:09:08,260
And that’s what this ammeter is showing you, the current flow through the tube.
76
00:09:08,260 –> 00:09:20,110
The only one that’s missing now is this dark blue wire, which again comes out of the controller and goes into the HV power supply.
77
00:09:20,110 –> 00:09:28,030
And it’s called “L” for “Low”. The green one is called IN.
78
00:09:28,030 –> 00:09:36,430
And here you’ll find it’s called on this controller. It says, Laser.
79
00:09:36,430 –> 00:09:48,720
And we’ve got L-on, which is what this blue is, L-on.
80
00:09:48,720 –> 00:09:53,370
And that’s a switch for switching the laser tube on and off.
81
00:09:53,370 –> 00:09:59,850
So that’s it. That’s, that’s virtually all of the wiring that’s required for this machine.
82
00:09:59,850 –> 00:10:05,190
When you break it down into very simple elements like this, there isn’t much wiring. Yeah,
Transcript for K40 Xtreeem Laser Cutter – Changing The Controller (Cont…)
83
00:10:05,190 –> 00:10:11,820
there looks like a lot of wire, because we’ve got four wires here, 4 wires here, three wires here, three wires here.
84
00:10:11,820 –> 00:10:18,750
But in reality, it’s just a matter of logically working your way through and joining up all these lumps.
85
00:10:18,750 –> 00:10:30,210
Not electronics at all. So if anybody was fearful of this rat’s nest of wires that I’ve got here, then I hope I’ve just taken the fear away.
86
00:10:30,210 –> 00:10:36,870
One step at a time, one element at a time. We’re just going to work our way through this very gently and very gradually.
87
00:10:36,870 –> 00:10:42,150
The first thing we’re going to do is probably bolt some of the pieces in.
88
00:10:42,150 –> 00:10:44,610
Not very difficult, but we need to make sure that we bolt.
89
00:10:44,610 –> 00:10:52,590
I mean, somewhere where we can see them and easily get to them. So, look we’ve got some wires here already.
90
00:10:52,590 –> 00:11:03,360
It would be very convenient if we didn’t have to… change this loom in any way at all.
91
00:11:03,360 –> 00:11:09,520
Which hopefully will be red, blue, green and black.
92
00:11:09,520 –> 00:11:13,120
Red, blue, hmmm, white and yellow.
93
00:11:13,120 –> 00:11:17,320
Okay, red, green, white and yellow.
94
00:11:17,320 –> 00:11:27,490
So those are definitely stepper motor wires. And I suspect that these four wires here; white and blue and black and green, if I follow them through,
95
00:11:27,490 –> 00:11:33,310
I should probably find that those are those colors of the wires that are on the micro switches.
96
00:11:33,310 –> 00:11:37,190
There is a hole through the side here where these wires originally went through.
97
00:11:37,190 –> 00:11:40,840
So let’s poke them through there. And we’ve got lots of the spiral wrap here.
98
00:11:40,840 –> 00:11:44,590
We can take some of this off and see where we can get to. Now this
99
00:11:44,590 –> 00:11:56,320
Six four three two will be supplied with a bag of cables and all your fittings.
100
00:11:56,320 –> 00:12:03,670
So we’ve got this cable here. It plugs into there. And plugs into there, so there we go.
Transcript for K40 Xtreeem Laser Cutter – Changing The Controller (Cont…)
101
00:12:03,670 –> 00:12:15,170
So there’s your connection between the keyboard and there, simple, just one cable.
102
00:12:15,170 –> 00:12:17,990
All the connectors that you require,
103
00:12:17,990 –> 00:12:31,010
I’ve already got them fitted in from another unit are in there, along with a couple of special clamps which will clamp the keyboard into the panel.
104
00:12:31,010 –> 00:12:38,510
OK, we’ll deal with that later. So here you’ve got your Ethernet cables if you want to run it with an Ethernet,
105
00:12:38,510 –> 00:12:42,890
you can do that. So this here as an extension cable,
106
00:12:42,890 –> 00:12:50,310
which comes with the panel so that you can plug in your USB stick and there should also be another cable in here.
107
00:12:50,310 –> 00:13:00,780
Which plugs into this connector here, which is the extension for your PC connection into this box.
108
00:13:00,780 –> 00:13:07,140
So we’ve got two external connectors to the outside of the frame to plug into.
109
00:13:07,140 –> 00:13:14,630
There we go. It’s as complicated as that. So all we’ve got to do now is to work out how we’re going to put all these.
110
00:13:14,630 –> 00:13:24,440
And this power supply into this case so that we don’t have to do any significant rewiring these cables here.
111
00:13:24,440 –> 00:13:29,030
Having seen that, it’s not going to be a massive job rewiring this.
112
00:13:29,030 –> 00:13:37,910
I think what we’ll do, first of all, is we’ll take out from here, all the cables that we don’t need.
113
00:13:37,910 –> 00:13:41,810
So let’s unplug that cable there.
114
00:13:41,810 –> 00:13:55,000
We don’t need that one. We don’t need that one because we’re going to put our own replacement cables in there.
115
00:13:55,000 –> 00:14:02,140
The only thing that we’ve got on here is the ground cables and the mains cables. We’ll use that switch
Transcript for K40 Xtreeem Laser Cutter – Changing The Controller (Cont…)
116
00:14:02,140 –> 00:14:13,130
maybe, maybe. So just leave me for a few minutes to play and I’ll unravel all these cables and we’ll see what we’re left with.
117
00:14:13,130 –> 00:14:22,900
Okay, so we’ve taken all that tangle of wires out now because we don’t need most of those wires on this high voltage power supply.
118
00:14:22,900 –> 00:14:28,750
There are some wires that we shall need, and we’ll pull them out of that cable and reuse the wire.
119
00:14:28,750 –> 00:14:34,390
So we’ve got a red and a green wire, which are coming in from the mains power.
120
00:14:34,390 –> 00:14:40,300
So this is 240 volts. Okay. And then we’ve got our earth, which is essential. On many power supplies,
121
00:14:40,300 –> 00:14:45,910
you’ll find that you’ve got the red wire and the black wire coming out the back of the power supply. In this instance,
122
00:14:45,910 –> 00:14:50,920
we have to put the black wire back into the front here in this terminal.
123
00:14:50,920 –> 00:14:56,770
So that’s what this end connection is. It’s the return wire from the tube.
124
00:14:56,770 –> 00:15:01,900
And here we’ve got our return wire from the tube – black.
125
00:15:01,900 –> 00:15:09,770
And what we’re going to do, we’re going to put in there, that ammeter.
126
00:15:09,770 –> 00:15:14,530
Okay, we’ll talk about how you decide which way round these wires go,
127
00:15:14,530 –> 00:15:22,640
when we come to wire that up. So for the moment, we can just push those wires out the way. We’ve got our 2 mains cables.
128
00:15:22,640 –> 00:15:27,670
We’ve got two mains wires here, push those out the way as well because we don’t need those at the moment.
129
00:15:27,670 –> 00:15:31,390
We just dangle those out the way. We’ve got our earths,
130
00:15:31,390 –> 00:15:40,210
which are, well, they’re a bit on the long side. But hey, we can shorten those as required rather than try and stack them back into this,
131
00:15:40,210 –> 00:15:44,650
into this trunking here, where they just consume a lot of volume unnecessarily.
132
00:15:44,650 –> 00:15:52,540
So rather than have these wires getting in the way, lets just take that connector out and hang them over the side as well.
133
00:15:52,540 –> 00:15:58,090
So look, we’ve got a nice, empty case there now. Do we need this piece of trunking in here?
134
00:15:58,090 –> 00:16:02,360
Hmmm, I’m not sure that we do. That’s a nice piece of wall area along there.
Transcript for K40 Xtreeem Laser Cutter – Changing The Controller (Cont…)
135
00:16:02,360 –> 00:16:17,770
I think we’ll take this piece of trunking out. So we’ll just put all our connectors on here, because we need to make sure that everything can be plugged in.
136
00:16:17,770 –> 00:16:21,700
We’ve got our two limit switches on there remember, green and black.
137
00:16:21,700 –> 00:16:27,670
So it’s very convenient that we put them in there because we can stretch the limit switches onto there.
138
00:16:27,670 –> 00:16:33,220
OK, those limit switches will pass nicely onto there. So I think that’ll fit quite neatly there.
139
00:16:33,220 –> 00:16:41,830
But it depends what we’re going to do with this cover because we’ve got to remember that we got this thing that sits on the top here somewhere.
140
00:16:41,830 –> 00:16:46,060
So we’ve got to allow room for that to sit on top there.
141
00:16:46,060 –> 00:16:54,610
So, yeah, they might fit in there quite neatly, actually. So somewhere around about there will be very convenient.
142
00:16:54,610 –> 00:17:03,080
We’ll be able to get access to everything from the top here and we’ll also have our two….
143
00:17:03,080 –> 00:17:10,740
These two here, there’s enough cable there to go across to that side and to that side to reach these connectors.
144
00:17:10,740 –> 00:17:16,760
That’ll be fine. Well that’s those fitting in there neatly.
145
00:17:16,760 –> 00:17:22,670
I can read all the information, we can get to the switches, we can get to the connections.
146
00:17:22,670 –> 00:17:27,140
It looks as though there’s just two fixing holes on the side there or, Ah,
147
00:17:27,140 –> 00:17:33,180
what have we’ve got here? Now that might be quite convenient mightn’t? To do it that way around.
148
00:17:33,180 –> 00:17:44,020
Look, we’ve got, we’ve got M3 fixings on the side here. So on the side here, it says 115 volts, 230 volts.
149
00:17:44,020 –> 00:17:49,960
Select by switch before turning on, please check input voltage to avoid damage.
150
00:17:49,960 –> 00:17:59,650
So let’s just do that, to be sure. Well, I’ve taken the cover off now and it was only just one screw underneath here that was fixing the cover on.
151
00:17:59,650 –> 00:18:03,400
And you can see here there’s this switch, which says 230.
Transcript for K40 Xtreeem Laser Cutter – Changing The Controller (Cont…)
152
00:18:03,400 –> 00:18:11,570
And if you move it the other way, it says 115. So you can see through the side there that it says 230.
153
00:18:11,570 –> 00:18:20,990
Which means you don’t need to take the cover off. But it was worth me checking just to be sure, an M3 hole there and a notch here,
154
00:18:20,990 –> 00:18:30,950
which is great because that means to say that I can put a screw in the back there and hook that on and then a screw through the side here into that one.
155
00:18:30,950 –> 00:18:37,740
So that again, is going to be very convenient for fixing this onto the side.
156
00:18:37,740 –> 00:18:41,360
We’re not worried about the screw this end, because that can be as long as you like.
157
00:18:41,360 –> 00:18:46,010
But this end must not be too long because we’ve got to poke it into this power supply.
158
00:18:46,010 –> 00:18:52,880
So I’ve got a short M3 screw for the front end. I’m going to use only two fixing holes on here,
159
00:18:52,880 –> 00:19:04,940
and I’m going to open up this top hole here to about 5.6 ~ 5.7 mm diameter so that the screw heads will pass through here.
160
00:19:04,940 –> 00:19:09,500
And that means I can put my two fixing screws in here to start with.
161
00:19:09,500 –> 00:19:23,030
And I should be able to very easily just unplug it and remove this, as and when and if I need to.
162
00:19:23,030 –> 00:19:28,360
Do we want them on the front or do we want them on the side? We’ve got a USB slot at the bottom here already.
163
00:19:28,360 –> 00:19:50,510
It might be a reasonable idea to just stretch that slot a little bit and put both of these next to each other in the same slot.
164
00:19:50,510 –> 00:19:54,020
Well, that’s all the main mechanical bits sorted out inside there.
165
00:19:54,020 –> 00:19:58,820
I don’t think we need these notes on here. Well, we’ve been left with some glue on there, but we can deal with glue.
166
00:19:58,820 –> 00:20:03,620
I think this CE Mark is a bit of a joke, because I don’t think it really has anything to do with the European Union.
Transcript for K40 Xtreeem Laser Cutter – Changing The Controller (Cont…)
167
00:20:03,620 –> 00:20:10,010
I think it’s really all to do with Chinese Export. To get all this sticky stuff off without damaging the paint.
168
00:20:10,010 –> 00:20:18,040
We’ll use some isopropyl alcohol. If you haven’t got any fingernails.
169
00:20:18,040 –> 00:20:25,610
Then use a wooden spatula or something like that, something that doesn’t damage the paint.
170
00:20:25,610 –> 00:20:32,160
Yeah, we still got a lot stuck on there at the moment. You see look, we’ve got some of these left over from where I did my Brazilian wax job.
171
00:20:32,160 –> 00:20:38,150
So it does a pretty good job, better than my fingernails actually. It does a great job of cleaning up powder coat.
172
00:20:38,150 –> 00:20:45,020
This is a five millimetre thick black acrylic panel, which I’ve used fixed on to the existing fixing.
173
00:20:45,020 –> 00:20:51,800
The plastic is too thick to mount this keyboard normally, because normally if you look along the front of the keyboard keyboard here,
174
00:20:51,800 –> 00:20:59,270
you’ll see it’s got some little. It’s got some little notches or little little pieces which hook behind the steel
175
00:20:59,270 –> 00:21:03,680
panel and then you put some clamps in the back here to pull the panel down.
176
00:21:03,680 –> 00:21:12,620
Well, I’ve not done that. I’ve cut some notches in here to miss these pieces so that it drops in there flat like that.
177
00:21:12,620 –> 00:21:19,550
So it’s not fixed in at any way at the moment, but because I’m going to do something a bit different.
178
00:21:19,550 –> 00:21:24,920
I’ve taken the protective cover off of here, but once you take the protective cover off?
179
00:21:24,920 –> 00:21:30,410
You’ll find that after a while. You’ll find that these will start to wear a bit, particularly the ones that you use the most.
180
00:21:30,410 –> 00:21:39,290
So what I’ve done, I’ve got a piece of 5mm thick material, which I’ve used to fill in the gap around here like that,
181
00:21:39,290 –> 00:21:48,250
and it spaces this off to the same thickness, approximately the same thickness as the keyboard panel itself.
182
00:21:48,250 –> 00:21:55,570
And then I’ve made this peace. Now what we’ve got here is a piece of thin film.
183
00:21:55,570 –> 00:22:02,860
It’s an acetate film, the sort of thing that you may well have had on your Cindy doll, for example, or maybe your Christmas cards.
Transcript for K40 Xtreeem Laser Cutter – Changing The Controller (Cont…)
184
00:22:02,860 –> 00:22:08,830
Before I cut this piece of black acrylic out, I put a piece of double sided tape on the back here.
185
00:22:08,830 –> 00:22:12,430
So that, then I cut the acetate out separately and attach the two together.
186
00:22:12,430 –> 00:22:18,790
So that is now a protective film, which sits on top of the keyboard here.
187
00:22:18,790 –> 00:22:25,000
Okay, now I’ve got holes through here and this is a tapped hole in the back here.
188
00:22:25,000 –> 00:22:29,710
Now, bear in mind, this panel is fixed to here, so it’s nice and stable.
189
00:22:29,710 –> 00:22:35,030
And what I’m actually doing is clamping the keyboard on.
190
00:22:35,030 –> 00:22:44,450
With this protector screen. By the time, I put those four screws on there, my keypad is security fixed in there?
191
00:22:44,450 –> 00:22:52,910
Well, I think that’s probably all of the mechanics of the electrical bits done. We’ve got everything in place.
192
00:22:52,910 –> 00:23:01,910
All we’ve got to do is this bit now. Connect them up! Keyboard, ammeter and start / stop button.
193
00:23:01,910 –> 00:23:18,850
Now I might put this on the side here just to isolate the tube so that you can run this without the tube being switched on.
194
00:23:18,850 –> 00:23:22,810
Well, I’ve just coated that with silicone adhesive.
195
00:23:22,810 –> 00:23:31,150
It’s specifically designed for integrating high voltages, so we’ll leave that to set 12 or so hours and we’ll put that back tomorrow.
196
00:23:31,150 –> 00:23:38,330
Now I purposely clamped it in this position here so that it doesn’t get strained.
197
00:23:38,330 –> 00:23:43,120
OK, now the first problem I’m going to have with wiring is these stepper motors.
198
00:23:43,120 –> 00:23:54,640
First of all, the color coding on here red, blue, yellow, white doesn’t quite match what we got on here red, blue, green, black.
199
00:23:54,640 –> 00:24:01,090
We got two pairs, so I’m very confident that red and blue will be a pair.
Transcript for K40 Xtreeem Laser Cutter – Changing The Controller (Cont…)
200
00:24:01,090 –> 00:24:09,430
Now I’ve got to cut these off here anyway. I’ve got my meter set to continuity check.
201
00:24:09,430 –> 00:24:19,990
So hopefully. Yeah, if I get continuity, I should get a beep. Red and blue should be a continuous circuit, which they are.
202
00:24:19,990 –> 00:24:27,910
So that’s half as I expected. They are one pair. I’m going to have to make an assumption that red plus blue minus.
203
00:24:27,910 –> 00:24:34,300
And then the way that they run on here is red, blue, yellow, white.
204
00:24:34,300 –> 00:24:38,740
So I’m going to assume that that’s my coding. If they’re wrong,
205
00:24:38,740 –> 00:24:43,930
the worst it’s going to happen is the motor doesn’t work, and I’m going to have to swap these over to make it rotate.
206
00:24:43,930 –> 00:24:49,030
The next thing is we got two stepper motors.
207
00:24:49,030 –> 00:24:52,810
When we come to drive it, we need to know which one we’re driving. The cables are on here.
208
00:24:52,810 –> 00:24:57,010
This one goes definitely to the X-drive.
209
00:24:57,010 –> 00:25:01,060
And then there’s a motor under here, which is the Y-drive.
210
00:25:01,060 –> 00:25:05,320
And there’s a separate cable that comes into here, which is the Y-drive.
211
00:25:05,320 –> 00:25:08,440
So if I grab hold of just one of these cables, let’s
212
00:25:08,440 –> 00:25:15,880
just say the red cable for the Y-drive. When I pull this cable we’ll see whether or not we can see whether it’s this red cable or this red cable,
213
00:25:15,880 –> 00:25:22,840
which is changing length. And very conveniently, is this one which we have already cut off.
214
00:25:22,840 –> 00:25:31,240
So this is the Y-stepper motor. I put a little tab on there, so I don’t get them confused.
215
00:25:31,240 –> 00:25:36,820
So we’ve got our two stepper motors wired in. We’ve still got to put the power to them, but that’s just the motors in.
216
00:25:36,820 –> 00:25:41,020
Now you see why I want to easily remove this little controller.
217
00:25:41,020 –> 00:25:46,690
I can just take the controller out and easily get to all the connections that I need.
218
00:25:46,690 –> 00:25:57,820
So we’ve got X and Y limit switches here. When I look across there, the blue and green are the X-axis, and the white and black and the Y-axis.
219
00:25:57,820 –> 00:26:02,500
So for, say, this corner where it’s set 0,0 it’s going to drive plus that way.
Transcript for K40 Xtreeem Laser Cutter – Changing The Controller (Cont…)
220
00:26:02,500 –> 00:26:09,110
And plus that way. So technically each one of these is setting
221
00:26:09,110 –> 00:26:17,600
a minus. So I think I’m going to put these as minus if we get them wrong, we just swop the wires over.
222
00:26:17,600 –> 00:26:24,920
Now, I’m not planning to go through every detail of this wiring, but I’m just. Just a few key points that I happened to come across.
223
00:26:24,920 –> 00:26:35,730
I’ve got this cable here, which is the main connection, the keyboard cable, and I’m going to be using this as a sort of a…. a piece of trunking almost.
224
00:26:35,730 –> 00:26:44,790
I’m going to connect some very thin wires to here, to guide it through. Because that very conveniently,
225
00:26:44,790 –> 00:26:52,900
collapses when I fold the door down. And I’ve used of these plastic P-clips to secure the cable here,
226
00:26:52,900 –> 00:27:02,680
here and here. There are two very convenient screws just here, which allow me to fix the trunking to the base,
227
00:27:02,680 –> 00:27:14,440
and I’m going to pull all my mains cables away from this thick red cable here, which is the the power supply, the high voltage power supply cable.
228
00:27:14,440 –> 00:27:26,650
Umm. Because I don’t like the idea that I’m going to be transmitting high voltage signals into the mains by running it parallel with that cable.
229
00:27:26,650 –> 00:27:35,230
So we’ll put those in there and they conveniently will run along here, to where I want mains here.
230
00:27:35,230 –> 00:27:39,490
And then we’re going to have to pick up mains up here as well onto here.
231
00:27:39,490 –> 00:27:46,000
So it’s not, not a long, is not a long haul up here, but our mains, first of all,
232
00:27:46,000 –> 00:27:51,820
as it comes in, has got to come up here because this is where we’re disconnecting
233
00:27:51,820 –> 00:27:57,400
the mains. While we’re in this area, we’ll just, we’ll just very conveniently connect up out ammeter.
234
00:27:57,400 –> 00:28:03,400
Now, if you take a look on the ammeter, you’ll find that there’s a plus or at least a minus on one of them.
Transcript for K40 Xtreeem Laser Cutter – Changing The Controller (Cont…)
235
00:28:03,400 –> 00:28:10,570
So the one that comes in the tube goes on to the plus side. If you get this wrong, the worst that’s going to happen, the meter goes the wrong way.
236
00:28:10,570 –> 00:28:29,390
And we’ve got the other black wire which will eventually go back into the high voltage power supply.
237
00:28:29,390 –> 00:28:34,700
So the mains is coming in from the plug at the back. It’s running up here to the stop switch,
238
00:28:34,700 –> 00:28:42,560
the emergency stop switch or on/off switch and then it goes back down here into the power supply and it’s
239
00:28:42,560 –> 00:28:49,520
then picked up off the power supply and taken across here to this other mains conditioning power supply.
240
00:28:49,520 –> 00:28:52,010
So there’s all our mains in. Now,
241
00:28:52,010 –> 00:28:59,870
all we’ve got to do, we’ve got to run the 24 volt around, so we can run the 24 volts from here onto these and down to here.
242
00:28:59,870 –> 00:29:06,290
So we’ve very conveniently got a little tapped holel here, or at least it’s a hole. It might not be a tapped hole.
243
00:29:06,290 –> 00:29:15,080
But that will be suitable for fixing one of these little P-clips on. which will allow me to bring my 24 volt round this way.
244
00:29:15,080 –> 00:29:19,280
Now, up to now, we’ve been using the mains voltage through to here,
245
00:29:19,280 –> 00:29:25,370
which means that the current flow is not very high, so I feel fairly happy with these small diameter cables.
246
00:29:25,370 –> 00:29:33,800
But now we’re going to transmit some power. We’re going to probably have as much as two amps running through to these controllers.
247
00:29:33,800 –> 00:29:41,850
So what I’m going to do now, I’m going to change my cable size and put some slightly thicker
248
00:29:41,850 –> 00:29:45,420
cable to link all of these up.
249
00:29:45,420 –> 00:29:57,480
OK, so I have now wired, all 24 volt stuff in and we’ve got two channels on this and it says on here that it’s 6.5 amps, 24 volt.
250
00:29:57,480 –> 00:30:03,120
That’s obviously not per channel, I suspect, because these drivers could drawer up to two amps.
Transcript for K40 Xtreeem Laser Cutter – Changing The Controller (Cont…)
251
00:30:03,120 –> 00:30:07,170
What I’ve done, I’ve put one driver on one channel and one driver on the other channel.
252
00:30:07,170 –> 00:30:16,320
Then I borrowed some 24 volts off of one of the channels down to feed the the actual 6432 unit.
253
00:30:16,320 –> 00:30:23,670
Well, we’ve got two more bits to do, really. We’ve got these here, which are the controls for the stepper motor itself.
254
00:30:23,670 –> 00:30:29,370
So these are the pulse and direction controls that have got to go on to the stepper motors X and Y.
255
00:30:29,370 –> 00:30:37,770
And then finally, we’ve got to link these up to here, which controls the tube. Well, just to make life a little simpler for myself.
256
00:30:37,770 –> 00:30:45,420
I’ve just colored the wires to make sure I know where they go, because there’s a sort of a bit of confusion there with all these wires running around.
257
00:30:45,420 –> 00:30:50,670
But it looks pretty simple. You know, literally just three wires going to three places.
258
00:30:50,670 –> 00:30:50,880
Well,
259
00:30:50,880 –> 00:31:01,420
going to four places because the red wire’s going to pulse plus and direction plus and then the green and the blue just go to pulse minus and direction minus.
260
00:31:01,420 –> 00:31:13,140
OK, so all the wiring is now done. We’ve connected up the stepper motors to their drives, but we’ve not connected the tube to here.
261
00:31:13,140 –> 00:31:17,970
I don’t want the tube to run. I’m just going to test the motor drive system.
262
00:31:17,970 –> 00:31:27,890
This cable folds up nicely as we close it down. Well, we’re now ready to put some power on this unit, but before we start,
263
00:31:27,890 –> 00:31:33,750
we shall have to have a bit of a think because I’ve never been in this position before.
264
00:31:33,750 –> 00:31:39,370
Where I’ve got a. machine that’s never run, a controller that’s never run.
265
00:31:39,370 –> 00:31:45,490
We have a work area. And we’ve got a position up here.
266
00:31:45,490 –> 00:31:55,550
Which is 0,0. Now, first of all, I don’t know whether I’ve connected this machine up correctly,
267
00:31:55,550 –> 00:32:01,730
I don’t know how the controller, the vendor settings in the controller are set.
Transcript for K40 Xtreeem Laser Cutter – Changing The Controller (Cont…)
268
00:32:01,730 –> 00:32:10,250
It may well be that it’s going to send the stepper motor in that direction or that direction, that direction or that direction.
269
00:32:10,250 –> 00:32:19,580
I’ve got no idea. If it sends it in this direction, hopefully it may detect 0,0.
270
00:32:19,580 –> 00:32:25,080
But then when it’s detected 0,0o.
271
00:32:25,080 –> 00:32:33,870
This controller may be set for, say, a thousand by a thousand in which case it will go flying off in this direction, I say flying off.
272
00:32:33,870 –> 00:32:43,070
We don’t know what speed it’s going to go at. Because we haven’t said anything on the stepper drives yet.
273
00:32:43,070 –> 00:32:50,190
So there’s a lot of things that we ought to think about before we even turn this power on.
274
00:32:50,190 –> 00:32:59,700
Now, this will eventually set itself up to the correct linear dimensions when we do a calibration.
275
00:32:59,700 –> 00:33:09,860
But in the meantime, we have to think about what resolution do we want this machine to work at?
276
00:33:09,860 –> 00:33:18,910
Let me explain that for a second. Here, at end of the machine.
277
00:33:18,910 –> 00:33:29,540
We’ve got a tooth wheel. Now my toothed wheel happens to be twelve point five mm diameter.
278
00:33:29,540 –> 00:33:36,930
Now, remember the Belt is traveling over there. And it’s pulling the head backwards and forwards.
279
00:33:36,930 –> 00:33:45,360
Question is, what resolution do we want this head to be able to work to? 0.01 of a millimetre?
280
00:33:45,360 –> 00:33:51,930
0.02 of a millimetre? Well 0.02 is about, about a thousandth of an inch.
281
00:33:51,930 –> 00:33:56,910
If we want one count, it was 0.02.
282
00:33:56,910 –> 00:34:03,000
The stepper motors here are naturally 200 steps
Transcript for K40 Xtreeem Laser Cutter – Changing The Controller (Cont…)
283
00:34:03,000 –> 00:34:18,610
per revolution – 360 degrees. What we’ve got to do, first of all, is to calculate roughly what the circumference of twelve point five is.
284
00:34:18,610 –> 00:34:23,020
So that’s πD, that’s thirty nine point two seven.
285
00:34:23,020 –> 00:34:28,570
Say thirty nine point two eight, Thirty nine point two eight mm.
286
00:34:28,570 –> 00:34:42,470
If we want the increment to be 0.02, we’ve got to find out how many steps there are in thirty nine point two eight.
287
00:34:42,470 –> 00:34:52,790
So we’re going to divide that by point, oh, two millimetres, equals one thousand nine hundred and sixty three.
288
00:34:52,790 –> 00:35:00,080
So we’ve got to change the increment of that from naturally 200 to 2000.
289
00:35:00,080 –> 00:35:07,840
I’m going to assume that exactly the same wheel has been used on the y axis is the x axis.
290
00:35:07,840 –> 00:35:15,640
And so if I want 2000 steps per revolution.
291
00:35:15,640 –> 00:35:27,880
2000 there is. So I’ve got to set my switches on this drive to that set there.
292
00:35:27,880 –> 00:35:31,000
I’ve got no idea what power we really need.
293
00:35:31,000 –> 00:35:37,510
I don’t know what these stepper motors are limited to, but I’m going to set this initially to that one there,
294
00:35:37,510 –> 00:35:45,760
one amp. On the back of these stepper drivers, there’s a series of switches, so we’re going to set them both the same; on is down.
295
00:35:45,760 –> 00:35:52,220
And off is up. On on off. So that’s one to three.
296
00:35:52,220 –> 00:36:02,260
Five, six, seven. Off on on. Two down, 3 up. 2 down, 1 up. There you are, they’re both set the same now.
Transcript for K40 Xtreeem Laser Cutter – Changing The Controller (Cont…)
297
00:36:02,260 –> 00:36:05,980
As I said, I’ve got no idea what’s going to happen when I put the power on.
298
00:36:05,980 –> 00:36:12,160
I think I’m just going to have to hold this head so that it can’t go flying in any particular
299
00:36:12,160 –> 00:36:22,960
direction and just let the stepper motor cog. Just do its own thing till it runs out of steps.
300
00:36:22,960 –> 00:36:27,340
I’ve got the emergency stop switch off at the moment, so when I plug the power in, nothing should happen.
301
00:36:27,340 –> 00:36:40,260
Correct. Nothing happens, Power on!
302
00:36:40,260 –> 00:36:46,090
Well, nothing’s happening. Good temp file.
303
00:36:46,090 –> 00:36:54,960
Now, the first thing is, it’s all in Chinese. Menu.
304
00:36:54,960 –> 00:37:04,790
Don’t know. If I remember, rightly? I think it was the third menu down. So that’s menu number 2, enter.
305
00:37:04,790 –> 00:37:09,200
Top one enter. And here we are.
306
00:37:09,200 –> 00:37:15,790
Languages. Second one down. English, enter.
307
00:37:15,790 –> 00:37:22,490
Voila! Menu. All in English.
308
00:37:22,490 –> 00:37:28,230
So let’s go to Vendor Settings.
309
00:37:28,230 –> 00:37:33,690
Well, at the moment, it thinks it’s 620 millimeters wide.
310
00:37:33,690 –> 00:37:42,390
Well, we know that’s not the case. Probably 350. 350 by 250.
311
00:37:42,390 –> 00:37:52,700
So. So X is 350 for the time being and Y is 250.
312
00:37:52,700 –> 00:37:57,310
I’ve got no idea what the other settings are at the moment, so we’ll just leave them as they are.
313
00:37:57,310 –> 00:38:03,060
So we’ll write that back and we’ll just read it again to make sure.
Transcript for K40 Xtreeem Laser Cutter – Changing The Controller (Cont…)
314
00:38:03,060 –> 00:38:17,630
Yep 250 by 350. So the PC and the machine are communicating, okay. So now we need to go and have a look at the, at the user settings.
315
00:38:17,630 –> 00:38:24,310
So we look at the User Tab, and again, we need to read.
316
00:38:24,310 –> 00:38:38,680
And there we’ll find whether we’ve got, for instance, the setting cut parameters, sweep parameters, auxiliary feeding, home parameters.
317
00:38:38,680 –> 00:38:45,100
Auto home, this is why it’s not homing you see. Auto home X.
318
00:38:45,100 –> 00:38:50,840
Yes. Auto home Y?
319
00:38:50,840 –> 00:39:06,540
Yes. OK, what speed is it going to do it at? Homing speed, 250mm/s, that’s a bit fast, so we’ll change that to say a 100, OK, we’ll write that as well.
320
00:39:06,540 –> 00:39:16,360
We’ll, just read them again to make sure that they’ve gone in. Homing speed is a hundred and homing, yes, yes.
321
00:39:16,360 –> 00:39:36,410
So now when I press reset. It should run to the corner and set 0,0.
322
00:39:36,410 –> 00:39:41,780
Well, what did you notice, the first thing we noticed is, it went the wrong way.
323
00:39:41,780 –> 00:39:46,370
It went back, OK, but it went the wrong way in X.
324
00:39:46,370 –> 00:39:58,030
So we go back to the vendor settings. I would think that the direction needs to change from negative to positive for X.
325
00:39:58,030 –> 00:40:11,720
Write it back. Do another reset.
Transcript for K40 Xtreeem Laser Cutter – Changing The Controller (Cont…)
326
00:40:11,720 –> 00:40:17,210
It’s going through a reset routine, but it’s not doing it properly. It should come off, go back on,
327
00:40:17,210 –> 00:40:29,370
come off and that should be zero. So at the moment, it’s come off and it’s going back looking in the other direction.
328
00:40:29,370 –> 00:40:44,380
Ah the limit switch is not working. Menu / Controller / System settings / Recovery / Backup / Function setting, lets try enter.
329
00:40:44,380 –> 00:40:50,800
Diagnosis, there it is. Enter. Right.
330
00:40:50,800 –> 00:40:56,610
So let’s just see whether that switch is working when I press it. If I check X,
331
00:40:56,610 –> 00:41:00,990
nothing is happening. Y, nothing is happening.
332
00:41:00,990 –> 00:41:08,680
So we’ve got a problem with our switches at the moment. We’ve now made the limit switches work, they’re on.
333
00:41:08,680 –> 00:41:13,560
And when I press it, they go off. When I press it
334
00:41:13,560 –> 00:41:18,020
they go off. All right. I’ve got them to work. But whether they are they going to work the right way round?
335
00:41:18,020 –> 00:41:24,000
Or whether the switches are wired the right way round, I don’t know. What I’ve done, previously,
336
00:41:24,000 –> 00:41:32,580
limit switches are these basically electronic hall effect switches, and they need to be driven with a 24 volt signal.
337
00:41:32,580 –> 00:41:37,980
But in this case, you’re not putting a 24 volt signal across the micro switch.
338
00:41:37,980 –> 00:41:46,190
Presumably. The controller itself is supplying some maybe five volts to the micro switch.
339
00:41:46,190 –> 00:41:52,970
And then when you make the micro switch, you’re dropping the voltage to ground.
340
00:41:52,970 –> 00:42:04,010
So instead of supply, instead of connecting X minus and Y minus with 24 volts, what I’ve done, I’ve connected X Y, X-minus and Y-minus.
Transcript for K40 Xtreeem Laser Cutter – Changing The Controller (Cont…)
341
00:42:04,010 –> 00:42:09,140
And the common pair I’ve put onto the ground line. Because these are changeover micro switches.
342
00:42:09,140 –> 00:42:15,860
Are they going to work the right way or have I got to rewire the micro switch itself?
343
00:42:15,860 –> 00:42:23,000
So I’ve now reset this because this was running the wrong way. So I’ve had to go back and for some reason or other swap it over.
344
00:42:23,000 –> 00:42:27,770
So it’s negative again now, but it’s working exactly the way that we want it to work.
345
00:42:27,770 –> 00:42:43,100
So let’s press the reset button and see what happens. I suspect it might still not work.
346
00:42:43,100 –> 00:42:48,610
That’s going the wrong way. That’s going the right way.
347
00:42:48,610 –> 00:42:56,810
Now, it’s very slow stop. Let’s press that and that.
348
00:42:56,810 –> 00:43:06,330
And it’s going in. Hmm.
349
00:43:06,330 –> 00:43:09,440
Okay, now I think I’m fighting several things at once here, remember,
350
00:43:09,440 –> 00:43:19,010
this machine doesn’t really know anything about the real world, so I’ve just drawn a twenty five millimetre square.
351
00:43:19,010 –> 00:43:26,600
That’s where my 25mm square is going to start and it’s going to be a little thing like this, remember?
352
00:43:26,600 –> 00:43:32,470
And this is where I think. Something is pretty seriously wrong.
353
00:43:32,470 –> 00:43:37,330
The calibration of the machine can screw everything else up that you’re trying to fight with.
354
00:43:37,330 –> 00:43:42,610
I had this problem when I lost the calibration on my original machine and nothing
355
00:43:42,610 –> 00:43:47,350
started to make sense until I got the calibration approximately correct.
356
00:43:47,350 –> 00:43:54,550
In other words, I’ve got to tell this machine what 25mm looks like because at the moment, I don’t think it knows.
357
00:43:54,550 –> 00:44:04,810
But let’s just test it. 25mm / 10mm/s, that’s two and a half that should take 10 seconds to draw that.
Transcript for K40 Xtreeem Laser Cutter – Changing The Controller (Cont…)
358
00:44:04,810 –> 00:44:21,790
That doesn’t look like a 25 millimetre square, does it? You see, now that says Y equals zero.
359
00:44:21,790 –> 00:44:27,960
And now when I come forward.
360
00:44:27,960 –> 00:44:39,250
It says Y=250, so I should be able to scale that and get that right. 260
361
00:44:39,250 –> 00:44:44,470
Two oh, five. Which is 55 mm.
362
00:44:44,470 –> 00:44:52,980
So the original length should have been 250 because that’s what the keyboard says.
363
00:44:52,980 –> 00:45:00,940
And actually, it measured 55. OK.
364
00:45:00,940 –> 00:45:05,080
Okay, so let’s set zero in Y?
365
00:45:05,080 –> 00:45:13,360
So if we push it right to the bank like that, it doesn’t know that it isn’t zero.
366
00:45:13,360 –> 00:45:23,100
It still says zero on the keyboard, so we count forward. 242.
367
00:45:23,100 –> 00:45:42,890
So that’s more or less the right sort of dimension. So let’s try and do the same thing in X and try and scale X up.
368
00:45:42,890 –> 00:45:59,220
So let’s do a reset again. Now we’ll get the switches sorted out.
369
00:45:59,220 –> 00:46:10,160
Well, now that we’ve got the scaling sorted out, we’ve been fiddling around with this direction polarity and limiter polarity. Now in X,
370
00:46:10,160 –> 00:46:17,820
I had to put the invert the key function in and I’ve got positive and positive.
371
00:46:17,820 –> 00:46:22,550
And in Y we’ve got negative and positive.
372
00:46:22,550 –> 00:46:31,740
And I’ve got NO invert direction. So if I run this to the middle of the machine.
373
00:46:31,740 –> 00:46:45,120
And now press a reset. They’re both performing a perfect reset function.
374
00:46:45,120 –> 00:46:53,250
So we’ll just do a couple of quick final tests and then we will close this session.
375
00:46:53,250 –> 00:47:00,360
I will just run that to the middle of the table and we’ll call that origin just there.
376
00:47:00,360 –> 00:47:05,970
We’re running it at 10 millimetres a second. And it’s a 25 mm square.
377
00:47:05,970 –> 00:47:09,660
So that’s going to be two and a half seconds per side.
378
00:47:09,660 –> 00:47:27,270
So that should take 10 seconds to perform that test.
379
00:47:27,270 –> 00:47:34,050
And I’ll just check the time, but we didn’t calibrate the machine accurately, but we got nine seconds on here.
380
00:47:34,050 –> 00:47:40,650
It’s done exactly what it was asked to do and now we will do something silly just as a final test.
381
00:47:40,650 –> 00:47:48,900
I’ll just change that speed 400 and we’ll change it to a scan and it’s going to do it with a 0.1 scan interval.
382
00:47:48,900 –> 00:47:58,650
OK, let’s see what it makes of this. So I think we have a pretty successful little piece of kit now. We really need to change the accelerations on this.
383
00:47:58,650 –> 00:48:06,180
At the moment. I could see what we can do to force the accelerations up a little bit, but hey, that’s for another day.
Transcript for K40 Xtreeem Laser Cutter – Changing The Controller (Cont…)
384
00:48:06,180 –> 00:48:10,890
We’ve got it working. We don’t have to see how well it works today. We can do that at a future date.
385
00:48:10,890 –> 00:48:16,590
Thank you very much for your time and patience, and we shall carry on in the next session.
386
00:48:16,590 –> 00:48:20,790
We’ll get the laser connected up because we’ve got to get water.
387
00:48:20,790 –> 00:48:29,620
We’ve got to get air. We’ve got to get ventilation. There’s still quite a bit to do, but we’ve now got a fundamentally working machine.
What Next?
Did you enjoy this post? Why not check out some of our other posts:
Related Guides and Resources
As you work through this stage of the K40 rebuild, the resources below provide additional engineering-focused guidance on optics, cutting performance, and overall system behaviour:
- Laser Myths Explained – The Physics Behind Better Cutting
Evidence-led explanations of common CO₂ laser cutting myths, including focal length behaviour, air-assist assumptions, intensity focus, and real-world beam physics.
→ https://laseruser.com/laser-myths-explained/ - Diode Lasers Explained – Under the Hood Guide
A deep technical guide to diode laser behaviour, covering optics, modulation, thermal limits, signal timing, and practical engraving performance.
→ https://laseruser.com/diode-laser-technology/ - K40 Xtreeem Upgrade Series Menu
See all sessions in the K40 Xtreeem project, from mechanical rebuild and tube mounting through to controller upgrades and beam alignment.
→ https://laseruser.com/k40-xtreeem-laser-cutter-upgrade-menu/ - Compatible Lenses, Mirrors, and Laser Accessories
Browse OEM-compatible lenses, mirrors, optical assemblies, and upgrade components suitable for K40 and other compact CO₂ gantry laser systems.
→ https://laseruser.com/shop/
These resources help connect the practical upgrade work in this session with the underlying optics, physics, and component choices that ultimately define cutting quality and reliability.
Disclaimer
WEBSITE DISCLAIMER
The information provided by n-Deavor Limited, trading as Laseruser.com (“we,” “us” , or “our”) on (the “Site”) is for general informational purposes only. All information on the Site is provided in good faith, however we make no representation or warranty of any kind, express or implied, regarding the accuracy, adequacy, validity, reliability, availability or completeness of any information on the Site.
UNDER NO CIRCUMSTANCE SHALL WE HAVE ANY LIABILITY TO YOU FOR ANY LOSS OR DAMAGE OF ANY KIND INCURRED AS A RESULT OF THE USE OF THE SITE OR RELIANCE ON ANY INFORMATION PROVIDED ON
THE SITE. YOUR USE OF THE SITE AND YOUR RELIANCE ON ANY INFORMATION ON THE SITE IS SOLELY AT YOUR OWN RISK.
EXTERNAL LINKS DISCLAIMER
The Site may contain (or you may be sent through the Site) links to other websites or content belonging to or originating from third parties or links to websites and features in banners or other advertising. Such external links are not investigated, monitored, or checked for accuracy, adequacy, validity, reliability, availability or completeness by us.
WE DO NOT WARRANT, ENDORSE, GUARANTEE, OR ASSUME RESPONSIBILITY FOR THE ACCURACY OR RELIABILITY OF ANY INFORMATION OFFERED BY THIRD-PARTY WEBSITES LINKED THROUGH THE SITE OR ANY WEBSITE OR FEATURE LINKED IN ANY BANNER OR OTHER ADVERTISING.
WE WILL NOT BE A PARTY TO OR IN ANY WAY BE RESPONSIBLE FOR MONITORING ANY TRANSACTION BETWEEN YOU AND THIRD-PARTY PROVIDERS OF PRODUCTS OR SERVICES.
AFFILIATES DISCLAIMER
The Site may contain links to affiliate websites, and we receive an affiliate commission for any purchases made by you on the affiliate website using such links. Our affiliates include the following:
- makeCNC who provide Downloadable Patterns, Software, Hardware and other content for Laser Cutters, CNC Routers, Plasma, WaterJets, CNC Milling Machines, and other Robotic Tools. They also provide Pattern Files in PDF format for Scroll Saw Users. They are known for their Friendly and Efficient Customer Service and have a comprehensive back catalogue as well as continually providing New Patterns and Content.
- Cloudray Laser: a world-leading laser parts and solutions provider, has established a whole series of laser product lines, range from CO2 engraving & cutting machine parts, fiber cutting machine parts and laser marking machine parts.
