1
00:00:05,120 –> 00:00:11,670
The K40 Xtreeem Laser Cutter Upgrade series with Russ Sadler.
2
00:00:11,670 –> 00:00:18,570
Session one: Upgrading the mechanics. Surprise.
3
00:00:18,570 –> 00:00:24,230
It’s me again. I’m just about to start a brand new venture.
4
00:00:24,230 –> 00:00:33,720
Now, look. Most of you guys will recognize what I’ve got here.
5
00:00:33,720 –> 00:00:40,260
It’s been sitting around in my workshop for about eighteen months now doing exactly this.
6
00:00:40,260 –> 00:00:49,830
It’s been very nice, as a coffee mug stand, but I I’ve got no interest in doing anything with this K40 machine.
7
00:00:49,830 –> 00:00:53,430
Now, that’s not meant to be disparaging in any way to the many,
8
00:00:53,430 –> 00:00:59,680
many owners of K40 machines out there. I have seen some fantastic work come off of these machines.
9
00:00:59,680 –> 00:01:06,750
And it’s a great little starter machine. But it’s also a machine that people love to take on board,
10
00:01:06,750 –> 00:01:12,720
and then do, I’m going to say silly things with it, like spend hundreds or thousands
11
00:01:12,720 –> 00:01:18,390
of pounds on it when they can get a machine like this for the same amount of money.
12
00:01:18,390 –> 00:01:23,310
But of course, they wouldn’t get the same enjoyment because most of the pleasure in spending
13
00:01:23,310 –> 00:01:27,960
money on these machines is, if you like, getting the pleasure of engineering.
14
00:01:27,960 –> 00:01:33,830
The cost is not important. It’s the challenge, that’s the important thing.
15
00:01:33,830 –> 00:01:39,470
And CloudRay in their wisdom, have recognized this,
16
00:01:39,470 –> 00:01:45,860
and they gave me this machine a couple of years ago or 18 months ago and said, Look, it’s sitting on our shelf.
17
00:01:45,860 –> 00:01:52,460
It was a return. Do you want it? Can you do something with it?
18
00:01:52,460 –> 00:01:58,820
Do I want it? Can I do something with it? It’s free.
19
00:01:58,820 –> 00:02:05,660
Well, as I said, this is what it’s been used for for the last 18 months.
Transcript for K40 Laser Cutter – Upgrading The Mechanics (Cont…)
20
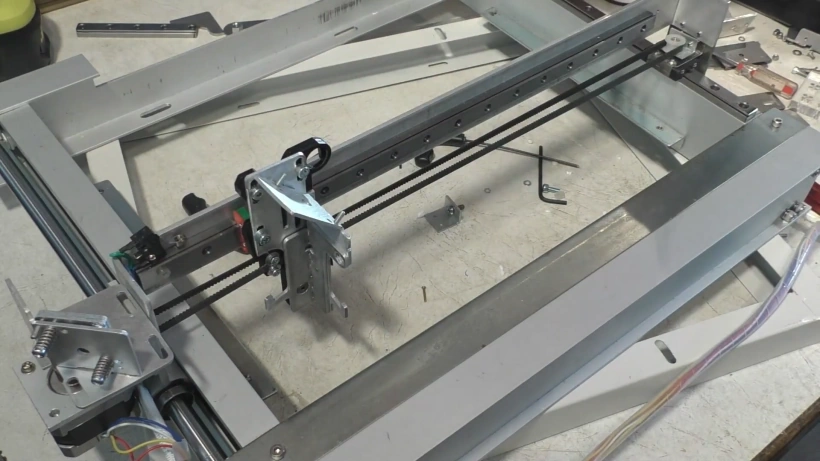
00:02:05,660 –> 00:02:11,310
A very convenient flat surface on which to place things. Just recently.
21
00:02:11,310 –> 00:02:19,150
Embarrassingly, CloudRay said to me. Have you managed to think about that K40 machine?
22
00:02:19,150 –> 00:02:25,960
There’s a lot of business out there supplying spares to people that want to upgrade them.
23
00:02:25,960 –> 00:02:34,600
And obviously now, they want to tap into that market. And they’ve asked me, can I look at upgrading this machine?
24
00:02:34,600 –> 00:02:43,960
The simple answer was no. Mechanically, it isn’t really worth the effort of upgrading. For what they are,
25
00:02:43,960 –> 00:02:53,720
they do a fantastic job, but they then also provide, as I said, a great engineering opportunity for people to pimp them up.
26
00:02:53,720 –> 00:03:01,790
I don’t want to pimp this machine up. I want to turn it into something that is just basic, useful, that performs a function.
27
00:03:01,790 –> 00:03:12,350
I would like it to be a micro version of these machines, so I’m using the knowledge and skills that I’ve used on these machines,
28
00:03:12,350 –> 00:03:20,970
and I’m going to try and apply some of them to this machine. Now, I’m not going to attempt to spend thousands of pounds on this machine.
29
00:03:20,970 –> 00:03:30,500
First of all, I want to upgrade the mechanics of the machine because they are, if I use the word basic that just about sums it up.
30
00:03:30,500 –> 00:03:42,960
That’s not being rude, it’s adequate to do the job. It’s basically a, an inkjet printer mechanism that’s been converted to take a scanning head.
31
00:03:42,960 –> 00:03:50,070
I want to take it beyond adequate and I want to push this machine into areas where maybe it’s not been before.
32
00:03:50,070 –> 00:04:01,590
But I want to do it at a pretty budget price. You can do it with very basic workshop equipment and buying some spare kit from CloudRay. Now,
Transcript for K40 Laser Cutter – Upgrading The Mechanics (Cont…)
33
00:04:01,590 –> 00:04:03,150
for all I know,
34
00:04:03,150 –> 00:04:13,350
CloudRay may decide to take the basic mechanical kit because it is a piece of simple kit that should just almost bolt into this machine and sell that,
35
00:04:13,350 –> 00:04:17,790
as well as all the extra pieces that I’m going to show to you on this machine.
36
00:04:17,790 –> 00:04:25,170
I’m not going to use the existing controller. I want to use a proper digital controller with a power supply and proper stepper motor drives.
37
00:04:25,170 –> 00:04:31,230
I know what’s in here at the moment works. But I want to do it,
38
00:04:31,230 –> 00:04:38,040
“big machine style”, but not at “big Machine” costs. So I hope you’ll join me for this adventure.
39
00:04:38,040 –> 00:04:44,940
I’m not going to take you into every single detail of what I’m doing. I’ve got no idea how long it’s going to take, how many sessions,
40
00:04:44,940 –> 00:04:52,020
but I suspect it’s probably in the region of five or six sessions to what I would call remodel this machine.
41
00:04:52,020 –> 00:04:59,460
I’m going to strip it out and I’m going to put something back in, which is more up to date than this.
42
00:04:59,460 –> 00:05:04,260
What can I say? This old school analogue control system that’s in here?
43
00:05:04,260 –> 00:05:08,310
Now, I’ve already made a start on ripping this thing apart. I’ve taken the head off.
44
00:05:08,310 –> 00:05:12,720
I’ve taken the four wheel head bearing system off,
45
00:05:12,720 –> 00:05:20,370
and I’ve also removed the screws that hold these two face frames in. If I need
46
00:05:20,370 –> 00:05:25,080
to get access to this complete system so that I can work on it mechanically.
47
00:05:25,080 –> 00:05:35,850
So these two frames are completely loose now, but it’s not physically possible to jiggle this out of here.
48
00:05:35,850 –> 00:05:42,690
And the only way we can get this off is basically to remove this mirror, just a couple of screws.
49
00:05:42,690 –> 00:05:47,760
Fix this mirror bracket onto the stepper motor.
50
00:05:47,760 –> 00:06:00,740
And now that we’ve got that off, there is sufficient wriggle room to get this frame out, but hang on, it doesn’t come out because….
Transcript for K40 Laser Cutter – Upgrading The Mechanics (Cont…)
51
00:06:00,740 –> 00:06:09,240
We’ve got some wires attached. So what we have to do now is to go into this electrical enclosure.
52
00:06:09,240 –> 00:06:21,570
And we have to remove these cables from this circuit board and voila, here is it! It’s all ready to work on.
53
00:06:21,570 –> 00:06:29,330
As you can see, at some stage somebody has frozen that mirror up with some hot glue so that it doesn’t adjust.
54
00:06:29,330 –> 00:06:34,340
Sounds like a bad idea to me. You’ve got adjusting screws on here. Why have you made it solid?
55
00:06:34,340 –> 00:06:39,470
That’s something we shall deal with in the future. We certainly shan’t be using that mirror.
56
00:06:39,470 –> 00:06:46,250
Right, well, we don’t need any of this at the moment. So we’ll just re-site that so that we’ve got a nice work area here.
57
00:06:46,250 –> 00:06:50,900
Let me explain what my thinking is.
58
00:06:50,900 –> 00:07:01,850
I don’t want to spend a fortune on re engineering this to the Nth degree. I want it nicely engineered so that it does the job.
59
00:07:01,850 –> 00:07:07,520
First of all, we’ve got this rather dodgy head system on here with its four wheels that runs in this [channel].
60
00:07:07,520 –> 00:07:12,170
It’s functional, but not exactly Accurate.
61
00:07:12,170 –> 00:07:14,780
You can’t run this thing really fast.
62
00:07:14,780 –> 00:07:22,070
And I’m hoping that even with these little dinky stepper motors, I might be able to get it to run fast. And if I can’t get it to run fast enough,
63
00:07:22,070 –> 00:07:26,470
I will see if I can get some slightly more powerful stepper motors to perform this function.
64
00:07:26,470 –> 00:07:31,850
Now, the very cheap construction of this is in fact a benefit as far as I’m concerned,
65
00:07:31,850 –> 00:07:37,940
because it makes it so much easier for me to take out parts and replace them.
66
00:07:37,940 –> 00:07:51,290
I mean, this gantry system is very simple to remove just two screws each end and there it is, hey, we don’t need that anymore.
67
00:07:51,290 –> 00:07:56,810
I’ve got some pieces already premade that I,
68
00:07:56,810 –> 00:08:04,970
I hate to use the word designed, because you can see look, it’s a piece of bent 3mm aluminium.
Transcript for K40 Laser Cutter – Upgrading The Mechanics (Cont…)
69
00:08:04,970 –> 00:08:08,210
Well, I suppose I had to design it didn’t I to make it like that,
70
00:08:08,210 –> 00:08:16,520
but that’s the sort of thing that you can go down to your local hardware store and buy a piece of 3mm aluminium flat bar.
71
00:08:16,520 –> 00:08:22,070
This happens to be something that I had up in the roof of my workshop and I pulled it down.
72
00:08:22,070 –> 00:08:27,890
This is 38 mm, inch and a half. But you can get away with one inch
73
00:08:27,890 –> 00:08:38,750
material. Strength is not important, because although this is bendy, it doesn’t matter because we’re going to make that stiff by doing this.
74
00:08:38,750 –> 00:08:43,220
So I’ve previously tapped some M3 holes in this bar.
75
00:08:43,220 –> 00:08:49,170
Now, although I bent this up in my little fly press on a v bender.
76
00:08:49,170 –> 00:09:00,330
This is the sort of thing that you could bend in your vice. It doesn’t have to be super accurate.
77
00:09:00,330 –> 00:09:09,010
OK, so now we have a really nice, super smooth, non flexible x axis.
78
00:09:09,010 –> 00:09:12,370
I haven’t designed and made all the pieces for this so far,
79
00:09:12,370 –> 00:09:19,810
but I’ve just given it a bit of a flying start so that you can see very quickly where we’re going to with this project.
80
00:09:19,810 –> 00:09:30,250
Okay. So again, I put tapped holes in the end here so that I can just screw this piece of aluminium straight onto that bracket.
81
00:09:30,250 –> 00:09:34,700
Now this bracket has got big holes in here.
82
00:09:34,700 –> 00:09:42,490
They’re 5mm holes, but I’ve used four millimetre screws, purposely so that the whole bracket can wobble like that.
83
00:09:42,490 –> 00:09:46,960
Eventually, you’re going to have to set this bracket true and square to this frame.
84
00:09:46,960 –> 00:09:52,220
But at the moment, I’m not worried. We just leave it loose ish.
85
00:09:52,220 –> 00:10:02,960
Now at this end here, look, we’ve got the drive belt that connects up. This stepper motor here is the Y stepper motor.
Transcript for K40 Laser Cutter – Upgrading The Mechanics (Cont…)
86
00:10:02,960 –> 00:10:10,700
There’s a very thin shaft and it is a very thin shaft which might need to be increased at some point in the future.
87
00:10:10,700 –> 00:10:16,610
But at the moment, we’ll see whether we get torque wind up on that when we start running it. That shaft connects to here.
88
00:10:16,610 –> 00:10:21,890
So you drive both ends of the gantry at the same time, so everything stays true and parallel.
89
00:10:21,890 –> 00:10:28,700
It doesn’t trend or want to crab. So we just take this support bearing off of here for the y axis.
90
00:10:28,700 –> 00:10:33,980
All this wheel was doing was just literally running backwards and forwards like this to support the end of the gantry.
91
00:10:33,980 –> 00:10:39,620
It wasn’t in any way contained. It was, it was free to lift up and down.
92
00:10:39,620 –> 00:10:51,920
The only thing that was containing it was this nut here, because if you set it tight enough like that.
93
00:10:51,920 –> 00:10:58,490
It stops it wobbling. Again, we’ve got two tapped holes in the end here, same as the other end.
94
00:10:58,490 –> 00:11:03,940
And all we need to do is just bolt that on there like that.
95
00:11:03,940 –> 00:11:08,590
OK, now I’m not going to do this up tight because we’re nowhere near finished yet, as you’ll see in a minute.
96
00:11:08,590 –> 00:11:15,700
But that’s the essence of how the X gantry fits on now.
97
00:11:15,700 –> 00:11:26,250
So. We got a problem here, which we’ve got to solve, and we solve that problem very simply in this way.
98
00:11:26,250 –> 00:11:32,670
We’ve got a 300 millimetre as opposed to a 400 millimetre linear bearing.
99
00:11:32,670 –> 00:11:40,020
Now, if you take a look, you’ll see that this linear bearing is different to that one.
100
00:11:40,020 –> 00:11:51,420
This is the long version, and this is the short version. We don’t need a long version for doing what I’m going to do now, which is to pop that,
101
00:11:51,420 –> 00:12:04,740
under there. So now. We’ve got a nice support.
Transcript for K40 Laser Cutter – Upgrading The Mechanics (Cont…)
102
00:12:04,740 –> 00:12:09,780
And control of our gantry. OK.
103
00:12:09,780 –> 00:12:18,070
It’s a little bit floppy at the moment. That’s because you haven’t seen the next very simple part that I’ve designed, which is.
104
00:12:18,070 –> 00:12:27,880
This very thin, stainless steel bracket. Now it is thin, and it’s made of 0.7 stainless steel because I want it to be flexible.
105
00:12:27,880 –> 00:12:33,250
I don’t want it to be stiff. These holes in here are designed for M3 screws.
106
00:12:33,250 –> 00:12:39,600
I’ve got a 3.5 drill that just happens to go nicely and neatly through that hole.
107
00:12:39,600 –> 00:12:49,020
Now there’s plenty of room under there for me to put a little clamp, like that.
108
00:12:49,020 –> 00:12:54,880
Now what I’ve got to do is make sure that I set that up against,
109
00:12:54,880 –> 00:13:04,470
the edge, of this rail. And I will do the same at the back here as well. I will line that up with the edge of that rail.
110
00:13:04,470 –> 00:13:16,140
Hopefully. And I say, hopefully. They’ve made these sufficiently accurate that,
111
00:13:16,140 –> 00:13:25,680
this rail will run parallel with this linear bearing that’s over here.
112
00:13:25,680 –> 00:13:33,330
That’s the reason why, I’ve got this rather floppy mounting here. There will be sufficient clearance in here for
113
00:13:33,330 –> 00:13:40,740
the bearing to be able to just flex very slightly and take up any slight non parallelism between these two.
114
00:13:40,740 –> 00:13:45,330
That means I haven’t got to set this up super accurately.
115
00:13:45,330 –> 00:13:51,900
This bearing is not doing anything other than supporting the end here and making it run smooth. And all
116
00:13:51,900 –> 00:14:06,610
we’re going to do with this, we’re going to fix this down with just two screws. One at this end.
Transcript for K40 Laser Cutter – Upgrading The Mechanics (Cont…)
117
00:14:06,610 –> 00:14:18,150
I’ll just make sure I’ve got a full diameter in there. So there we go,
118
00:14:18,150 –> 00:14:23,220
we’ve got two nice perfect marks here for me to drill through.
119
00:14:23,220 –> 00:14:34,200
We’re going to drill through two point five and put an M3 tapped hole in there. So I’m just going to take that to my pillar drill and drill and tap those holes.
120
00:14:34,200 –> 00:14:42,600
Now, as I said to you, I’m trying to make this simple so that you don’t need any sophisticated equipment to do this modification.
121
00:14:42,600 –> 00:14:46,830
I drilled and tapped the holes for these screws.
122
00:14:46,830 –> 00:14:48,360
There is nothing to stop
123
00:14:48,360 –> 00:14:55,440
you putting straightforward drilled holes right the way through and putting nuts on the back. That will perform the task just as easily.
124
00:14:55,440 –> 00:15:01,470
And there’s nothing at the back here that gets in the way of having nuts there, In a similar way,
125
00:15:01,470 –> 00:15:10,680
although I am going to put tapped holes here and here. What I will warn you is, that when you try and put these drilled holes in,
126
00:15:10,680 –> 00:15:19,680
there are all sorts of ribs on the underneath of this extrusion here, which you might be able to see in the bottom here.
127
00:15:19,680 –> 00:15:24,390
You can see these grooves that’s going to make your drill go all sorts of funny ways.
128
00:15:24,390 –> 00:15:31,450
So just be very careful when you do your drilling or you break your drill, so do it very gently.
129
00:15:31,450 –> 00:15:38,950
The same will apply when you come to do your tapping, I’m not going to machine tap this because there is a risk that I might break the tap,
130
00:15:38,950 –> 00:15:43,270
whereas if I do these manually, I should be able to feel what’s going on.
131
00:15:43,270 –> 00:15:49,240
Now this is a machine tap. It’s something called a spiral point tap.
132
00:15:49,240 –> 00:15:54,160
So if you’re going to try and do tapping, I always suggest you use a machine
133
00:15:54,160 –> 00:15:59,230
tap, a spiral point, tap. They cost a little bit more, but you only need one of them.
134
00:15:59,230 –> 00:16:03,400
You don’t need a full set of three as per the old style. So provided you
Transcript for K40 Laser Cutter – Upgrading The Mechanics (Cont…)
135
00:16:03,400 –> 00:16:13,030
keep this upright and you can see I’m using an old drill chuck. Which is a perfect way in which you can get a nice, well, aligned tapped hole.
136
00:16:13,030 –> 00:16:18,280
It doesn’t need to be too deep because the screws are only around about 10 millimetres long.
137
00:16:18,280 –> 00:16:26,170
Now these holes are designed for cap head screws. So if you’ve got some M3 cap head screws, that’ll do the job just fine.
138
00:16:26,170 –> 00:16:30,730
I am going to be using countersink screws that will centre
139
00:16:30,730 –> 00:16:38,050
these up slightly better. Because the heads fit perfectly in these holes and there we go.
140
00:16:38,050 –> 00:16:41,620
We don’t need any more than two screws in there because this is a very short length.
141
00:16:41,620 –> 00:16:48,080
It’s a very, very stiff piece of stainless steel. It’s not going to go anywhere.
142
00:16:48,080 –> 00:16:50,740
There’s absolutely zero flex on there.
143
00:16:50,740 –> 00:16:59,070
We’ll undo this screw, we’ll just get the bearing out the way for the minute, we don’t need that anyway now. Between these two plates,
144
00:16:59,070 –> 00:17:04,550
we will sandwich my thin steel plate. And there we go.
145
00:17:04,550 –> 00:17:08,910
So we’ve got that in there. Now again, we can just snug that up, but we don’t need that.
146
00:17:08,910 –> 00:17:13,820
We just leave it loose at the moment because we, we need this whole thing to be
147
00:17:13,820 –> 00:17:19,700
a little bit flexible because we’re going to pop our bearing underneath there.
148
00:17:19,700 –> 00:17:27,890
The screws that are required to go into this bearing are very short. M3 x 4 is what I shall be using.
149
00:17:27,890 –> 00:17:31,900
Don’t tighten these screws up yet, just get them engaged.
150
00:17:31,900 –> 00:17:39,730
Now you may ask the question, how do I make my holes so accurate? Well the answer is very simple.
151
00:17:39,730 –> 00:17:47,080
I always use my laser machine to drill the holes, cut the holes in a block of Perspex to start with.
152
00:17:47,080 –> 00:17:53,530
Now this is not the jig that I used, but this is a drill jig that I’ve made out of a piece of 8mm,
153
00:17:53,530 –> 00:18:02,320
but I often make them out of four or five millimetre thick Perspex, clamp them onto the surface in the right place and then drill through.
Transcript for K40 Laser Cutter – Upgrading The Mechanics (Cont…)
154
00:18:02,320 –> 00:18:08,140
So I get my holes perfect, because the holes are cut to the right centres perfectly on the laser machine.
155
00:18:08,140 –> 00:18:18,070
Now we haven’t tightened this up at the moment, but already look at that… silky smooth.
156
00:18:18,070 –> 00:18:22,420
When you saw that steel bracket that I had there, it had slots in it.
157
00:18:22,420 –> 00:18:32,170
Well, that’s the reason for the slots, so that I can adjust this gantry up and down so that this end is the same distance away.
158
00:18:32,170 –> 00:18:36,850
And I don’t know what is at the moment, but we’ll find something that actually fits in there.
159
00:18:36,850 –> 00:18:41,800
One of the small issues you’re going to have is this, you’re either going to have the bridge
160
00:18:41,800 –> 00:18:46,480
over the outside here because we’ve got this rail in the way or in this case,
161
00:18:46,480 –> 00:18:54,190
because I happen to have a 400 rail, which I’ve shortened. I can do that.
162
00:18:54,190 –> 00:19:01,120
So I’ve already got the same packing piece, this side that I’ve got this side.
163
00:19:01,120 –> 00:19:07,600
So I’m going to basically measure from on top of this rail to on top of this rail.
164
00:19:07,600 –> 00:19:10,010
So I’ve tucked those pieces of metal under there.
165
00:19:10,010 –> 00:19:17,380
And because this is sitting on a flat surface, I think it’s reasonable to assume that this and this are pretty parallel to each other.
166
00:19:17,380 –> 00:19:26,950
So if I use my workbench as a flat reference surface and then just check the squareness and make sure that that is sitting upright.
167
00:19:26,950 –> 00:19:35,560
Now I can tighten these screws up. Okay, so now I can adjust that down on to the pile of shims that I’ve got there.
168
00:19:35,560 –> 00:19:39,820
I now know that my gantry is running true to the base.
169
00:19:39,820 –> 00:19:51,640
So without any major modification, except ripping the gantry off and using exactly the same items that are already there,
170
00:19:51,640 –> 00:20:00,490
we’ve already done a major conversion to this machine in two simple stages. Two screws here and four screws just here.
Transcript for K40 Laser Cutter – Upgrading The Mechanics (Cont…)
171
00:20:00,490 –> 00:20:04,460
Now, these could both be part of a kit.
172
00:20:04,460 –> 00:20:15,830
But if they’re not, as you can see, it’s not exactly rocket science to do this, I can provide you with drawings for this bracket.
173
00:20:15,830 –> 00:20:20,780
You can go out and buy these from eBay. And here we are.
174
00:20:20,780 –> 00:20:29,510
We’ve already got ourselves a fundamental x y motion with proper bearings on it now.
175
00:20:29,510 –> 00:20:32,870
Now, trust me, this is not the right way that this is going to fix on,
176
00:20:32,870 –> 00:20:40,130
but this is just a temporary fix just to demonstrate to you what we’re trying to achieve.
177
00:20:40,130 –> 00:20:46,530
There’s the new head and I’ll just go on to my other machine and nick
178
00:20:46,530 –> 00:20:57,210
the C-series lens tube and the clamp system that goes with this head, and there we go.
179
00:20:57,210 –> 00:20:58,680
That’s how the head fits on now.
180
00:20:58,680 –> 00:21:06,450
So there’s your, there’s your nozzle and lens tube, which will take a four inch lens, a two inch lens, a two and a half inch lens,
181
00:21:06,450 –> 00:21:13,020
and a one and a half inch or compound engraving lens. So you can have everything that you want on there.
182
00:21:13,020 –> 00:21:26,910
And. Now, this head is going to go higher than this, it’s not, it’s not going to be here, it’s going to go up at least another inch.
183
00:21:26,910 –> 00:21:36,490
So lets put that frame in which is basically your machine, and now as you can see, we can get right down to the base of your machine.
184
00:21:36,490 –> 00:21:41,010
Or we can come right up to here. I’ve got a specific application that I want this machine for.
185
00:21:41,010 –> 00:21:43,410
I don’t need a super depth. Now if for any reason
186
00:21:43,410 –> 00:21:54,660
you want more depth for cutting. Then you always have the opportunity to cut the bottom out of this frame and stand the frame up on taller legs.
187
00:21:54,660 –> 00:22:03,180
I don’t need to. I’m going to be very happy that I can reach the whole of the working depth inside this machine with my adjustable nozzle.
Transcript for K40 Laser Cutter – Upgrading The Mechanics (Cont…)
188
00:22:03,180 –> 00:22:08,770
Today, we’re going to start off by
189
00:22:08,770 –> 00:22:18,880
mounting this lightweight head onto this carriage. To do this, I’ve manufactured some little bits of acrylic.
190
00:22:18,880 –> 00:22:29,140
Now these are 3mm thick acrylic. Now I’m waiting for an air fitting to go in here, but it doesn’t stop me assembling it.
191
00:22:29,140 –> 00:22:36,010
I can always take it apart again because the whole thing, although it’s three pieces, it literally just plugs together.
192
00:22:36,010 –> 00:22:44,230
So what we’ve got here is a little location tenon. And these two pieces plug together.
193
00:22:44,230 –> 00:22:54,430
And we can drop the tenon in there, and the idea of that tenon going in the back is that it sticks out the front and allows us to move the head
194
00:22:54,430 –> 00:23:01,160
up and down in a linear controlled manner. So we don’t get any twist on the head when we adjust it.
195
00:23:01,160 –> 00:23:06,010
Anybody that’s used to a K40 will know that the head is totally unadjustable.
196
00:23:06,010 –> 00:23:10,780
And it may well be that it’s a real nightmare to set the machine up.
197
00:23:10,780 –> 00:23:16,360
This is not. This will be a dead simple job to set the beam up on this machine and be able to set it up accurately.
198
00:23:16,360 –> 00:23:20,230
The first thing we’re going to do is to plug this onto here.
199
00:23:20,230 –> 00:23:27,850
Screw that straight onto there. But before we do that, I don’t put tapped holes in this material because it’s not strong enough.
200
00:23:27,850 –> 00:23:38,140
So what I do, I put nuts on the back like that, and then we’re going to screw this onto here and captivate those nuts.
201
00:23:38,140 –> 00:23:46,180
So we’re screwing this bracket straight onto the bearing so that we get the least amount of twist,
202
00:23:46,180 –> 00:23:51,250
wobble, flex. It is as stiffly mounted as we can possibly get it.
203
00:23:51,250 –> 00:23:57,960
Now there are two more of these nuts to go on the top here that are used to clamp the head.
204
00:23:57,960 –> 00:24:04,920
We’ve only got a limited thickness here, two millimetres plus three and three, so that’s 8mm.
Transcript for K40 Laser Cutter – Upgrading The Mechanics (Cont…)
205
00:24:04,920 –> 00:24:11,940
And we’ll just put an M4 washer on there as well. So we’ll just loosen those screws off, with this guide tongue in here.
206
00:24:11,940 –> 00:24:21,830
The whole head can be adjusted up and down by a total of 12 millimetres, so we’ll set that into the central position and we’ll just lock that up.
207
00:24:21,830 –> 00:24:31,830
So there’s an additional screw in the bottom here that locks the head up. And this is now completely, completely solid in all directions.
208
00:24:31,830 –> 00:24:38,210
There’s the head mounted now. Next, we’ve got to look at how we’re going to mount the mirror on here and what sort
209
00:24:38,210 –> 00:24:48,710
of mirror we’re going to use, because we’re not going to use the old mirror. I’ve got here a short head that I originally designed for this machine.
210
00:24:48,710 –> 00:24:54,170
OK, but it’s, I thought it would make more sense to use the long head so that we’ve got
211
00:24:54,170 –> 00:24:58,580
a maximum amount of adjustment without having to have a fully adjustable table.
212
00:24:58,580 –> 00:25:03,530
We can use the lens tube, a long lens tube, to achieve the same result,
213
00:25:03,530 –> 00:25:10,190
much easier and cheaper. Because this is a nice, lightweight head with a 25mm mirror that goes in there.
214
00:25:10,190 –> 00:25:19,070
I’m going to use this as the basis of a mirror assembly that adjusts in this y axis, and I’m going to use this edge here,
215
00:25:19,070 –> 00:25:25,940
as my reference edge. So that I can move it backwards and forwards in a straight line instead of using this slot.
216
00:25:25,940 –> 00:25:31,110
We don’t need all this clamping system on here, so I’m going to be a bit brutal with a hacksaw and
217
00:25:31,110 –> 00:25:38,890
we’re just going to cut this off. Now that I’ve got the head on. I’ve got a lot of space here that’s wasted space.
218
00:25:38,890 –> 00:25:44,420
And I’m going to run out of rail here, but if I go to the other end.
219
00:25:44,420 –> 00:25:50,200
I can’t use the space at this end because I shall hit the bearing – here.
220
00:25:50,200 –> 00:26:02,740
So what I plan to do, it’s worthwhile, physically just moving this rail along one pitch.
Transcript for K40 Laser Cutter – Upgrading The Mechanics (Cont…)
221
00:26:02,740 –> 00:26:08,090
I’ll take these screws out and move them along one. If we take that pin out
222
00:26:08,090 –> 00:26:14,750
there. I’m slightly worried that we shall fall off of the end of the rail.
223
00:26:14,750 –> 00:26:25,270
Let me just have a look. No, we’re not, we’re perfect.
224
00:26:25,270 –> 00:26:30,520
We mustn’t run off the end of the rail, otherwise we shall lose the ball bearings inside there.
225
00:26:30,520 –> 00:26:37,090
But there’s a natural stop there now, which prevents that coming off the end of the rail and a natural stop there.
226
00:26:37,090 –> 00:26:42,800
So we should be able to set zero and make sure we maximize the table size.
227
00:26:42,800 –> 00:26:50,120
Now, this at the moment is obviously the wrong place for the limit switch.
228
00:26:50,120 –> 00:27:06,560
Okay, so we’re going to have to re-site that limit switch and the sensible thing is probably to put it up here somewhere, I would think.
229
00:27:06,560 –> 00:27:10,940
Well, I think that’ll be a nice, convenient place to mount it. But it’s got to go the other way up.
230
00:27:10,940 –> 00:27:40,980
So I need to create a little bit more slack, and that looks like it’s an M2 screw.
231
00:27:40,980 –> 00:27:48,560
Make sure those bearings are clean. There we go, that’s perfect.
232
00:27:48,560 –> 00:27:52,640
OK, so now, we’re going to put the belt back.
233
00:27:52,640 –> 00:27:59,620
And this was the tricky bit that I had to think about quite a lot. These screws here.
234
00:27:59,620 –> 00:28:06,100
There are nuts, captive nuts in the back there in hexagon slots.
Transcript for K40 Laser Cutter – Upgrading The Mechanics (Cont…)
235
00:28:06,100 –> 00:28:15,760
The same as I did behind here. Now I would advise you to put this assembly together before you mount
236
00:28:15,760 –> 00:28:22,330
this lot up. Because it’s a little bit tricky to get the nuts up behind here with it all assembled.
237
00:28:22,330 –> 00:28:32,110
It’s possible. I’ve just done it, but it’s tricky. We’ve got M3 screws and we’ve got some oversize M3 washers.
238
00:28:32,110 –> 00:28:39,490
That’s a normal size M3 washer. And this is an oversize, I think they call it a C washer.
239
00:28:39,490 –> 00:28:42,400
It’s the next size up. Okay.
240
00:28:42,400 –> 00:28:50,830
It’s got a bigger outer diameter that fits on an M3 screw, and that’s what I’ve used. Because the nuts are captive at the back there.
241
00:28:50,830 –> 00:29:02,470
You should be able to just tighten this up from the front. So hold the belt nice and flat and level as you tighten it up and tighten the screws up.
242
00:29:02,470 –> 00:29:08,740
Little by little. And we should get the belt coming out nice and straight like that.
243
00:29:08,740 –> 00:29:13,810
Just give them a final pinch and that belt is never going to come off there.
244
00:29:13,810 –> 00:29:17,560
OK, so we thread the belt around this idler pully at the end here.
245
00:29:17,560 –> 00:29:23,680
Make sure you’ve got the screws almost as loose as possible, so they’re only just hanging into that bracket.
246
00:29:23,680 –> 00:29:29,860
Now what we’re going to try and do now is get this belt tucked behind those two washers.
247
00:29:29,860 –> 00:29:35,650
So I’ve got a lot of excess belt because this is a different mechanism for fixing the belt.
248
00:29:35,650 –> 00:29:41,690
So we’re trying to get the belt as evenly as possible underneath those two washers.
249
00:29:41,690 –> 00:29:48,740
And then tighten up. Again, we don’t want the belt to go flying off any sort of angle, we’d like it to come out straight.
250
00:29:48,740 –> 00:29:59,090
Now we come back to this end here, which is where we’ve got our idler pully. And on the outside, we’ve got two screws, which allows us to tension that pulley up.
251
00:29:59,090 –> 00:30:08,360
So we’ll put those two screws, screw them in evenly. And there we go.
Transcript for K40 Laser Cutter – Upgrading The Mechanics (Cont…)
252
00:30:08,360 –> 00:30:14,030
That’s a nice amount of tension on that belt. And we can leave the spare piece of belt there because it doesn’t matter.
253
00:30:14,030 –> 00:30:16,070
And here’s the number 2 mirror that
254
00:30:16,070 –> 00:30:30,020
I said I was going to modify. Cut the end off and it’s just a mirror, a 25mm mirror holder. This material that we used for this back rail,
255
00:30:30,020 –> 00:30:40,070
which happens to be 38mm by 3mm aluminum. Look, I’ve used it again to make a bracket, a very simple bracket,
256
00:30:40,070 –> 00:30:45,650
which has just got the corner notched away so that it sits over the belt and it’s
257
00:30:45,650 –> 00:30:55,890
got two holes in it so that we can use the same two screws to fix this bracket on.
258
00:30:55,890 –> 00:31:03,960
And then in there, we’ve got just one tapped hole, that’s all we need to hold this into place very neatly.
259
00:31:03,960 –> 00:31:11,730
We’ve got our mirror there that slides backwards and forwards, so you keep that nicely referenced against this surface here.
260
00:31:11,730 –> 00:31:16,440
Change the position of your beam as it hits mirror three. And then just lock it up.
261
00:31:16,440 –> 00:31:23,760
We’ve done the x axis switch, so that the x axis will zero just there.
262
00:31:23,760 –> 00:31:32,550
We haven’t done the y axis switch. Now the y axis switch is hidden over the back here, and I don’t think that’s changed at all.
263
00:31:32,550 –> 00:31:45,950
Let’s just have a look. No, switch, it just perfectly sits on the end of that wide rail there, click click.
264
00:31:45,950 –> 00:31:58,560
So if that’s zero, we’ve got about 240mm of travel that we can use. Well, there’s our zero.
265
00:31:58,560 –> 00:32:06,160
And we’ve got something like about 340, so we’ve gained 40mm each way. With those few simple modifications,
Transcript for K40 Laser Cutter – Upgrading The Mechanics (Cont…)
266
00:32:06,160 –> 00:32:10,480
we’ve completely transformed this machine and it’s ready to go back into its box now.
267
00:32:10,480 –> 00:32:16,030
So I’m just going to remove these pieces here, and we’re going to pop this back into that box.
268
00:32:16,030 –> 00:32:25,810
What you see here is the conventional way that they mount tubes. Most clamps are adjustable on decent machines,on these cheap machines,
269
00:32:25,810 –> 00:32:31,420
they fix them, but there is no way to adjust the clamps when you want to set the beam.
270
00:32:31,420 –> 00:32:39,790
So that’s why I’m tackling this problem a completely different way. I am still going to have a fixed clamp system like this.
271
00:32:39,790 –> 00:32:43,010
But it’s going to be like a clamped system that you’ve never seen before.
272
00:32:43,010 –> 00:32:50,480
We’ll just remove these clamps because we are not going to need these anymore. Well, to get access to those, I’m going to have to take this out.
273
00:32:50,480 –> 00:32:54,490
We’ve taken the old tube holder out with all its packing pieces in it.
274
00:32:54,490 –> 00:33:01,270
We don’t need those anymore. They can go in the bin. Mirror is pretty small.
275
00:33:01,270 –> 00:33:06,550
Put everything in a box. Now my tube holder comprises of a very simple piece of
276
00:33:06,550 –> 00:33:17,190
channel, that happens to be 38mm inside and 25mm outside with a 3mm wall thickness.
277
00:33:17,190 –> 00:33:23,830
And basically, all I’m going to do is to drop the tube,
278
00:33:23,830 –> 00:33:34,570
on there like that. There’s my mirror holder at the end here and the Mirror will be fixed in relation to the laser tube. So there’ll be no adjustment.
279
00:33:34,570 –> 00:33:41,170
How am I going to hold the tube on? Well, the tube is held on very simply with these over centre clamps.
280
00:33:41,170 –> 00:33:51,370
I put them into these slots like this, drop my tube on.
281
00:33:51,370 –> 00:34:01,230
And just go Click. Click.
Transcript for K40 Laser Cutter – Upgrading The Mechanics (Cont…)
282
00:34:01,230 –> 00:34:09,720
And there it is, completely solidly locked on there. Now, the idea will be that I should move the tube and the mirror backwards and forwards together.
283
00:34:09,720 –> 00:34:17,100
I’ve got a plate and that plate will sit in the bottom against the back face of the enclosure
284
00:34:17,100 –> 00:34:21,660
so that it can always be moved backwards and forwards in a controlled straight line.
285
00:34:21,660 –> 00:34:30,000
It’s only going to move backwards and forwards a few millimetres. All right, but that’s the plan now we’re going to bolt this onto here.
286
00:34:30,000 –> 00:34:33,480
This is the high voltage input terminal.
287
00:34:33,480 –> 00:34:42,330
And if you remember how this was connected, it was connected with nothing more than a crocodile clip and an exposed terminal,
288
00:34:42,330 –> 00:34:47,280
which is pretty close to this metal surface here.
289
00:34:47,280 –> 00:34:53,820
Bad news. So we shall be changing that when we come to actually physically reconnecting this together.
290
00:34:53,820 –> 00:35:00,750
So what we shall do is lose that crocodile clip inside its protective case.
291
00:35:00,750 –> 00:35:04,930
And we shall put a little hole through the side here.
292
00:35:04,930 –> 00:35:11,500
So that the pin can go through the side there, and then I’ll fill up the end here with high voltage silicone sealant,
293
00:35:11,500 –> 00:35:17,020
so there’s no chance of this arcing across to this place. In the end here
294
00:35:17,020 –> 00:35:25,350
we’ve got a piece of foam that has been put in there with some double sided tape.
295
00:35:25,350 –> 00:35:33,510
Now I don’t know why that in there, because that’s not the place where it’s going to arc out, it’s going to arc here, not there.
296
00:35:33,510 –> 00:35:43,930
So I’m a bit puzzled as to why that’s there, but we’re taking it out anyway so that when we put our tube in, yeah, that’s all going to work.
297
00:35:43,930 –> 00:35:50,370
These pipes are very um, what can I say?Flimsy.
298
00:35:50,370 –> 00:35:56,800
They have got a tendency to kink very easily.
299
00:35:56,800 –> 00:36:06,790
So we may well be doing something with those, just to make sure there’s not a problem with electricity at the back there.
Transcript for K40 Laser Cutter – Upgrading The Mechanics (Cont…)
300
00:36:06,790 –> 00:36:16,630
I shall be putting in a plastic backplate like that, so there’s no chance that we’re going to get any arcing across to that case.
301
00:36:16,630 –> 00:36:20,980
So I’m going to be screwing a plate on the back there, a plastic plate on the back there.
302
00:36:20,980 –> 00:36:27,730
So that’s all looking pretty neat at the moment, and we shall do the same on this end, we’ll push the crocodile clip right back into its housing.
303
00:36:27,730 –> 00:36:36,620
So we’ll just unclamp the tube like that? Rotate the tube temporarily to get our fitting on.
304
00:36:36,620 –> 00:36:43,270
There we go. We’ve got a connection onto there. When we’re ready, we can just fill that up, and it will just sit neatly over the back there.
305
00:36:43,270 –> 00:36:48,790
So that basically is all the mechanical structural work that we’re going to be doing on the machine.
306
00:36:48,790 –> 00:36:53,650
So I think in probably the next session, we’re going to start on the electrical modifications.
307
00:36:53,650 –> 00:36:58,040
So we’re going to rip out the existing system and replace it with a proper digital control system.
 Skip to content