00:15
Welcome to another Lightblade learning lab
00:17
if you cast your mind back to the
00:20
previous session and we made a little
00:23
box, i promised you then that we would make a
00:27
slightly different version of a gift box
00:29
and what I plan to do is to show you the
00:32
creative or perhaps it’s the non-creative
00:36
process that i go through to make one of
00:40
these boxes my artistic creative skills
00:43
are pretty close to zero so i have to
00:46
rely on borrowing other people’s skills
00:49
to make my designs and i’m going to show
00:53
you that process today and along the way
00:56
I should be showing you how we’re going
00:58
to convert a bitmap file into a vector
01:02
file so that it can be cut on here as
01:04
opposed to engraved. Well to show you how
01:07
i go about producing some of my designs
01:10
as i mentioned to you i’m no artist so I
01:14
have to go and look for other people’s
01:16
artistic talent and bolt things together
01:19
that i can find on the interweb but
01:21
today we’re going to start off by
01:22
hunting for a butterfly to use in this
01:26
project now it’s not a real butterfly, what
01:30
I want to find and i’m going to put this in
01:32
a search for butterfly graphics
01:38
that’s always a good term to use
01:40
“graphics” because it will get you to
01:42
pictures like this and then we’ve got
01:47
images of butterfly graphics now i can
01:50
already see one there that i think is
01:52
quite nice
01:53
we are eventually going to have to make
01:55
this black-and-white so we could either
01:58
choose something like this one
Transcript for how to convert a bitmap to a vector file (Cont…)
02:01
I mean they are loads to choose from as
02:03
you can see and we’ve got a nice clear
02:04
picture there and we will now do a
02:09
screen grab of it so we should just do a…..
02:12
and then we should go to photoshop now
02:18
you may not have photoshop you may have
02:20
something else
02:21
photoshop is something that I prefer and
02:24
i use but i’m going to show you how I do
02:27
it and then you can adapt this method to
02:29
suit your your software. We’re trying to
02:32
convert this now into a DXF file which
02:36
basically is a vector format file what
02:39
we have here at the moment is a bitmap
02:41
file with all sorts of shades and colors
02:43
in it but what we are trying to do is to get a
02:45
skeletal drawing that we can cut rather
02:50
than engrave and to do that what I’m
02:52
going to do is go to image adjustments
02:56
and down at the bottom I’ve got
02:57
something called Posterise, now i can set
03:01
the posterised levels to different
03:02
levels and really where after
03:06
black-and-white and if black-and-white is
03:08
what we’re after
03:09
then we’re after only two levels and
03:13
there we are, we’ve got rid of the shadow
03:14
around the outside and we’ve got the
03:18
basic shape still the only problem is we
03:21
still got some yellow in this and colour
03:23
so we can get rid of that as well by
03:25
going somewhere else
03:26
ok now we can go to image we can go to
03:32
mode then we can go to grayscale, discard
03:38
the colour information. In two simple steps
03:41
we’ve got ourselves a nice black and
03:43
white image crisp black and white image
03:45
now we need to save that…. PNG is a good
03:49
format
03:49
ok now I’m going to go and work in Adobe
03:53
Illustrator so we will open this PNG
Transcript for how to convert a bitmap to a vector file (Cont…)
04:02
here
04:04
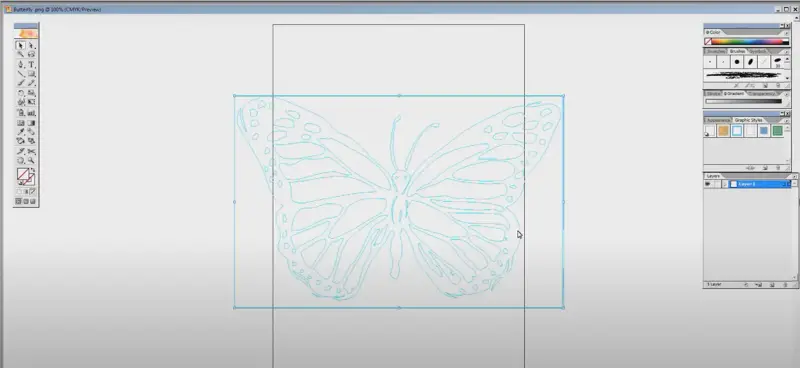
and we’ll use the object trace
04:07
live trace make
04:11
and then we’ll do edit sorry object
04:15
again live trace
04:18
and the option that we want is show the
04:20
tracing results show outlines
04:24
and there we go so we know we’ve got the
04:26
outlines i can either take it as an
04:29
autocad drawing which I can deal with or
04:31
we can do
04:32
dxf file we’ll try the dxf file and now
04:35
we’re going to my cad program butterfly
04:37
dxf and there we go we’ve got the
04:40
butterfly dxf now as a CAD file
04:48
Now the only problem is the chances are that
04:51
if we look at this closely we shall
04:53
probably find that there are two lines
04:55
we find a corner somewhere we might find
04:59
it there are two tracings here look can
05:03
you see that we’ve got a tracing of the
05:05
black outline and a tracing of the white
05:07
outline that’s one of the problems with
05:11
doing a tracing so we’ve got two lots of
05:15
data there overlapped on top of each
05:17
other and so first of all we convert
05:19
this from splines as they call them, which
05:21
is that Brown shape and convert to lines and arcs //
05:24
lines and circles lines and arcs
05:26
that’s all we’ve got to play with and so
05:28
that’s how this drawing will get
05:30
converted even though it looks like all
05:32
sorts of funny shapes it will get
05:33
converted into just those two features
05:35
delete the original ok
05:42
there we go, that’s turned nice and green
05:44
which tells me it’s now been converted
05:45
into something called geometry what
05:48
we’re really interested in is a
05:50
butterfly
05:52
we’re not interested in a wonky
05:53
butterfly so what we should do as we
05:56
will draw a line approximately through
Transcript for how to convert a bitmap to a vector file (Cont…)
06:02
the middle of this butterfly here like
06:07
that
06:11
and then we’ll see how far off of
06:13
vertical it is by drawing a vertical
06:15
line F6, no F3 sorry and then we’ll go up
06:20
here will measure the angle
06:26
and the angle between that line and that
06:29
line is 3.618 so we can pick up this
06:35
whole drawing and rotate it, rotate
06:44
about any point 3.618 enter, enter and
06:51
there we go we’ve now got a butterfly
06:54
that’s vertical now we can choose either
06:59
half for our master and i’ll tell you what
07:03
we should do
07:06
we’ll just delete that because we don’t need it any
07:08
more, we’ll delete that because we
07:10
don’t need it anymore and this piece
07:12
here
07:13
well this is quite important because
07:14
what we’re going to do now, is there’s a feature here
07:17
called trim, trim
07:22
trim
07:24
and now everything else are separate
07:26
features and so now i should be able to do
07:28
delete just come in here like this and delete them
07:35
and there we go so now we’ve got half a
07:37
butterfly we’re gonna finish up with a
07:38
whole butterfly but what we’re going to
07:41
do is we are going to have to think about this
07:43
because some of this stuff is going to
07:46
be very delicate between these wings by
07:48
the time, by the time we cut these
07:51
out so what we need to do is to rework
07:56
this, I mean for instance here look we’ve
07:58
got a join here we can’t have that what we
08:01
can do we can put an offset in and let’s
08:03
just see what we’ve got
08:04
offset of, we’ll offset geometry and we’ll
08:07
offset it by just say one millimeter and
08:11
see how much that is
08:19
yeah that looks quite nice
08:22
maybe we can just do it the simple way
08:24
like this
08:28
we’ll offset all of these by one mill
08:34
bear in mind as I said to you there are double
08:37
shapes on here so i have to delete them
08:39
twice
08:42
ok now the gaps between those shapes now
08:45
are probably more realistic so I’ll go around and
08:50
take all the double images off
08:57
right, so there’s our basic butterfly, well there it’s a
09:00
bit um, it’s a little bit tight just here isn’t it
09:04
it’s getting close to this, this gap here
09:06
is going to be very small so i think
09:09
what we might do is just change that
09:11
slightly, we’ll delete that and then we will
09:17
just put this tangent to line or arc on
09:20
here and we join it onto the end of there
09:23
like that
09:25
there we go that’s better right, so now
09:27
we’ve got a much stronger antenna and we
09:31
might need the body stretched a little
09:33
bit so what I might do is to
09:40
put something like a two-millimeter
09:42
offset on this to start with so we’ll
09:44
put two millimeter offset on here like
09:48
that
09:50
we’ll delete this, basically what we’ve done is we’ve
09:53
changed the centre line and we’re gonna make
09:55
this moth, we’re going to make this
09:56
butterfly fatter nobody will notice that
09:59
so now we shall mirror
Transcript for how to convert a bitmap to a vector file (Cont…)
10:05
this
10:07
keep the original
10:11
and then we will do an
10:13
extend
10:16
to that line, like that
10:22
and then we’ll do one of these tangent to arc
10:25
things
10:27
from here
10:31
to here well there’s our beautiful vector
10:35
butterfly now courtesy of some no skill
10:41
on my part so that’s part one of this
10:45
project and it’s taken, taken the best part of ah….
10:51
three-quarters of an hour to do that so
10:53
we’ve got our basic graphic idea we’ve
10:55
got a butterfly now I want to try and
10:58
find a little box or I want to find
11:01
inspiration from somewhere for a box
11:04
design so I’m going to nick somebody
11:06
else’s idea now, let’s go and have a look
11:09
at wedding favor boxes, here we go… images
11:16
this is what we want
11:25
I’m just looking for something that’s a
11:28
little bit different, oh look
11:29
there’s an interesting box
11:32
could have done something like that
11:33
couldn’t I
11:38
now I see something like this and think
11:40
triangular, oh look that’s an interesting
11:42
one as well I saw something here look
11:44
these boxes here it’s not what I want
11:48
but I’ve just seen something in my mind
11:51
that that I can see working so okay
11:55
you’ve seen me pinch a butterfly you’ve
11:59
seen me pinch a basic idea for a box
Transcript for how to convert a bitmap to a vector file (Cont…)
12:02
this is the way that I go about my
12:04
cardboard engineering so I should go
12:06
back to my cad system now and I’m not
12:08
going to drag you through the pain of
12:10
design so i’ll present you with my
12:12
design when it’s finished now this is
12:14
the paper that i tend to use for my
12:17
cards and for most of my cardboard
12:20
engineering it’s it’s a nice white art
12:23
paper i’ll take the red stuff out
12:27
because that’s something slightly
12:28
different but this is a hundred sheets
12:32
which come in a pad and it’s basically a
12:34
watercolor paper as you can see but it’s
12:38
200 grams and it’s got a very nice sort
12:40
of a texture to it now what I’ve got to
12:46
do is take a quick look at my pin bed
12:48
underneath here because we need to make
12:52
sure we’ve got support down the middle
12:54
we will just check we’ve got our focus set to
12:56
6.5
13:02
we need air but not too much of it
14:09
you can see that some of the detail on
Transcript for how to convert a bitmap to a vector file (Cont…)
14:11
here there’s a little bit on the
14:13
delicate side
14:16
ok let’s see what the end result is
14:18
going to be like shall we?
14:20
so that’s the outside so we need to
14:24
tuck these little tabs down
14:28
we need to fold these back
14:40
and that’s in essence what the box is
14:43
about
14:47
but what I got to do now is if we look
14:50
carefully you’ll see that I’ve left a
14:51
little slot at the bottom here and a
14:54
little slot at the top there so we’ve
14:57
got to do is very carefully engage these
15:00
two butterflies together like that
15:08
so they sit neatly on the corner
15:09
crossed over like that look just like a
15:12
little butterfly sitting there on the
15:13
corner and they hold the edges of the
15:16
box together so we’ve got to do that for
15:18
all four corners carefully
15:23
folding to each other like this
15:46
there we go
15:50
and then
15:57
we’re going to put this pair across the top here
15:58
we’re going to engage those two little teeth
Transcript for how to convert a bitmap to a vector file (Cont…)
16:02
like that
16:07
and then we can do the same thing with
16:09
these two butterflies but the opposite
16:11
so we’re going to have to pull these very gently
16:14
apart to get them past each other
16:20
and there we go we’ve got a very delicate
16:22
little gift box
16:26
something any young lady would be very
16:28
pleased to receive that especially if it’s
16:31
got diamond rings or diamond earrings or
16:36
an airline ticket to New York or
16:41
the possibilities are endless
16:44
there is one other possibility for this
16:46
which if you’re in business rather than
16:49
trying to impress your young lady
16:52
you could quite easily cut or etch names on
16:58
these
16:59
and these could be wedding favors and
17:02
place positions, seating positions both
17:06
at the same time
17:09
so maybe there’s some business there for
17:12
somebody this design will be available
17:14
from the Thinklaser website the same
17:16
as the other boxes will be as well so
17:19
feel free to use it
17:21
adapt it, modify it, well I hope that i’ve
17:24
demonstrated that there’s a lot of
17:26
potential in cardboard engineering
17:29
both to enjoy yourself and maybe to make
17:32
some money as well
17:34
so what I can say to you is thank you
17:36
very much for your patience
17:38
we shall return to cardboard engineering
17:40
later on in the series when we’re
17:41
probably do some birthday cards
17:43
Christmas cards Easter cards depends on
17:47
the time of the year but for now thank
17:49
you very much for your time and I shall
17:51
see you in the next session
 Skip to content