 Skip to content
 The LightBurn Software Series
The Lightburn Software is probably the best generic laser cutting software available (I use it for almost all of my laser work). This series has LightBurn tutorials, hints and tips as well as the occasional speed comparisons between it and RDWorks. In this session, we learn how the LightBurn Pass Through feature and a LightBurn camera allows the cutting of projects lager than the size of your laser bed.
My thanks to the team at Lightburn for allowing me to embed their videos.
Contents
Using the ‘Cut Shapes’ and ‘Print and Cut’ features of LightBurn to cut a project larger than your laser bed (and using it to correct an error).
Video Resource Files
There are no resource files associated with this video.
External Resource Links
https://lightburnsoftware.com/pages/trial-version-try-before-you-buy
There are no more external resource links associated with this video.
Transcript for Lightburn Cutting Larger Projects than your Laser
Click the “Show More” button to reveal the transcript, and use your browsers Find function to search for specific sections of interest.
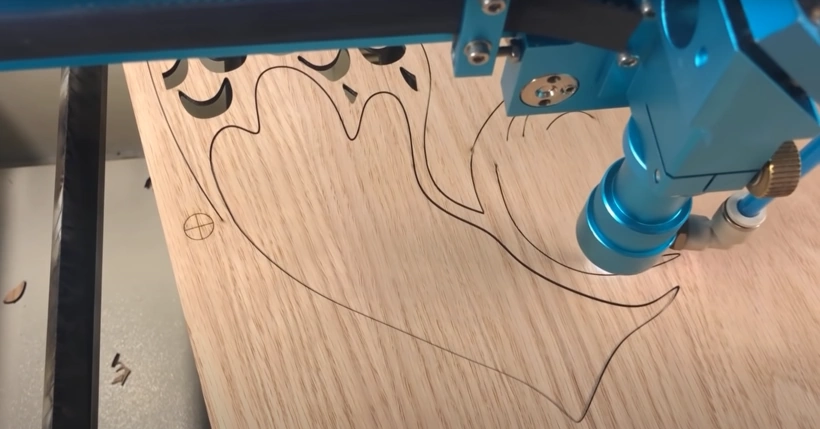
0:00hey folks so i was asked if i could cut a decoration for a kid’s room uh more specifically
0:07i was asked if i could cut this file um out of a piece of wood that is about
0:12three feet long three feet by one foot now my machine is not this large
0:18and so this project is too big to fit on the bed of my machine and cut in one
0:24piece so i thought this would be a great project to show you a couple of newer features in light burn
0:30that can make it easier for you to cut up projects and execute things that are larger than your
0:35laser bed so there are a couple of parts to this the first part is going to be
0:40taking this file and cutting it into the multiple sections needed so that each section
0:45is small enough to fit on your laser and then the next part is aligning those
0:51sections so that you can make this look like it was all cut in one piece and so to do the cutting
1:00we’re going to use a new tool in light burn called cut shapes and the cut shapes tool acts remarkably
1:06like a cookie cutter and so what i mean by that is you have a shape like this that is your cutter you have a
1:12shape like this that is the thing you want cut and similar to the boolean tools you select
1:19both you go tools cut shapes and it doesn’t look like it did anything but
1:25light burn has actually broken this out into two pieces one which is everything that was outside of
1:30the cutter and one that is everything that was inside the cutter and so if i was to make three
1:38squares each one basically a panel that i want i can use those squares to cut the
1:46project up into the pieces that are small enough that will fit on my machine the next part of this is going to be
1:53aligning the different cuts so that they come out correctly and for that we’re going to use the print and cut feature in light
Transcript for Lightburn Cutting Larger Projects than your Laser (Cont…)
2:00burn which lets you register a cut to a set of registration marks
2:06and so in order to make this all work we’re going to put some registration marks in this
2:11project and when we cut out one section it will emit a couple of registration
2:16marks along with it and then we’ll use those to line up the next section with the previous one and we’ll show how
2:23all of that ties together as we do this so let’s get going now the artwork that i have right now is set to
2:29fill however because this is going to be a cut out i’m going to change it to line i just had it in fill mode so that you
2:36could see how things looked this is not the scale that we need yet
2:43we actually need a template here just as a starting point so i’m going to create a rectangle and
2:50type three feet by one foot and so that is the ultimate size that
2:57this is going to be i’m going to select my mermaid i’m going to select my
3:02wood template and hit align centers to move this into the middle
3:08deselect everything select just the mermaid and then hold the control key as i drag
3:14this so that it drags from the center and scale it to be roughly the size that i’m going to
3:20want when i’m done here so i want a little bit of room on either side so that i have
3:26some room to make mistakes but overall this looks about right i think the sizing
3:31here is basically correct this is what i want so now we have to cut this into three
3:37different sections you’ll notice i’m going to group this quickly
3:42using the greater than and less than keys i can rotate 90 degrees in either direction so my machine has passed through doors
3:50on the front and rear if you had a machine with pass-through doors on the side you could do this in
3:55two sections just halves like this mine has them in
Transcript for Lightburn Cutting Larger Projects than your Laser (Cont…)
4:00front and back and with my laser bed i don’t have enough space to cut this in halves i’m
4:07going to have to actually do it in three sections so the tail the middle and then the head
4:14so to do that let me ungroup this again i need three cutting boxes effectively
4:20one for the tail section one for the midsection one for the head technically you don’t need to do them
4:26all you can do every other one and i’ll show you what i mean by that
4:32so i’m just going to break this into three sections that are each one foot by one foot so again we’re
4:38going to create a box i’m going to type one foot by one foot
4:44um i have the aspect lock turned off um if i did not have the aspect lock
4:50turned off um it would scale this box to be locked when i scaled it and i’ll show
4:56you what i mean by that if you dragged something out that was not the correct shape and you have the aspect lock
5:03turned on if i type three feet here it will make this
5:09the same shape with the new scale that i want that i chose and that’s obviously not correct um i want
5:20one foot by one foot like that so i’ve just created two little boxes
5:26i’m going to make these a different color so we’ll make our cutters red
5:31just because now i’m going to line these up so that one of these boxes is at the
5:37front end here and one of them is at the back end here and to do that i’m going to click this
5:42corner of this box and you’ll see that my cursor changes shape to a crosshair that’s telling me that
5:48it’s snapping to that corner node so when i grab it i’m now dragging from that exact corner
5:54and if i get near something else lightburn will snap it to that thing so in this case i’m
5:59dragging it near this other corner of this large template rectangle i have and so lightburn has snapped the cutting
Transcript for Lightburn Cutting Larger Projects than your Laser (Cont…)
6:06shape to match and i’m going to do the other one from the other corner so that i can snap it to here
6:12so grabbing here drag to there so now i have my
6:20rough layout and then i’ve got a cutting shape on this end and a cutting shape on this end and then whatever’s left is in
6:26the middle um i’m also going to create registration marks and so what i
6:33mean by that is we need a way for the print and cut feature to have
6:39something for me to line it up with print and cut just lets you specify
6:45a target shape so i can draw pretty much anything it could be a circle like this you just
6:51need something that you have a center point that you can align your red dot pointer up with and now a circle doesn’t
6:59have a center point that’s visible so what we’re going to do instead is make one i’m going to make one a
7:06little smaller first of all we’ll just make these 10 millimeters i’m going to draw a line now again
7:12using the snaps when i get to this top edge or side edge a circle is actually
7:19four arcs that start at the north east south and west points
7:24and so i can draw a straight line from the top to the bottom and then i can draw a straight line from the left to the right and they’re nice
7:31and horizontal and they make a nice perfect little cross select the whole thing and group it
7:37uh normally i use ctrl g to group but this is the button for it
7:43now we want these cross hairs to be a different color again i’m going to make them green
7:49and i’m going to drag this to this snapping point here so that it’s
7:55right on that corner and then i’m just going to use my cursor arrow to move it down by one step so that it’s just in from the
Transcript for Lightburn Cutting Larger Projects than your Laser (Cont…)
8:02wood because we actually do have to engrave this on the material that we’re cutting so we can see it
8:08so i’m going to copy that shape and paste one down here and snap it to that corner
8:14move it up paste one over here snap it to that corner and move it up
8:20paste one up here snap it here move it down so now i have marks
8:27on each of these corners here basically where my cuts are going to get split
8:33so the way that the print and cut feature works you create registration marks like
8:40this either on something that you are printing or something that you are sending to your laser
8:45and then you use those same marks later to register a different thing or a different cut to
8:53these marks so what we’re going to do is run this part of the job here on the laser
9:00and send these marks with it so they get drawn by the laser wherever
9:06they end up then when we do the next section this middle section here
9:11we’re going to use those two marks that got emitted with the previous section and tell this section to use these to
9:18line them up with it sounds a lot more complicated than it is and when you actually see it in practice
9:24it’s quite simple to do so don’t panic yet we have to cut up our project so to do that
9:32we’re going to use these red shapes that we used or we created to be our cutters
9:38so the first thing we do is select the mermaid then we select the cutting tool we go to
9:43tools cut shapes and it’s done again it doesn’t
9:48look like it did anything but it actually has segmented the job and you can see we
9:55have this little pokey bit sticking out here this here has split everything off into
Transcript for Lightburn Cutting Larger Projects than your Laser (Cont…)
10:03its own group and i can move this just using the cursor keys and it lines up perfectly so that when
10:09it’s not selected you can’t actually tell that it’s done anything and then the
10:15rest of the project is over here in this second piece so now we have to repeat the process
10:21to cut this section off so again i’m going to select the mermaid i’m going to select my
10:26cutting tool go to tools cut shapes and now i have
10:32the next piece so there’s the head there’s the mid section and here’s the tail so we have our
10:38project now cut into three sections and we have these small registration marks
10:44created for it so this is pretty much ready to go
10:50the things we’re going to have to be careful of are getting this lined up on the machine
10:58properly getting these marks sent correctly and so on so what i’m going to do is
11:04break this into three distinct files so that i don’t make a mistake basically when i’m
11:10sending it first of all uh pressing the greater than key rotate it 90 degrees so that
11:16this is now vertical which is the way my machine needs it i’m going to feed it
11:21through from the tail uh then the midsection then the head so i’m going to do the tail as the first
11:29part of the project um i’m going to save this as mermaid
11:36so we’re going to call this one page 1.
11:42um i’m going to do it again for page two
11:49and then i’m going to do it again for page three now i’m going to go back and edit these
11:55so that the individual pages are correct i also haven’t set up my power and
Transcript for Lightburn Cutting Larger Projects than your Laser (Cont…)
12:02speeds correctly yet we’re going to have to do that as well and it would have been easier if i
12:07did that to begin with i’ll go back and clean that up so the first file is going to be
12:14the tail section and so for that we’re going to delete everything except these
12:22so i’m going gonna save this as page one
12:28so this tail is going to get cut and it’s going to send these two engraving crosshairs with it
12:35now these are just set to line i’ve got these set to fairly high speed
12:41fairly low power this is the cut the tail cutout itself and this has
12:47relatively high speed with lots of power i’m actually going to need to change this
12:53so we’ll do this at say 15 millimeters a second 80 power that’s
13:00probably accurate for my system um and then the line cuts just to do the
13:05engraving marks those are fine as they are now you could and you probably would
13:12want to save out a template to show you where the wood should go
13:21so what i’m likely to want to do is remove all of these other parts and then
13:32just pull this up a little bit so we’re still on page one here um
13:40i will save this so this now is a piece or an outline that i can
13:46use to show me where the wood should go so when i load my sheet
13:52into the machine if i frame it’s going to show me this exact outline and that’s going to
13:59help me line up the wood for the first cut before i start feeding the others
Transcript for Lightburn Cutting Larger Projects than your Laser (Cont…)
14:04through it’s important to get this lined up well enough so that you have room if you kind of
14:12go off a little bit while you’re doing your cuts the print and cut alignment is going to
14:18make sure that the cut itself is aligned but if i had the wood arranged funny to
14:23begin with so for example if my wood was placed into the machine like this
14:28it wouldn’t be lined up correctly as i fed the project through it would you know go off the
14:34side if that would and so that would be bad by
14:39including a little template like this at least for the first cutting file i have a good
14:45idea of where the wood needs to go or land on the machine bed to line this all up
14:52so i’m not going to engrave this at full power i’m actually not going to engrave it at
14:58all um we’ll set this to be 100 speed and say 3 percent power just so
15:05that it basically does nothing and we’ll save that
15:10so i’m going to open up the next page of the mermaid file which is this one
15:16and move everything up by one section now for this part
15:23i do not need the tail i do not need the body i also do not need that i only need
15:30the middle section that i’m going to be cutting and i need to make sure that this is set at the same speed and power
15:36that i had in the other layers or in the other files pardon me so 15 and 80
15:41and we’ll set min power to be 30 for no particular reason
15:50and the crosshairs are fine now we have cross hairs
15:57in the other file that are here and here these ones are going to engrave as well
Transcript for Lightburn Cutting Larger Projects than your Laser (Cont…)
16:04that’s fine they should just engrave right over top of the other ones these ones are the important ones these
16:10are going to be new for this file so when we run this on the machine it’s going to engrave
16:15this mark and this mark over the ones that we already have that were part of the other or the first part of the job
16:22and then it’s going to engrave these ones new so that we can line up the next part of the job
16:28and then obviously it’s going to run the rest of the cut as well so we’ll save this
16:35and then we’ll open up the third page of our project and this is the final step
16:43position that about there now for this one we don’t need anything but
16:50the head and then these two marks which we’re going to align to
16:55um so again these two marks will have been output already by the previous stage by
17:02the previous file and we’re using the presence of these two to
17:08line up this next piece of the cut and we’ll show how that works in a moment when we actually do the cutting so i’m
17:15going to go back and just quickly spot check everything that i’ve done so far and then we’ll head over to the machine
17:21and start cutting so the first section of this is pretty
17:27easy now i have loaded the file into the machine it’s in my controller i’ve placed the
17:34wood just to give you an idea of where it’s going to go if i hit the frame button either in lightroom
17:41or on the machine it does this follows the path in my wood
17:49and so that is framed fairly well so we’re going to
17:54run this first cut and then we’ll show how to do the registration with the
Transcript for Lightburn Cutting Larger Projects than your Laser (Cont…)
18:01second half while we’re using the pass-through
18:12while this is engraving you can see the two registration marks have already been
18:18put down it’s running through the cuts can’t tell
18:28yet if it’s actually going through or not this is wood that i have not cut before so i may have to go back over this and
18:37do it a second time not a big deal
18:43so after running a quick second pass everything has properly cut out and you can see that my two registration
18:51marks one here and one here are quite visible i’ve got my pass-through door open
18:57so let’s do the fun part aligning the next part of the file with this one so first
19:04thing you do is pick this up carefully and feed it in
19:10now i’m going to do this in a way that hopefully makes my life just a
19:16little bit easier i’m going to manually line up my red dot
19:22pointer with the first mark as just
19:28how i’m placing the wood now you don’t have to do this there’s no requirement that you do this
19:34but it makes it a little bit quicker if you do it like this so this is the important part we’re
19:41going to point the red dot and you can see it there glowing in the middle
19:47at this cross hair we’re going to select this same crosshair in the project in light
19:53burn and tell light burn to align
19:58where the machine is right now with where that red dot or where that cross hair is in
Transcript for Lightburn Cutting Larger Projects than your Laser (Cont…)
20:04the project and then we’re going to go over to this one
20:09and do the same thing we’ll jog the laser over to this point here and we’ll tell lightburn this is the
20:16second crosshair while having that second crosshair selected in the project
20:21and in that way light burn will be able to align the next part so that it
20:28connects perfectly here so we’ll go to the machine i’ll show you
20:34how to align this target in lightburn we’ll do that next so i’ve loaded the
20:41next part of this project um this and this are the two or this this marker
20:47up here and this one over here are the two markers that were output by the previous section
20:56of the project so if you remember the tail of the mermaid is up here somewhere and there were two
21:03crosshair marks that were output with that job so the one that i currently have the laser pointed at
21:10is this one and so in order to tell light burn how to align this part of the job with the
21:17previous part we select this crosshair we go to tools print and cut and we say set first
21:24target position now when you select this light burn reads the current position of the laser head
21:32and it looks at the position of what you have selected and it records both and so when i say
21:39print and cut set first target position nothing really seems to have happened if i go back and look at that menu you
21:45can see that this first option here is now highlight there’s a little blue square so it’s telling me that that
21:52first marker position is now valid so now we have to line up the second target so on the laser itself
Transcript for Lightburn Cutting Larger Projects than your Laser (Cont…)
22:00i jog the red dot pointer to point at the second target marker this one as accurately as
22:07i can point the red dot pointer right at the dead center of this crosshair
22:12i go to tools print and cut set second target position and when i
22:17click this you’ll notice that light burn now says print and cut here in the in the laser window
22:25and if i go up to the tools menu and i open up the print and cut menu you can see the first
22:30second and third entries all have a little blue highlight next to them so that’s telling me
22:36that my first target position is valid my second target position is valid and it’s
22:42aligning the output to the targets now it enabled this automatically for me as long as you have
22:48valid targets you can align your output to those targets if i want to turn the print and cut feature off i just click this entry
22:55again and it goes away over here i haven’t changed my target markers yet
23:00so i can go back here and turn this back on without any problem i could also if my alignment wasn’t
23:06correct or it framed wrong or something go back and reselect my targets and
23:11redo the process but effectively by selecting this marker and this marker with the
23:18laser pointed at each of them and using the print and cut feature light burn has figured out
23:24exactly where to position the output on the laser so that this cut will now line up with
23:31the one before it and so i’m going to send this file to the laser and we’ll
23:37run it so this is still lined up
23:42with the previous target marker right there that’s the original one the first one that we did i’ve loaded the file
23:49into the laser so when i hit frame it should frame just on the outside of
23:55that marker and that marker and then the two that are going to go at the bottom here
Transcript for Lightburn Cutting Larger Projects than your Laser (Cont…)
24:01it’s not going to frame the mermaid exactly because there are four target markers that you can see in the corners
24:07of the job so one up there one down there one down there and so on but the frame should go on the outside
24:15of this mark and this mark at the very least so when we frame you’ll see that happen
24:32that looks good so i’m going to close the lid and run the job
24:57all right so we’re at the first kind of critical part of this where you can see
25:04that line right up there has actually met the other part of the
25:10tail that was sent already so if we move over here a little bit you can see
25:17that it has lined up properly with the part that was already cut and it’ll continue to do that so we’ll
25:24come back to this as it finishes the job
25:30now if we zoom in a little bit you can actually see a couple of spots there’s one about
25:36there and one about
25:41it’s difficult for me to point my finger at the right spot while i’m holding the phone but one about there and then there’s one there that are
25:47slightly dark and that’s because of where the machine began firing it left a
25:54little splash of air there so you can see a little bit of char where the end points lined up but
Transcript for Lightburn Cutting Larger Projects than your Laser (Cont…)
26:00otherwise this is accurate and perfect so this is how it looks with the second
26:07half done you can see again we’ve got our next set of target marks
26:15output on either side of the job here these will be connected to the next
26:21piece when it does the next the final third but the critical bit is up here by the
26:29tail where right about there
26:34is the connection mark between the two jobs so you can see a tiny little burn there
26:39one there uh and one there and that one’s actually almost imperceptible but these two are a
26:45little more visible but those are where the two parts of the
26:51job were connected together and it’s just um air assist splash or a little bit of
26:57smoke from the beginning of the cut but you can see the alignment is perfect it’s it looks like it’s one continuous
27:04piece so now we’re going to take the wood slide it through do the same registration procedure for
27:11the next part using these two target markers to line up the third part
27:17of the job and we’ll uh see what the final output looks like shortly
27:23all right so i’m sliding the wood up here getting it into position for the next cut but i thought i would show just to prove
27:31that this isn’t some strange trickery that i’m doing i’m
27:36going to arrange the wood in the machine like this so you remember that the first two parts
27:43were very very straight like that they were lined up nice and straight in the machine
27:49so for the last piece i’m going to show you just how off you can be and twist it like that and so
27:58i am going to jog my laser over to this first mark
Transcript for Lightburn Cutting Larger Projects than your Laser (Cont…)
28:03you really want to slow it down when you get close so you can either use light burn itself
28:10with the jog arrows to adjust in very very very small
28:15increments i usually move 0.1 millimeters at a time to line up my
28:20target markers or on your rueta control panel or whatever controller you’re using
28:27if you have one with a speed button you can adjust the speed of movement down
28:33uh to the point where it’s just crawling so i’ve set this to one millimeter per
28:39second and now i can jog very very very slowly
28:49so you want the laser to be pointed at that center mark as accurately as you possibly can
28:57so here i’ve loaded the third and final file i’ve also put these two markers on their
29:04own layer and set them to one percent power output because i don’t actually want these ones to burn i don’t need
29:09them to i just need the markers so that i can tag them so again select this first marker go to
29:16tools print and cut set first target position to line it up with the selected marker on the laser then i jog
29:23the laser over to point at this second marker on the bed
29:28select it go to tools print and cut set second target position so now the
29:34second position target is set and so even though this job is arranged
29:40nice and vertical here and it’s really really slanted and rotated on the laser
29:45you’ll see that the output is registered correctly because we’ve used these two target markers to line everything up
29:50so i’m going to send this file and run it on the laser and we’ll see what the finished product looks like so i’ve sent the job
29:58to the machine and as a quick check you can actually see in the file preview that it shows you on
Transcript for Lightburn Cutting Larger Projects than your Laser (Cont…)
30:03the display that those two marks that one and that one are in approximately the same
30:09orientation as they are on the bed of the machine so that’s a good sign you can tell that lightburn has actually angled the job
30:16properly so that everything should line up so i’m going to turn everything on
30:21and run this and we’ll see how it looks
30:29you can see pretty much immediately the first part of the job being sent
30:37has already connected to and is lined up with part of it that was already sent out
30:44and that part just dropped so it’s perfectly lined up with what was sent before
31:11you can see this piece is yet another uh that was sectioned in parts
31:19with between this file and the previous file and again the cuts are nicely lined up
31:44so this was a happy little accident not really happy but an accident nonetheless um while running the second pass
31:52i had a piece i think this piece right here fall into the knife bed a little bit and
31:59poke out so when this one was cut it hopped back over to hit another cut it caught this and pulled the machine with
Transcript for Lightburn Cutting Larger Projects than your Laser (Cont…)
32:07it i think it was actually going to cut this this shape here but bumped up against the piece of this
32:14that was stuck up and pulled the wood off to one side misaligning all of the subsequent cuts that would
32:21follow it so i went back to
32:26the computer um realigned the print and cut markers again with the position of the wood as it is
32:32now and we’re going to run the job one last time just to show you that even if you
32:38horribly screw up like i just did you can probably salvage it using target marks and print and cut to
32:44align the output so we’ll close the lid here set everything up and hit go
33:02so remember this wood is slid about half an inch out of position
33:10from where it was when i did this last run and yet you can see the beam grazing the
33:16insides of the edges that are already there as it goes around
33:21so this is another example of how accurate the print and cut feature is uh you’re able to make a second pass
33:29over an existing project after you’ve moved it as long as you can line everything up
33:41all right so the job is finished
33:49and if you look we now have one large
33:56continuous piece
34:02with no visible seam here except for a couple of very very minor little discolorations from the
34:08exhaust um there are where is it
34:14on this end there were a couple of spots
34:19there if you look really closely there you can see just a tiny little indent right there
34:26and that’s basically because i ran this three times and so the beam width got a little wider there
34:32but it was only because i screwed up uh having it catch that piece and pull the
34:38job out of alignment that was even necessary normally you would not be able to see those at all um
34:44there’s another one right there but they’re basically invisible um and
34:52you may have depending on the size of your laser and your exhaust and air assist and so on you may have
34:58visible marks at the start and end of every cut so this is not an
35:04unexpected result but there’s the finished product and it’s
35:10all one piece and it’s quite a bit larger than i could put in my laser by itself
What Next?
Did you enjoy this post? Why not check out some of our other posts:
Disclaimer
Last updated April 25, 2024
WEBSITE DISCLAIMER
The information provided by n-Deavor Limited, trading as Laseruser.com (“we,” “us” , or “our”) on (the “Site”) is for general informational purposes only. All information on the Site is provided in good faith, however we make no representation or warranty of any kind, express or implied, regarding the accuracy, adequacy, validity, reliability, availability or completeness of any information on the Site.
UNDER NO CIRCUMSTANCE SHALL WE HAVE ANY LIABILITY TO YOU FOR ANY LOSS OR DAMAGE OF ANY KIND INCURRED AS A RESULT OF THE USE OF THE SITE OR RELIANCE ON ANY INFORMATION PROVIDED ON THE SITE. YOUR USE OF THE SITE AND YOUR RELIANCE ON ANY INFORMATION ON THE SITE IS SOLELY AT YOUR OWN RISK.
EXTERNAL LINKS DISCLAIMER
The Site may contain (or you may be sent through the Site) links to other websites or content belonging to or originating from third parties or links to websites and features in banners or other advertising. Such external links are not investigated, monitored, or checked for accuracy, adequacy, validity, reliability, availability or completeness by us.
WE DO NOT WARRANT, ENDORSE, GUARANTEE, OR ASSUME RESPONSIBILITY FOR THE ACCURACY OR RELIABILITY OF ANY INFORMATION OFFERED BY THIRD-PARTY WEBSITES LINKED THROUGH THE SITE OR ANY WEBSITE OR FEATURE LINKED IN ANY BANNER OR OTHER ADVERTISING.
WE WILL NOT BE A PARTY TO OR IN ANY WAY BE RESPONSIBLE FOR MONITORING ANY TRANSACTION BETWEEN YOU AND THIRD-PARTY PROVIDERS OF PRODUCTS OR SERVICES.
AFFILIATES DISCLAIMER
The Site may contain links to affiliate websites, and we receive an affiliate commission for any purchases made by you on the affiliate website using such links. Our affiliates include the following:
- makeCNC who provide Downloadable Patterns, Software, Hardware and other content for Laser Cutters, CNC Routers, Plasma, WaterJets, CNC Milling Machines, and other Robotic Tools. They also provide Pattern Files in PDF format for Scroll Saw Users. They are known for their Friendly and Efficient Customer Service and have a comprehensive back catalogue as well as continually providing New Patterns and Content.
- Cloudray Laser: a world-leading laser parts and solutions provider, has established a whole series of laser product lines, range from CO2 engraving & cutting machine parts, fiber cutting machine parts and laser marking machine parts.
