 Skip to content
 The Fiber Laser Learning Lab Series with Russ Sadler
In this Series, Lotus Laser have lent Russ a MOPA 20 watt fiber laser to “play with”. Although Russ has a moderate understanding of laser technology (his words) and how constant power glass tube systems work, pulsing fiber laser marking machines are shrouded in a deeper mystery than the glass tube machines. So let’s test some Fiber Laser Pulses.
They have been designed for high speed marking and the technology has been well tried and proven. There are limited “tricks” that the pulsing laser technology can perform. You enter predefined parameters for each marking “trick” you wish the machine to deliver , then stand back in amazement. Most correspondents tell Russ that they have bought their machine direct from China and received a machine and EZCAD software, preloaded with a few default parameters. No other instructions beyond the EZCAD manual are forthcoming.
Russ states “I am neither a teacher or expert in this field so you join me in my learning adventure with the warning that I have a simple but inquisitive mind and will probably make mistakes on my way to discovering the truth. I WILL oversimplify and maybe distort the scientific detail in my quest to build a simple picture of why and how this technology works. I am not trying to reverse engineer anything, just to break through the seemingly impenetrable ‘techno cotton wool’ that surrounds this amazing piece of science.”
Contents
To be completed soon.
Video Resource Files
There are no more resource files associated with this video.
External Resource Links
There are no more external resource links associated with this video.
Transcript for Let’s Test Some Fiber Laser Pulses
Click the “Show More” button to reveal the transcript, and use your browsers Find function to search for specific sections of interest.
00:00
welcome to another Fiber Laser Learning
00:03
lab today we’re going to go off on a
00:07
tangent now we’re not going to lose
00:09
sight of the goal that we’re trying to
00:11
achieve which is to work out how we
00:13
thicken the chromium oxide layer on the
00:16
surface of stainless steel to produce
00:18
refractive colors but before we can do
00:23
that we’ve got to understand how we can
00:26
manipulate that layer with what this
00:29
machine has to offer now this machine
00:31
has only got light which as I explained
00:35
to you before the light energy is like a
00:38
tsunami wave it’s very powerful but it
00:41
has to be and can be controlled because
00:43
this is a motor laser which is a pulsing
00:46
laser which enables us deliver very
00:49
exact amounts of power per pulse so
00:52
we’ve got all sorts of parameters to
00:53
work with to try and find a way of
00:56
manipulating the thickness of this
00:58
chromium oxide layer now the first thing
01:02
we’re going to do is take a quick look
01:03
at a program that I’ve written to try
01:07
and test this machine and at the same
01:10
time find out what the power is in each
01:13
one of these pulses so I’m trying to
01:16
achieve several things with this program
01:19
and I would explain what I’m trying to
01:21
achieve as we go through but I think one
01:24
of the most important things to say is
01:26
that the program that I’m going to be
01:28
used is called Lotus mark now any of you
01:31
guys out there with a fiber laser will
01:33
already have a copy of this program
01:35
because it’s called EZCAD but
01:39
it’s written in China and the one thing
01:42
the Chinese are not good at is quality
01:46
control of their software a piece of
01:49
software that’s completely bug free will
01:51
be upgraded and there will be bugs where
01:54
they were never bugs before all credit
01:57
to Lotus laser they have actually frozen
02:00
a version of easy care for their own use
Transcript for Let’s Test Some Fiber Laser Pulses (Cont…)
02:04
and agreed with the suppliers of the
02:06
software that they will always receive
02:08
the same thing so it will not get bugs
02:11
coming into it as they upgrade the
02:13
software which is an amazing quality
02:16
control approach which is reflected in
02:19
the rest of the design of this machine
02:20
know you had a chance to look around it
02:22
but as an engineer I look at this I
02:24
think to myself everything around this
02:26
machine is well-made and well built its
02:28
won’t designed okay the actual laser
02:31
itself comes from China the to hate the
02:36
lens and the head up here probably comes
02:38
from China as well but these are well
02:40
made pieces whereas my experience with
02:44
Chinese pieces so far
02:46
Chinese machines I mean I’ve got a
02:47
Chinese laser machine out the other side
02:49
of the workshop there I’ve got the
02:50
Chinese mill here I’ve got a Chinese
02:52
light behind me yeah they all work but
02:56
the Chinese lathe I had to spend several
02:59
hours fixing problems before I could use
03:01
it properly
03:02
the mill was one of the least trouble
03:04
things was one of the least troublesome
03:06
things I had from China the Chinese
03:08
laser machine well over there you could
03:12
see my other series and see how many
03:13
troubles I had fixing all the problems
03:15
that we encountered with that machine
03:17
as well as trying to understand the
03:18
technology because I said this is not a
03:20
corporate video I’m not being paid to do
03:22
any of this stuff I’m just saying it as
03:25
it is so yeah if we come across problems
03:28
don’t worry I shall tell you as well no
03:31
I don’t know who dramatized what I’m
03:33
just about to do but I am prepared now
03:37
you remember what happened to paper when
03:40
I exposed it to ten point six micron
03:42
wavelength light on the other machine
03:45
yeah it caught fire now you’ll
03:48
understand my precautionary measures
03:56
well that’s very interesting isn’t it
03:58
look we’ve them we’ve got the front of
Transcript for Let’s Test Some Fiber Laser Pulses (Cont…)
04:02
the paper
04:02
[Applause]
04:05
nothing on the back
04:10
I think you earlier stop and absolutely
04:16
no marks on the anodized aluminium well
04:19
that’s another interesting conundrum
04:20
isn’t it we’ve got the ability to
04:26
vaporize the ink which is probably a
04:30
water-based ink but we saw water
04:34
yesterday only absorbing a small
04:35
proportion of this light so it was able
04:38
to force its way through the water and
04:40
the glass and still have enough energy
04:41
to damage the anodized the black
04:44
anodized surface basically was able to
04:45
evaporate the dye that’s in the surface
04:49
not completely not as complete as it did
04:51
there but there was enough energy coming
04:54
through so there is a certain amount of
04:56
energy that gets absorbed by water and
04:58
one has to assume that that’s what’s
05:00
happened here but hey we’ve got paper
05:03
behind delicates absolutely nothing and
05:06
yet it has no effect on paper doesn’t
05:09
attempt to scorch it burn it go through
05:12
it we’ve just discovered something that
05:13
goes along with the square wheel paper
05:17
glasses to protect you against one
05:20
micron wavelength well here I’ve
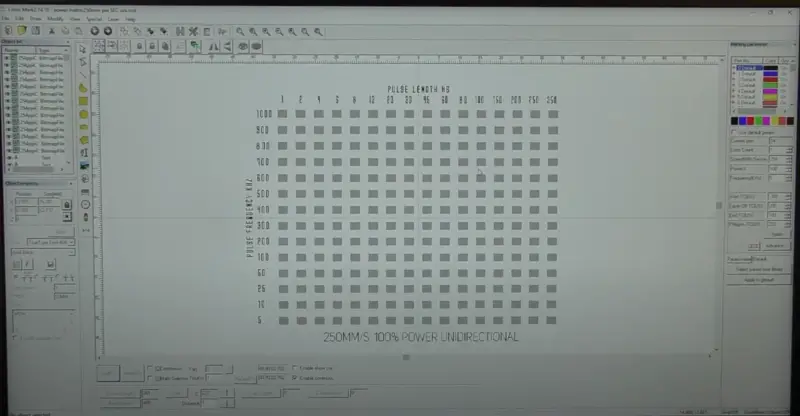
05:23
designed a matrix to check out all sorts
05:26
of power and frequency combinations so
05:31
it’s easier to see if i zoom in on the
05:32
pattern itself and there we go look each
05:38
one of those little marks there’s a
05:43
little checkerboard pattern
05:46
and here we can see we run about pulse
05:50
duration from 1 all the way up to 350
05:55
doing 16 pulses that are available on
05:59
this machine and then what I’ve done
Transcript for Let’s Test Some Fiber Laser Pulses (Cont…)
06:02
here down the side we’ve got a pulse
06:04
frequency I’ve just chosen pulses all
06:07
the way down from a thousand to five now
06:12
these are not necessarily that peak
06:14
power pulses this is just a range now
06:19
somewhere in there I shall be able to
06:21
find my peak power pattern but we’ll
06:25
talk about that after we carried out the
06:27
test but before we do the test let me
06:29
explain why
06:31
I’ve gone for this interesting little
06:33
pattern from a distance as you can see
06:36
that looks like a Meade gray it’s not
06:41
white it’s not black because it’s a
06:43
pattern of 50% black and 50% white which
06:47
your eye perceives as mid gray and
06:50
that’s part of the design of the pattern
06:53
so that when we look at the pattern from
06:56
a distance we can immediately see which
06:58
parts are burnt
07:01
well back to white remember we’re going
07:04
to be doing this test on black anodized
07:06
aluminium and with black anodized
07:08
aluminium what we’ve got to try and do
07:10
is evaporate away the top surface which
07:13
is the salient and then we’ve got to
07:15
evaporate away the inter crystalline
07:17
black dye that’s hiding underneath the
07:20
top sailing surface now if we remove all
07:22
of the black dye which will get a nice
07:25
white mark like this but if we don’t
07:30
evaporate away all of the dye we shall
07:33
get something like this so this has been
07:37
set up so that it’s got a fixed dpi
07:39
in x and y 254 the machine knows that
07:45
it’s got to step down every time point
07:48
one okay so here’s that pattern and
07:52
that dimension there in both directions
Transcript for Let’s Test Some Fiber Laser Pulses (Cont…)
08:02
not 0.1 millimeters because the problem
08:07
with this and any other laser machine is
08:11
it cannot produce sharp corners at this
08:15
size this along with any other laser is
08:18
going to have a round beam so it cannot
08:26
produce sharp corners and the claim for
08:30
this machine is that it has got a beam
08:33
diameter of naught point O six five
08:38
millimeters diameter and that’s what
08:42
I’ve drawn here
08:43
that’s a naught point O six five beam
08:47
diameter now you might ask the question
08:53
why have you drawn it like this well
08:56
what happen is as the software comes in
08:59
and analyzes what it’s got to do it will
09:02
come across a black pixel and it will
09:04
turn on a black pixel signal just there
09:07
and then it will run out of black pixel
09:10
just there and then it will start
09:12
another black pixel there and so it will
09:15
go across and produce lines it will
09:19
produce signals to the light so it says
09:20
turn on turn off turn on turn off and I
09:23
don’t think this machine knows anything
09:25
about this little bit here and this
09:28
little bit here so the net result is
09:32
we’re gonna finish up I think but that’s
09:35
what we could find out with a pattern
09:37
that looks like this now it’s only going
09:41
to drive across the center of the pixels
09:44
because as I just pointed out to you
09:46
I’ve defined that these lines here are
09:50
254 pixels per inch which makes this
09:54
dimension here not point 1 so it’s going
09:57
to produce naught point 1 lines even
10:00
though it comes across black pixels all
Transcript for Let’s Test Some Fiber Laser Pulses (Cont…)
10:03
it’s going to do is is
10:05
the age of the pixel and the age of the
10:08
pixel and turn on off on off like that
10:13
so effectively even though I’ve drawn
10:15
black pixels it’s actually going to draw
10:19
single black lines which hopefully are
10:22
not 0.065 millimeters wide because this
10:25
is a pulsing system I anticipate we
10:28
cannot change the line width it is what
10:31
it is unless we mess around with the
10:33
focal distance the whole principle of
10:36
this test pattern was so that we can
10:37
have a quick visual check to see whether
10:41
or not we got 50% gray and 50% white to
10:45
give us a meet grey if these marks are
10:48
not completely white it means we haven’t
10:51
put enough power in to completely
10:53
evaporate the black Danny if we get
10:56
these marks nice and clean and white
10:59
then we shall still have approximately a
11:03
mid gray look to the pattern because if
11:07
we take a quick look at these two pieces
11:10
that hanging out the end here they’re
11:12
roughly 32 33 point 2 units of area and
11:17
then when I look at this little red area
11:20
here it’s 17.5 but of course there are
11:24
two of those so – 17.5 s is 35 33 give
11:30
or take a little bit we’re not going to
11:32
get too fussy we’re is still expecting
11:34
to see with this pattern a mid gray look
11:38
or if we see a completely white look it
11:40
means that we’ve either over burnt these
11:43
patterns which I can’t really see
11:46
happening because we’ve got to remember
11:48
the possibility that we have got a beam
11:50
which has got a power distribution and
11:55
I’ve drawn it upside down this time but
11:57
effectively what we’ve got is got more
11:59
power in the centre of the beam I’m
Transcript for Let’s Test Some Fiber Laser Pulses (Cont…)
12:01
anticipating that regardless of the
12:04
speed at which we run we shall always
12:08
get the same position power level in the
12:13
beam which will be that width of line
12:16
whatever
12:16
width of line happens to be this is not
12:19
the same as a continuous power layer
12:23
where when you change the speed you will
12:25
change the width of the line because
12:28
you’re only using the very high peak
12:30
power as you get faster and as you get
12:33
slower you allow more and more of this
12:36
Gaussian curve to have it’s burning
12:38
effect its power to come in I don’t
12:41
think that’s going to happen here so I’m
12:43
expecting to see a fairly constant
12:45
thickness line we might see some
12:47
ghosting of some sort which would
12:50
indicate this Gaussian distribution
12:54
power coming into play we’re going to
12:57
find out what this machine is actually
12:59
capable of with this simple test we can
13:01
see that the program is very nicely
13:03
outlined for us so we don’t have to
13:06
guess where to put the material
14:06
so let me catch this in the light right
Transcript for Let’s Test Some Fiber Laser Pulses (Cont…)
14:08
you’ll see that there’s a whole band of
14:11
results across there where the surface
14:13
has really been badly damaged and the we
14:17
worked our way properly even through to
14:20
the aluminium underneath we’ll have to
14:21
check it out under the microscope and we
14:26
can see that same band when we look at
14:28
them from a distance including these
14:30
three just here so we can study this
14:34
stuff under the microscope and see what
14:36
we can find
14:36
now I’ve had a quick look at the first
14:39
set of results that we’ve done there
14:41
before revealing anything to you guys
14:43
and there are some fairly interesting
14:48
pretty serious inconsistencies in the
14:50
results not what I would expect and I’m
14:54
sure these are not results that Lotus
14:57
will expect when I reveal them to them
14:59
the first thing I must do is to make
15:00
sure that the machine is acting
15:02
consistently now here we are I’ve
15:04
switched the machine off I’ve switched
15:05
the machine on again I’ve really origen
15:09
the machine and I reset the program but
15:13
we’re running the same program again
15:15
immediately beside the first one so that
15:17
we can do a comparison now the only
15:20
difference between the two programs is
15:22
the wording at the bottom the wording at
15:25
the bottom says you need errection on
15:27
the first one and it should say
15:29
bi-directional I’ve set all the
15:32
parameters to bi-directional but I
15:34
failed to change the wording so this one
15:37
has got the correct wording on it same
15:40
pattern
16:37
okay so I’m now going to examine this
Transcript for Let’s Test Some Fiber Laser Pulses (Cont…)
16:39
under my little microscope my little USB
16:42
microscope there I’m going to take a
16:44
look on the screen at exactly what’s
16:46
going on the one nanosecond results are
16:50
supposed to be CW continuous wave so as
16:54
I look down here at the various
16:55
frequencies that run from a thousand
16:57
kilohertz down to 5 kilohertz we should
17:01
see exactly the same pattern lovely
17:05
that’s just what we expect you to see so
17:08
we carry on down 800 700 600 500 400
17:17
kilohertz what’s going on there 300 –
17:25
and we’re back to normal
17:30
150 25 10 and 5 so we’ve got lovely
17:41
consistent results all the way down CW
17:43
as you would expect because that’s
17:45
exactly what it says constant and
17:47
throughout the frequency range we’ve got
17:50
good results except at 300 and 400
17:53
kilohertz now let’s take a look at some
17:56
others we’re not going to take a look at
17:58
all the results but let me just jump in
18:01
somewhere at somewhere like look at 6 9
Transcript for Let’s Test Some Fiber Laser Pulses (Cont…)
18:04
a second now interesting that we’ve got
18:11
several things that we can observe on
18:13
there first of all this is
18:17
bi-directional scaling and we can see
18:20
that because look here is the start
18:22
point of the scan when we go in this
18:24
direction and here is the start point of
18:27
the scan when we go in districts can you
18:29
see the intense dots at the beginning of
18:32
the scan now that is not something that
18:34
I was expecting I’m expecting these to
18:36
be uniform all the way along and in in
18:39
addition to that although these are very
18:41
very thin lines these are a lot thinner
18:44
than 0.06 because look point oh six how
18:48
many of these lines do you think I could
18:50
get
18:50
these two the answer is at least two of
18:53
them so that means that probably this
18:55
line here is about 0.03 thick so that’s
19:00
the great advantage of knowing the scale
19:02
of this picture point one long and point
19:04
one pitch wide well you can look and say
19:07
that the lines are already longer than
19:09
0.1 because first of all look they’re
19:11
overlap with each other so something
19:14
strange going on here with the timing
19:16
and with the power and we could see also
19:19
that we’ve got a halo around the outside
19:21
of each of these so let’s just push on a
19:24
little bit well let’s just go back a
19:26
little bit because I have seen something
19:28
else than 800 kilohertz and that is CW
19:35
continuous wave mode and those to be
19:38
approximately what we expected about
19:40
2006 5 long with little bits on the end
19:44
that sort of just about overlap each
19:46
other so that’s pretty representative of
19:49
what I was expecting if you remember
19:50
when I looked at the picture beforehand
19:52
that there is 800 kilohertz at 2
19:57
nanoseconds so that’s more or less one
19:59
of the numbers I’m allowed to use for
Transcript for Let’s Test Some Fiber Laser Pulses (Cont…)
20:02
peak power right so that’s 2 nanoseconds
20:07
850 kilohertz and this is 800 kilohertz
20:10
at 2 nanoseconds look at the width of
20:13
the line difference between this and
20:15
this these are both set at exactly the
20:17
same focus point okay so this is CW what
20:21
this is 2 nanoseconds time shouldn’t
20:23
make any difference basically what’s
20:25
happening here is we’re only just making
20:28
it to the most powerful part of the
20:31
center of the beam and that’s the part
20:33
that’s doing the drawing of this line
20:34
whereas here we’ve got more time and so
20:38
consequently what’s happening is we’re
20:39
we’re allowing more of the beam width to
20:44
do the burning it may get a lower power
20:46
but it’s still being allowed to burn
20:49
further up the Gaussian distribution
20:51
shape of the beam let’s go back to the
20:54
8th known a second hmm
20:59
where’s my dash is gone where my dash is
21:03
gone ah there they are they’re very thin
21:07
but they’ve also got ghosting around
21:09
them you’ll see and they have got a
21:13
little bit of heavy spot at the
21:16
beginning of the burn the beam is
21:20
getting a bit thicker now look what’s
21:22
happened there first of all we’ve got a
21:24
very distinct white patch at the
21:25
beginning of every burn and then what
21:29
we’ve got we’ve got a well you can see
21:32
we’ve got a little deep black bit in the
21:34
middle here which i think is probably
21:37
burning right the way through to the
21:40
aluminium underneath and you’ll also
21:42
notice got a yellow tinge to it as well
21:44
which to me would indicate that we’re
21:46
melting the aluminium oxide so let’s
21:51
push on that was at a frequency of 600
21:56
kilohertz with eight nanosecond pulse oh
22:00
dear
Transcript for Let’s Test Some Fiber Laser Pulses (Cont…)
22:03
we’ve got a pretty significant burn all
22:05
the way across there no dashes where my
22:07
dash is gone and there it is again look
22:15
how yellow it is dropping down from 200
22:18
to 100 kilohertz
22:19
we’ve got her dashes back nothing else
22:22
has changed now I was convinced that I
22:25
had got a problem with my programming so
22:28
I’ve been in and I’ve checked my program
22:30
everything is exactly as I expect it to
22:33
be on every one of these having found
22:36
that these tests have not exactly gone
22:38
quite to expectations I’ve got a
22:42
question whether or not first of all
22:43
I’ve been programming them right and the
22:47
answer that question is I’m absolutely
22:48
sure that I must be programming the
22:51
right because some of the results are
22:53
working perfectly fine and when I look
22:56
at my program everything is consistent
22:59
throughout the program all I’m doing is
23:02
changing basically one number at a time
23:05
it’s either pulse width or pulse
23:08
frequency
23:10
the power is always a hundred percent
23:12
and the scan speed in this particular
23:15
instance is always 250 millimeters a
23:18
second there’s something strange about
23:22
pulse frequency because when we look at
23:24
300 and 400 kilohertz that’s where we
23:28
seem to be getting most of the problems
23:30
I’m absolutely sure it’s not the XY
23:32
mirror system that’s at fault because
23:34
the mirror system is rotating at a
23:37
steady speed whatever that speed is and
23:39
it doesn’t go click click click click
23:41
click to make my dashes it’s going at a
23:46
steady speed and the laser itself is
23:48
switching on and off at a frequency
23:50
which causes those dots to happen so
23:53
there’s some sort of problem between the
23:56
control software and the firing software
23:59
where this is a unique problem to this
Transcript for Let’s Test Some Fiber Laser Pulses (Cont…)
24:02
machine because it’s got a problem I
24:04
can’t say but what we are going to have
24:07
to do is to get locus laser involved and
24:10
make them aware that I’ve got an issue
24:13
so even though we’ve come across this
24:15
problem it’s not going to stop us
24:18
investigating one or two other things
24:19
that we’ve found today I am particularly
24:25
interested in trying to find out how
24:28
pulse width and pulse frequency can be
24:31
used and manipulated to generate
24:33
specific amounts of power and how that
24:36
power goes down into the job now when I
24:39
say power we’re talking about light
24:41
energy we’re talking about light
24:43
intensity stimulating atoms remember so
24:46
when I use the word power that’s what I
24:48
really mean but never forget the fact
24:51
that it’s stimulation of atoms that’s
24:53
causing the effects that we’re looking
24:54
at we can obviously regulate the power
24:58
to bring it back down to whatever but
25:01
I’ve used 100% today and I’ve used a
25:03
standard scan speed of 250 millimeters a
25:07
second which as I said is one eighth of
25:09
the maximum that this machine could
25:11
deliver but different speeds are going
25:15
to produce different results when we
25:16
combine it with pulse frequency and
25:18
pulse width and that’s the strange
25:21
relationship that I want to
25:23
try and take a quick look at because
25:25
there’s some very strange but simple
25:27
maths involved now if I write this
25:30
example we’re going to use my little
25:32
north point one millimeter long line as
25:34
our reference to do some calculations
25:38
with now as I said we were doing these
25:42
tests at 250 millimeters a second and
25:46
therefore it’s fairly easy to calculate
25:48
that one millimetre of travel at 250
25:52
millimetres a second takes place in
25:55
North Point
25:56
0:04 of a second or 4 milliseconds per
25:59
millimetre okay so therefore my line is
Transcript for Let’s Test Some Fiber Laser Pulses (Cont…)
26:05
actually 0.1 1/10 of that travel so it’s
26:09
going to take point four of a
26:11
millisecond to travel 0.1 of a
26:14
millimeter so if I’m going to produce
26:16
that lined with a pulse repetition rate
26:19
of 1000 kilohertz that basically is a
26:24
million cycles per second so if I take
26:29
one second to divide it by a million I
26:32
finish up with a millionth of a second
26:34
so it didn’t actually take Einstein to
26:37
help us with that bit of the equation
26:39
and now for the next bit this is just as
26:42
simple if we take the time to travel 0.1
26:46
of a millimeter which is 0.4
26:49
milliseconds and and and the time it
26:51
takes to complete one cycle or one pulse
26:55
point four milliseconds divided by one
26:57
microsecond which when you mess around
27:00
with the Matteson that and the numbers
27:02
it comes out to four hundred pulses per
27:04
naught point 1/2 a millimeter so if we
27:07
go to the other extreme of my test where
27:09
I was using 5 kilohertz there it means
27:13
if we take one second to divide it by
27:15
5000 we finish up with a cycle time for
27:19
just one cycle of Northpoint two
27:22
milliseconds so therefore when we’re
27:25
travelling naught point one of a
27:27
millimeter at 5 kilohertz
27:29
we’re only getting two pulses per length
27:33
of line we’re getting 400 pulses
27:36
in the line when we do it at this speed
27:38
and two pulses when we do it at this
27:41
speed okay let’s put those numbers into
27:43
a little bit more of a reality check the
27:49
very first test that we did was using a
27:52
two nanosecond pulse so we worked out
27:55
that at 5 kilohertz each pulse each
28:00
cycle was not 0.2 milliseconds right but
Transcript for Let’s Test Some Fiber Laser Pulses (Cont…)
28:05
at the speed that we’re traveling we’re
28:07
doing point 4 milliseconds over the
28:11
whole distance so there’s our whole
28:14
distance of not 0.1 millimeters and
28:19
there’s our time to do half of it
28:23
because we’re getting two of those
28:25
pulses per point one of a millimeter so
28:31
we’ve got a time for one pulse if not
28:35
point to really seconds but we’re
28:38
actually using a pulse at the beginning
28:41
of that there and another pulse there
28:44
and another pulse here which is actually
28:47
only 2 nanoseconds wide so how many of
28:53
these two nanosecond pulses could we get
28:56
in point two of a millisecond well the
29:00
answer is 100,000 just by this very
29:06
simple bit of maths 2 milliseconds
29:07
divided by 2 nanoseconds but really
29:11
we’re only going to put one pulse into
29:14
that period of time and it’s there and
29:15
there and there regardless of how many
29:18
other pulses we could get in between so
29:21
that means that we’ve got one part in a
29:25
hundred thousand when we’re heating the
29:28
material and then 999,000 when the beam
29:33
or the power is off so that’s a very
29:38
very large cooling rate in relation to a
29:41
heating rate and that rate that heating
29:45
ratio
29:45
is very important to us when we’re
29:47
dealing with pulses we’re no longer
29:49
working as we were with the constant
29:52
wave laser machine a continuous power
29:55
here we’ve got little teeny-weeny pulses
29:58
and we’ve got a heating effect and a
Transcript for Let’s Test Some Fiber Laser Pulses (Cont…)
30:01
cooling effect and that’s the huge ratio
30:04
between the two so when we work in a
30:06
thousand kilohertz we’ve worked out that
30:10
the pulse rate was one microsecond a
30:13
millionth of a second per cycle so here
30:16
we are we’ve got all these millionths of
30:18
a seconds and in one point one of a
30:21
millimeter we’ve got four hundred pulses
30:25
but it does mean to say that we’ve still
30:28
got two nanoseconds for this pulse and
30:31
then a thousand nanoseconds later we’ve
30:35
got another pulse and then a thousand
30:39
nanoseconds later we’ve got another two
30:41
nanosecond pulse so that’s a ratio of
30:44
two nanoseconds per thousand nanoseconds
30:48
which is a microsecond and when you do
30:51
that very simple calculation it’s five
30:53
hundred to one so that’s the staggering
30:54
difference between these two frequencies
30:58
for the same pulse duration okay that’s
31:04
that’s the one thing that you’ve got to
31:06
remember we’ve got a beam which is
31:08
roughly not 0.06 diameter 60 micro
31:12
meters diameter so if we divide those
31:16
400 pulses equally amongst that not 0.1
31:20
millimeter we shall find that actually
31:23
we are going to advance naught point 2 5
31:31
microns per pulse so what that means is
31:38
we’re going to get these pulses which
31:41
are overlapping by a very very large
31:45
amount in other words this dot is only
31:47
going to move forward a small amount and
31:49
it’s going to almost stand on the same
31:51
spot repeating itself so that’s how
31:54
we’re going to get our heating effect
31:55
because we’re not moving very much
31:58
for every step of the pulse advancement
Transcript for Let’s Test Some Fiber Laser Pulses (Cont…)
32:01
well it’s pretty obvious really when we
32:03
look at this situation because we’ve got
32:05
a nought point six not point O six but
32:10
the type by the time we get to here we
32:14
will have already covered roughly not
32:17
point one so we’ve only got two pulses
32:21
as we said in this not point one so not
32:25
only have we got a huge off time in
32:29
relation to the on time we’ve got a huge
32:32
step difference so we’re going to get
32:34
virtually no repeat heating on top of
32:38
the one that we put down before this is
32:41
all very clear in my mind how this is
32:43
beginning to work this machine and I
32:45
hope I’m not be fuddling you with that
32:47
with the numbers and go away for
32:49
yourself and maybe think about this in a
32:51
bit more detail but what I am slightly
32:54
worried about is the inconsistent
32:56
results that we’re getting and why bear
32:59
in mind these two results are both for
33:01
the same pulse width of two nanoseconds
33:04
and the only thing that we’re changing
33:06
here at the moment is the frequency of
33:09
which with which we’re dispensing these
33:12
pulses so in this instance not only have
33:15
we got a much better heating to call
33:17
heating to cooling ratio we’ve also got
33:20
a much closer over burning of the dots
33:24
so we’re going to get a much great heat
33:26
buildup because of it remember I keep
33:29
talking about vibration and molecules
33:32
and atoms if I vibrate a molecule or an
33:36
atom with a beam of energy it’s not
33:39
going to vibrate on its own it’s going
33:42
to nudge and vibrate its neighbors and
33:45
nudging and vibrating its neighbors is
33:47
basically conduction we’re going to
33:50
vibrate those molecules into a hotter
33:53
state because they’re going to get
33:55
excited and that’s how conduction
33:57
happens through the material so the
34:00
other thing that we’ve got to take into
Transcript for Let’s Test Some Fiber Laser Pulses (Cont…)
34:01
account when we talk about pulses is the
34:03
fact that some of these pulses are long
34:06
and shallow just because of post is 350
34:09
nanosec
34:10
long it isn’t necessarily the same power
34:13
throughout its pulse length whereas the
34:16
shorter pulses tend to be just a spike
34:18
of energy there are these fill in the
34:20
middle here which are a mixture of a
34:23
spike of energy and a certain amount of
34:26
let’s call it a body energy so it’s yet
34:30
a further complication that we’ve got to
34:31
take into account when we try and choose
34:33
a waveform which is why it’s so
34:36
important to try and see and understand
34:39
what the relationship between damage and
34:43
frequency and pulse length is one other
34:47
rather interesting thought crossed my
34:50
mind as I was doing those very simple
34:54
calculations and that is if we are
34:58
running a naught point one line at two
35:02
thousand millimeters a second with the
35:05
slowest pulse possible when we tell the
35:08
pulse to stop that’s the last pulse
35:10
remember and the last pulse is on its
35:13
way and it will carry on for another 350
35:16
nanoseconds how far is that 350
35:22
nanoseconds going to cause my line to
35:25
overrun I’m going to make the line
35:28
longer by 350 nano seconds it’s a small
35:31
point but it’s something that I really
35:34
want to just build into my equation is
35:36
it important or is it not important
35:38
my very basic maths and I’m going to ask
35:40
the question in this way so that
35:42
everybody can understand how many 350
35:44
nano seconds chunks are there in one
35:48
second
35:49
and the answer is 2.8 million if we
35:53
travelled at one meter a second the
35:57
distance covered in 350 nano seconds
36:00
will actually be just one of those
Transcript for Let’s Test Some Fiber Laser Pulses (Cont…)
36:03
chunks ie it’ll be one meter divided by
36:07
this big number that we found here and
36:10
the answer to that question is not 0.35
36:13
micro meters not 0.35 microns so
36:19
therefore at 2 meters a second we’re
36:22
going to get an over trap
36:23
nor point seven microliters it’s it’s
36:27
it’s negligible amount when we do our
36:30
line we’ve automatically got half of
36:33
them whipped hanging at the end so a
36:35
tenth of that beam width isn’t gonna
36:38
make a lot of difference it’s just a
36:41
simple piece of information that I can
36:43
now put to one side and say the beam
36:46
length and the over travel has no effect
36:48
on this at all what I’m a lot more
36:50
concerned about when I look at these
36:51
pictures is why from all the theory that
36:57
we dealt with up to now technically we
37:00
should have a fairly steady stream of
37:02
energy coming out of the laser why is it
37:05
that when the laser switches on it goes
37:08
and does one power and then as it gets
37:14
into its stride it either goes heavier
37:18
or in some cases lighter
37:21
I haven’t yet worked that out because I
37:24
haven’t studied the patterns enough the
37:27
one thing that we can always say is that
37:28
there is a different power at the start
37:31
of the bee and you might say well that’s
37:33
because remember the pulse-width looks
37:37
like this therefore you know it will
37:39
always have a starting point which is
37:42
very sharp yes but what you’re
37:43
forgetting is that we’ve got four
37:46
thousand we’ve got four hundred of these
37:48
in that like that so there is no reason
37:54
to have that spot there any heavier than
37:57
the rest of the line length so I’ve got
Transcript for Let’s Test Some Fiber Laser Pulses (Cont…)
38:03
quite a lot of questions technical
38:05
questions which I’m not sure whether
38:08
Lotus laser can answer or whether this
38:12
is stuff that’s got to go back right to
38:14
people like Jay PT who probably won’t
38:17
even want to tell me so I’m going to
38:20
gather together some data and send it
38:22
off to Lotus later and we shall have to
38:25
put things on hold for a little while
38:27
until I can come up with some reasonably
38:29
satisfactory answers to these questions
38:31
if I just want to go blip-blip blip-blip
38:33
blip-blip blip-blip blip-blip
38:35
with this machine it does a fine job and
38:39
that’s what it’s designed to do I’m not
38:42
trying to find out how well it does that
38:45
I couldn’t care less what I want to find
38:47
out is how it works and at the moment
38:50
I’ve found my little simple test has
38:52
shown me that there are conditions under
38:55
which this system does not work in the
38:57
way in which I expected and on that note
39:00
I think we should finish and I’ll go and
39:02
get myself another cup of coffee and
39:04
I’ll catch up with you in the next
39:06
session whenever that is
39:09
cheerio now and thanks for your time
