Transcript for Speed Up Laser Engraving – Optimising Engraving Cycle Times
1
00:00:06,090 –> 00:00:11,030
The Concise RDWorks Learning Lab with Russ Sadler.
2
00:00:11,030 –> 00:00:16,520
Session 30: Optimizing Engraving Cycle Times.
3
00:00:16,520 –> 00:00:20,750
Many moons ago, I seem to remember telling you that engraving was a big subject.
4
00:00:20,750 –> 00:00:26,840
Now there is one feature that is common to all types of engraving and that is scan.
5
00:00:26,840 –> 00:00:31,010
Backwards and forwards and backwards and forwards and backwards and forwards.
6
00:00:31,010 –> 00:00:37,760
Whether you are doing it for logos, text or as latterly photographs,
7
00:00:37,760 –> 00:00:46,610
and the amount of time that it takes to go backwards and forwards and gradually scan down a picture is dependent upon so many different factors.
8
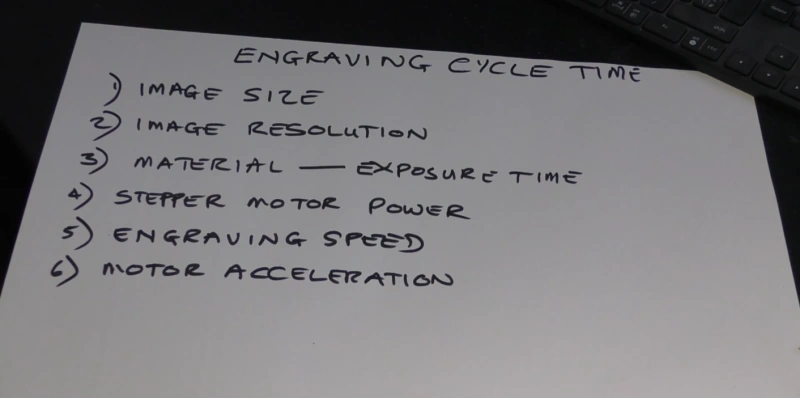
00:00:46,610 –> 00:00:54,650
And here are the six key factors that will influence the cycle time for an engraving.
9
00:00:54,650 –> 00:01:02,630
So we’re going to look at these two factors here to start with, and they are tied in with this motor power as well.
10
00:01:02,630 –> 00:01:09,320
But particularly, I want to talk about these two factors here. So you’ve got a good understanding of what these are all about.
11
00:01:09,320 –> 00:01:15,710
Right? Let me explain my dodgy drawing here. First of all, what is acceleration?
12
00:01:15,710 –> 00:01:21,140
How many millimetres per second per second you are changing your speed by?
13
00:01:21,140 –> 00:01:25,460
I’ve got a simple task for this laser machine to perform.
14
00:01:25,460 –> 00:01:30,800
I want it to draw a line. It’s a scan line, 300 mm long.
15
00:01:30,800 –> 00:01:38,150
But the thing about scanning is when you specify in your scanning parameters that you want to run at 300mm a second,
16
00:01:38,150 –> 00:01:42,980
it will run at 300mm a second over the length of that line.
17
00:01:42,980 –> 00:01:47,690
But it doesn’t just instantly start off at the beginning of this line,
18
00:01:47,690 –> 00:01:57,410
300mm a second and stop. No, it has to accelerate up to 300mm a second, then draw the line and then stop.
19
00:01:57,410 –> 00:02:01,340
Turn around, accelerate up to 300mm a second.
Transcript for Speed Up Laser Engraving – Optimising Engraving Cycle Times (Cont…)
20
00:02:01,340 –> 00:02:04,610
Draw the line on the way back and decelerate again.
21
00:02:04,610 –> 00:02:13,040
So there are three phases to drawing a scan line the acceleration, the drawing and the deceleration.
22
00:02:13,040 –> 00:02:22,310
So let’s just take a look at how this 300mm long line, how long it’s going to take with different accelerations.
23
00:02:22,310 –> 00:02:27,450
Now, acceleration is the change of speed.
24
00:02:27,450 –> 00:02:32,820
And it’s the change of speed in this case of millimeters per second per second.
25
00:02:32,820 –> 00:02:37,140
I’m going to set the acceleration to 300mm, a second, a second.
26
00:02:37,140 –> 00:02:42,690
And at the end of the first second, I’m traveling at 300mm per second.
27
00:02:42,690 –> 00:02:47,190
If I was to go on to another second, it would be 600mm a second.
28
00:02:47,190 –> 00:02:54,180
But I’m not because I’ve reached my goal of 300mm a second speed, which is my line, your speed.
29
00:02:54,180 –> 00:03:00,450
Now I’m going to draw a line which is 300mm long. Well, how long is it going to take me to draw that line?
30
00:03:00,450 –> 00:03:05,490
Well, I’m already traveling at 300mm a second and I’ve got a 300mm long line,
31
00:03:05,490 –> 00:03:12,180
so it’s going to take me one second to draw that line, which is one second across the bottom of that time here.
32
00:03:12,180 –> 00:03:17,310
Okay. And then it’s going to take another second here.
33
00:03:17,310 –> 00:03:26,700
To drop back to zero at the end of the line, so it’s taken a total of three seconds to draw my 300 mm long line.
34
00:03:26,700 –> 00:03:32,520
Now if I change the acceleration only to 150 millimeters a second,
35
00:03:32,520 –> 00:03:39,030
in other words it’s half the acceleration. It’s going to take twice as long to reach 300mm a second.
36
00:03:39,030 –> 00:03:43,380
So it’s going to take two seconds to reach 300 mm a second.
37
00:03:43,380 –> 00:03:50,730
But once I’m at 300mm a second, it’s still only going to take one second to draw my line.
38
00:03:50,730 –> 00:03:58,290
And there it is one second. But it’s going to take another two seconds to decelerate back down to zero again.
Transcript for Speed Up Laser Engraving – Optimising Engraving Cycle Times (Cont…)
39
00:03:58,290 –> 00:04:06,240
So here it takes three seconds to draw 300mm line. And here it takes five seconds to draw a 300 mm line.
40
00:04:06,240 –> 00:04:10,230
So it’s not double the time because I’ve got half the acceleration.
41
00:04:10,230 –> 00:04:18,680
That’s just an illustration that the faster you can accelerate, the more time you can save on a cycle.
42
00:04:18,680 –> 00:04:22,500
I mean, you could run this at twice the speed. Okay.
43
00:04:22,500 –> 00:04:30,100
But the problem is to run it at twice the speed, you’ve got to have the acceleration up to that speed.
44
00:04:30,100 –> 00:04:34,750
And now comes another issue, which is the motor power itself.
45
00:04:34,750 –> 00:04:45,700
Now the problem with a stepper motor is the faster the stepper motor runs, the less torque or the less ability it has to drive.
46
00:04:45,700 –> 00:04:52,810
And so consequently, we’re very quickly going to hit a ceiling where our aspirations, 600mm
47
00:04:52,810 –> 00:04:59,770
a second at a certain acceleration are not possible because we don’t have the power in the motor.
48
00:04:59,770 –> 00:05:08,290
The faster the motor runs, the less powerful it becomes. So we’ve got a very strange set of circumstances here which play together.
49
00:05:08,290 –> 00:05:13,180
There is no way that I can begin to describe that situation to you on paper.
50
00:05:13,180 –> 00:05:19,210
We’re going to have to go to the laser machine and we’re going to have to experiment with these three factors.
51
00:05:19,210 –> 00:05:24,070
We can’t change the stepper motor power. We’ve got a certain stepper motor.
52
00:05:24,070 –> 00:05:30,090
But what we can do, we can play with the engraving speed and the motor acceleration.
53
00:05:30,090 –> 00:05:38,400
And that will, in fact, affect the cycle time. Right, we’re going to start off by taking a quick look at the head that I’ve got
54
00:05:38,400 –> 00:05:44,580
on this laser machine and the sort of head that you might have on your machine.
55
00:05:44,580 –> 00:05:50,010
Now this is a fairly typical head that you would have on the laser machine.
56
00:05:50,010 –> 00:05:56,610
And if we take a look at it, the weight of it around about 300 grams.
57
00:05:56,610 –> 00:06:03,210
I’ve completely redesigned the head to make this into what I call a lightweight head.
Transcript for Speed Up Laser Engraving – Optimising Engraving Cycle Times (Cont…)
58
00:06:03,210 –> 00:06:10,440
All we’ve really got on here is the lens tube and as little mass as possible to
59
00:06:10,440 –> 00:06:17,190
just hold a very lightweight mirror plate in place as opposed to this heavy one.
60
00:06:17,190 –> 00:06:24,570
With all these big brass fittings on it and this big lump of aluminium here and this big fitting down at the bottom.
61
00:06:24,570 –> 00:06:35,460
So everything has been lightened so that this is roughly a third of the mass of this one. You might say, well, what’s the benefit of that?
62
00:06:35,460 –> 00:06:45,210
The reason why I’ve changed the head is because Isaac Newton told me to. Look here’s Newton’s second law of motion.
63
00:06:45,210 –> 00:06:50,460
It clearly says force equals mass times acceleration.
64
00:06:50,460 –> 00:06:58,620
OK, so it’s a formula. What on earth does that mean? Well, look, I’ve got a stepper motor on this laser machine, which is the force,
65
00:06:58,620 –> 00:07:07,580
and at the moment it is doing a job and we know that if I was to use this head.
66
00:07:07,580 –> 00:07:17,690
The laser machine would be set up and capable of driving this head backwards and forwards at, say, 600mm a second with a certain amount of acceleration.
67
00:07:17,690 –> 00:07:22,160
So let’s put this head into the equation and say force of one.
68
00:07:22,160 –> 00:07:30,350
And it doesn’t matter what the numbers are. Force of one with a mass of one gives me a certain acceleration.
69
00:07:30,350 –> 00:07:37,130
So the equation is balancing look, one times one equals one, which is exactly what the equation says.
70
00:07:37,130 –> 00:07:47,210
Now, if I can reduce this mass by 50 percent, then here’s what the equation looks like.
71
00:07:47,210 –> 00:07:51,320
I can reduce the mass by 50 percent to half.
72
00:07:51,320 –> 00:08:00,830
If I keep the force the same without asking the motor to do any more or less work, then I can make the acceleration twice as fast.
Transcript for Speed Up Laser Engraving – Optimising Engraving Cycle Times (Cont…)
73
00:08:00,830 –> 00:08:07,810
So in my situation here, where I’ve got a force of one because I’ve not changed the stepper motor.
74
00:08:07,810 –> 00:08:12,220
I’ve gone down to naught point three three,
75
00:08:12,220 –> 00:08:24,010
so I can multiply the acceleration by three. So I could put three times as much acceleration into this head as I can into this head.
76
00:08:24,010 –> 00:08:32,320
So that immediately gives me the opportunity to run the machine and generate much faster cycle times.
77
00:08:32,320 –> 00:08:38,830
OK, let’s go and look in RDWorks. We need to go to file.
78
00:08:38,830 –> 00:08:50,890
Vendor settings, and you will get the opportunity here to put in a password, which is RD8888.
79
00:08:50,890 –> 00:08:57,420
Enter. And now it lets you into a magical secret part of the software.
80
00:08:57,420 –> 00:09:06,560
So we need to read. And there it goes. And now the numbers that are in this chart here, are the numbers that are in my machine.
81
00:09:06,560 –> 00:09:15,470
This is vendor settings and in vendor settings most of the numbers in here are safe numbers that
82
00:09:15,470 –> 00:09:25,740
the vendor ,the seller thinks you shouldn’t exceed. Right now over on the side panel here you find we’ve got a tab called user.
83
00:09:25,740 –> 00:09:30,180
Now in user, you’ve got all sorts of other settings.
84
00:09:30,180 –> 00:09:41,070
Now these are settings that you are allowed to play with, the vendor settings are basically safety limits that you cannot play with.
85
00:09:41,070 –> 00:09:48,330
So the vendor says, Yeah, I’ll let you go up to say, 100mm a second maximum speed.
86
00:09:48,330 –> 00:09:52,200
You can put a thousand millimeters a second speed in here,
87
00:09:52,200 –> 00:10:02,610
but it won’t allow you to go to a thousand millimeters a second because the restraint has been defined by the vendor at 100 millimeters a second.
Transcript for Speed Up Laser Engraving – Optimising Engraving Cycle Times (Cont…)
88
00:10:02,610 –> 00:10:10,800
So you can put what numbers in you like here, but if the vendor settings are wrong, they will have no effect on your machine.
89
00:10:10,800 –> 00:10:13,650
So that’s an important, that’s an important fact
90
00:10:13,650 –> 00:10:22,320
you must understand. If you want to fiddle with these numbers, you may well have to go into your vendor settings and make big adjustments.
91
00:10:22,320 –> 00:10:26,850
It doesn’t mean to say that the machine is going to explode and burst into flames.
92
00:10:26,850 –> 00:10:38,490
So we’re going to be interested mainly in the X scan because when you’re doing a scanning operation, the movements in Y are very, very, very small.
93
00:10:38,490 –> 00:10:46,620
And you don’t have any serious acceleration problems. So we’ve got maximum speed 2000
94
00:10:46,620 –> 00:10:50,580
Wow, that’s very high.
95
00:10:50,580 –> 00:10:59,880
Normally on your machine, you’ll probably find that that set to something like about maybe 500, 600. 2000 is a dream.
96
00:10:59,880 –> 00:11:08,080
So I’m not worried about it, because I’m going to go maximum on this machine, we might be able to get up to 1500….
97
00:11:08,080 –> 00:11:12,910
Might. So let’s not worry too much about that number.
98
00:11:12,910 –> 00:11:23,110
Just make sure that it is high. OK, and then we’ve got acceleration here, set to 40000. 40000?
99
00:11:23,110 –> 00:11:26,050
You may well find that yours is set to 20000.
100
00:11:26,050 –> 00:11:33,730
Now, I know that this machine has already been set to quite reasonable limits for the weight of the head, the mass of the head.
101
00:11:33,730 –> 00:11:40,610
So we might not have too much change to make on this machine, but we’ll give it a try.
102
00:11:40,610 –> 00:11:46,730
Now on our user settings, we’ve got cut parameters which we’re not interested in.
103
00:11:46,730 –> 00:11:52,400
What we’re more interested in is these things here, which is sweep parameters.
104
00:11:52,400 –> 00:11:59,840
They call it sweep, but it’s basically scanning. OK, so we’ve got a start speed, which is low.
Transcript for Speed Up Laser Engraving – Optimising Engraving Cycle Times (Cont…)
105
00:11:59,840 –> 00:12:06,590
That’s not a problem. Start speed? Mm a second. Then what we’re interested in is this x acceleration.
106
00:12:06,590 –> 00:12:17,640
Now, at the moment, the X acceleration is only set to 20000. And remember, we’ve got a limit in the vendor settings of 40000.
107
00:12:17,640 –> 00:12:19,830
So what are we’re going to do, to start with is just
108
00:12:19,830 –> 00:12:27,570
use the settings that are in the machine and see what we’ve got. Now, to help me in this task what I’ve done.
109
00:12:27,570 –> 00:12:38,460
I’ve drawn a little test rectangle here and I’ve got it set to 400mm the second to start with, scanning with a power of 25 percent.
110
00:12:38,460 –> 00:12:47,070
But what I’ve done here, I’ve got the interval set to point five. My box is a 100 mm wide.
111
00:12:47,070 –> 00:12:52,770
The head is probably going to travel across this way to start with and finish up over
112
00:12:52,770 –> 00:13:01,140
here, at a point where it can accelerate from zero up to 400 millimetres a second,
113
00:13:01,140 –> 00:13:09,390
which is the speed that I’ve asked it to scan at. It will then scan across here at 400mm a second turn off,
114
00:13:09,390 –> 00:13:16,530
but it’ll carry on traveling this way and decelerating to zero from 400 millimetres a second.
115
00:13:16,530 –> 00:13:21,390
Then it will accelerate back up to 400 millimetres a second and scan this way.
116
00:13:21,390 –> 00:13:27,090
So at the end of every stroke, there’s going to be this over travel. To try and see the over travel,
117
00:13:27,090 –> 00:13:32,190
I’ve got a little trick. There are two tricks that I could use, but this is the easiest one for you to understand.
118
00:13:32,190 –> 00:13:40,290
In my bearing here, I’ve got a little groove. I’m going to sit this drill in the groove so that it can just move backwards and forwards.
119
00:13:40,290 –> 00:13:47,550
Once the machine is running, you’ll see what I’m going to do. I’m going to try and find the point at which the bearing stops.
120
00:13:47,550 –> 00:13:52,740
In other words, I’m going to use this like little end stop. If you’re going to try this, don’t do it from here.
121
00:13:52,740 –> 00:14:00,360
Look, you’ve got a laser beam coming across here, and you’ll very quickly find out that laser beams appear to be warm.
Transcript for Speed Up Laser Engraving – Optimising Engraving Cycle Times (Cont…)
122
00:14:00,360 –> 00:14:18,630
So make sure you put your hand over the back of the head and do this adjustment. And I gradually just find the point at which that drill just touches
123
00:14:18,630 –> 00:14:30,780
the head. Now I’m letting my program run to the end because I want to find out how long it took to do that program.
124
00:14:30,780 –> 00:14:37,980
So we’ve got to put several pieces of information on here 400 millimetres a second.
125
00:14:37,980 –> 00:14:48,870
We know that the acceleration was 20000 millimetres per second squared.
126
00:14:48,870 –> 00:14:57,250
And now what we got to do is find out what the over travel is. So I’ll just measure that over travel,
127
00:14:57,250 –> 00:15:11,550
and that’s about six point four. So the next thing we’ll do, we’ll try and run this at 800mm a second.
128
00:15:11,550 –> 00:15:18,480
Just touching, just there. So we’re now running at 800mm a second.
129
00:15:18,480 –> 00:15:25,080
So we’ve doubled the speed. But we haven’t halved the cycle time.
130
00:15:25,080 –> 00:15:31,560
And in practice, to be honest, I don’t think I can run engraving at much more than 800 millimeters a second.
131
00:15:31,560 –> 00:15:36,410
We will go faster than that. We will see where this thing finishes up.
132
00:15:36,410 –> 00:15:42,850
Let’s try running at 1200 millimetres a second. OK.
133
00:15:42,850 –> 00:15:49,080
So immediately you heard there something going wrong, and I’ve just press the pause button.
134
00:15:49,080 –> 00:15:56,040
Because it’s lost steps. It will not run at twelve hundred millimetres a second with that acceleration.
135
00:15:56,040 –> 00:16:03,430
Press reset.. OK, so now we’re back in order.
Transcript for Speed Up Laser Engraving – Optimising Engraving Cycle Times (Cont…)
136
00:16:03,430 –> 00:16:09,130
You heard something went wrong. It’s not dangerous. It’s just you need to stop the machine.
137
00:16:09,130 –> 00:16:14,890
So we change the speed back to a thousand. Yes.
138
00:16:14,890 –> 00:16:31,180
It runs at a thousand. And the over travel is now twenty nine point eight and the cycle time is 11 seconds.
139
00:16:31,180 –> 00:16:42,160
But hang on. It was 11 seconds when we’re at 800mm a second.
140
00:16:42,160 –> 00:16:47,200
So we’ve gone 200mm a second faster,
141
00:16:47,200 –> 00:16:53,590
we’ve got more over travel. But we finish with the same cycle time.
142
00:16:53,590 –> 00:16:59,080
And this is one of the points I wanted to make to you that the amount of over travel
143
00:16:59,080 –> 00:17:06,340
and the speed will cross over at some point in time and the faster you travel,
144
00:17:06,340 –> 00:17:15,250
the more over travel you have, the more wasted the time you have. Because of the acceleration,
145
00:17:15,250 –> 00:17:19,600
up to a thousand millimetres a second. Now what we’ll do now,
146
00:17:19,600 –> 00:17:25,930
we will keep a thousand millimeters a second and we’ll see whether we can push
147
00:17:25,930 –> 00:17:35,630
the acceleration up to decrease this time and get a benefit on the cycle time.
148
00:17:35,630 –> 00:17:44,010
Look, I’ll tell you what I’ll do. I’ll change just the four, backspace, to three.
149
00:17:44,010 –> 00:17:50,200
Thirty thousand. Write.
150
00:17:50,200 –> 00:17:55,530
And now we’ll will read what’s in memory.
Transcript for Speed Up Laser Engraving – Optimising Engraving Cycle Times (Cont…)
151
00:17:55,530 –> 00:18:04,710
Now we’ve got it. Now bear in mind, at a thousand millimetres a second, we were right on the verge of the power of the motor.
152
00:18:04,710 –> 00:18:10,110
We’re nowt going to ask it to accelerate even faster. It’s going to fail.
153
00:18:10,110 –> 00:18:18,280
I can absolutely tell you it’s going to fail. But let’s give it a try.
154
00:18:18,280 –> 00:18:43,160
There you go. We will leave the acceleration. And we will now back the speed off to 800 hundred. So at 800 at the higher acceleration works fine.
155
00:18:43,160 –> 00:18:52,890
Fourteen point eight. Now we’ve managed to get the cycle time down to 10 seconds.
156
00:18:52,890 –> 00:19:06,110
And all we’ve done. 800mm a second, nineteen point eight, 11 seconds. Exactly the same,
157
00:19:06,110 –> 00:19:13,970
800mm a second, and that’s fourteen point eight as opposed to nineteen point eight.
158
00:19:13,970 –> 00:19:17,090
Because we’ve got a greater acceleration,
159
00:19:17,090 –> 00:19:26,720
we got to the run speed faster in a shorter distance and we’ve managed to get another second off the cycle time.
160
00:19:26,720 –> 00:19:31,970
I mean, most people won’t want to run,. I don’t think at 800mm a second.
161
00:19:31,970 –> 00:19:38,030
My guess is that they’re probably going to be closer to 600 mm a second maximum.
162
00:19:38,030 –> 00:19:43,850
Because you just haven’t got enough power with 70 watts to produce decent engraving.
163
00:19:43,850 –> 00:19:48,530
Let me push the power up to 99 per percent because remember, I can do that on this machine.
164
00:19:48,530 –> 00:19:56,350
800mm a second. At the moment, we’ll leave the focus exactly where is.
165
00:19:56,350 –> 00:20:02,570
We’ll drop the table down by about 3mm
Transcript for Speed Up Laser Engraving – Optimising Engraving Cycle Times (Cont…)
166
00:20:02,570 –> 00:20:06,940
It’s not exactly dark, is it?
167
00:20:06,940 –> 00:20:18,680
Let’s try it on a piece of plywood. Full power at 800mm a second. Let’s change the speed to 600 millimetres a second.
168
00:20:18,680 –> 00:20:24,950
A slight difference in the colour, by dropping it down 200mm a second.
169
00:20:24,950 –> 00:20:37,520
Let’s just change the pitch between the lines, because at the moment this is half millimetre pitch and I’ve just about filled that up nicely.
170
00:20:37,520 –> 00:20:47,210
So they’re about a half mill wide lines at the moment to get an even, quite nice even engraving. If I go to point two.
171
00:20:47,210 –> 00:20:50,060
I’m going to be over burning the lines.
172
00:20:50,060 –> 00:21:04,970
And so consequently, you’d expect that double burning would give me a darker burn, from point five to point two, but we’re still on 600 mm a second.
173
00:21:04,970 –> 00:21:14,950
There is a very, very small change in the colour. We’re now up to 28 seconds for something that can be done in 11 seconds.
174
00:21:14,950 –> 00:21:18,280
And we got no benefit to show from it.
175
00:21:18,280 –> 00:21:26,680
Now you’ve been through enough of the early engraving to try and understand why I’m not getting a colour change.
176
00:21:26,680 –> 00:21:39,760
If I drop that to 200mm a second, I probably will get a different color.
177
00:21:39,760 –> 00:21:48,820
Now, the amount of over travel we’ve got now that we’re traveling very, very slowly, is almost nil.
178
00:21:48,820 –> 00:21:52,900
It’s no more than about two millimetres.
179
00:21:52,900 –> 00:22:08,650
So look 400 at 30000 was a slight change of colour, but we had five mm over travel. 67 seconds down to 37 seconds just for a 200mm
Transcript for Speed Up Laser Engraving – Optimising Engraving Cycle Times (Cont…)
180
00:22:08,650 –> 00:22:15,190
a second change. I doubt whether we shall want to run this machine at more than 600 millimeters a second.
181
00:22:15,190 –> 00:22:24,910
So it would make more sense to try and wring the absolute maximum acceleration out of this machine, rather than play with acceleration for high speed.
182
00:22:24,910 –> 00:22:34,930
So I’ve pushed the acceleration up now to 40000 and we’re going to bring the speed to 600 and see what happens.
183
00:22:34,930 –> 00:22:46,330
Six hundred mm a second, 40000 millimetres a second, a second – thirty eight seconds.
184
00:22:46,330 –> 00:22:51,580
So we’ve got greater acceleration, faster speed.
185
00:22:51,580 –> 00:22:54,850
And it’s taking a second longer. OK.
186
00:22:54,850 –> 00:23:07,030
I think my point is proven there is an optimum combination of speed and acceleration that will give you an optimum cycle time.
187
00:23:07,030 –> 00:23:09,490
So that’s one of the things that you need to play with.
188
00:23:09,490 –> 00:23:20,560
Now the other thing that I must point out to you and I did mention this before is this. There will be exactly the same over travel,
189
00:23:20,560 –> 00:23:33,920
nine millimetres of over travel, 600 mm a second, 40000 acceleration and cycle time.
190
00:23:33,920 –> 00:23:42,320
Every time you do a scan, you’ve got nine millimeters of over travel each end, which is wasted time.
191
00:23:42,320 –> 00:23:52,020
But look how many scans we’ve got. Compared to the number of scans on this one.
192
00:23:52,020 –> 00:23:57,900
And that’s where your extra time it’s the dead time at the end of the stroke.
193
00:23:57,900 –> 00:24:06,030
So even though you might like to see pictures on your machine the right way up, turn them on their side.
194
00:24:06,030 –> 00:24:12,510
Make sure the aspect ratio is always landscape and not portrait.
195
00:24:12,510 –> 00:24:18,570
Size of picture will have an effect on the cycle time.
196
00:24:18,570 –> 00:24:31,410
Orientation of the picture will have an effect on the cycle time. The resolution of the picture cannot be changed.
197
00:24:31,410 –> 00:24:44,550
This is point one. And therefore, you have to have a point one line interval. That applies to bitmap pictures, but it does not apply to text.
Transcript for Speed Up Laser Engraving – Optimising Engraving Cycle Times (Cont…)
198
00:24:44,550 –> 00:24:50,790
If you’re doing filled text, it doesn’t matter about the resolution.
199
00:24:50,790 –> 00:24:57,180
What you’re really interested in, then, is maybe the speed of your text, depending on the size of the text.
200
00:24:57,180 –> 00:25:03,090
If you’ve got large text, you can do what I’ve done here, which is drop the focus down.
201
00:25:03,090 –> 00:25:14,040
You could increase the size of the line spacing if you increase the size of the line spacing from point one to point two,
202
00:25:14,040 –> 00:25:18,750
you’ve almost halved the time that it’s going to take to do the job.
203
00:25:18,750 –> 00:25:24,090
I can only give you all these demonstrations of this information, at the end of the day.
204
00:25:24,090 –> 00:25:30,120
The decision will be yours on the optimum speed that you could run your machine at.
205
00:25:30,120 –> 00:25:32,370
Every machine will be different.
206
00:25:32,370 –> 00:25:40,480
But I’ve given you hopefully the tools and the demonstrations to show you how to go about wringing the absolute optimum from your machine.
207
00:25:40,480 –> 00:25:49,200
It looks as though on this machine, the optimum acceleration is 30000 and not 40000.
208
00:25:49,200 –> 00:25:55,230
Well, the answer is thirty seven seconds.
209
00:25:55,230 –> 00:26:01,620
So the acceleration is making no difference when we get down to these very small numbers,
Transcript for Speed Up Laser Engraving – Optimising Engraving Cycle Times (Cont…)
210
00:26:01,620 –> 00:26:07,770
so we may as well play safe and set this machine back to thirty thousand and know that it will run all
211
00:26:07,770 –> 00:26:14,250
the way up to about 800 millimeters a second and not compromise what we’re doing here at slow speed.
Transcript for Speed Up Laser Engraving – Optimising Engraving Cycle Times
 Skip to content