Transcript for Laser Cutting Science and Basic Rules
1
00:00:06,090 –> 00:00:11,820
The Concise RDWorks Learning Lab with Russ Sadler.
2
00:00:11,820 –> 00:00:17,220
Section 32, cutting science and basic rules. In this session,
3
00:00:17,220 –> 00:00:22,980
I know you’re desperate to get creating smoke and cutting things, but hey,
4
00:00:22,980 –> 00:00:30,930
you can’t dive into deep water if you can’t swim and an understanding of what cutting is,
5
00:00:30,930 –> 00:00:37,590
we started with last time. The beam, the lens and what the lens does.
6
00:00:37,590 –> 00:00:43,320
And then this strange relationship between the lens and the beam.
7
00:00:43,320 –> 00:00:52,590
But I must stress again that this part here the shape of your beam is the most important part of cutting.
8
00:00:52,590 –> 00:00:57,570
If you have a rubbish beam, you will not get very effective cutting.
9
00:00:57,570 –> 00:01:08,490
You can amplify the intensity in this beam as much as you like, but you still won’t get efficient cutting. Sharp beam, lens,
10
00:01:08,490 –> 00:01:14,680
good results cutting. The lens itself has got different characteristics.
11
00:01:14,680 –> 00:01:24,850
It will shape the intensity that you put into it, and it will produce different shaped intensity profiles with your cutting.
12
00:01:24,850 –> 00:01:29,410
So you need to have a little bit of understanding about what your lens can do.
13
00:01:29,410 –> 00:01:35,200
And what I would advise you to do is to make sure you download that PDF document with all my test
14
00:01:35,200 –> 00:01:42,700
data in it so that you can have a look at your lens and see how it affects material as it cuts material.
15
00:01:42,700 –> 00:01:47,260
Now we will eventually make it to the workshop later on, because there are some important things that
16
00:01:47,260 –> 00:01:53,170
I want to show you. Some practical things that I want to show you about your steps into cutting.
17
00:01:53,170 –> 00:02:02,020
But first of all, I want to go back through some of the physics and chemistry of materials that we discussed in some of the very,
Transcript for Laser Cutting Science and Basic Rules (Cont…)
18
00:02:02,020 –> 00:02:10,640
very early sessions about laser technology. This is partly a reminder, and some of it will be new.
19
00:02:10,640 –> 00:02:17,320
Now, some of it may look as though it’s veering a long way away from cutting.
20
00:02:17,320 –> 00:02:24,330
But as I try and explain to you, these things all eventually come together to make sense.
21
00:02:24,330 –> 00:02:30,780
The most powerful thing that you have with using your laser machine is your eyes and your brain.
22
00:02:30,780 –> 00:02:37,230
I mentioned that before observation looking without seeing is not really an option.
23
00:02:37,230 –> 00:02:45,870
You must look and understand what you are seeing. To help you move forward with this, in an efficient and knowledgeable manner.
24
00:02:45,870 –> 00:02:48,210
So what I’m going to show you, first of all,
25
00:02:48,210 –> 00:03:00,090
is a step through at twenty millisecond intervals of a pulse hitting a piece of, in this case, half inch MDF.
26
00:03:00,090 –> 00:03:05,790
And then we’ll move on to a piece of half-inch poplar plywood. Two different materials,
27
00:03:05,790 –> 00:03:11,550
the same pulse. In this first image, the pulse is only 10 milliseconds long.
28
00:03:11,550 –> 00:03:18,440
So let’s take a look at what happens when the laser beam hits the wood. A laser beam is invisible.
29
00:03:18,440 –> 00:03:26,020
So why are we seeing a white splash? Let’s step on.
30
00:03:26,020 –> 00:03:30,400
Now you’ll observe because of the lighting, the effect of the smoke coming up here, look,
31
00:03:30,400 –> 00:03:39,460
it’s coming up like a little volcano, and producing a mushroom cloud well away from the work.
32
00:03:39,460 –> 00:03:47,460
And look, what’s happening to our whatever it is that’s happening here.
33
00:03:47,460 –> 00:03:52,890
Now, the pulse is virtually finished and look where the smoke is.
34
00:03:52,890 –> 00:04:01,830
The smoke is up here. Remember, it went up like this, and it’s ballooning out just up here around the nozzle.
Transcript for Laser Cutting Science and Basic Rules (Cont…)
35
00:04:01,830 –> 00:04:09,870
And then we’ll go to probably the last frame in the burn. And you can see where the smoke is.
36
00:04:09,870 –> 00:04:14,670
Here and here, it’s like a candle being snuffed out. That was a piece of MDF.
37
00:04:14,670 –> 00:04:20,160
MDF is not wood. It’s a mixture of wood and a plastic binder.
38
00:04:20,160 –> 00:04:26,550
Let’s move on to a piece of wood now. As you can see, this is plywood. This is very soft poplar plywood.
39
00:04:26,550 –> 00:04:34,130
This is just pure wood and no plastic involved. The pulse will actually burn a lot deeper in this material.
40
00:04:34,130 –> 00:04:37,710
Again, what’s this white stuff here?
41
00:04:37,710 –> 00:04:41,580
Because the laser beam has got no visible light, it’s an invisible beam.
42
00:04:41,580 –> 00:04:49,680
And again, we’ll take a look here and we see our smoke billowing up like a little volcano and collecting at the top here.
43
00:04:49,680 –> 00:04:54,240
Let’s push on and watch the smoke, particularly you see the way that it’s puffed up.
44
00:04:54,240 –> 00:04:57,510
Look, here is our little jet of smoke,
45
00:04:57,510 –> 00:05:08,730
after the event. There’s a huge amount going on, in those images. Which most people have never bothered to look at or watch or even understand.
46
00:05:08,730 –> 00:05:20,800
That’s the basis for our first look at some science. This is something called an electromagnetic spectrum, because these are electromagnetic waves.
47
00:05:20,800 –> 00:05:27,220
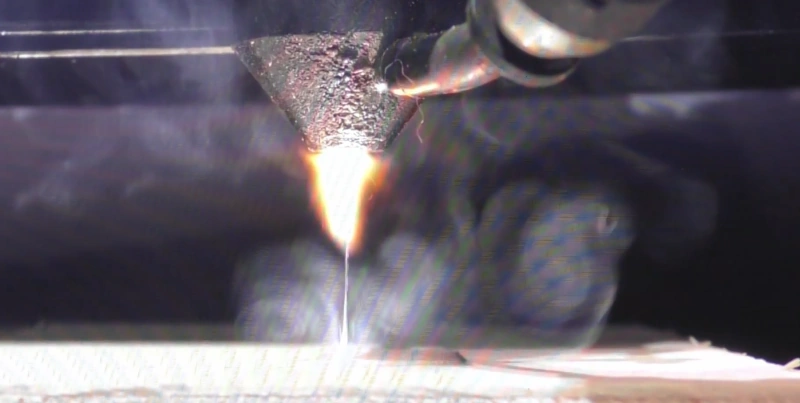
Now they do the same thing as sound waves. They hit things and then make them vibrate.
48
00:05:27,220 –> 00:05:34,000
We’ve got a range that we can see in this spectrum, it’s this colour range here.
49
00:05:34,000 –> 00:05:45,060
Look, those are all the colours of the rainbow. That’s because we’ve got sensors in the back of our eye, which are only sensitive to this range of frequencies.
50
00:05:45,060 –> 00:05:46,650
Outside this range of frequencies,
51
00:05:46,650 –> 00:05:56,160
we cannot see what’s happening elsewhere. The wavelength that we’re going to be working with is ten point six microns a trillion cycles a second.
52
00:05:56,160 –> 00:05:59,820
And that’s what our eyes are capable of perceiving.
Transcript for Laser Cutting Science and Basic Rules (Cont…)
53
00:05:59,820 –> 00:06:06,030
There are some very interesting properties that happen in this region here and now we’re going to go to materials.
54
00:06:06,030 –> 00:06:07,620
I think everybody knows what that is
55
00:06:07,620 –> 00:06:15,180
a picture of: an atom. Isn’t Google wonderful because all of a sudden we can very quickly show you, without any of my dodgy diagrams,
56
00:06:15,180 –> 00:06:23,330
something that it’s very easy for me to explain. These are individual atoms.
57
00:06:23,330 –> 00:06:27,450
In a very diagrammatic format that most people will recognize.
58
00:06:27,450 –> 00:06:31,310
I mean, they don’t actually look like this at all, but it’s a way of describing them.
59
00:06:31,310 –> 00:06:37,910
Now look, this is H2O. It’s got two hydrogen atoms attached to an oxygen atom.
60
00:06:37,910 –> 00:06:42,920
Now there is a bond of some sort here, which holds all these atoms together.
61
00:06:42,920 –> 00:06:51,770
Now look, hydrogen hydrogen, two hydrogen. They’ve both got the same strength of bond to the oxygen atom that’s in the middle.
62
00:06:51,770 –> 00:06:55,460
That’s the thing that holds them together. Call it love. Call it whatever you want.
63
00:06:55,460 –> 00:06:57,500
It’s magnetism. It’s gravity.
64
00:06:57,500 –> 00:07:07,130
I got no idea what it really is, because I’m not a physicist, but there’s something that keeps this molecule together in that shape.
65
00:07:07,130 –> 00:07:14,090
Now, oxygen is a very, very strange material. It’s very happy to love-in with anybody.
66
00:07:14,090 –> 00:07:19,250
It’s almost incestuous. Look, it likes to go around on its own and join to itself.
67
00:07:19,250 –> 00:07:25,110
So you’ll always find oxygen generally attached to itself in the form of O2.
68
00:07:25,110 –> 00:07:31,710
There is another form of oxygen called ozone, which you smell when you go down into the London Underground or you go to the seaside,
69
00:07:31,710 –> 00:07:37,140
and that’s O3. But if you start taking a look at these structures, look at this one here.
70
00:07:37,140 –> 00:07:40,950
This is very open and wobbly, as I would like to call it.
71
00:07:40,950 –> 00:07:44,760
This one is pretty stiff because there’s only one bond.
72
00:07:44,760 –> 00:07:51,330
These are quite stiff bonds here, but as you get more complex, some molecules have got very short,
73
00:07:51,330 –> 00:07:56,370
strong bonds between them and other molecules have got very weak bonds between them.
Transcript for Laser Cutting Science and Basic Rules (Cont…)
74
00:07:56,370 –> 00:08:03,960
The strength to the bond between the atoms is totally variable, depending on the material that you’re working with.
75
00:08:03,960 –> 00:08:11,230
Let me give a very silly example. You’re at a birthday party and you’ve got jelly on the table.
76
00:08:11,230 –> 00:08:19,360
You’ve also got a birthday cake on the table. If you just gently bang on the edge of the table, which one will wobble?
77
00:08:19,360 –> 00:08:25,840
The answer is obvious it’s the jelly, because the jelly is obviously a very open structure like this.
78
00:08:25,840 –> 00:08:29,980
It’s not a stiff structure, and it very easily wobbles.
79
00:08:29,980 –> 00:08:35,230
It’s a little mechanical analogy that I want you to remember when we move on a little bit further.
80
00:08:35,230 –> 00:08:42,450
Everything around you is made up of molecules and atoms. And you might not believe it, but they are all,
81
00:08:42,450 –> 00:08:53,400
doing this, vibrating. Something that they didn’t tell you when you’re at school is that that vibration in a molecule or an atom is its temperature.
82
00:08:53,400 –> 00:08:59,810
Let me just put that a different way; if I can make a molecule vibrate faster.
83
00:08:59,810 –> 00:09:03,860
It’s going to get hotter. You only imagined things getting hot,
84
00:09:03,860 –> 00:09:09,410
but what you don’t see is that they’re getting so hot that they’re probably breaking faster and faster and faster.
85
00:09:09,410 –> 00:09:15,650
And hang on, there is a limit to how much these bonds will stand.
86
00:09:15,650 –> 00:09:23,740
If you shake something hard enough, it will break. And that’s what happens to these bonds when you shake them hard enough.
87
00:09:23,740 –> 00:09:28,300
So these two things heat and vibration, all are interchangeable.
88
00:09:28,300 –> 00:09:32,680
You’ve never imagined molecules vibrating and shaking themselves to pieces.
89
00:09:32,680 –> 00:09:37,270
You only see things burning if we break these bonds here, for example,
90
00:09:37,270 –> 00:09:44,140
this oxygen will go off on its own and it will join with something else because it doesn’t like being alone.
91
00:09:44,140 –> 00:09:53,770
So we get a chemical change when we shake these molecules to death. Such that they self-destruct and they break apart.
Transcript for Laser Cutting Science and Basic Rules (Cont…)
92
00:09:53,770 –> 00:10:06,130
Our laser beam is generating a frequency at around about 28 trillion cycles a second, 28 trillion vibrations a second.
93
00:10:06,130 –> 00:10:19,360
Now that sounds unbelievable, but it just so happens that that is the frequency at which molecules and atoms can be stimulated to vibrate.
94
00:10:19,360 –> 00:10:25,330
So if we fire our laser beam at a piece of material, it will stimulate the molecules,
95
00:10:25,330 –> 00:10:34,390
make them hotter or make them more energetic to the point where they will eventually fly apart and change into a different material.
96
00:10:34,390 –> 00:10:43,180
So that’s the way in which our laser actually works. Now we’re going to jump around to another subject: Light. I know we’ve just been dealing with light.
97
00:10:43,180 –> 00:10:48,520
But hang on. Look, I’ve got a handful of light here at the moment. Can you see it?
98
00:10:48,520 –> 00:10:55,780
What colour is it? Well, look, I’ve got some radio waves in there. I’ve got some X-rays.
99
00:10:55,780 –> 00:11:03,110
I’ve got all sorts of waves in my hand. They’re all part of the electromagnetic spectrum and I’ve just got a handful of them.
100
00:11:03,110 –> 00:11:07,910
Where’s the colour? I said to you, this colour in that spectrum.
101
00:11:07,910 –> 00:11:11,960
And that colour comes from the Sun. Basically, it’s white light.
102
00:11:11,960 –> 00:11:17,870
It’s frequency of light that comes from the Sun and we see it around us all the time.
103
00:11:17,870 –> 00:11:24,380
It’s invisible, but it’s there. The problem with light is that it’s energy.
104
00:11:24,380 –> 00:11:33,090
It’s not anything, really. It’s photons, little packets of nothing that are energy floating in the air.
105
00:11:33,090 –> 00:11:47,480
Until they hit something. Now look, a stone falling from the sky is not in the least bit dangerous. Until it hits you on the head and then you know that it had energy.
106
00:11:47,480 –> 00:11:53,820
The same applies to light. What colour is that?
107
00:11:53,820 –> 00:11:59,250
You’re going to say that’s white. Well, not entirely true.
Transcript for Laser Cutting Science and Basic Rules (Cont…)
108
00:11:59,250 –> 00:12:07,920
That’s all the colours of the rainbow there. Mixed up so that you can’t see them, but that’s what makes white light.
109
00:12:07,920 –> 00:12:14,050
All those colours. So what colour is that? Yes, it’s a sort of a purply colour.
110
00:12:14,050 –> 00:12:20,130
But why? Why is that different to this piece of paper?
111
00:12:20,130 –> 00:12:29,730
There’s every colour of the rainbow hitting both of those pieces of paper with white paper, every colour is reflected back to your eye.
112
00:12:29,730 –> 00:12:38,910
And you still see it as white light. It wasn’t white until the photons hit it and did something,
113
00:12:38,910 –> 00:12:48,030
and they made it reflect back to your eye where you see it as all the colours of the rainbow mixed up as white. With this one,
114
00:12:48,030 –> 00:12:54,090
the only difference is, that all the colours of the rainbow that are not mauve have been absorbed into that
115
00:12:54,090 –> 00:13:03,120
paper. And the only thing that’s being transmitted back to your eye is the colour combination that makes mauve.
116
00:13:03,120 –> 00:13:10,050
So, white is total reflection of all the light, all the white light.
117
00:13:10,050 –> 00:13:14,710
And we only call it white light because that’s what you see.
118
00:13:14,710 –> 00:13:19,680
In fact, look, there is no colour to this stuff here, which is light.
119
00:13:19,680 –> 00:13:24,800
Look what colour is that? I know it’s black.
120
00:13:24,800 –> 00:13:30,680
It’s a colour, but it’s only a colour because the light is hitting it.
121
00:13:30,680 –> 00:13:36,170
How much of that light is being reflected to your eye? How many colours of the rainbow can you see?
122
00:13:36,170 –> 00:13:41,810
The answer is none, because all of the light has been totally absorbed by the surface.
123
00:13:41,810 –> 00:13:47,180
There’s none of it being reflected. It’s a colour black.
124
00:13:47,180 –> 00:13:50,690
But in fact, it just means there’s no light being reflected from it.
125
00:13:50,690 –> 00:13:54,770
Colour is a very interesting subject on its own, light.
126
00:13:54,770 –> 00:14:04,880
And how colour appears to us in our eyes. We’ve only got sensitivity to that range of colours that I showed you on the electromagnetic spectrum.
Transcript for Laser Cutting Science and Basic Rules (Cont…)
127
00:14:04,880 –> 00:14:08,840
So you’ve got a little bit of a flavour now to why you’re seeing black, white and colour.
128
00:14:08,840 –> 00:14:14,520
We only see the colour in light because of the non-absorption element of it.
129
00:14:14,520 –> 00:14:22,320
Now here’s an interesting question. What colour is that? What’s happening to the light?
130
00:14:22,320 –> 00:14:28,780
Basically, in this instance, there is no absorption of the light.
131
00:14:28,780 –> 00:14:33,070
It’s not being absorbed is going right through. Look, you can see what’s happening in the background.
132
00:14:33,070 –> 00:14:38,380
The light is passing right the way through this and it’s not taking any notice of it at all.
133
00:14:38,380 –> 00:14:49,850
Light is very strange. This is just water. I have to admit, I have put one drop, one drop of washing up liquid in there.
134
00:14:49,850 –> 00:15:02,540
Now. Watch this. What colour is it now and why?
135
00:15:02,540 –> 00:15:16,540
OK, so it’s turned white. And this is an analogue for what you’re going to see in this video.
136
00:15:16,540 –> 00:15:22,360
I’m going to say that that is smoke in a bottle. Slightly the wrong way round.
137
00:15:22,360 –> 00:15:31,420
What you’ve got in here are air bubbles, which are playing with the light and reflecting it and making it white.
138
00:15:31,420 –> 00:15:37,430
Remember, total reflection. When we see smoke in air, and
139
00:15:37,430 –> 00:15:41,480
it’s white, like steam, is a good example.
140
00:15:41,480 –> 00:15:52,430
You know, steam is still water, but it’s micro droplets of water that are so small that they can actually float around in the air.
141
00:15:52,430 –> 00:15:58,820
But they are still micro raindrops, solid water droplets, very, very small.
Transcript for Laser Cutting Science and Basic Rules (Cont…)
142
00:15:58,820 –> 00:16:09,800
Now the important word there is solid. Now you remember what happens when light hits a solid surface, it vibrates the molecules.
143
00:16:09,800 –> 00:16:15,800
Let’s go back to our pictures that we started the session off with and just take a look again to see if we can have a different
144
00:16:15,800 –> 00:16:23,810
perspective on what we saw in those pictures with these little bits of information that I’ve given you these little science facts.
145
00:16:23,810 –> 00:16:34,600
The one thing I must state is that laser light can pass through air, gases without any problems at all.
146
00:16:34,600 –> 00:16:44,050
It only wants to hit solid things. Things are molecules that make up solid items.
147
00:16:44,050 –> 00:16:47,950
You can clearly see that our laser beam here is passing through air.
148
00:16:47,950 –> 00:16:53,590
It’s invisible here, but it must be doing something to something else here.
149
00:16:53,590 –> 00:17:00,250
Not only have we got our heating and our reheating of this crud that we’re producing down here.
150
00:17:00,250 –> 00:17:09,070
We’re squirting the material out from being solid into something very, very much more volumetric and gaseous.
151
00:17:09,070 –> 00:17:16,060
And then along the way, we’re also producing, look, this plume of white stuff. Hang on!
152
00:17:16,060 –> 00:17:29,070
This is more white stuff. These are solid particles of whatever this is down here, but it’s suspended in the air.
153
00:17:29,070 –> 00:17:35,220
That’s why we can see them as white, just like fog or steam.
154
00:17:35,220 –> 00:17:46,830
OK, so this is not just gas, this is solid particles suspended in the air, and that’s partially what we are probably reheating and reburning here.
155
00:17:46,830 –> 00:17:53,520
But the key thing that I’d like you to see in this picture, is the way in which this white plume of smoke is going upwards.
156
00:17:53,520 –> 00:17:59,190
Then we move on to the next frame. It’s starting to explode up here big, like an atomic cloud.
Transcript for Laser Cutting Science and Basic Rules (Cont…)
157
00:17:59,190 –> 00:18:04,200
The next frame, we’ve virtually finished. Yes, we have.
158
00:18:04,200 –> 00:18:09,570
So, look, the energy has ceased here. It’s just a little teeny weeny reaction at the surface
159
00:18:09,570 –> 00:18:16,320
there. A continuation of the burning action that was stimulated by the laser beam.
160
00:18:16,320 –> 00:18:23,670
But the laser beam is no longer there. But what we’ve got look, is our tell-tale puff of smoke that went straight up.
161
00:18:23,670 –> 00:18:31,290
So this is only 10 milliseconds of pulse and in 10 milliseconds, we have not converted a huge amount of material here.
162
00:18:31,290 –> 00:18:37,860
Some of this material has been burned, and some of this material has been left as smoke.
163
00:18:37,860 –> 00:18:43,770
Now I’m going to go all the way up to 500 milliseconds now for a Pulse. In half a second,
164
00:18:43,770 –> 00:18:47,610
we shall probably burn through this material completely. We’re converting, so much material,
165
00:18:47,610 –> 00:18:52,410
it can’t come up here quick enough. It’s having to fly out sideways.
166
00:18:52,410 –> 00:19:06,520
Look at it. Oh, my goodness me, look what we’ve done up here.
167
00:19:06,520 –> 00:19:11,140
So there are several things I would like you to take note of in this image.
168
00:19:11,140 –> 00:19:17,170
First of all, the actual nozzle is about 15 mm away from the work surface.
169
00:19:17,170 –> 00:19:25,240
That’s quite a long distance from a cutting point of view. But the moment, what I want you to observe is the fact that this very powerful
170
00:19:25,240 –> 00:19:32,200
beam and I’ve got probably fully 70 watts firing straight down at the material.
171
00:19:32,200 –> 00:19:36,220
Those 70 watts of energy are concentrated into a very small area,
172
00:19:36,220 –> 00:19:47,110
but that small area is instantly being converted into a different chemical because the light is shaking the molecules,
173
00:19:47,110 –> 00:19:52,270
making them self-destruct, turning them into smoke, vapor, gases.
174
00:19:52,270 –> 00:20:03,280
Tars. all sorts of things are happening at that surface there, but it’s happening at such a high rate that the smoke is exploding sideways.
Transcript for Laser Cutting Science and Basic Rules (Cont…)
175
00:20:03,280 –> 00:20:08,590
It’s no longer drifting upwards, as we saw in the first images.
176
00:20:08,590 –> 00:20:14,860
So that’s one thing I want you to note; the way in which the smoke is actually exploding sideways.
177
00:20:14,860 –> 00:20:22,570
It’s no longer volcanic. The second thing is, look at the diameter of that flame.
178
00:20:22,570 –> 00:20:29,200
That’s not the laser beam, that’s the laser beam that has ignited some of the fumes.
179
00:20:29,200 –> 00:20:38,030
Remember what the white is? The white is solid particles suspended in air.
180
00:20:38,030 –> 00:20:43,100
Remember, the laser beam has no effect on gas or air.
181
00:20:43,100 –> 00:20:46,910
It only has an effect on solid particles.
182
00:20:46,910 –> 00:20:57,310
So the fact that we can see a flame, which is going right the way up to the nozzle means that that laser beam is using its energy
183
00:20:57,310 –> 00:21:01,960
to ignite those particles.
184
00:21:01,960 –> 00:21:12,760
Now, if it’s using its energy to ignite those particles, it’s not using its energy to convert molecules down in the pit that it’s making.
185
00:21:12,760 –> 00:21:18,440
The first thing is, what is the cutting efficiency here? Pretty low.
186
00:21:18,440 –> 00:21:26,300
Because we’re allowing the smoke to get in the way. Now this is what happens every time you start a cut.
187
00:21:26,300 –> 00:21:32,360
The ideal situation is to force this smoke out the bottom of the material.
188
00:21:32,360 –> 00:21:43,010
If you force the smoke out the bottom of the material, it doesn’t get in the way of the laser beam and absorb energy that could be used for cutting.
189
00:21:43,010 –> 00:21:51,020
But the very first part of cutting is drilling a hole through the material.
190
00:21:51,020 –> 00:21:57,860
Only when you drilled a hole through the material have you got somewhere that you can send the smoke out from,
191
00:21:57,860 –> 00:22:03,590
then your cutting becomes more efficient, if you can make the smoke go out the bottom of your cut.
Transcript for Laser Cutting Science and Basic Rules (Cont…)
192
00:22:03,590 –> 00:22:09,020
I haven’t got any air passing through that nozzle. Now at this moment in time,
193
00:22:09,020 –> 00:22:19,280
there’s a pretty fair chance that that smoke is going right the way back up inside the nozzle and contaminating the face of the lens.
194
00:22:19,280 –> 00:22:26,540
Now, if you take a look at the top of the picture there, you’ll see that there is a pipe going into the nozzle.
195
00:22:26,540 –> 00:22:36,890
And that pipe is in there purposely to send air into the nozzle. Because provided we can get a flow of air through the nozzle,
196
00:22:36,890 –> 00:22:40,010
then it will suppress that flame,
197
00:22:40,010 –> 00:22:51,650
push it down, keep the fumes away from the lens itself. So we can protect the lens with air flow. Right, now just above my nozzle here.
198
00:22:51,650 –> 00:22:59,420
I’ve got a little tap. It’s a ball valve which is controlling my air assist airflow out of this nozzle.
199
00:22:59,420 –> 00:23:05,660
Now this nozzle has got a big hole in it, so there’s not a great deal of directed airflow.
200
00:23:05,660 –> 00:23:09,650
It is a strange airflow coming out of here.
201
00:23:09,650 –> 00:23:13,130
It’ll be totally chaotic. There we go,
202
00:23:13,130 –> 00:23:16,430
you can hear it. Now that is my pulsing,
203
00:23:16,430 –> 00:23:28,610
silly little Chinese air pump that they supplied with the laser machine six years ago. We’ll to do the same test again with a 500 millisecond pulse. Immediately,
204
00:23:28,610 –> 00:23:34,430
one thing I think you can see. Is this shape, it’s a smoke cone.
205
00:23:34,430 –> 00:23:43,280
Look, it’s no longer emanating up this way as a volcano would do, explosively upwards.
206
00:23:43,280 –> 00:23:47,540
Look, we’ve got smoke, which is being blown down.
207
00:23:47,540 –> 00:23:53,300
This smoke that would normally be wanting to go up is being forced down onto the work by the air
208
00:23:53,300 –> 00:24:04,520
assist that’s coming out of this nozzle. And look, it’s blowing out the side here right across the work.
Transcript for Laser Cutting Science and Basic Rules (Cont…)
209
00:24:04,520 –> 00:24:12,800
The actual fumes themselves this time are not going as far up towards the nozzle, because we’ve got the air that is driving this,
210
00:24:12,800 –> 00:24:19,520
let’s call it gas, before it burns downwards.
211
00:24:19,520 –> 00:24:33,380
But you can clearly see the path of the laser beam itself. It’s straight down, and it’s through the centre of the nozzle.
212
00:24:33,380 –> 00:24:43,490
Okay, so now I’m going to do a cut with the same power, but away from the camera so that we can see what happens.
213
00:24:43,490 –> 00:24:48,230
And again, you’ll notice we’re getting air blown everywhere sideways.
214
00:24:48,230 –> 00:24:57,380
But you look carefully, you’ll see that there is much happening out this side, but a lot of the air is blowing out this way.
215
00:24:57,380 –> 00:24:59,900
We’ve got some sort of bias happening.
216
00:24:59,900 –> 00:25:11,270
Maybe it’s because of this air assist direction here, but we’ve definitely got a bias to the left with this smoke if you watch.
217
00:25:11,270 –> 00:25:19,490
Can you see that puff of smoke going out left virtually nothing coming out here to the right?
218
00:25:19,490 –> 00:25:29,120
We’re going to run the same line away from the camera, but this time with no air assist.
219
00:25:29,120 –> 00:25:38,390
And wow, I’m no good this way.
220
00:25:38,390 –> 00:25:44,970
Now you’ll notice with no air assist how all the smoke is going upwards.
221
00:25:44,970 –> 00:25:53,750
There’s nothing going down anywhere near the work, so stop there because it’s enough.
222
00:25:53,750 –> 00:25:58,490
Now this is the poplar plywood. Neither of these cuts are going right the way through.
Transcript for Laser Cutting Science and Basic Rules (Cont…)
223
00:25:58,490 –> 00:26:06,120
So they’re both blind cuts, which means that all the fumes that are produced have to come upwards.
224
00:26:06,120 –> 00:26:17,610
Now, in this case, the fumes coming up, which have been blowing back down with a left biased air assist, and that’s why we’ve got this here.
225
00:26:17,610 –> 00:26:21,850
It’s not on the right hand side, it’s here on the left.
226
00:26:21,850 –> 00:26:29,590
When we had no air assist, we’ve got a nice clean cut because as I pointed out to you, all the fumes were drifting upwards.
227
00:26:29,590 –> 00:26:36,310
They weren’t going anywhere near the work and we had exactly the same results of the MDF.
228
00:26:36,310 –> 00:26:44,390
Look at this super clean cut here. Haven’t even got a start point because all the fumes were being burnt out there.
229
00:26:44,390 –> 00:26:56,170
Put the work onto spices. 10 No spices to get it off the deck so that we don’t get those marks on the back and we’re going to attempt through cuts.
230
00:26:56,170 –> 00:27:02,770
So we’ve got plenty of power there. We’re going through very nicely. So the cut was through.
231
00:27:02,770 –> 00:27:09,340
Something is happening here because we’re not getting air flowing through the cut, which keep still getting some crud here on the left hand side.
232
00:27:09,340 –> 00:27:16,100
So we must be getting some hot wash a Fuze when we move along this cut.
233
00:27:16,100 –> 00:27:23,570
Some of the cut is deep, but there will always be a piece of cut that is right on the surface because remember,
234
00:27:23,570 –> 00:27:27,860
we’re cutting this slot molecule by molecule.
235
00:27:27,860 –> 00:27:36,920
And the first molecules that are cut and disturbed are those on the surface, and there’s nowhere for the fumes to go on the surface.
236
00:27:36,920 –> 00:27:46,220
And so unless we get some well directed airflow to suck the fumes down into the cut and the bottom of the cut,
237
00:27:46,220 –> 00:27:55,790
we’re going to get some debris on the surface here. Now again, we’ve got this left biased debris because of the airflow from our nose.
238
00:27:55,790 –> 00:27:59,180
So look, here’s our nose. We’ve got about a six millimetre hole in the end.
Transcript for Laser Cutting Science and Basic Rules (Cont…)
239
00:27:59,180 –> 00:28:02,810
It’s a huge hole. So here we have what I would call a cutting nozzle.
240
00:28:02,810 –> 00:28:08,780
It’s got about a two or two and a half millimeter diameter hole in the end of the nozzle.
241
00:28:08,780 –> 00:28:15,860
So this won’t produce a waft of air. It will produce a jet of air.
242
00:28:15,860 –> 00:28:27,080
Do we want a jet of you? Listen to the sound difference. First of all, because it’s restricted, you can hardly hear the policy.
243
00:28:27,080 –> 00:28:32,480
It’s another piece of physics which I’m not going to go into. Let’s just see what difference this house.
244
00:28:32,480 –> 00:28:40,370
Remember that smoke that is busy absorbing your energy because it’s coming up?
245
00:28:40,370 –> 00:28:44,300
We’re pushing the smoke down as fast as it’s being produced.
246
00:28:44,300 –> 00:28:48,230
We’re not allowing it to go near the rule.
247
00:28:48,230 –> 00:28:59,890
Lovely new naked laser beam is being blown away from the laser beam.
248
00:28:59,890 –> 00:29:09,430
And there we go. A lovely clean cut. And the bottom, not all your classes are cut.
249
00:29:09,430 –> 00:29:16,420
Now is it cut it would come through, but basically if we take a look at the difference between the top.
250
00:29:16,420 –> 00:29:26,140
And the bottom. Effectively, what we’ve got, we got a v cut right at the top, very narrow at the bottom there.
251
00:29:26,140 –> 00:29:31,090
That’s going to do is going to choke the air flow through the cut.
252
00:29:31,090 –> 00:29:40,150
It’s not going to allow very much air flow through the cut. So we’re basically although we’ve got what many people regard as a good through cut.
253
00:29:40,150 –> 00:29:44,770
I don’t regard that as a proper good quality, cut some and take that down to about seven.
254
00:29:44,770 –> 00:29:59,050
We run another beside it so that we can compare them. And I know we’ve got a cut, which is much the same on the top as it is on the bottom.
Transcript for Laser Cutting Science and Basic Rules (Cont…)
255
00:29:59,050 –> 00:30:06,250
And that means we’ve basically got a parallel cut through which the air can flow and it does not get choked.
256
00:30:06,250 –> 00:30:19,480
I’ve got my solid table on now, which is a piece of nice cold steel and I’ve got some 3mm spaces and some three millimeter hgf.
257
00:30:19,480 –> 00:30:27,640
Now I’m going to do the same thing that I’ve just been doing. We’re going to run a line away from the camera.
258
00:30:27,640 –> 00:30:32,590
OK, so two things aren’t going to make Kit note.
259
00:30:32,590 –> 00:30:41,200
Number one, if you catch in the light, you can just see a shiny edge to it.
260
00:30:41,200 –> 00:30:51,310
So there’s some sort of override, there’s some sort of painting that’s taking place along the edge of the cut near the back of the cut.
261
00:30:51,310 –> 00:30:57,190
He’s not bad. But look what we’ve got here.
262
00:30:57,190 –> 00:31:06,800
Look at this. That’s what would normally go onto the surface of your work.
263
00:31:06,800 –> 00:31:12,590
That’s the tar that’s being generated in those fumes that I talk about.
264
00:31:12,590 –> 00:31:21,260
That’s the liquid content of that white smoke. I’ve just condensed it onto this very cold surface.
265
00:31:21,260 –> 00:31:28,040
So if you’ve got any doubt as to what that brown stuff is on the surface, if you have a tube, it’s not burning.
266
00:31:28,040 –> 00:31:34,310
It’s very condensed to just clean off a little teeny weeny bit of acetone,
267
00:31:34,310 –> 00:31:40,880
put on 10 mm spices to keep it away from the surface because although I got a reasonable cut through,
268
00:31:40,880 –> 00:31:47,150
I got terrible back reflection off of this base plate.
269
00:31:47,150 –> 00:31:56,150
So we’re still getting some reflection off the back plate, so I’ve got to go even further away.
Transcript for Laser Cutting Science and Basic Rules (Cont…)
270
00:31:56,150 –> 00:32:09,800
On the back of got rid of all the reflection on the front, I got rid of all but just the merest hint of that marking,
271
00:32:09,800 –> 00:32:13,580
though it was talking about because most of the air is going through.
272
00:32:13,580 –> 00:32:21,350
But I say most of the air because look again, we’ve got a much smaller cut on the back that we have on the top.
273
00:32:21,350 –> 00:32:26,720
And that means I’ve got a tapered cut on choking the airflow through the cut.
274
00:32:26,720 –> 00:32:32,270
So I’m running too fast, but it’s getting better.
275
00:32:32,270 –> 00:32:40,040
As you can see, we’ve got a much wider cut at the bottom now.
276
00:32:40,040 –> 00:32:48,620
Then again, I’ve got a lovely, clean mark, free cut on the top.
277
00:32:48,620 –> 00:32:53,000
OK, so here I’ve got a piece of 3mm birch plywood.
278
00:32:53,000 –> 00:32:58,460
I’m going to use the same settings at the moment, the same speed, but I know I should be able to go a lot faster.
279
00:32:58,460 –> 00:33:09,840
But let’s just run this very slow speed to start with. And we’ve got a very nice clean cut on top.
280
00:33:09,840 –> 00:33:17,610
And the same thickness of cut underneath. So nice change to a quite a fast speed that 30mm a second.
281
00:33:17,610 –> 00:33:25,200
Two things, you know, first of all, the thickness of the line is just about through its adjust cut.
282
00:33:25,200 –> 00:33:26,850
But look, what’s happened to the surface?
283
00:33:26,850 –> 00:33:36,240
There is a hint on here the throwing around the edge because I’m not allowing the air to pass cleanly through the cut.
284
00:33:36,240 –> 00:33:41,790
I’m getting some backwash from the cut itself, so I’m running too fast.
285
00:33:41,790 –> 00:33:52,140
OK, so we know getting a better cut on the back, but it’s still not for which cut, but we virtually got rid of all the marking on the surface.
286
00:33:52,140 –> 00:33:59,750
We’ve got airflow through the cut a little bit slower.
Transcript for Laser Cutting Science and Basic Rules (Cont…)
287
00:33:59,750 –> 00:34:12,510
Oh, I got a lovely clean cut on the top. And it’s becoming a half decent cut underneath here.
288
00:34:12,510 –> 00:34:15,820
And that looks like a very nice cut.
289
00:34:15,820 –> 00:34:24,130
No marks on the top one little burn mark here on the outside, where we always get a burn mark because that’s where you start,
290
00:34:24,130 –> 00:34:30,220
you’re blowing fumes upwards because there is no hole through which to blow the fumes.
291
00:34:30,220 –> 00:34:41,620
My recent work has made me understand exactly how lenses work and what you see here is me just about to cut a piece of hardwood 26 millimeters thick.
292
00:34:41,620 –> 00:34:51,790
Using only 60 watts and a two and a half inch gallium arsenide lens used the wrong way round flat side up.
293
00:34:51,790 –> 00:34:54,790
This is a quick hit, the video it did a couple of months ago.
294
00:34:54,790 –> 00:35:04,210
I set my lens a millimeter off the surface, and I’m only using my silly or Chinese pulsing pump.
295
00:35:04,210 –> 00:35:12,080
And look, it’s cutting right through it. He’s just hanging on by that last little bit at the end, which may have been a not.
296
00:35:12,080 –> 00:35:14,432
And looking square and clean, the cut is.
Transcript for Laser Cutting Science and Basic Rules
 Skip to content