 Skip to content
 The LightBurn Software Series
The Lightburn Software is probably the best generic laser cutting software available (I use it for almost all of my laser work). This series has tutorials, hints and tips as well as the occasional speed comparisons between it and RDWorks. In this session we use the LightBurn Cut Shapes feature to laser Cut and engrave a LightBurn puzzle. My thanks to the team at Lightburn for allowing me to embed their videos.
Contents
Using the new ‘Cut Shapes’ feature in LightBurn, you can cut pieces too large for your laser by cutting multiple pieces and assembling them later.
Video Resource Files
There are no resource files associated with this video.
External Resource Links
https://lightburnsoftware.com/pages/trial-version-try-before-you-buy
There are no more external resource links associated with this video.
Transcript for LightBurn Puzzle: Laser Cut a Puzzle using “Cut Shapes”
Click the “Show More” button to reveal the transcript, and use your browsers Find function to search for specific sections of interest.
0:00 hey everyone in today’s light burn
0:02 tutorial we’re going to go over
0:04 the cut shapes tool again but today
0:07 instead of utilizing cut shapes to maybe
0:10 use a pass through
0:11 with the print and cut feature in light
0:13 burn what if you have a laser that
0:15 doesn’t necessarily
0:16 have a pass-through but you still want
0:18 to be able to make project
0:20 larger than the volume of your laser
0:22 today i’m going to utilize
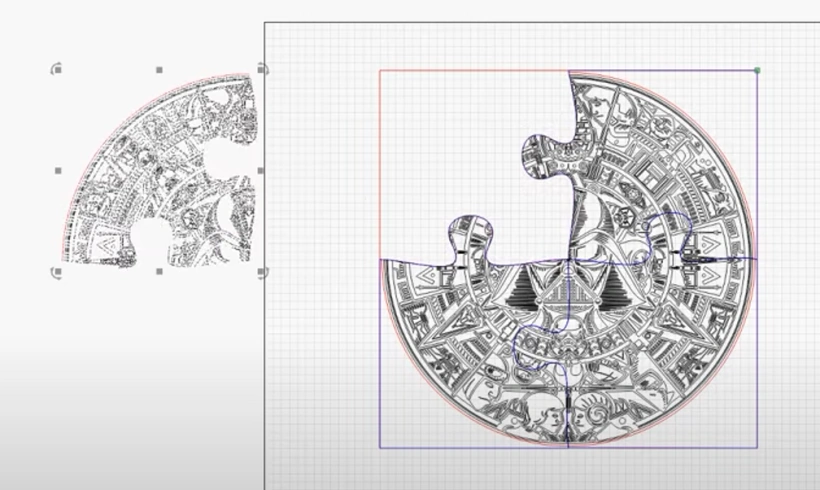
0:24 a interlocking shapes vector like this
0:27 puzzle piece vector
0:28 to cut out a large version of this
0:32 space aztec calendar now
0:35 i’m going to have to do a few things
0:37 with that but
0:38 the cut shapes feature will allow me to
0:41 do this
0:42 quickly and relatively easily so let’s
0:44 jump into it
0:46 now the first thing we’ll know is the
0:50 cutting tools that i’m using are four
0:52 separate shapes
0:53 they’re all interlocking but all these
0:55 lines have some overlap
0:57 they’re not perfect so you’ll see some
0:59 artifacts
1:00 when i do the cut but they’re good
1:02 enough to get me what i need
1:04 so first thing that we’re going to do
1:08 is we’re going to resize my puzzle
1:10 pieces to encompass
1:12 four sheets of 300 by 300 or
1:16 12 inch by 12 inch pieces of plywood
1:20 so the first thing we’ll do is we’ll
1:22 select them all
1:24 and we leave the aspect lock on for
1:28 just a second and i’m going to make them
1:32 uh 460
1:36 millimeters unlock that
1:40 460
1:43 and then re-lock it and i’m doing that
1:45 because
1:46 each puzzle piece is slightly larger
1:49 than or slightly different sizes and i
1:53 want to make sure
1:54 that they all fit on my 300 by 300
1:56 millimeter plywood
1:57 so we’ll go through and we’ll select it
1:59 make sure
Transcript for LightBurn Puzzle: Laser Cut a Puzzle using “Cut Shapes” (Cont…)
2:01 in our properties box
2:04 that box of the shapes are all smaller
2:07 than my piece
2:08 of plywood looks like we’re good
2:11 so now we’ll center this up in our
2:15 workspace so it’s nicer to work on
2:18 and the next thing i’m going to do is
2:20 i’m going to make a duplicate
2:22 of these puzzle pieces and this is
2:24 because as light burn uses the cut
2:26 shapes tool it actually
2:28 deletes the cutting tool that it
2:30 utilizes and i want to
2:32 use these for layout later in my actual
2:35 cutting
2:36 process so i’m going to highlight all
2:38 four shapes
2:40 go to edit and duplicate and what this
2:43 does is it creates an exact copy
2:45 directly on top of the original copy and
2:48 it automatically selects it so the first
2:50 thing i’ll do
2:52 while those are all selected is i’m
2:53 going to put them onto a separate layer
2:56 that is a different color that way as
2:59 we’re going through this you can see
3:00 that
3:01 these are being deleted and the others
3:03 are left behind
3:06 now the next thing we’ll do is we’ll
3:08 resize our calendar
3:10 to fit in our wood so
3:13 we made the bounding box of the puzzle
3:17 piece is 460.
3:19 let’s make these 455.
3:22 notice the aspect lock is on so it will
3:26 keep its aspect ratio and as i’m
3:29 dragging this i grabbed
3:31 the middle handle and what this will let
3:34 me do is it will let me snap
3:36 to the center points of these shapes
3:43 now we have it nicely centered up in our
3:45 puzzle pieces
3:47 and we can start our cutting process so
3:51 to use the cut shapes tool what we have
3:54 to do
3:55 is first select the objects to be cut
3:58 so i’m going to group select those by
Transcript for LightBurn Puzzle: Laser Cut a Puzzle using “Cut Shapes” (Cont…)
4:00 dragging from the right hand side over
4:02 to the left
4:03 and that will select all of the objects
4:05 in that
4:06 group and then the next thing i’m going
4:09 to do is i’m going to
4:11 hold shift and select the top
4:14 left puzzle piece and this tells light
4:18 burn
4:18 that the last thing that we selected
4:21 that is going to be the tool to utilize
4:23 to cut the shape so we’ll click cut
4:26 shapes and a couple things happened
4:30 one you’ll notice that the marching ants
4:33 they shifted a little bit when that
4:35 happened
4:36 notice this one’s moving this way and
4:40 these are moving this way on the red
4:41 line the other thing that happened
4:43 is our blue puzzle piece is gone that’s
4:45 because light burn
4:47 utilized it to do the cut and then it
4:49 deleted it
4:51 so now if i click out and i click into
4:55 the puzzle piece
4:56 it grabs this and we have this nice cut
5:00 out shape here
5:02 now there’s a couple things we could do
5:04 with this
5:05 we could just leave it as is but i want
5:07 to do a fill operation on this
5:09 now notice i have it selected as line in
5:11 the cuts and layers dialog
5:14 if i select fill it
5:17 does what we expect it fills in all of
5:20 the closed shapes
5:21 and it leaves all the open shapes
5:24 unfilled and this is because
5:26 if we drop down window i have spilled
5:28 smooth
5:29 turned on i have a pretty fast computer
5:31 so i can do this
5:33 if you have a slower computer and you
5:35 still want to use the field rendering
5:37 filled course is a new thing that we’ve
5:38 recently added and it
5:40 makes the render time much much faster
5:44 and it’s much smoother as you drag
5:45 around if you have a slower computer
5:47 it’s very useful
5:50 but so we we have all these open shapes
5:54 now
5:55 we could um draw lines in to close them
5:59 but light burn is smart enough to know
Transcript for LightBurn Puzzle: Laser Cut a Puzzle using “Cut Shapes” (Cont…)
6:02 that if
6:02 it is a filled shape when
6:06 it cuts it using the cut shapes tool
6:08 it’ll automatically do all that welding
6:10 for us
6:11 so if we hit the undo button a couple
6:14 times
6:15 move that guy back and we’ll undo our
6:19 cut
6:20 so now our puzzle piece is back and our
6:24 calendar is in one piece and notice that
6:26 the calendar
6:27 and the red line are not grouped
6:29 together so i can drag them separately
6:32 and then we will
6:37 use the fill dialog and now it’s all
6:40 filled rendered
6:43 and we’ll select the calendar
6:46 shift select our puzzle piece go to
6:49 tools
6:52 cut shapes puzzle piece goes away
6:56 the marching ants change a little bit
6:59 we’ll select out of it
7:01 now when we drag it over
7:06 all of those open areas are now filled
7:09 as they should be and the other thing to
7:11 note is when i drag this when i click
7:13 this
7:14 it’s now grouped with the red outline
7:17 that i’m going to use to cut this out
7:18 later so
7:20 that’s an important thing to note when
7:22 you use the cut shapes
7:24 tool uh it will try to
7:27 intelligently think about what needs to
7:30 be grouped together
7:30 and what will be ungrouped so if you
7:32 have shapes that are already grouped
7:34 plan on those groups being completely
7:36 obliterated
7:38 and if you have any uh thing turned on
7:41 and shape properties
7:42 like power scaling your power scaling
7:46 probably got
7:47 blown away too so if you’re doing
7:49 anything like that with a
7:50 object make sure you do it after you do
7:53 the cut shapes not before
7:57 so i’m going to undo a couple steps
Transcript for LightBurn Puzzle: Laser Cut a Puzzle using “Cut Shapes” (Cont…)
8:01 so that we can get our puzzle piece
8:03 moved back
8:05 and i’m going to repeat this process
8:08 with the next
8:10 three pieces so select the calendar
8:14 shift select the puzzle to
8:19 select them at the same time
8:23 now that one’s cut
8:27 and then we have to do it one more time
8:28 so we’ll
8:32 grab that
8:36 shift select the puzzle piece tools
8:40 cut shapes and
8:43 our last piece is selected
8:48 now for the last one i’m going to delete
8:51 the blue puzzle piece
8:52 because i don’t need it and we can
8:58 pull these pieces apart
9:04 so we can see what we’re left with
9:08 now because my puzzle pieces weren’t
9:10 exactly lined up
9:13 i end up with a little bit of
9:14 artifacting and this really isn’t a big
9:17 deal
9:18 but it is important to note that it is
9:20 grouped with my last puzzle piece
9:22 so the way we get rid of that is we hit
9:24 ungroup
9:25 and then we’ll probably need to ungroup
9:27 it one more time
9:29 and then we can just select
9:33 and we can use the delete option
9:36 in the edit menu or the delete button on
9:39 our keyboard to delete these
9:41 last little bits of overlap
9:48 all right now
9:53 let’s select all of this make sure we
9:56 didn’t ungroup too far
9:59 and then we’ll regroup these all
Transcript for LightBurn Puzzle: Laser Cut a Puzzle using “Cut Shapes” (Cont…)
10:02 together
10:04 same with this
10:11 and this will just make it easier to
10:13 move things around later and make sure
10:14 everything stays aligned
10:16 because when i go to cut this out on my
10:18 laser i want this red
10:19 outline here to go through and
10:23 cut out my puzzle pieces so they
10:24 interlock we don’t necessarily need this
10:27 outer line here
10:28 we can make that go away if we want to
10:30 but i’m going to leave it just so
10:32 that i have that bounding box area
10:35 for when i go to frame on my laser
10:39 now to send this to the laser i’m
10:41 actually going to save this out as four
10:42 separate light burn projects so
10:46 first step i’m going to go to file
10:49 save as
10:53 make a new folder space
10:58 puzzle
11:02 and
11:07 call this individual pieces
11:12 all and that way i have a project that
11:15 has all the pieces in it in case i need
11:17 to edit it
11:19 and then we’ll do this four more times
11:21 save as
11:24 pieces one
11:30 as to
11:36 i’ll go through and edit all these files
11:40 so they only have one piece in them
11:49 okay now we’re in individual pieces four
11:54 so let’s go ahead and delete three of
11:57 the pieces
11:59 and we’ll save this it will say open
12:04 [Music]
12:08 three
12:18 that back center
12:21 save open
12:36 to
12:39 save and open and then for the last
12:42 piece
12:48 select these and then this one and now i
12:52 can send each of these to my laser
12:54 to be cut out individually and we can
12:56 line them all up
12:58 so with that i hope you guys learned how
13:01 to use the cut
13:02 shapes tool to make your projects even
13:04 bigger
13:05 than the envelope of your laser enabling
13:08 bigger better cooler ideas be on the
13:11 lookout for more
13:12 light burn features and tutorials in the
13:14 future
13:15 and thank you for watching
