Skip to content
 The Concise RDWorks Learning Lab Series
Welcome to Module 4 of the new Concise RDWorks Learning Lab Series with Russ Sadler. Module 4 will build on the information learned in the previous modules and will be targeted on the process of laser cutting. Russ will explain the science behind the laser cutting process and go on to demonstrate the techniques needed to consistently achieve great laser cutting results across a variety of materials. So, Laser Beam Cutting? Where do we start?
In this Session, Russ explains why the current optical lens theory does not apply to laser cutting and explains in detail how the laser actually interacts with materials. He then goes on to explain the importance of intensity within a laser beam and why it has such a huge impact on laser cutting performance. Find out if your laser beam is “BLUNT” or “SHARP”!
Release Date: 11th February 2022
Over the last 6 years, Russ has built up a formidable YouTube following for his RDWorks Learning Lab series which currently has over 200 videos.
The original RDWorks Learning Lab series on his “Sarbar Multimedia” YouTube Channel, follows Russ as he tries to make sense of his new Chinese laser machine and to sort out the truths, half truths and outright misleading information that is available on the web.
Six years later with over 3 million YouTube Views under his belt, Russ has become the go to resource for everything related to the Chinese CO2 laser machine user or wannabe user.

In this new series, Russ has condensed his knowledge and experience of the last 6 years to provide valuable information and insights into the purchasing, understanding, use, repair and maintenance of the Chinese CO2 laser machines and their key component parts.
| Previous Video | Next Video | Series Menu |
Podcast Download for Laser Cutting: Where Do We Start?
You can download the audio file for this video here, just click on the three dots to the right of the player:
Video Resource Files for Laser Cutting: Where Do We Start?
There are no resource files associated with this video.
External Resource Links for Laser Cutting: Where Do We Start?
There are no external resource links associated with this video.
Transcript for Laser Cutting: Where Do We Start?
Click the “Show More” button to reveal the transcript, and use your browsers Find function to search for specific sections of interest.
Transcript for Laser Cutting: Where Do We Start?
1
00:00:06,090 –> 00:00:11,660
The Concise RDWorks Learning Lab with Russ Sadler.
2
00:00:11,660 –> 00:00:16,980
Session 31 Cutting: where do we start?
3
00:00:16,980 –> 00:00:25,890
Well, you’ve seen this before. It’s a lens! You’re very familiar with lenses now because you’ve been using them for all your engraving.
4
00:00:25,890 –> 00:00:31,300
We’re going to change the subject now. Because we’re going to talk about cutting. Now if you
5
00:00:31,300 –> 00:00:37,970
remember, way back in session 18, when we opened up the discussion about engraving.
6
00:00:37,970 –> 00:00:46,470
I said there was no such thing as an engraving lens all lenses are basically cutting lenses.
7
00:00:46,470 –> 00:00:55,130
Well. That is essentially true. But before we get to the lens, we’ve got the laser beam.
8
00:00:55,130 –> 00:01:00,740
It’s a very common term in computer language. Rubbish in equals rubbish out.
9
00:01:00,740 –> 00:01:10,500
Well, it equally applies to this. This is only an amplifying device for intensity, light intensity.
10
00:01:10,500 –> 00:01:14,850
If you put rubbish light intensity in, you’ll get more of it out.
11
00:01:14,850 –> 00:01:19,200
It’ll intensify it, but it won’t intensify it very much.
12
00:01:19,200 –> 00:01:23,430
You get out an amplification of what you put in.
13
00:01:23,430 –> 00:01:32,750
Now everybody knows what lenses do. You’ve seen this picture before back in session eighteen When we introduced you to lenses for engraving.
14
00:01:32,750 –> 00:01:38,220
And you may remember at that point, I said this picture is total rubbish.
15
00:01:38,220 –> 00:01:44,220
This is what the lens manufacturers would have you believe happens.
16
00:01:44,220 –> 00:01:50,220
Well, you’ve already seen that. We don’t need the focal point.
17
00:01:50,220 –> 00:01:57,990
We don’t need the intensity that they talk about here to do engraving. With engraving,
18
00:01:57,990 –> 00:02:02,400
we just want to damage the surface of the material. Most of the time.
Transcript for Laser Cutting: Where Do We Start? (Cont…)
19
00:02:02,400 –> 00:02:07,950
And so consequently, we’re not interested in this very, very fine focal point here.
20
00:02:07,950 –> 00:02:13,350
And the very high intensity that they claim for that focal point. You’ll notice
21
00:02:13,350 –> 00:02:21,150
the cynicism in my voice, because I’ve spent a long time trying to understand how lenses cut.
22
00:02:21,150 –> 00:02:27,420
And lenses do not cut the way that you believe.
23
00:02:27,420 –> 00:02:34,740
Let’s take a look at this one as a classic example look, the rays come in, they hit the focal point,
24
00:02:34,740 –> 00:02:44,840
which happens to be the surface of your material and you get huge intensity of light at that point to do damage to your material.
25
00:02:44,840 –> 00:02:56,540
What then happens to that light? It dissipates. Now you remember when we were trying to find the way to get a soft beam,
26
00:02:56,540 –> 00:03:02,990
that only damaged the surface of the material and did not cut into the surface of the material. We had a lot of trouble.
27
00:03:02,990 –> 00:03:09,760
This was an inch and a half lens that we were using and we had the power turned right down.
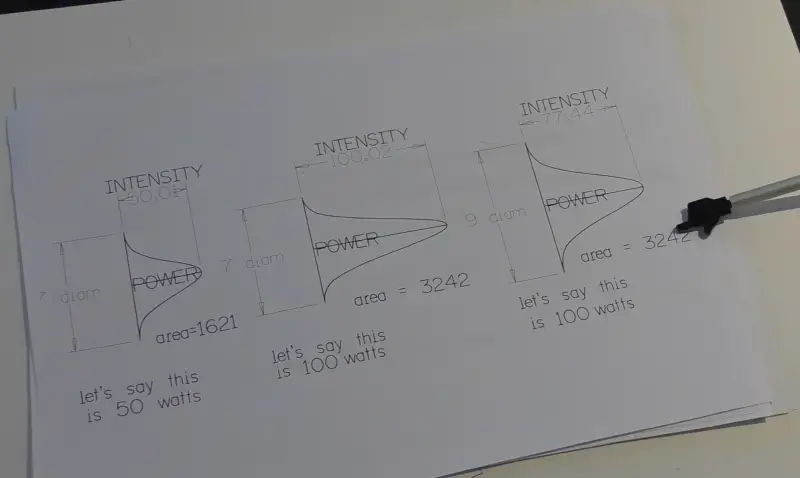
28
00:03:09,760 –> 00:03:14,770
But we still were penetrating into the surface here with this very deep cut.
29
00:03:14,770 –> 00:03:17,980
I mean, this is somewhere in the region of about two millimeters thick.
30
00:03:17,980 –> 00:03:25,690
This top layer of material on this plywood. When we turned the power up to 100 percent.
31
00:03:25,690 –> 00:03:32,470
That same lens was able to do this amount of damage to the material, it’s gone right through.
32
00:03:32,470 –> 00:03:37,330
Is that the sort of cut that you’d expect after the focal point?
33
00:03:37,330 –> 00:03:46,360
Look what’s happening to the beam after it passes through the focal point. Look, here it is, you can clearly see it comes to zero and then it grows again.
34
00:03:46,360 –> 00:03:51,130
The lens that I used for this job was focused onto the top surface of the material.
35
00:03:51,130 –> 00:03:58,050
So two questions arise; Number one. Why have we got a cut?
36
00:03:58,050 –> 00:04:01,750
And Number two; look at this.
Transcript for Laser Cutting: Where Do We Start? (Cont…)
37
00:04:01,750 –> 00:04:11,200
It’s not just a cut that passes through the material because I’ve increased the power, that should not be possible according to that drawing,
38
00:04:11,200 –> 00:04:15,970
because the intensity is now doing this.
39
00:04:15,970 –> 00:04:24,760
It’s diverging at an alarming rate and there’s no intensity there to actually cut through that material.
40
00:04:24,760 –> 00:04:28,870
Now I’ve approached, learned professors of physics.
41
00:04:28,870 –> 00:04:34,930
I’ve approached senior people in the laser industry that design these machines,
42
00:04:34,930 –> 00:04:42,880
and I’ve approached the lens manufacturers to ask them, can they explain why and how their lenses do this?
43
00:04:42,880 –> 00:04:47,920
As you might expect, the people in the lens industry basically tell me to go away.
44
00:04:47,920 –> 00:04:53,680
What happens after the focal point and how you use and apply the lens is basically your problem.
45
00:04:53,680 –> 00:05:01,240
People in the laser industry and learned professors come up with all sorts of maybes, things like; Well, you know,
46
00:05:01,240 –> 00:05:08,570
once you start producing a gas in here, the laser beam finds its way in somehow and it vaporizes or ionizes
47
00:05:08,570 –> 00:05:13,510
the gas inside there and it gradually finds its way through?
48
00:05:13,510 –> 00:05:18,100
Did you believe that? It sounded like Bullshit to me, to be honest.
49
00:05:18,100 –> 00:05:23,200
So the first thing that we must say is, you must throw away all your conceptions
50
00:05:23,200 –> 00:05:27,970
of how lenses work because they do not work the way that you think they work.
51
00:05:27,970 –> 00:05:32,350
Crude lens theory was around in the time of the Greeks. The Egyptians used it.
52
00:05:32,350 –> 00:05:39,280
Then we get as far as the Middle Ages, where people like Galileo started inventing the telescope and Kepler and people like that.
53
00:05:39,280 –> 00:05:46,390
So this lens theory? Tracing of rays like this.
54
00:05:46,390 –> 00:05:56,200
Look, we’ve got rays, we’ve got rays. That’s the outline of where people think the beam is. Lasers themselves,
Transcript for Laser Cutting: Where Do We Start? (Cont…)
55
00:05:56,200 –> 00:06:06,280
have only been around for about 60 years. Serious industrial application for cutting materials probably only about 30, maybe 35 years.
56
00:06:06,280 –> 00:06:12,280
So this is a very young technology. People that design these laser machines,
57
00:06:12,280 –> 00:06:17,170
they take their technology and put it through something that’s been existing for hundreds of years.
58
00:06:17,170 –> 00:06:20,830
It’s a proven technology. Why would you question it?
59
00:06:20,830 –> 00:06:25,030
Here’s how it works. Well, now I’m afraid it’s your misfortune that
60
00:06:25,030 –> 00:06:30,880
you’ve encountered somebody that does not believe any of this.
61
00:06:30,880 –> 00:06:36,680
Essentially, there’s nothing wrong with the lens theory.
62
00:06:36,680 –> 00:06:42,740
If you had a camera, a telescope, a microscope, a projector.
63
00:06:42,740 –> 00:06:54,920
This stuff works a 100%. It’s well proven, but when you throw a laser beam at a lens, that’s not the same as throwing an image,
64
00:06:54,920 –> 00:06:58,460
which has got fairly uniform light across the image.
65
00:06:58,460 –> 00:07:08,900
No, we’re interested in only one thing; light intensity. Light intensity is the thing that causes material damage.
66
00:07:08,900 –> 00:07:16,340
Remember how material damage happens, you’re busy shaking molecules and the more energy you can put to shake those molecules,
67
00:07:16,340 –> 00:07:27,950
the faster you will be able to create damage. We’ve created damage here, which tells us exactly what the profile of intensity is. Here,
68
00:07:27,950 –> 00:07:37,370
we’ve got a parallel beam which doesn’t really tell us what the profile of the intensity is, but it tells us where the intensity has passed through.
69
00:07:37,370 –> 00:07:44,870
And look, if we look just here, you will see down at the bottom here, we’ve got a hint of this taper.
70
00:07:44,870 –> 00:07:49,670
Yes, we’ve broken through the bottom, but we haven’t broken through with the beam fully.
71
00:07:49,670 –> 00:07:53,060
We’ve still got part of the tapered beam there.
72
00:07:53,060 –> 00:07:59,330
So in the instance of this cut, it’s very interesting to see that we’ve got two different types of material.
Transcript for Laser Cutting: Where Do We Start? (Cont…)
73
00:07:59,330 –> 00:08:02,270
We’ve got material which is this type.
74
00:08:02,270 –> 00:08:09,800
Then we’ve got a softer material, which, if you look, has got a little bit more damage taking place and then we’ve got this harder material again,
75
00:08:09,800 –> 00:08:14,150
and then we’ve got this softer material again, finishing up with the hard material.
76
00:08:14,150 –> 00:08:22,310
And you can see the slight difference in damage as the beam has passed through all of those different material structures.
77
00:08:22,310 –> 00:08:30,230
Now the other observation that I’d like you to make is the whole of this surface here has been cut with the laser beam.
78
00:08:30,230 –> 00:08:37,060
But you notice this is a different colour to this, but it’s all wood.
79
00:08:37,060 –> 00:08:41,140
This happens to be end grain. This happens to be long grain.
80
00:08:41,140 –> 00:08:45,460
So the grains are going in the opposite directions and you can see here, look,
81
00:08:45,460 –> 00:08:51,830
we have got a certain amount of dark brown in certain parts of this grain structure.
82
00:08:51,830 –> 00:08:59,690
But other parts are completely white, and uncharred. I said to you, that engraving was a complicated process.
83
00:08:59,690 –> 00:09:12,500
Cutting is actually simple. But just as complicated in different ways, because then you need to understand much more about the materials themselves,
84
00:09:12,500 –> 00:09:17,270
the damage that you caused to materials when you’re only trying to mark the surface.
85
00:09:17,270 –> 00:09:22,790
You’re not worried about penetration and rate of damage. In fact, if anything, we were trying to do exactly the opposite.
86
00:09:22,790 –> 00:09:29,600
We were trying to minimize the amount of damage that we put onto the surface and just produce this brown scorching.
87
00:09:29,600 –> 00:09:40,140
We found how difficult that was because look, this little cut here, even though it’s done with high intensity light, is not brown.
88
00:09:40,140 –> 00:09:45,930
Remember, we looked inside that and we saw that it was absolutely clean.
89
00:09:45,930 –> 00:09:53,460
What you saw from the top as a black line was, in fact, the occlusion of light, just the fact that it’s a deep groove.
90
00:09:53,460 –> 00:09:59,700
This has got some sort of charring, some sort of carbon surface that’s left behind.
Transcript for Laser Cutting: Where Do We Start? (Cont…)
91
00:09:59,700 –> 00:10:03,870
You can see from my little torch here that I’m shining on the surface.
92
00:10:03,870 –> 00:10:14,190
There is no real edge to that beam. It’s very, very bright in the centre and it sort of tapers away to almost nothing on the edge.
93
00:10:14,190 –> 00:10:19,290
Well, that’s the intensity of the light disappearing towards the edge.
94
00:10:19,290 –> 00:10:23,520
High intensity in the center. Low intensity at the edge.
95
00:10:23,520 –> 00:10:27,390
Well, that’s what that picture shows us.
96
00:10:27,390 –> 00:10:31,920
That’s exactly the situation happening within a laser beam.
97
00:10:31,920 –> 00:10:36,930
The perfect laser beam will have an intensity distribution. As per this curve.
98
00:10:36,930 –> 00:10:41,070
It’s a curve called a Gaussian distribution curve.
99
00:10:41,070 –> 00:10:44,940
Even though the proportions of it might change.
100
00:10:44,940 –> 00:10:51,990
The same mathematical formula is used to generate this curve, regardless of what the shape actually happens to be.
101
00:10:51,990 –> 00:10:57,120
Now what I’ll show you here is a beam that is seven millimeters diameter.
102
00:10:57,120 –> 00:11:05,010
I’ve just chosen some numbers here. They’re just numbers to show the relative differences and what happens within a laser beam.
103
00:11:05,010 –> 00:11:10,590
This curve represents two properties of the laser beam.
104
00:11:10,590 –> 00:11:17,340
On the one hand, the area underneath that curve is its power.
105
00:11:17,340 –> 00:11:25,680
Now, in this instance, we’ve made it 50 watts and the area is 1621 square millimetres under that curve.
106
00:11:25,680 –> 00:11:37,230
So 621 square millimetres represents 50 watts, and that happens to give us a curve, which is a height of 50mm.
107
00:11:37,230 –> 00:11:48,150
Now, if we keep the base dimension of this mathematical formula the same and we change to 100 watts.
108
00:11:48,150 –> 00:11:54,060
Well, if we go from 50 to 100 watch, we expect the area to go up by double.
Transcript for Laser Cutting: Where Do We Start? (Cont…)
109
00:11:54,060 –> 00:12:07,360
And sure enough, here is look 3242. But 3242 area with the same base has caused the curve to change to this shape.
110
00:12:07,360 –> 00:12:13,930
This is a sharper curve, then that one, let’s call that one blunt and this one sharp.
111
00:12:13,930 –> 00:12:24,510
If you buy a 100 watt tube. To replace the existing 50 watt that’s in your machine, you will get twice as much cutting power from it.
112
00:12:24,510 –> 00:12:26,460
Well, sorry, that isn’t the case.
113
00:12:26,460 –> 00:12:36,480
That isn’t the way it works because generally when you buy a more powerful tube, the diameter of the beam increases as well.
114
00:12:36,480 –> 00:12:47,850
And so now we’ve gone from 50 watts to 100 watts, so we’ve still got 3242 as our area.
115
00:12:47,850 –> 00:12:57,540
But because the diameter of the beam has increased. For the same amount of area under there, and you would expect the intensity to double.
116
00:12:57,540 –> 00:13:05,040
It’s only gone from 50 to 77, so it’s only a 50 percent increase in intensity for a doubling of the power.
117
00:13:05,040 –> 00:13:11,820
Now here you’ll see a block of, a little block of acrylic and I’m going to fire the laser beam at this block of acrylic.
118
00:13:11,820 –> 00:13:19,290
Now, just down at the bottom here, you’ll see that I’m blowing some air at where I’m going to fire it, because I don’t want it to catch fire.
119
00:13:19,290 –> 00:13:23,550
But this is about 70 watts of power on a
120
00:13:23,550 –> 00:13:30,620
probably what the manufacturer claims to be a five or six millimetre beam.
121
00:13:30,620 –> 00:13:36,670
Now, if you watch, you’ll see the centre of that beam growing at a much faster rate than the outside.
122
00:13:36,670 –> 00:13:40,400
The Outside is staying virtually the same diameter. And there we go.
123
00:13:40,400 –> 00:13:45,770
Let’s stop there. So that’s the outside diameter of the beam.
124
00:13:45,770 –> 00:13:52,550
And this is the centre of the beam, which has done a lot more damage to the material because of its higher intensity.
125
00:13:52,550 –> 00:13:57,230
This is not a focal point. There is no lens in this system.
126
00:13:57,230 –> 00:14:03,620
The sharp point on this burn is nothing to do with focus.
Transcript for Laser Cutting: Where Do We Start? (Cont…)
127
00:14:03,620 –> 00:14:08,390
It’s all to do with the intensity distribution within the beam itself.
128
00:14:08,390 –> 00:14:14,600
This part of the beam has got a much higher intensity, so it’s burning forward at a faster rate.
129
00:14:14,600 –> 00:14:22,100
This little demonstration is probably the most important demonstration that I can make to try and illustrate how cutting works.
130
00:14:22,100 –> 00:14:30,440
It took 10 seconds roughly for, say, a six millimeter beam to burn through 25 millimeters of acrylic.
131
00:14:30,440 –> 00:14:38,210
Now that’s just a gauge for you. But that is the shape that you’d expect from a cutting beam.
132
00:14:38,210 –> 00:14:46,850
Now I’ve turned the power right down to 15 percent. And here you’ll see what happens for the same 10 seconds of burn.
133
00:14:46,850 –> 00:14:59,270
So you will notice the bubbling that took place in there as the acrylic was boiling and then it vaporizes and turns to acrylic vapor at 200 degrees C.
134
00:14:59,270 –> 00:15:04,470
But look how relatively blunt the beam in.
135
00:15:04,470 –> 00:15:09,450
So there’s the sharp beam at the bottom with its 10 second burn.
136
00:15:09,450 –> 00:15:14,880
As I’ve illustrated here, 10 seconds of burn produces this sharp form.
137
00:15:14,880 –> 00:15:22,740
Here we’ve got a blunt beam because we’ve turned the power right the way down.
138
00:15:22,740 –> 00:15:33,600
OK, so it’s not doing the damage as quickly, so we can get both a sharp beam and a blunt beam out of my tube just by adjusting the power.
139
00:15:33,600 –> 00:15:38,340
We went all the way through a piece of 10 millimetre thick material with this shape of
140
00:15:38,340 –> 00:15:44,700
beam and this shape of beam was doing just the smallest amount of damage on the surface.
141
00:15:44,700 –> 00:15:50,850
The point I want to stress here is that the beam itself is very important to your ability to cut.
142
00:15:50,850 –> 00:15:55,380
Many of the tubes that you buy online are basically junk.
143
00:15:55,380 –> 00:15:59,640
They cannot perform this function here of a sharp beam.
Transcript for Laser Cutting: Where Do We Start? (Cont…)
144
00:15:59,640 –> 00:16:03,870
They will only be able to do something like this, fine for engraving.
145
00:16:03,870 –> 00:16:07,980
No good for cutting. Now this is a gaussian curve, which very conveniently,
146
00:16:07,980 –> 00:16:14,970
I’ve just made six millimetres diameter because look, we’ve got one millimetre, two millimetres, three millimetres either side of the centre line.
147
00:16:14,970 –> 00:16:22,890
The first central two millimeters of the beam contains about 70 percent of the power.
148
00:16:22,890 –> 00:16:30,420
The blue sections around the outside each contain about 10 percent and the remaining five percent each side
149
00:16:30,420 –> 00:16:35,490
here, is the remnant part of the power, right at the extreme edge of the beam.
150
00:16:35,490 –> 00:16:41,700
Power is not the same as intensity when we allow that beam to fire into a piece of
151
00:16:41,700 –> 00:16:47,040
material after one second, two, three, four, five, six, seven, eight, nine, 10 seconds.
152
00:16:47,040 –> 00:16:50,960
This is the shape that we will get, a nice sharp burn.
153
00:16:50,960 –> 00:16:58,500
Now it’s important to remember these three coloured zones. This red zone has got virtually no intensity in it.
154
00:16:58,500 –> 00:17:08,700
The blue zone? Well, it’s got some moderate intensity in it, but the real working zone of your tube is this high intensity part of the tube.
155
00:17:08,700 –> 00:17:14,940
So let’s move our attention away from the beam itself. Remember rubbish in, rubbish out.
156
00:17:14,940 –> 00:17:24,570
This is not rubbish. This is a good quality cutting beam, and we’re now going to talk about what happens when we pass it through this amplifier.
157
00:17:24,570 –> 00:17:27,510
This energy amplifier, which you call a lens.
158
00:17:27,510 –> 00:17:34,620
The most common lens that you’ll come across is something called a plano convex lens. Flat on one side, curved on the other.
159
00:17:34,620 –> 00:17:41,610
The way in which these lenses are designed, is for the light to come in, in a parallel manner.
160
00:17:41,610 –> 00:17:49,230
Parallel to the axis of the lens itself, and pass through the lens to something called the focal point.
161
00:17:49,230 –> 00:17:54,510
You can see that I’m pointing here at something which appears to be the focal point.
162
00:17:54,510 –> 00:18:03,960
But if we look at this a little bit more carefully, what you’ll see is that all the rays are not actually focusing at one single point.
Transcript for Laser Cutting: Where Do We Start? (Cont…)
163
00:18:03,960 –> 00:18:08,070
There is a range of focal points that’s happening here.
164
00:18:08,070 –> 00:18:16,440
It’s manufactured with a spherical surface, and that spherical surface has a property called spherical aberration.
165
00:18:16,440 –> 00:18:23,160
An aberration basically means that it doesn’t all finish up at one fixed focal point.
166
00:18:23,160 –> 00:18:31,060
If we look carefully, you’ll see that these rays from the outside are actually crossing over here.
167
00:18:31,060 –> 00:18:37,110
Whereas, the rays from the centre are crossing over here.
168
00:18:37,110 –> 00:18:44,550
So there’s a difference between the focal points across different diameters of the lens.
169
00:18:44,550 –> 00:18:52,800
So it is incredibly difficult to get a decent single focal point out of a plano
170
00:18:52,800 –> 00:19:02,280
convex lens. If we use the lens the wrong way round and we put our parallel rays of light onto the flat surface of the lens,
171
00:19:02,280 –> 00:19:07,320
aberration becomes absolutely ridiculous.
172
00:19:07,320 –> 00:19:14,370
This is an exaggerated picture. It demonstrates exactly what happens when you flip a lens over. These rays from the
173
00:19:14,370 –> 00:19:20,190
outside focus at an even earlier point than they did when it was used the right way round.
174
00:19:20,190 –> 00:19:25,020
And look at these. Look at the discrepancy between the focal points of all
175
00:19:25,020 –> 00:19:31,050
these various rays that are coming in from these disparate parts of the lens.
176
00:19:31,050 –> 00:19:39,330
And let’s have a look what happens to these red rays from this low intensity region of the beam?
177
00:19:39,330 –> 00:19:45,780
So here are these red rays. And we’ve got another one here.
178
00:19:45,780 –> 00:19:52,130
So there’s our red zone. Hitting the material, there’s not much intensity there.
179
00:19:52,130 –> 00:19:56,240
Let’s take a look at these rays that are coming in from the blue zone.
180
00:19:56,240 –> 00:20:03,650
So there we are. Look, we’ve got our blue zone coming in and it looks as though our blue zone is actually focusing onto the surface.
Transcript for Laser Cutting: Where Do We Start? (Cont…)
181
00:20:03,650 –> 00:20:14,210
It is very small, so we have still only got around about 10 or 15 per cent of the available intensity that we’re applying to that surface there.
182
00:20:14,210 –> 00:20:19,520
Now this yellow zone is not focusing until we get down to here,
183
00:20:19,520 –> 00:20:26,210
and it’s only at that point that we get a true central focus onto the surface in the material.
184
00:20:26,210 –> 00:20:32,450
Most of you guys will be using your lens this way round. You will get moderately good cutting if you use the lens this way round. Because
185
00:20:32,450 –> 00:20:37,640
there is sufficient aberration in here to still create this filtering effect.
186
00:20:37,640 –> 00:20:46,160
Now these learned professors and these lens people don’t happen to have one of these machines tucked away in their shed in their back garden.
187
00:20:46,160 –> 00:20:51,350
So they’ve got no idea of how their lens actually work,
188
00:20:51,350 –> 00:20:59,810
when we ask it to cut material. But my study of the way in which lenses and laser beams work together start to reveal
189
00:20:59,810 –> 00:21:05,360
this strange mechanism, the filtering mechanism that’s caused by lens aberration.
190
00:21:05,360 –> 00:21:13,560
Lens aberration? That’s the last thing that you must talk about when you speak to a lens manufacturer. Aberration is our friend, not our enemy.
191
00:21:13,560 –> 00:21:18,350
Now, as I’ve said, it’s taken me a long time to decode how cutting works.
192
00:21:18,350 –> 00:21:26,750
But one of the interesting stages in that progression was this experiment here that I carried out.
193
00:21:26,750 –> 00:21:36,950
You can see that we’ve got parallel rays of light coming from our laser beam, which has got variable intensity firing at a piece of material.
194
00:21:36,950 –> 00:21:44,810
Now you’ve seen this experiment, 10 seconds fired into that material produced a point at the end of the acrylic block.
195
00:21:44,810 –> 00:21:55,760
There is no lens in that system. That point was all to do with the intensity difference between the outside and the inside centre part of the beam.
196
00:21:55,760 –> 00:22:03,200
Here we’ve got a lens which I’ve put into this system. It was a very, very long, focused lens.
Transcript for Laser Cutting: Where Do We Start? (Cont…)
197
00:22:03,200 –> 00:22:07,490
It started off here at, say, six millimeters diameter,
198
00:22:07,490 –> 00:22:17,450
but at the time it got down to here it was maybe five millimeters diameter because the lens had already started to decrease the diameter of the beam.
199
00:22:17,450 –> 00:22:21,320
But look, I produced exactly the same sort of pointed burn,
200
00:22:21,320 –> 00:22:31,160
but this time it only took three seconds to pass through the 25mm block, not the 10 seconds that it did before.
201
00:22:31,160 –> 00:22:36,530
And here are those two results. This was the one that took 10 seconds.
202
00:22:36,530 –> 00:22:39,170
And this is the one that took three seconds.
203
00:22:39,170 –> 00:22:47,240
Now you may or may not be able to see that there is a significant difference in the diameter of this one compared to this one.
204
00:22:47,240 –> 00:22:52,340
A much smaller beam and a higher concentration of intensity.
205
00:22:52,340 –> 00:22:59,840
And that is why we were able to burn through quicker. This is still not focused because the focus is down here.
206
00:22:59,840 –> 00:23:04,010
It’s just a smaller diameter start point.
207
00:23:04,010 –> 00:23:09,740
And that really is the whole essence of what cutting is about.
208
00:23:09,740 –> 00:23:18,770
And then when we change the focus and reduce the diameter of the beam to an even smaller entry wound.
209
00:23:18,770 –> 00:23:25,050
Look how quickly it runs in. And now we move the focal point even closer.
210
00:23:25,050 –> 00:23:31,780
Now you can clearly see the difference in the diameter of the entry points of these beams.
211
00:23:31,780 –> 00:23:38,920
Slow. Faster. Very fast. Okay, now look you can see what we’ve got here.
212
00:23:38,920 –> 00:23:44,190
We’re getting more of a parallel beam.
213
00:23:44,190 –> 00:23:49,440
It’s tapered here, very tapered here. But here we’ve got a parallel beam.
214
00:23:49,440 –> 00:23:57,840
This is beginning to get much closer to what we see with a deep cut, a parallel cut.
Transcript for Laser Cutting: Where Do We Start? (Cont…)
215
00:23:57,840 –> 00:24:07,740
Look what we’ve got at the top here, though. You see, that’s the effect of the blue zone creating a cone at the entry to the cut.
216
00:24:07,740 –> 00:24:11,730
So we got some of our medium power doing damage.
217
00:24:11,730 –> 00:24:20,580
The higher the intensity, the faster the damage can be done. And here is a classic example of that. The speed at which damage is being done,
218
00:24:20,580 –> 00:24:29,370
is all to do with the concentration of that energy by the lens. Decreasing the diameter of the beam through a lens towards
219
00:24:29,370 –> 00:24:38,310
its focal point, gradually reduces the diameter of the beam and increases the intensity at the centre of the beam.
220
00:24:38,310 –> 00:24:47,940
We started off before the lens with this nice Gaussian distribution, we start putting these various intensities of light through the lens,
221
00:24:47,940 –> 00:24:56,190
and all of a sudden we get some sort of strange filtering effect down here, as you can see as we get closer to the focal point.
222
00:24:56,190 –> 00:24:59,340
Now, this is not a focal point of image.
223
00:24:59,340 –> 00:25:08,400
This is a focal point of intensity because we’ve got lots of different intensity focal points sitting in this beam. When we sample across
224
00:25:08,400 –> 00:25:13,740
there, is no longer a nice Gaussian distribution.
225
00:25:13,740 –> 00:25:23,600
Effectively, what we’ve done there, we’ve pushed the yellow up here like this because it’s intensified.
226
00:25:23,600 –> 00:25:28,730
The red beam is out here somewhere.
227
00:25:28,730 –> 00:25:34,400
Virtually useless and the blue beam, we’ve will actually change the shape of that
228
00:25:34,400 –> 00:25:41,270
gaussian intensity to something completely different than what it was when it started out.
229
00:25:41,270 –> 00:25:51,740
We’ve actually intensified the centre part of the beam itself, and we have filtered out or decreased the useless part of the beam.
230
00:25:51,740 –> 00:25:56,570
That’s what this lens has actually done with the aberration effect.
231
00:25:56,570 –> 00:26:00,830
So let’s take a look at what’s actually happening just here.
Transcript for Laser Cutting: Where Do We Start? (Cont…)
232
00:26:00,830 –> 00:26:01,490
Because remember,
233
00:26:01,490 –> 00:26:14,420
the yellow zone is not not just a zone. It is an area where the intensity is gradually going up and up and up towards the centre of the beam.
234
00:26:14,420 –> 00:26:20,270
Like that, so the center of the laser beam is still much, much higher than the edge of the yellow zone.
235
00:26:20,270 –> 00:26:25,430
This is the entry point. This may be only 0.2 of a millimetre diameter.
236
00:26:25,430 –> 00:26:30,680
The beam is coming in here, but this is effectively the intensity zone.
237
00:26:30,680 –> 00:26:35,830
The yellow intensity zone of that beam, which has been grossly amplified.
238
00:26:35,830 –> 00:26:39,830
Now outside this zone, we’ve got our blue zone.
239
00:26:39,830 –> 00:26:44,590
And outside that. We’ve got our red zone. Now our
240
00:26:44,590 –> 00:26:54,460
red zone is going to have no effect on our material because it’s such a low power to start with and it’s diverging and becoming even lower.
241
00:26:54,460 –> 00:27:03,280
So it’s intensity is unimaginably small. It’s never going to exceed the damage threshold of the material. The blue zone,
242
00:27:03,280 –> 00:27:08,830
well, given enough time. It may well have an effect.
243
00:27:08,830 –> 00:27:18,670
But the first effect that’s going to happen. Remember back to the pictures a few moments ago, the smaller we make the entry wound, the faster
244
00:27:18,670 –> 00:27:25,780
the damage will occur. So we’ve decreased this damage zone to very, very small proportions.
245
00:27:25,780 –> 00:27:36,920
So any intensity that happens to exist at that point is going to have a very, very rapid effect at damaging the material.
246
00:27:36,920 –> 00:27:40,290
And so consequently, what we’re going to get, we’re going to get the beam,
247
00:27:40,290 –> 00:27:47,070
which remember has still got a Gaussian distribution because we’ve not messed around with the yellow part of the beam specifically.
248
00:27:47,070 –> 00:27:52,140
That is still going to have a very high intensity path to the centre of that beam.
249
00:27:52,140 –> 00:28:01,590
Which is immediately going to rapidly grow down into and through a piece of material.
Transcript for Laser Cutting: Where Do We Start? (Cont…)
250
00:28:01,590 –> 00:28:12,020
So the only part of the laser beam that is going to have an effect is the bit that can get through the hole that’s made in the material.
251
00:28:12,020 –> 00:28:21,560
So the material is actually going to be a filter for all this other crap that you normally imagine is going to have an effect on your hole.
252
00:28:21,560 –> 00:28:28,670
No, it’s never going to get through the hole. It’s going to be filtered out by the surface of the material itself.
253
00:28:28,670 –> 00:28:35,690
OK, so this beam that you imagine happening below the focal point is never going to get there.
254
00:28:35,690 –> 00:28:43,160
The only thing that’s going to get below the focal point is what gets through the damage hole that you create on the surface.
255
00:28:43,160 –> 00:28:50,530
And the smaller the damage hole, the faster the material will erode.
256
00:28:50,530 –> 00:28:59,170
So this damage, technically this damage could only ever be as big as this beam.
257
00:28:59,170 –> 00:29:05,650
So the front of the beam might be pointed. But actually, if you give it enough time.
258
00:29:05,650 –> 00:29:12,490
The whole of that beam will produce a parallel hole.
259
00:29:12,490 –> 00:29:20,800
And if you stop the beam just before the material has finished, you will see that the front of the beam will still have a small taper on it.
260
00:29:20,800 –> 00:29:27,240
And that’s what we saw when we looked at our piece of, when we looked at the cut passing through our 10 millimetre material.
261
00:29:27,240 –> 00:29:34,260
Just at the bottom of the cut, we could see evidence where the beam had not quite passed through the material.
262
00:29:34,260 –> 00:29:40,510
We needed to give it a few more parts of a second to allow it to pass through cleanly.
263
00:29:40,510 –> 00:29:45,510
Now, by the time, you give it enough time to pass through the material,
264
00:29:45,510 –> 00:29:51,210
what will have happened is, some of this blue will have had an effect at the top here.
265
00:29:51,210 –> 00:29:57,510
Okay. And what will happen is this blue will effectively be doing this.
266
00:29:57,510 –> 00:30:02,930
It will erode. The top of the cut.
Transcript for Laser Cutting: Where Do We Start? (Cont…)
267
00:30:02,930 –> 00:30:11,120
So there’s your cut profile now. It’s a mixture of a little bit of blue beam with a lot of yellow beam,
268
00:30:11,120 –> 00:30:16,670
which has produced a parallel hole as it’s wandered through the material.
269
00:30:16,670 –> 00:30:25,590
So that’s how cutting, that’s what the cutting mechanism is. And your imagination about what’s happening below the focal point…
270
00:30:25,590 –> 00:30:29,160
It’s just totally misleading you.
271
00:30:29,160 –> 00:30:36,030
Now you can go and have a look at a lot of these tests that I’ve carried out, a lot of these experiments on my RDWorks learning lab channel.
272
00:30:36,030 –> 00:30:41,490
Now I carried out lots and lots of tests with lenses to try and establish what was going on.
273
00:30:41,490 –> 00:30:47,610
And one of the tests that I carried out was here. It was, it was basically a, what I call a speed test.
274
00:30:47,610 –> 00:30:57,630
It’s characterizing the beam itself. What we did, we put a thirty eight point one lens correctly focused onto the surface.
275
00:30:57,630 –> 00:31:10,680
And here we’ve got a two millisecond burst of power at 100 percent. Four, six, eight, 10 milliseconds. 12, 14, all the way up to about 30 milliseconds.
276
00:31:10,680 –> 00:31:17,040
As the exposure time was increased, you could see the rate at which the beam was growing.
277
00:31:17,040 –> 00:31:24,090
But if you look carefully, you’ll see that across here. There seems to be almost like a neck.
278
00:31:24,090 –> 00:31:30,780
But we’ve also got this strange ballooning effect which gets greater, more ballooning as time goes on.
279
00:31:30,780 –> 00:31:39,450
This is not uniform intensity, even at 0.2 diameter, and we’ve still got rays that are coming in.
280
00:31:39,450 –> 00:31:47,830
Like this? And like this.
281
00:31:47,830 –> 00:31:52,600
OK, they’re still not absolutely parallel to the axis.
282
00:31:52,600 –> 00:32:01,930
There are rays that are very slightly off axis, and they’re still passing through this 0.2mm diameter entry hole.
Transcript for Laser Cutting: Where Do We Start? (Cont…)
283
00:32:01,930 –> 00:32:09,460
OK, so the bore that’s been left behind by the major part of the yellow beam is being scoured
284
00:32:09,460 –> 00:32:17,890
by some more rays that are able to get into this hole through the entry diameter.
285
00:32:17,890 –> 00:32:28,990
These are rays that are very, very close to the centre and will come down here like this and they will produce a sort of a scouring effect.
286
00:32:28,990 –> 00:32:35,440
Which the more time you allow, the more effect they will have.
287
00:32:35,440 –> 00:32:38,860
Who said cutting was simple? Did I say that earlier on?
288
00:32:38,860 –> 00:32:43,600
That is the way that cutting takes place. That has got nothing to do with your imagination,
289
00:32:43,600 –> 00:32:51,280
which is dragged around in all directions by these pictures that have been out there for many, many years.
290
00:32:51,280 –> 00:32:55,690
These do not take into account the intensity of the beam.
291
00:32:55,690 –> 00:33:03,760
These just are rays and as I have shown you, these rays are totally ineffective.
292
00:33:03,760 –> 00:33:09,310
They don’t do anything at all. The only bit that works is the central part of the beam.
293
00:33:09,310 –> 00:33:13,420
Now it took me a long time to work out how lenses work,
294
00:33:13,420 –> 00:33:20,770
and I spent a great deal of time doing tests with lenses to try and reverse engineer what was happening to the beam.
295
00:33:20,770 –> 00:33:25,850
Acrylic is a fantastic material that leaves footprints in the sand.
296
00:33:25,850 –> 00:33:30,230
Can I read those footprints in the sand and find out what’s actually happening?
297
00:33:30,230 –> 00:33:35,690
Well, the answer is finally, yes. And I’ve tried to describe that process in this session.
298
00:33:35,690 –> 00:33:44,550
All the test data that I’ve collected about various types of lenses are included in this very, very long PDF document.
299
00:33:44,550 –> 00:33:53,000
It’s 109 pages long. Now, that isn’t 109 pages of reading, because although there’s a little bit of text there, we’ve got summary graphs.
300
00:33:53,000 –> 00:34:01,490
So we’ve got a whole range of lenses, a whole range of different set up configurations that I’ve used for the following tests.
Transcript for Laser Cutting: Where Do We Start? (Cont…)
301
00:34:01,490 –> 00:34:08,480
Now, although, as you can see from the crosses, it’s a pretty comprehensive spread of testing for lenses.
302
00:34:08,480 –> 00:34:15,290
Not every lens is in there. Now, as I pointed out to you earlier on, there is no such thing as a focal point.
303
00:34:15,290 –> 00:34:21,390
The focal point depends on the speed. It depends on the power and one of the things that surprises people.
304
00:34:21,390 –> 00:34:28,100
It also depends on material. So we’ve got a whole range of material here and a whole range of different focal
305
00:34:28,100 –> 00:34:32,720
points that happen to have the best focal points for different materials.
306
00:34:32,720 –> 00:34:42,440
OK, now it clearly says in this that these are tests using acrylic. Now acrylic cuts fairly slowly.
307
00:34:42,440 –> 00:34:51,890
If you want to cut MDF or HDF, the speeds are about the same as the speeds that acrylic cuts at.
308
00:34:51,890 –> 00:34:58,520
The only other materials that you can really cut are organic materials, which are the woods, the real woods, not the plastics.
309
00:34:58,520 –> 00:35:03,890
So real wood will cut at about twice the speed of acrylic.
310
00:35:03,890 –> 00:35:07,610
This one, which is a gallium arsenide meniscus lens.
311
00:35:07,610 –> 00:35:14,320
It takes two four six eight, maybe 10.
312
00:35:14,320 –> 00:35:20,880
And yet when we turn it the wrong way round. Two, four, six eight.
313
00:35:20,880 –> 00:35:32,700
It’s faster. So that’s the sort of information that you can read in this, immense set of data that I’ve produced.
314
00:35:32,700 –> 00:35:39,060
So there’s a huge amount of data that you can find out from this document. Look, here we’ve got a thirty eight point one CVD.
Transcript for Laser Cutting: Where Do We Start? (Cont…)
315
00:35:39,060 –> 00:35:44,010
Look how thin the entry is, it’s deep as well.
316
00:35:44,010 –> 00:35:48,960
So this is a very good lens for cutting deep and producing thin lines.
317
00:35:48,960 –> 00:35:56,600
Because if we take a look here, look, the lines on the surface are bigger, even though the cut is smaller.
318
00:35:56,600 –> 00:36:07,220
All right, so it looks like a thirty eight point one CVD lens has really got the best cut, the deepest cut and the thinnest entry.
319
00:36:07,220 –> 00:36:11,990
So the thinnest line, so you will be able to download this from the website.
320
00:36:11,990 –> 00:36:17,580
Well, that’s as much as I can tell you about cutting at the moment. We’ll get on and do some real cutting in the next session.
Transcript for Laser Cutting: Where Do We Start?
Disclaimer
Last updated August 26, 2021
WEBSITE DISCLAIMER
The information provided by n-Deavor Limited, trading as Laseruser.com (“we,” “us” , or “our”) on (the “Site”) is for general informational purposes only. All information on the Site is provided in good faith, however we make no representation or warranty of any kind, express or implied, regarding the accuracy, adequacy, validity, reliability, availability or completeness of any information on the Site.
UNDER NO CIRCUMSTANCE SHALL WE HAVE ANY LIABILITY TO YOU FOR ANY LOSS OR DAMAGE OF ANY KIND INCURRED AS A RESULT OF THE USE OF THE SITE OR RELIANCE ON ANY INFORMATION PROVIDED ON
THE SITE. YOUR USE OF THE SITE AND YOUR RELIANCE ON ANY INFORMATION ON THE SITE IS SOLELY AT YOUR OWN RISK.
EXTERNAL LINKS DISCLAIMER
The Site may contain (or you may be sent through the Site) links to other websites or content belonging to or originating from third parties or links to websites and features in banners or other advertising. Such external links are not investigated, monitored, or checked for accuracy, adequacy, validity, reliability, availability or completeness by us.
WE DO NOT WARRANT, ENDORSE, GUARANTEE, OR ASSUME RESPONSIBILITY FOR THE ACCURACY OR RELIABILITY OF ANY INFORMATION OFFERED BY THIRD-PARTY WEBSITES LINKED THROUGH THE SITE OR ANY WEBSITE OR FEATURE LINKED IN ANY BANNER OR OTHER ADVERTISING.
WE WILL NOT BE A PARTY TO OR IN ANY WAY BE RESPONSIBLE FOR MONITORING ANY TRANSACTION BETWEEN YOU AND THIRD-PARTY PROVIDERS OF PRODUCTS OR SERVICES.
AFFILIATES DISCLAIMER
The Site may contain links to affiliate websites, and we receive an affiliate commission for any purchases made by you on the affiliate website using such links. Our affiliates include the following:
- makeCNC who provide Downloadable Patterns, Software, Hardware and other content for Laser Cutters, CNC Routers, Plasma, WaterJets, CNC Milling Machines, and other Robotic Tools. They also provide Pattern Files in PDF format for Scroll Saw Users. They are known for their Friendly and Efficient Customer Service and have a comprehensive back catalogue as well as continually providing New Patterns and Content.
- Cloudray Laser: a world-leading laser parts and solutions provider, has established a whole series of laser product lines, range from CO2 engraving & cutting machine parts, fiber cutting machine parts and laser marking machine parts.