 Skip to content
 The Concise RDWorks Learning Lab Series
Welcome to Module 2 of the new Concise RDWorks Learning Lab Series with Russ Sadler. Module 2 will build on the information learned in Module 1 and will provide practical machine set-up sessions as well as more detailed subject material. So let’s learn all about laser cutting machine parameters and loading files.
In this Session, Russ covers the machine parameters such as calibrating the X and Y axis, machine speed, etc. RDWorks discussed and backing up the machine settings through the Vendor Settings. Individual parameters are explained. User Parameters Settings in the software are explained and backed up. Layer Parameters explained for cutting. Communicating with the laser machine.
Release Date: 12th October 2021
Over the last 6 years, Russ has built up a formidable YouTube following for his RDWorks Learning Lab series which currently has over 200 videos.
The original RDWorks Learning Lab series on his “Sarbar Multimedia” YouTube Channel, follows Russ as he tries to make sense of his new Chinese laser machine and to sort out the truths, half truths and outright misleading information that is available on the web.
Six years later with over 3 million YouTube Views under his belt, Russ has become the go to resource for everything related to the Chinese CO2 laser machine user or wannabe user.

In this new series, Russ has condensed his knowledge and experience of the last 6 years to provide valuable information and insights into the purchasing, understanding, use, repair and maintenance of the Chinese CO2 laser machines and their key component parts.
Podcast Download
You can download the audio file for this video here, just click on the three dots to the right of the player:

Video Resource Files
There are no resource files associated with this video.
External Resource Links
There are no external resource links associated with this video.
Transcript for Laser Cutting Machine Parameters and Loading Files
Click the “Show More” button to reveal the transcript, and use your browsers Find function to search for specific sections of interest.
1
00:00:06,440 –> 00:00:19,150
The Concise RDWorks Learning Lab with Russ Sadler. Session 13: Machine Parameters and Loading Files. Now in the previous session.
2
00:00:19,150 –> 00:00:25,580
We managed to get the machine started and you saw that there was an automatic started routine built into the brain,
3
00:00:25,580 –> 00:00:32,510
into the controller that enabled it to find zero zero for its work area.
4
00:00:32,510 –> 00:00:41,210
Now, there are many other parameters the machine needs to carry out its work, before we even put a program anywhere near the machine,
5
00:00:41,210 –> 00:00:49,340
for example, is 20 millimeters, 20 millimeters of movement on the stepper motors.
6
00:00:49,340 –> 00:00:59,510
Somehow they have to be calibrated so that the stepper motor or the brain knows what our 20 millimeters or two inches or 10 inches looks like.
7
00:00:59,510 –> 00:01:04,910
So we have to make that calibration accurate, how fast are we are allowed to run the stepper motors.
8
00:01:04,910 –> 00:01:10,970
We can’t run them too fast because if we do, the motors will do that horrible noise that we spoke about last time.
9
00:01:10,970 –> 00:01:17,730
Cogging. We should lose steps and steps are most important when you’ve got an open loop system.
10
00:01:17,730 –> 00:01:24,650
Remember that the controller is sending out pulses, but it’s not keeping an eye on what the stepper motor is doing.
11
00:01:24,650 –> 00:01:27,680
All it’s doing is sending signals to the stepper motor.
12
00:01:27,680 –> 00:01:34,190
If we get an interruption because I put my finger in the way, as I showed you last time, everything goes to pot.
13
00:01:34,190 –> 00:01:38,600
There are all sorts of parameters that need to be set in this machine.
14
00:01:38,600 –> 00:01:45,320
And when you receive your machine, those parameters will already be preset by the manufacturer.
15
00:01:45,320 –> 00:01:55,550
One of the things that you must do when you first start your machine up, is to save those manufacturer parameters.
16
00:01:55,550 –> 00:02:00,020
Now, the software that we’re going to talk about later gives an impression that the
Transcript for Laser Cutting Machine Parameters and Loading Files (Cont…)
17
00:02:00,020 –> 00:02:07,550
manufacturer has already saved those parameters into a manufacturer’s parameter file.
18
00:02:07,550 –> 00:02:12,950
I wouldn’t trust that at all, because I’ve known too many people lose the parameters for their machine as
19
00:02:12,950 –> 00:02:20,960
they’re messing around and they preload the factory parameters, only to find their machine is totally junk.
20
00:02:20,960 –> 00:02:26,420
And they have to start from square one and beg, steal and borrow parameter files from somebody else.
21
00:02:26,420 –> 00:02:34,680
So listen to other people’s mistakes and the first thing you must do is what I’m going to show you now.
22
00:02:34,680 –> 00:02:44,610
Now, all Ruide controllers are supplied with a piece of free software called RDWorks, and that’s what I’m running here.
23
00:02:44,610 –> 00:02:48,330
There are other pieces of software which I shall talk about later,
24
00:02:48,330 –> 00:02:54,000
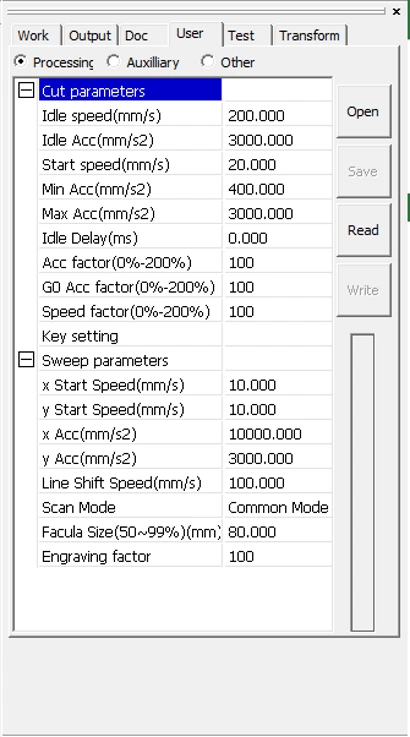
which are probably substantially better than RDWorks, but you have to pay for them.
25
00:02:54,000 –> 00:02:59,620
This is free and for free. It’s very good,
26
00:02:59,620 –> 00:03:03,370
but clunky. This software only runs on a Windows machine,
27
00:03:03,370 –> 00:03:10,810
whereas other software’s run on Linux, OS as well as Windows machines, and they’ve got many more features in them.
28
00:03:10,810 –> 00:03:17,120
But we’ll talk about them, a program called Lightburn. Oh, did I say that in a future session.
29
00:03:17,120 –> 00:03:22,780
Now, what Ruida supply on this machine is a digital controller.
30
00:03:22,780 –> 00:03:30,490
There are many other machines around which still use what I call old school type controllers, which are analog controllers.
31
00:03:30,490 –> 00:03:35,890
They do not have anywhere near the power and the flexibility of the digital controllers.
32
00:03:35,890 –> 00:03:36,280
Now Ruida
33
00:03:36,280 –> 00:03:46,540
are not the only people that make digital controllers, but most machines use Ruida controllers because they have become an industry standard.
34
00:03:46,540 –> 00:03:51,860
And as I mentioned just now, this software only runs on Ruida controllers.
35
00:03:51,860 –> 00:04:00,520
So if you have a different controller, it may look similar and it may perform many of the same features, but it won’t be exactly the same as this.
Transcript for Laser Cutting Machine Parameters and Loading Files (Cont…)
36
00:04:00,520 –> 00:04:13,650
The other software that I just mentioned in passing, Lightburn. Is an amazing piece of work, because not only does it run on Windows, Linux and OS,
37
00:04:13,650 –> 00:04:18,750
it encompasses many of the other digital controllers that are out there.
38
00:04:18,750 –> 00:04:24,840
So you can have a standard software that runs all these other digital controllers.
39
00:04:24,840 –> 00:04:29,670
Lightburn is an amazing piece of software, which I said we will get onto at a later date.
40
00:04:29,670 –> 00:04:36,510
But for the time being, I’m going to show you the software that you are probably supplied with, with your machine for free.
41
00:04:36,510 –> 00:04:43,620
I would suggest, in all seriousness, that you use RDWwork’s if it comes with,
42
00:04:43,620 –> 00:04:51,270
if it comes with your machine and you use it for two or three months to find out just how it works,
43
00:04:51,270 –> 00:05:01,410
and then you can download the free version of Lightburn and you’ll see that there’s a completely different universe out there to be experienced.
44
00:05:01,410 –> 00:05:07,330
But become familiar with your machine with this software.
45
00:05:07,330 –> 00:05:15,370
Now, the first thing that I’m going to show you is how to protect your software, not against thieves, but for yourself.
46
00:05:15,370 –> 00:05:22,930
Now up in the top left hand corner here, we shall find file, and down here we shall find vendor settings.
47
00:05:22,930 –> 00:05:29,750
So we click on vendor settings. And the first thing it says is, give me a password.
48
00:05:29,750 –> 00:05:37,420
They didn’t supply you with a password when they supplied this software, but to get into your machine, you need to put in the password.
49
00:05:37,420 –> 00:05:41,380
RD8888. One, two, three, four.
50
00:05:41,380 –> 00:05:49,210
So I’ve got a USB male connector into the laptop and we have a USB male connector into the machine.
51
00:05:49,210 –> 00:05:58,210
And there are two ports on this machine. One of them will say USB or Udisk and the other one will probably say something like disk interface.
Transcript for Laser Cutting Machine Parameters and Loading Files (Cont…)
52
00:05:58,210 –> 00:06:06,110
At this stage the are the RD8888 only sends us to this page in RDWorks.
53
00:06:06,110 –> 00:06:11,110
It’s not talking to the machine at the moment at all. There are several pages that we can scan through.
54
00:06:11,110 –> 00:06:15,100
But before you go anywhere else, what we need to do is to read.
55
00:06:15,100 –> 00:06:22,660
We press the read button and what that’s going to do, it’s going to make this piece of software connect to the machine.
56
00:06:22,660 –> 00:06:27,940
And there we go. You can see that it’s reading in the data and what it’s done.
57
00:06:27,940 –> 00:06:32,920
It’s put the data from the machine into this panel here.
58
00:06:32,920 –> 00:06:38,950
So it tells me all the factors that the manufacturer has put into these panels.
59
00:06:38,950 –> 00:06:43,450
So you’ll have some you have some parameters up here to do with the motor control.
60
00:06:43,450 –> 00:06:50,470
And then you’ll have this thing here, called Breadth. Well, look, this machine is a 600 wide machine.
61
00:06:50,470 –> 00:06:55,180
As I told you before, the machine already knows the size of the table.
62
00:06:55,180 –> 00:07:01,840
What it doesn’t know is where it starts. So here’s the six hundred width of my table there.
63
00:07:01,840 –> 00:07:08,780
And then we’ve got these things here. Look, Jump-Off speed. Well, basically, that’s the speed at which the head will start taking off at.
64
00:07:08,780 –> 00:07:17,680
It can immediately start offf at a speed of 50 millimeters a second and then we’ve got a maximum speed of a thousand millimeters a second.
65
00:07:17,680 –> 00:07:22,600
And then we’ve got acceleration factors here. And then down at the bottom, we’ve got something called keying.
66
00:07:22,600 –> 00:07:27,400
Well, basically, remember the arrow keys that we showed you last time where you can move ahead around?
67
00:07:27,400 –> 00:07:29,440
Well, that’s what these do.
68
00:07:29,440 –> 00:07:38,230
It tells you the jump off speed for keying is only one millimeter a second in this instance, but the acceleration is four thousand five hundred.
69
00:07:38,230 –> 00:07:43,330
OK, so you’ve got the opportunity to change the settings and then we’ve got things like the laser.
70
00:07:43,330 –> 00:07:50,830
Now, the laser is quite important because, you know, in this instance, you can choose glass tube.
71
00:07:50,830 –> 00:07:55,030
Or there’s an RF combination there that you can use.
72
00:07:55,030 –> 00:08:03,220
Well, we’re not using RF on this machine, we’re using glass tube. So there are some settings in here which I’m not going to go through all these settings.
Transcript for Laser Cutting Machine Parameters and Loading Files (Cont…)
73
00:08:03,220 –> 00:08:11,920
And then you’ve got others and soft p.l.c., which is all to do with the red lights, the lamps that you can have on the side of a production machine.
74
00:08:11,920 –> 00:08:15,220
So we’ve got all our settings in there. We can check the X, Y, Z.
75
00:08:15,220 –> 00:08:19,780
This is one of the pre-features I was telling you about, which is the distance calibration.
76
00:08:19,780 –> 00:08:29,890
The distance calibration allows you to set 20 millimeters real dimension to be 20 millimeters of stepper motor movement.
77
00:08:29,890 –> 00:08:35,950
Most of the settings in here are maximum allowable values.
78
00:08:35,950 –> 00:08:41,330
Like you used to say, to your kids, you will be home by 12 o’clock. You set a deadline, you set a limit.
79
00:08:41,330 –> 00:08:44,050
Well, that’s what these are. These are limits.
80
00:08:44,050 –> 00:08:54,160
They’re not necessarily the values that the machine runs at, but these are limits in some instances that are preset for you.
81
00:08:54,160 –> 00:09:04,330
So you can’t exceed safe limits. If we change any of these, we will go back and we will write them back to the machine.
82
00:09:04,330 –> 00:09:09,940
OK, so now we’ve sent those values back to the machine down our USB cable.
83
00:09:09,940 –> 00:09:18,040
That doesn’t make your parameter safe. Remember what we’ve just done? We’ve pulled the parameters up from the machine into this panel.
84
00:09:18,040 –> 00:09:23,950
Now, what we’ve got to do is save them into an external file. You can call it whatever you want.
85
00:09:23,950 –> 00:09:28,180
RussLB21 save parameter success.
86
00:09:28,180 –> 00:09:35,180
OK, just remember where you’ve saved them to, of course, because one of these days you might need to come back in and open them.
87
00:09:35,180 –> 00:09:42,010
It will open them up into here and then you’ll have to write them back to the machine.
88
00:09:42,010 –> 00:09:49,990
And then all of a sudden the parameters that you’ve screwed up will be corrected again to those original ones that were supplied with the machine.
89
00:09:49,990 –> 00:09:57,370
Now, as well as the vendor parameters, up here we’ve got some tabs. And one of those tabs is user.
Transcript for Laser Cutting Machine Parameters and Loading Files (Cont…)
90
00:09:57,370 –> 00:10:02,980
And we’ve got a whole load of parameters in here which are user parameters.
91
00:10:02,980 –> 00:10:10,660
So, for instance, we saw that the maximum speed of X was a thousand millimeters a second.
92
00:10:10,660 –> 00:10:14,200
So let’s have a look in here and see what the maximum speed is.
93
00:10:14,200 –> 00:10:23,110
We’ve got cut parameters, idle speed. Six hundred these settings in here, it says six hundred.
94
00:10:23,110 –> 00:10:33,460
Do I believe that? Let’s read. Now it says five hundred, right, those settings in there with some sort of default.
95
00:10:33,460 –> 00:10:42,190
They weren’t the settings, that are the machine settings. So the machine also stores your user settings as well.
96
00:10:42,190 –> 00:10:50,320
And so you will read your user settings into here and then you will also save them.
97
00:10:50,320 –> 00:10:54,970
OK, if you want to modify them, you write them back to the machine.
98
00:10:54,970 –> 00:10:59,230
But at this point, the one thing that you must do is save them.
99
00:10:59,230 –> 00:11:05,380
And again, you’ll save them to an external file, save parameter success.
100
00:11:05,380 –> 00:11:14,140
That’s the very first message I want to impart to you, the importance of saving the machine parameters that are supplied with your machine.
101
00:11:14,140 –> 00:11:18,460
Remember the menu hiding behind the Z/U button?
102
00:11:18,460 –> 00:11:25,650
There are two things in here. One is called set default parameters.
103
00:11:25,650 –> 00:11:28,530
Set factory parameters.
104
00:11:28,530 –> 00:11:38,250
I would advise you to stay away from those settings because there is no escape from those, once you go into them, you automatically select them.
105
00:11:38,250 –> 00:11:47,100
There isn’t a choice to choose or escape. These parameters here are not quite as dangerous as I’m implying.
106
00:11:47,100 –> 00:11:53,010
They do require a password. I’m not going to tell you the password yet.
107
00:11:53,010 –> 00:11:57,870
I’ve got no intention in this series to show you how to use these pieces of software.
Transcript for Laser Cutting Machine Parameters and Loading Files (Cont…)
108
00:11:57,870 –> 00:12:05,350
I’m going to jump in and out of them and I’m going to do certain things to show you and illustrate what can be done.
109
00:12:05,350 –> 00:12:07,320
But you’re going to have to learn this software on your own.
110
00:12:07,320 –> 00:12:17,910
There is my series, RDWorks Learning Lab on YouTube, which takes you through all the basic commands associated within the first few lessons.
111
00:12:17,910 –> 00:12:22,980
Now, all I’m going to do at the moment is do something very simple. I’m going to draw a square.
112
00:12:22,980 –> 00:12:27,780
OK, so I’ve got myself a 25 millimeter square there. Now I’m going to come up here to the tab
113
00:12:27,780 –> 00:12:32,670
called work. As I said, I’m not trying to teach you how to use this software.
114
00:12:32,670 –> 00:12:40,470
I’m just going to show you one or two key things. Now, at the moment, we’re using this black layer and if we double check on it, click, click.
115
00:12:40,470 –> 00:12:45,090
We’ve got a black layer there. We’ve got a question.
116
00:12:45,090 –> 00:12:49,140
Is output: Yes. And there’s another option in there.
117
00:12:49,140 –> 00:12:56,520
No, we choose Yes. we want the program to go from here down to the machine.
118
00:12:56,520 –> 00:13:01,620
OK, we do want an output for that square because we want to do something with it.
119
00:13:01,620 –> 00:13:09,210
We may possibly have another shape there as well that is on a different layer that we do not want to cut or engrave.
120
00:13:09,210 –> 00:13:14,070
And we can suppress that with the answer: No. Speed?
121
00:13:14,070 –> 00:13:19,230
Well we are we going to make this layer, a cut layer? So 20 millimeters a second.
122
00:13:19,230 –> 00:13:23,400
Yeah. From experience that’s going to do me. If Blowing.
123
00:13:23,400 –> 00:13:27,420
Well, the choices there are, yes or no, to be honest,
124
00:13:27,420 –> 00:13:34,260
it will make no difference to most of your machines because you won’t have the opportunity for being able to turn the air assist on or off,
125
00:13:34,260 –> 00:13:41,580
which is basically what that is. Programable air assist. That’s an advanced feature, which we’ll talk about later.
126
00:13:41,580 –> 00:13:47,410
Processing mode. Well, at the moment it’s set to something called dot, I don’t want dot.
127
00:13:47,410 –> 00:13:51,360
I don’t want to scan. I want to cut. So I’m going to choose cut mode.
128
00:13:51,360 –> 00:13:54,270
Now, automatically, it changes some of the parameters over here
129
00:13:54,270 –> 00:14:00,420
if you note. Let’s just go back to scan mode and you’ll see we get a completely different set of parameters over here.
Transcript for Laser Cutting Machine Parameters and Loading Files (Cont…)
130
00:14:00,420 –> 00:14:05,250
I’ve only got one laser tube in this machine, so forget about the rest.
131
00:14:05,250 –> 00:14:10,470
Even if I put ticks beside all of these, it isn’t going to make any difference because I’ve only got one tube.
132
00:14:10,470 –> 00:14:15,300
These numbers here. You must ignore my numbers because I know what I’m doing.
133
00:14:15,300 –> 00:14:17,430
I’m going to put these at ninety five percent power.
134
00:14:17,430 –> 00:14:25,170
You may well have to use your machine at something like a maximum of maybe 65 or 70 percent power, sometimes 80 percent power.
135
00:14:25,170 –> 00:14:32,430
But there is a limit beyond which you cannot go, which I described to you in the laser tube video.
136
00:14:32,430 –> 00:14:38,910
If you drive the tube with too much current, you will quickly destroy its capability.
137
00:14:38,910 –> 00:14:44,070
You need to find out what the maximum current rating for your tube that the manufacturer allows
138
00:14:44,070 –> 00:14:51,690
and then what the maximum percent power is that matches that current and don’t tick default.
139
00:14:51,690 –> 00:14:56,100
I’ll mention default at a later stage. And in general for cutting.
140
00:14:56,100 –> 00:15:03,840
Keep the numbers exactly the same. There are special situations where you can modify those numbers, but that’s rather advanced stuff.
141
00:15:03,840 –> 00:15:11,870
Anything down here don’t put anything in. Laser through mode: would generally be ticked, untick it, you don’t need it.
142
00:15:11,870 –> 00:15:16,190
So this power here will not have any effect if that power is not ticked.
143
00:15:16,190 –> 00:15:24,170
OK, leave these open and closed delays set to zero so you don’t do anything down here and you don’t tick anything down there.
144
00:15:24,170 –> 00:15:33,080
So now we can say, OK, there are four ways that you can communicate with your machine and tell it that you want to cut that square.
145
00:15:33,080 –> 00:15:36,920
I’m going to show you three of them because I don’t have the fourth one connected up.
146
00:15:36,920 –> 00:15:40,830
The first one is to press this start button here. RDWorks
147
00:15:40,830 –> 00:15:47,750
software will convert your square into a special machine code instructions and it will
148
00:15:47,750 –> 00:15:55,100
send it down the USB line to the machine into a piece of temporary memory in the machine.
Transcript for Laser Cutting Machine Parameters and Loading Files (Cont…)
149
00:15:55,100 –> 00:16:05,760
And then it will automatically run the square and cut it.
150
00:16:05,760 –> 00:16:16,890
Now very crudely, I’m just putting little pulses down and I’m changing the position of the head here to get the smallest dot that I can find,
151
00:16:16,890 –> 00:16:25,440
it’s not far off the correct dimension there. Now this is not the way you’d normally set the focus.
152
00:16:25,440 –> 00:16:32,350
But I’m doing this very quickly and crudely just to show you what’s possible. There we go.
153
00:16:32,350 –> 00:16:37,320
Now, this is really not the right nozzle that I’ve got on here for doing the job.
154
00:16:37,320 –> 00:16:43,350
And you’ll hear that I’ve got some air coming out of the nozzle as well.
155
00:16:43,350 –> 00:16:48,450
Air assist. Again, I’m not going to explain all this technical detail to you at the moment.
156
00:16:48,450 –> 00:16:55,620
Those are for later sessions. All I’m trying to do at the moment is to show you how we get a program down to the machine.
157
00:16:55,620 –> 00:17:00,810
Now, remember, one other thing that comes back to the science that we spoke about in the first sessions.
158
00:17:00,810 –> 00:17:13,020
This stuff reflects. So when I burn through this, I’m going to be firing the laser energy right through the slot at this table.
159
00:17:13,020 –> 00:17:21,600
This table is only about 60 or 70 percent reflective. So it’s going to bounce off this very surface and it’s going to scatter very slightly.
160
00:17:21,600 –> 00:17:28,350
Now, at the moment, I’ve got 10 millimeter spacers under here so that when the light does reflect,
161
00:17:28,350 –> 00:17:34,290
it is going to probably mark the back of the product. It just depends how I’ve got the power set.
162
00:17:34,290 –> 00:17:40,200
If I’ve got the power set just right, then I will just make a cut without too much damage at the back.
163
00:17:40,200 –> 00:17:43,710
If I’ve got too much power, the power will stay on,
164
00:17:43,710 –> 00:17:49,920
it will reflect and it will damage the back of the cut. So we shall see what happens when I do this.
165
00:17:49,920 –> 00:17:55,860
So the first thing I’m going to do on the keyboard is an origin button, and the origin basically means I’m going to start the
166
00:17:55,860 –> 00:18:00,260
head there. And that’s where my shape is going to start.
Transcript for Laser Cutting Machine Parameters and Loading Files (Cont…)
167
00:18:00,260 –> 00:18:05,970
When we look at our program square, you’ll notice that there is a little green dot in the top right hand corner.
168
00:18:05,970 –> 00:18:09,660
That is where the program is going to start from.
169
00:18:09,660 –> 00:18:24,430
I’m not going to put extraction on at the moment. We’re going to produce some smoke. So I’m going to press the start button on the screen here.
170
00:18:24,430 –> 00:18:33,970
OK, look, it’s a cut. It’s cut it out wonderfully well and surprisingly enough, it’s not too bad on the back.
171
00:18:33,970 –> 00:18:41,680
That’s one way that I can get the program to cut. You can see in here it says temp file.
172
00:18:41,680 –> 00:18:45,190
Well, that’s because I’ve loaded that program into a temporary file.
173
00:18:45,190 –> 00:18:53,320
It hasn’t given it a name, but it has temporarily stored that program in the machine in a piece of temporary memory.
174
00:18:53,320 –> 00:18:59,490
So if I want to rerun that again, I can move the head across to there.
175
00:18:59,490 –> 00:19:07,590
With the keypad, with the Arrow keys, I can press origin and you hear it go pip and what that’s done, that’s now made that point
176
00:19:07,590 –> 00:19:14,490
there, the start of a new program. I don’t have to load that same program again,
177
00:19:14,490 –> 00:19:20,550
if I’m not making any changes. I can just do a repeat by pressing the start button here.
178
00:19:20,550 –> 00:19:28,470
And if I press that start button as opposed to the one on the PC screen.
179
00:19:28,470 –> 00:19:40,920
It’ll run exactly the same program again. There’s another way that you can make that program appear on your machine to be cut, and that is to download it.
180
00:19:40,920 –> 00:19:42,000
Now, there was what we’re going to do,
181
00:19:42,000 –> 00:19:49,560
we’re going to use our USB cable and we’re going to physically download the program onto the machine, not into temporary memory,
182
00:19:49,560 –> 00:19:55,230
but into permanent memory this time so that you can use the program again and again and again.
183
00:19:55,230 –> 00:19:59,940
As I’ve just produced there, a one inch, one inch file for cutting to test the cutting speed.
Transcript for Laser Cutting Machine Parameters and Loading Files (Cont…)
184
00:19:59,940 –> 00:20:03,670
Those are the sorts of things that you need to have in your machine,
185
00:20:03,670 –> 00:20:09,900
little test programs that when you want to find the focus or when you want to find a cutting speed for a material,
186
00:20:09,900 –> 00:20:14,910
you can just call up your one inch square and you can fiddle with the parameters on the machine itself,
187
00:20:14,910 –> 00:20:18,930
which I’ll show you how to do in a moment. We’ll go to here this time, I’m going to download it.
188
00:20:18,930 –> 00:20:24,030
Now it’s going to ask me to give it a name. This is a very old operating system.
189
00:20:24,030 –> 00:20:31,570
You can only use eight characters, 25TSQ Test Square.
190
00:20:31,570 –> 00:20:36,550
OK, download success. We press the file button.
191
00:20:36,550 –> 00:20:46,530
And now we shall find a list of programs that are in the machine. Program number 42 says 25TSQ.
192
00:20:46,530 –> 00:20:56,320
And we now select that one, then we’ll press the enter key, there it is, look you can see the square is drawn on there. Now that we’ve got into here.
193
00:20:56,320 –> 00:21:01,330
We’ve got something called frame button here. And I’ll show you what frame button does.
194
00:21:01,330 –> 00:21:10,270
I’ll move the head across, press the origin button and out there, press the frame button.
195
00:21:10,270 –> 00:21:16,740
And there we go, it’s just drawing a quick frame for me to show me where the program will cut.
196
00:21:16,740 –> 00:21:24,170
So I’ll now press the start button on the keypad here.
197
00:21:24,170 –> 00:21:31,040
And it’s now running the same program, but from memory, so I can choose any other program that I want, run it,
198
00:21:31,040 –> 00:21:37,700
and then I can come back to that and run it again. So I could always have that program in memory. When I look at these.
199
00:21:37,700 –> 00:21:49,160
They’re quite nice. Pale brown colour. On the back, not bad, I think I could run that a bit faster. Back to the keyboard, we can press enter.
200
00:21:49,160 –> 00:21:55,350
Bear in mind we’ve got the program there already, Enter, enter.
201
00:21:55,350 –> 00:21:59,880
And now what we get the opportunity to do, is to play with the parameters.
202
00:21:59,880 –> 00:22:06,230
The power is what it is. Ninety five percent. But what I can do is run the job a little bit faster.
Transcript for Laser Cutting Machine Parameters and Loading Files (Cont…)
203
00:22:06,230 –> 00:22:08,390
So if I press the Z/U bitton,
204
00:22:08,390 –> 00:22:22,840
it’ll bring me down to that blue pane there where it says 20 millimeters a second and I can change that to 30 millimeters a second, and press enter, enter.
205
00:22:22,840 –> 00:22:28,760
I’m now ready to run. So I’ve now modified that program to 30 millimeters a second, and that’s what it will be whenever I run it.
206
00:22:28,760 –> 00:22:33,560
It won’t go back to the 20 that I originally sent it down as, it’s now a modified program.
207
00:22:33,560 –> 00:22:38,120
So Origin, checkewith the frame. There we go.
208
00:22:38,120 –> 00:22:46,490
And now we’re running it at 30 millimeters a second. And it still works.
209
00:22:46,490 –> 00:22:52,640
You can see that the one on the right is actually lighter and cleaner than the one on the left,
210
00:22:52,640 –> 00:22:58,040
and that’s just one of the properties of cutting at the right speed. You get less burning on the edge of the cut.
211
00:22:58,040 –> 00:23:02,420
We’ve now found two ways to cut that program.
212
00:23:02,420 –> 00:23:07,520
We can either run it from the PC or we can run it from a program in the machine.
213
00:23:07,520 –> 00:23:12,940
Now, there is a third way. I’m going to disconnect the PC.
214
00:23:12,940 –> 00:23:20,210
I’m now going to show you the third way because in the winter months, this is an unheated workshop and I don’t want to stand in here at
215
00:23:20,210 –> 00:23:28,340
freezing temperatures, programing bits and pieces. So I take my laptop into the warm office and I program my job in the warm office.
216
00:23:28,340 –> 00:23:32,690
I do not have an Internet connection between here and the machine.
217
00:23:32,690 –> 00:23:38,780
You could set up an ethernet connection between the two, but I don’t have that.
218
00:23:38,780 –> 00:23:45,710
So what I can do, I can load my program, instead of via this cable,
219
00:23:45,710 –> 00:23:50,240
I can load it onto a memory stick. So down at the bottom right hand corner.
220
00:23:50,240 –> 00:23:53,840
I’ve got the option here to save Ufile.
221
00:23:53,840 –> 00:23:57,890
Instead of sending the machine code program down the wire to the machine,
Transcript for Laser Cutting Machine Parameters and Loading Files (Cont…)
222
00:23:57,890 –> 00:24:03,830
it’s going to send a machine code program onto a memory stick for me. Save to Ufile.
223
00:24:03,830 –> 00:24:11,570
What do you want to call it? I’m going to save it to the right place, which is a memory stick, which is there.
224
00:24:11,570 –> 00:24:19,550
And then I’m going to save this as 25SQX21to make it different than the file that I’ve already downloaded.
225
00:24:19,550 –> 00:24:25,040
Now when you’ve downloaded it onto the memory stick, it comes up with this gobbledygook.
226
00:24:25,040 –> 00:24:35,460
Who knows what it says. Have a nice day in Chinese I suppose. Anyway, when you see this it basically means you’ve saved the file to your memory stick.
227
00:24:35,460 –> 00:24:42,950
We’ve got two USB ports, this one is the USB wire connection to the PC and this one on top here,
228
00:24:42,950 –> 00:24:49,610
which normally says Udisk disk or USB is the connection into which you put your memory stick.
229
00:24:49,610 –> 00:24:57,920
We now come to the machine again and we can press file button. And what we should find in here is read memory file No.
230
00:24:57,920 –> 00:25:04,250
Second one down is Udisk. So that’s what we want. We want it, because that’s what we’ve plugged in, Udisk.collected you disk.
231
00:25:04,250 –> 00:25:08,990
So we’ll move to Udisk, and press, enter and then we get some more choices.
232
00:25:08,990 –> 00:25:18,980
Read the Udisk file. Well, we’ve got to know what we want to load, so we better read the file. Enter.
233
00:25:18,980 –> 00:25:28,700
And now it tells me all the files that are on that Udisk and the one that we just put on there was no four, 25SQX21.
234
00:25:28,700 –> 00:25:37,510
So we’ll move down to that one and then we get the chance to copy to memory.
235
00:25:37,510 –> 00:25:44,790
Enter. Copy, successful. Enter.
236
00:25:44,790 –> 00:25:51,080
Escape. And now when I go looking for the file on here
237
00:25:51,080 –> 00:25:58,610
Number forty three is 25SQX21, the number of times I’ve run it is zero,
Transcript for Laser Cutting Machine Parameters and Loading Files (Cont…)
238
00:25:58,610 –> 00:26:03,650
so it’s highlighted there so I can press enter and there we go.
239
00:26:03,650 –> 00:26:06,830
Now we’re when I check the parameters this time, remember,
240
00:26:06,830 –> 00:26:14,690
I’ve downloaded the incorrect parameters off of the original PC program. So Enter, Enter and we shall find that
241
00:26:14,690 –> 00:26:17,300
they still say twenty.
242
00:26:17,300 –> 00:26:28,570
OK, so I want to change that so I can now press the Z/U button to move the panel down and we’ll change that this time to forty.
243
00:26:28,570 –> 00:26:35,720
See, I’m extremely daring aren’t I? 40 mm a second, Enter.
244
00:26:35,720 –> 00:26:51,740
Enter. Now, we’re going to run that program at 40 millimeters a second. So we’ll move the head to a new position, there. We’ll press the origin button.
245
00:26:51,740 –> 00:27:07,220
And we just run it from the start key. Forty millimeters a second looked as though it didn’t quite work, it did more or less just look not quite.
246
00:27:07,220 –> 00:27:12,380
So what we can do now, remember, is to edit the program. Enter, Enter.
247
00:27:12,380 –> 00:27:16,920
And we change that to 35. Z/U
248
00:27:16,920 –> 00:27:33,090
Take it down to three, at thirty five millimeters a second, Enter, Enter. Let’s move the head. Press the origin button, press the start button.
249
00:27:33,090 –> 00:27:38,790
Well, it didn’t drop out, but look, it’s actually cut and there we go.
250
00:27:38,790 –> 00:27:46,800
That’s a wonderfully clean cut. Now, I’m just showing you a little bit of a trick there as to how I find the best cutting speed.
251
00:27:46,800 –> 00:27:53,940
Maximum power, and then gradually increase the speed until it doesn’t fall out and then back off a little bit.
252
00:27:53,940 –> 00:28:01,440
And once you get a nice clean cut like that, well, I mustn’t teach you too many tricks, otherwise you become expert too quickly.
Transcript for Laser Cutting Machine Parameters and Loading Files (Cont…)
253
00:28:01,440 –> 00:28:08,980
Now, I want to do one more thing. Remember, we started off at 20 millimeters a second and we’ve now found that we could run at 35.
254
00:28:08,980 –> 00:28:14,400
I’m going to change the speed to 10 millimeters a second, 10 millimeters a second.
255
00:28:14,400 –> 00:28:18,900
Very, very slow, excessively slow for this particular material.
256
00:28:18,900 –> 00:28:24,410
See, the mess that I’m making on the surface and all the smoke coming out underneath.
257
00:28:24,410 –> 00:28:32,450
The burning around the edge. Remember, that is the reflection off of the metal surface underneath, look how bad that is.
258
00:28:32,450 –> 00:28:41,870
That’s the difference between right and wrong cutting. Now, I can reduce that reflection quite considerably by raising the work away from this table.
259
00:28:41,870 –> 00:28:50,540
So if I put it 25 or 30 millimeters above the table, I wouldn’t get anywhere near as much damage as that.
260
00:28:50,540 –> 00:28:52,610
I might get a little bit, but not as much.
261
00:28:52,610 –> 00:29:06,752
With that very simple display of cutting and how we download programs in different ways onto this machine. I think we’ll conclude this session.
Transcript for Laser Cutting Machine Parameters and Loading Files
Disclaimer
Last updated August 26, 2021
WEBSITE DISCLAIMER
The information provided by n-Deavor Limited, trading as Laseruser.com (“we,” “us” , or “our”) on (the “Site”) is for general informational purposes only. All information on the Site is provided in good faith, however we make no representation or warranty of any kind, express or implied, regarding the accuracy, adequacy, validity, reliability, availability or completeness of any information on the Site.
UNDER NO CIRCUMSTANCE SHALL WE HAVE ANY LIABILITY TO YOU FOR ANY LOSS OR DAMAGE OF ANY KIND INCURRED AS A RESULT OF THE USE OF THE SITE OR RELIANCE ON ANY INFORMATION PROVIDED ON
THE SITE. YOUR USE OF THE SITE AND YOUR RELIANCE ON ANY INFORMATION ON THE SITE IS SOLELY AT YOUR OWN RISK.
EXTERNAL LINKS DISCLAIMER
The Site may contain (or you may be sent through the Site) links to other websites or content belonging to or originating from third parties or links to websites and features in banners or other advertising. Such external links are not investigated, monitored, or checked for accuracy, adequacy, validity, reliability, availability or completeness by us.
WE DO NOT WARRANT, ENDORSE, GUARANTEE, OR ASSUME RESPONSIBILITY FOR THE ACCURACY OR RELIABILITY OF ANY INFORMATION OFFERED BY THIRD-PARTY WEBSITES LINKED THROUGH THE SITE OR ANY WEBSITE OR FEATURE LINKED IN ANY BANNER OR OTHER ADVERTISING.
WE WILL NOT BE A PARTY TO OR IN ANY WAY BE RESPONSIBLE FOR MONITORING ANY TRANSACTION BETWEEN YOU AND THIRD-PARTY PROVIDERS OF PRODUCTS OR SERVICES.
AFFILIATES DISCLAIMER
The Site may contain links to affiliate websites, and we receive an affiliate commission for any purchases made by you on the affiliate website using such links. Our affiliates include the following:
- makeCNC who provide Downloadable Patterns, Software, Hardware and other content for Laser Cutters, CNC Routers, Plasma, WaterJets, CNC Milling Machines, and other Robotic Tools. They also provide Pattern Files in PDF format for Scroll Saw Users. They are known for their Friendly and Efficient Customer Service and have a comprehensive back catalogue as well as continually providing New Patterns and Content.
- Cloudray Laser: a world-leading laser parts and solutions provider, has established a whole series of laser product lines, range from CO2 engraving & cutting machine parts, fiber cutting machine parts and laser marking machine parts.
