 Skip to content
 The Concise RDWorks Learning Lab Series
Welcome to Module 2 of the new Concise RDWorks Learning Lab Series with Russ Sadler. Module 2 will build on the information learned in Module 1 and will provide practical machine set-up sessions as well as more detailed subject material. So let’s try and get an understanding of laser cutting based on beam versus intensity.
In this Session, Russ explains some of the reasons a laser beam is capable of interacting with materials the way it does. He also discusses some of the key parameters and properties that are required in the laser beam. Why B-Grade tubes can be so very poor, even if they have high power outputs. Pre-ionisation zone discussed and how it can be used. Testing the profile of your laser beam.
Release Date: 15th October 2021
Over the last 6 years, Russ has built up a formidable YouTube following for his RDWorks Learning Lab series which currently has over 200 videos.
The original RDWorks Learning Lab series on his “Sarbar Multimedia” YouTube Channel, follows Russ as he tries to make sense of his new Chinese laser machine and to sort out the truths, half truths and outright misleading information that is available on the web.
Six years later with over 3 million YouTube Views under his belt, Russ has become the go to resource for everything related to the Chinese CO2 laser machine user or wannabe user.

In this new series, Russ has condensed his knowledge and experience of the last 6 years to provide valuable information and insights into the purchasing, understanding, use, repair and maintenance of the Chinese CO2 laser machines and their key component parts.
Podcast Download
You can download the audio file for this video here, just click on the three dots to the right of the player:
Video Resource Files
There are no resource files associated with this video.
External Resource Links
There are no external resource links associated with this video.
Transcript for Understanding Laser Cutting: Laser Beam Versus Intensity
Click the “Show More” button to reveal the transcript, and use your browsers Find function to search for specific sections of interest.
Understanding laser cutting
1
00:00:06,440 –> 00:00:16,210
The Concise RDWorks Learning Lab with Russ Sadler. Session 14: Laser Beam Versus Intensity.
2
00:00:16,210 –> 00:00:26,350
Well, just to remind you, I know it’s not long ago, but in the last session, we used the laser machine to actually do some cutting.
3
00:00:26,350 –> 00:00:35,340
Now, it wasn’t the intention of the session to do the cutting, but we actually used a laser beam to do some damage to material.
4
00:00:35,340 –> 00:00:42,110
What we’re really trying to do was to show you all the ways in which you could get a program loaded into the machine.
5
00:00:42,110 –> 00:00:50,890
Today, I’m going to try and explain some of the reasons why the laser beam can do the sort of things that it does,
6
00:00:50,890 –> 00:00:59,410
only some of them, because we’re going to describe the fundamental properties that you require for a good laser beam.
7
00:00:59,410 –> 00:01:03,110
Now, I know we talked about the laser beam in a session.
8
00:01:03,110 –> 00:01:09,490
I think it might have been session three, but those were the just the basic scientific properties of a laser beam.
9
00:01:09,490 –> 00:01:18,550
They didn’t specifically mention the key properties that you must have in your laser beam to do this sort of damage.
10
00:01:18,550 –> 00:01:29,170
Everybody seems to think that Watts power is the important thing that you should have when you buy a laser beam.
11
00:01:29,170 –> 00:01:35,650
Well, all I can caution you is be careful, first of all, two many watts,
12
00:01:35,650 –> 00:01:45,250
on a glass tube machine is fine for cutting, but it’s not very good if you want to do some fine, particularly photo engraving.
13
00:01:45,250 –> 00:01:51,460
So Watts of power is an important parameter that you need to be able to determine
14
00:01:51,460 –> 00:02:02,840
about your laser beam. The manufacturer or the person that sold you the machine will claim that they’ve sold you a 50 or 60 or an 80 watt tube.
Transcript for Understanding Laser Cutting: Laser Beam Versus Intensity
15
00:02:02,840 –> 00:02:09,080
Now, I can almost guarantee that that will be an outright lie.
16
00:02:09,080 –> 00:02:13,980
I think I might have mentioned it when we talked about buying a machine.
17
00:02:13,980 –> 00:02:19,260
The sellers of these machines will exaggerate the power of your laser.
18
00:02:19,260 –> 00:02:24,970
And secondly, they will be selling you B-grade tube.
19
00:02:24,970 –> 00:02:33,850
Because B-tubes are cheap. A-grade tubes are quite expensive, but to do proper cutting with a machine,
20
00:02:33,850 –> 00:02:39,190
you need an A-grade tube, which will have specific properties.
21
00:02:39,190 –> 00:02:42,490
Now, some B-grade tubes, don’t get me wrong, some B-grade,
22
00:02:42,490 –> 00:02:50,860
some B-grade tubes will have just failed final test and they may well have pretty good properties.
23
00:02:50,860 –> 00:02:59,920
So your B-grade tube is a bit of a lottery. It might be near junk or it might be near perfection.
24
00:02:59,920 –> 00:03:06,940
What I’m going to try and show you today is what a near perfection laser beam should be like.
25
00:03:06,940 –> 00:03:12,880
But before we do that, we’re going to talk about how you measure the power of a laser beam.
26
00:03:12,880 –> 00:03:19,090
Now, measuring the watts of an invisible beam is a bit of an interesting problem.
27
00:03:19,090 –> 00:03:24,040
There are many instruments out there that have been designed to do just that,
28
00:03:24,040 –> 00:03:30,580
they’re obviously all based on energy absorption from the light and converted into some other form,
29
00:03:30,580 –> 00:03:33,890
whether it be electrical energy or whether it be heat energy.
30
00:03:33,890 –> 00:03:45,580
Those devices can cost you anything from a few thousand dollars down to maybe as little as a hundred dollars for a Chinese something or other.
31
00:03:45,580 –> 00:03:51,290
But typically you’d expect to pay two to three hundred dollars for a piece of reasonable kit.
32
00:03:51,290 –> 00:03:57,280
That’s an unreasonable amount of money to pay for something that you’re not going to use very often.
Transcript for Understanding Laser Cutting: Laser Beam Versus Intensity (Cont…)
33
00:03:57,280 –> 00:04:03,580
And so in the early days of my learning journey, I, along with several other guys,
34
00:04:03,580 –> 00:04:09,130
tried to invent a different and more cost effective way of measuring power.
35
00:04:09,130 –> 00:04:11,110
Now, we didn’t really succeed,
36
00:04:11,110 –> 00:04:22,120
but what I finished up doing with decoding the systems that were out there and making my own much more cost effective system for you guys to use.
37
00:04:22,120 –> 00:04:29,170
When I first got my regional China blue laser machine, it had a very, very poor quality tube in it.
38
00:04:29,170 –> 00:04:37,330
And I struggled for a long time to prove the power in that tube was not as claimed.
39
00:04:37,330 –> 00:04:45,700
I spent a long time trying to devise ways of measuring power through calorimeter techniques and in the end I had to give up
40
00:04:45,700 –> 00:04:54,280
and I searched the Internet for a reasonably priced power meter that enabled me to measure the power coming out of my tube.
41
00:04:54,280 –> 00:05:01,870
On the surface of it, it looks like a meat thermometer with a blob of aluminum araldited to the stem.
42
00:05:01,870 –> 00:05:11,290
And in essence, that’s what it is. But it’s a very expensive piece of equipment, relatively speaking, for a hobby use.
43
00:05:11,290 –> 00:05:20,500
This cost me around about 350 dollars because I couldn’t buy anything like this in the U.K. I had to get it specially imported from the states.
44
00:05:20,500 –> 00:05:26,650
This is a company called Mackan Instruments. This is the cheap end of their product range.
45
00:05:26,650 –> 00:05:33,430
Although I invested in this and it did a superb job of telling me everything I wanted to know about the machine,
46
00:05:33,430 –> 00:05:42,710
it’s still out of the price range of many people. And so consequently, on this site here, RDWorks Learning Lab 53,
47
00:05:42,710 –> 00:05:53,830
I’ve done an analysis of how this works and I’ve designed my own simple version, cheap version that will do the same task as this.
48
00:05:53,830 –> 00:05:59,800
This reads out Watts directly. This does not read out Watts directly.
Transcript for Understanding Laser Cutting: Laser Beam Versus Intensity (Cont…)
49
00:05:59,800 –> 00:06:05,170
It’s a compromise. We get the same answer, but we have to put a little bit more effort in.
50
00:06:05,170 –> 00:06:12,050
So before we can start any testing, we need to put a test program into the machine. We’ve got
51
00:06:12,050 –> 00:06:15,160
a starting point here, which is the blue.
52
00:06:15,160 –> 00:06:27,160
And the first thing that happens is at a speed of one millimeter a second, we traverse outwards by about 10 millimeters.
53
00:06:27,160 –> 00:06:33,040
So that means it’s going to take 10 seconds to run up the blue line.
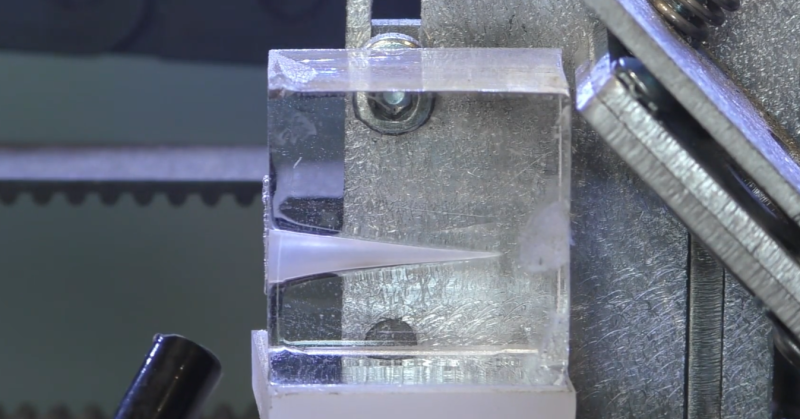
54
00:06:33,040 –> 00:06:42,640
And at the end of that period, 10 seconds, we start running around this red spiral, getting closer and closer towards the center.
55
00:06:42,640 –> 00:06:46,210
Now, that red spiral has been very carefully designed.
56
00:06:46,210 –> 00:06:56,110
Its length and its speed has been set to 14 millimeters a second because that will give us the correct amount of exposure
57
00:06:56,110 –> 00:07:00,310
time for the calibration to work.
58
00:07:00,310 –> 00:07:08,710
We don’t have to panic when we press the start buttons. We’ve got the power set to one percent and one percent will not work the laser.
59
00:07:08,710 –> 00:07:15,700
Under normal circumstances, you would not run this machine at more than its maximum rated
60
00:07:15,700 –> 00:07:21,460
milliamps, but for a very, very short period of time for doing these tests,
61
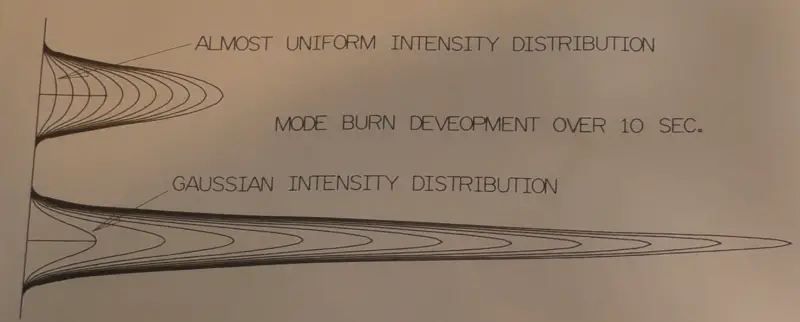
00:07:21,460 –> 00:07:24,700
it’s not going to cause any major damage to your tube,
62
00:07:24,700 –> 00:07:33,280
so don’t worry. It really doesn’t matter where you place the laser head, but somewhere into the middle of the machine is a good idea.
63
00:07:33,280 –> 00:07:39,340
And then press your origin button. So I always fire my beam into a little puddle of water.
64
00:07:39,340 –> 00:07:48,820
Okay, so that’s the program set up and all the safety precautions. Put the probe into the water bath and we’re going to swill it around,
65
00:07:48,820 –> 00:07:56,100
turn the meter off and back on and that will be a live temperature,
66
00:07:56,100 –> 00:08:01,260
the doohickey is measuring. Yeah, give or take 0.2 / 0.3 of a degree C
Transcript for Understanding Laser Cutting: Laser Beam Versus Intensity (Cont…)
67
00:08:01,260 –> 00:08:07,140
its stable and it’s at around about twenty two point eight to 23 and I’m going to
68
00:08:07,140 –> 00:08:12,600
walk round to the front of the machine and I’m going to press the start of the program button.
69
00:08:12,600 –> 00:08:17,790
No immediate panic. We can turn the meter on and we press the max power.
70
00:08:17,790 –> 00:08:23,730
Twenty three point one is the number that I want to see.
71
00:08:23,730 –> 00:08:36,780
Here we go. We can see the belt moving. And that tells us we’ve got something going on.
72
00:08:36,780 –> 00:08:45,750
Twenty three point one was our starting temperature, remember? There we go.
73
00:08:45,750 –> 00:08:53,010
It’s finished now we can take a look on the meter and we can see that it says fifty five point four.
74
00:08:53,010 –> 00:08:59,730
OK, that’s two pieces of vital information that we need, the starting temperature and the finishing temperature.
75
00:08:59,730 –> 00:09:03,180
If you’ve got some help, then maybe somebody else can read this for you.
76
00:09:03,180 –> 00:09:08,820
But if you haven’t got help, then you’ll need to run the program again, as I will do here.
77
00:09:08,820 –> 00:09:14,340
And of course, it’s safe to run it because we’re running into a bucket of water.
78
00:09:14,340 –> 00:09:20,370
And what we shall need to do now is to make a note of the current
79
00:09:20,370 –> 00:09:28,680
once the program is running. Twenty four point five, probably. OK, so that’s basically what I’m recording,
80
00:09:28,680 –> 00:09:34,830
power 90 percent, start temperature twenty three point one, maximum temperature that we established,
81
00:09:34,830 –> 00:09:39,420
fifty five point four and our milliamps twenty four point five.
82
00:09:39,420 –> 00:09:47,370
Those are the four numbers that we need to record. 10 percent steps is good enough to get a reasonably good calibration graph.
83
00:09:47,370 –> 00:09:56,040
And now we go through the same procedure again and we do that for seventy, sixty, fifty, 40, 30, all the way down to 10 percent.
Transcript for Understanding Laser Cutting: Laser Beam Versus Intensity (Cont…)
84
00:09:56,040 –> 00:10:07,130
We’re going to put the final temperature into a calculation, fifty seven point five and then we’re going to subtract
85
00:10:07,130 –> 00:10:15,270
the start temperature from it, which was twenty four point four.
86
00:10:15,270 –> 00:10:22,320
And that gives us an answer of thirty three point one, now that’s thirty three point one degrees C.
87
00:10:22,320 –> 00:10:29,160
The speed that I’m running this at, there is a multiplication factor of two.
88
00:10:29,160 –> 00:10:36,570
So if I put two times two into there, the answer that comes out is sixty six point two.
89
00:10:36,570 –> 00:10:43,950
Now that’s sixty six point two watts, there is a calibration chart that you can work to.
90
00:10:43,950 –> 00:10:54,150
But to be honest, if you’re running at 14 mm a second, then just taking the difference and multiplying it by two gives you the Watts.
91
00:10:54,150 –> 00:11:02,550
It’s a nice, simple, almost mental calculation. We’ve drawn this characterization for the tube.
92
00:11:02,550 –> 00:11:15,240
Now this blue line here is power Watts and this red line here is current milliamps. As you can see it is pretty well approximately linear.
93
00:11:15,240 –> 00:11:21,420
So that bit checks out. And what you can see is that the power is not linear.
94
00:11:21,420 –> 00:11:29,140
So the power that comes out of this tube is not directly related to the current that you’re using to drive the tube
95
00:11:29,140 –> 00:11:33,450
with. People get rather confused and they think that I’ve got a 60 watt tube.
96
00:11:33,450 –> 00:11:38,690
Therefore, if I put in 50 percent power, I’m going to get 30 watts out.
97
00:11:38,690 –> 00:11:44,400
Well, look, 50 percent power is in fact going to generate something like about 55 watts.
98
00:11:44,400 –> 00:11:49,050
OK, the other vital piece of information that we must get from this graph now,
99
00:11:49,050 –> 00:12:01,530
you would normally expect to be able to drive a 60 Watt tube to a maximum drive current of 22 milliamps, 22 milliamps, OK, now 22 milliamps.
Transcript for Understanding Laser Cutting: Laser Beam Versus Intensity (Cont…)
100
00:12:01,530 –> 00:12:06,750
If we draw that up there like that, we get two bits of information, 78 percent.
101
00:12:06,750 –> 00:12:19,500
And the other piece of information is that at 78 percent, we’re getting so this tube, a 60 Watt tube is delivering 64 watts at 78 percent power.
102
00:12:19,500 –> 00:12:24,750
And provided we don’t program more than seventy eight percent into this machine,
103
00:12:24,750 –> 00:12:31,110
then we shall not be exceeding the 22 milliamp limit for a 60 watt tube.
104
00:12:31,110 –> 00:12:39,990
Now, those are crucial pieces of information that you need to know and you would not be able to get this information without the use of a power meter.
105
00:12:39,990 –> 00:12:45,480
Now, the first time that I measured the power of the laser beam, as we’ve just seen,
106
00:12:45,480 –> 00:12:51,400
I thought I knew everything there was to know about the laser tube itself.
107
00:12:51,400 –> 00:13:00,150
Apart from the science that we talked about in the beginning. No, that turns out not to be the case.
108
00:13:00,150 –> 00:13:06,810
As I get older and grayer and by the way, every one of these white hairs is a pound (£) that my wife has spent,
109
00:13:06,810 –> 00:13:14,250
it turns out that there’s a lot more to know and understand about the laser tube.
110
00:13:14,250 –> 00:13:19,650
And I’m now going to try and explain some of the finer points of the laser tubes performance.
111
00:13:19,650 –> 00:13:27,480
This tube, every time it starts up, goes through a very strange set of conditions.
112
00:13:27,480 –> 00:13:38,760
Now for a 50 Watt tube, 20 milliamps is approximately the maximum operating current that you should use, but up to about six milliamps,
113
00:13:38,760 –> 00:13:44,520
the actual beam itself is totally unstable and only becomes a stable,
114
00:13:44,520 –> 00:13:53,190
constant current laser at between six and 20 million amps, which is where we get a lovely, smooth pink beam.
115
00:13:53,190 –> 00:14:02,710
Although your ammeter might be showing you six milliamps. In fact, what’s happening is this.
Transcript for Understanding Laser Cutting: Laser Beam Versus Intensity (Cont…)
116
00:14:02,710 –> 00:14:08,350
And I don’t exaggerate that in any way at all, very, very high frequency, very,
117
00:14:08,350 –> 00:14:19,090
very high current flows are happening in that tube. Six milliamps is, if you like the average current flow for all this rubbish.
118
00:14:19,090 –> 00:14:24,310
Now, this happens in a few microseconds or less every time you switch the tube on,
119
00:14:24,310 –> 00:14:31,690
unless you hold the tube at these very low current values and then you can see
120
00:14:31,690 –> 00:14:39,010
and experience the benefits of this very strange operating zone in your tube.
121
00:14:39,010 –> 00:14:46,150
In fact, some manufacturers actually claim this as a real advantage of their tube.
122
00:14:46,150 –> 00:14:54,910
They call it high frequency impact engraving. There’s nothing special about this for that particular manufacturer’s tube.
123
00:14:54,910 –> 00:15:02,080
Every tube in the universe has this property, but not too many people know and understand,
124
00:15:02,080 –> 00:15:08,140
A: that this is here, and, B: that it’s a very useful property of the tube.
125
00:15:08,140 –> 00:15:20,590
It may well be six to 10 percent. It depends on your tube, what percentage power this strange characteristic occurs on your tube.
126
00:15:20,590 –> 00:15:25,120
So I’m going to show you how to find that particular characteristic.
127
00:15:25,120 –> 00:15:32,950
And bear it in mind, when you’re using your tube, it is a unique feature that has got some great properties.
128
00:15:32,950 –> 00:15:37,030
Here we go, oh, we’ve got something happening there at nine per cent power,
129
00:15:37,030 –> 00:15:43,390
you can just about see right at this end here a very faint glow at this end of the tube here.
130
00:15:43,390 –> 00:15:54,970
Now, if we start looking along the tube, we shall find that we have got no, no real discernible beam along the middle of the tube just at the end here.
131
00:15:54,970 –> 00:16:03,850
So here’s what eleven percent looks like. And now we’re starting to get more along the tube, but it still isn’t all the way along the tube.
Transcript for Understanding Laser Cutting: Laser Beam Versus Intensity (Cont…)
132
00:16:03,850 –> 00:16:06,880
And you can see how the beam is jumping around at the end there.
133
00:16:06,880 –> 00:16:17,400
We’re now going up to 13 percent, which is where we think the beam is nearly going to make it along the tube.
134
00:16:17,400 –> 00:16:27,830
Still jumping around a lot at this end, as you can see, and there is just the faintest glow that goes more or less all the way along the tube.
135
00:16:27,830 –> 00:16:34,370
Look. But it’s still not what I would call a continuous beam, because, look,
136
00:16:34,370 –> 00:16:42,500
we’ve still got it jumping around at the end there and that jumping around is a characteristic of this pre-ionization phase.
137
00:16:42,500 –> 00:16:50,870
Now, this is 14 percent. Yes. You can see we’ve still got a jumpy beam there and we’re getting a much stronger beam.
138
00:16:50,870 –> 00:16:54,510
And it’s more or less well, it is all the way along the tube.
139
00:16:54,510 –> 00:17:00,710
Now, we’ve still got this jumpy characteristic there on that cathode.
140
00:17:00,710 –> 00:17:06,450
Well we’re now at 15 percent, it’s still a bit jumpy there.
141
00:17:06,450 –> 00:17:17,010
And we’re getting quite a good solid beam all the way along. But you can see how it’s the whole beam is a little bit jittery.
142
00:17:17,010 –> 00:17:24,900
And if you listen carefully, you can hear it actually jumping around, OK, now this is 16 percent.
143
00:17:24,900 –> 00:17:30,240
And look, we’re switching pretty good now.
144
00:17:30,240 –> 00:17:39,150
We’ve got a steady beam. Can you see that? It’s flipping, but it’s basically a nice, steady beam.
145
00:17:39,150 –> 00:17:49,790
It’s no longer jittery. And just to verify that, here we are driving at 20 percent and as you can see,
146
00:17:49,790 –> 00:17:56,720
we’ve got a nice steady pink beam all the way along here and a little bit of movement on the cathode.
147
00:17:56,720 –> 00:18:03,390
But it’s not jittery movement. It is just like a little teeny weeny pulsing movement.
Transcript for Understanding Laser Cutting: Laser Beam Versus Intensity (Cont…)
148
00:18:03,390 –> 00:18:08,450
Now, we should be able to go backwards and we should be able to find that at 15 percent,
149
00:18:08,450 –> 00:18:16,490
that different characteristic, 15 percent was the upper threshold of this pre-ionization.
150
00:18:16,490 –> 00:18:22,820
Now you can see that jittery behavior on the cathode.
151
00:18:22,820 –> 00:18:28,490
And if you listen carefully, you may be able to hear it hissing.
152
00:18:28,490 –> 00:18:37,880
Now, look, it’s gone to steady mode now, so it’s on a on a cusp of being stable and unstable at 15 percent.
153
00:18:37,880 –> 00:18:41,510
So therefore, I think the limit probably is 14 percent.
154
00:18:41,510 –> 00:18:46,040
So let’s just drop back to 14 percent. And here we are at 14 percent.
155
00:18:46,040 –> 00:18:54,980
As you can see, it’s it is a weak looking beam. It isn’t a lovely solid pink beam it’s a bit wispy.
156
00:18:54,980 –> 00:19:00,830
But it’s this jumping around characteristic that is the thing that gives away this pre-ionization.
157
00:19:00,830 –> 00:19:08,270
Anywhere between nine and 14 percent for this particular tube is the pre-ionization zone.
158
00:19:08,270 –> 00:19:16,250
Now, normally, your bean operates silently. But in this pre-ionization phase,
159
00:19:16,250 –> 00:19:25,700
the beam is very noisy because of the intermittent nature of the cut that it’s generating because of these high frequency pulses.
160
00:19:25,700 –> 00:19:31,230
It’s very hissy. That’s the best description I can give you of it.
161
00:19:31,230 –> 00:19:38,370
Now, in this next little clip, you see me using the pre-ionization zone to cut card,
162
00:19:38,370 –> 00:19:46,110
thin hard and it cuts thin card extremely well without doing any burning around the edges.
163
00:19:46,110 –> 00:19:54,860
Now, when you listen to the last part of this clip, you’ll see that when we go around the outside shape.
164
00:19:54,860 –> 00:20:03,600
It’s mainly hissy, but on a few occasions you’ll hear it going quiet and then back to hissy and then quiet and back to hissy,
Transcript for Understanding Laser Cutting: Laser Beam Versus Intensity (Cont…)
165
00:20:03,600 –> 00:20:09,350
and that’s because I’ve set the power right onto the top edge of this operating zone.
166
00:20:09,350 –> 00:20:45,560
And so it’s moving from mainly hissy mode. Just occasionally it flips into stable mode and then back to hissy mode.
167
00:20:45,560 –> 00:20:54,550
It’s also a zone I use for photo engraving, for engraving on glass, as I said, or engraving on slate and tile.
168
00:20:54,550 –> 00:21:03,940
So it’s got some fantastic properties, if you know that it’s there and you go and play with it and find out exactly what it can do for you.
169
00:21:03,940 –> 00:21:06,580
Now, earlier on in this session, I mentioned that, you know,
170
00:21:06,580 –> 00:21:11,740
when I found out how to measure the power of the laser tube, I felt like king of the world.
171
00:21:11,740 –> 00:21:18,220
It wasn’t till later that I realized that, you know, actually power isn’t the most important thing.
172
00:21:18,220 –> 00:21:24,550
And I’m going to show you something that is the most important thing ever about your laser beam.
173
00:21:24,550 –> 00:21:29,860
I’m not going to dumb this down too much. Just a little bit.
174
00:21:29,860 –> 00:21:38,110
Doesn’t matter where on the body? But if I was to poke you with that pencil, would you prefer I poked you with that end or the end?
175
00:21:38,110 –> 00:21:44,680
I know the answer’s, not at all. I think it’s pretty obvious which end would hurt the most.
176
00:21:44,680 –> 00:21:53,200
Well, that’s exactly the same as your laser beam. You can get blunt laser beams and you can get sharp laser beams.
177
00:21:53,200 –> 00:21:59,650
I’m going to now demonstrate what a sharp tube looks like and how you can controllably
Transcript for Understanding Laser Cutting: Laser Beam Versus Intensity (Cont…)
178
00:21:59,650 –> 00:22:07,240
make it blunt. If that’s what your machine was supplied with. I’m afraid you know you’re not going to be able to do too much with it.
179
00:22:07,240 –> 00:22:16,210
That’s good for engraving, but it’s no good for cutting. Now, to aid me in this quest, I’m going to use this material here.
180
00:22:16,210 –> 00:22:28,750
It’s one of the best materials ever. For experimenting and testing and finding out what’s going on with a CO2 laser, it’s acrylic.
181
00:22:28,750 –> 00:22:37,070
This is the only material which will actually tell you what your laser beam is doing.
182
00:22:37,070 –> 00:22:45,380
And what we’re trying to find out now is the light intensity distribution within the laser beam.
183
00:22:45,380 –> 00:22:52,370
Now, I’ve produced a little one inch block, of perspex from 10 millimeter thick material.
184
00:22:52,370 –> 00:23:01,070
I’m not going to set the power on the max power button to 95 percent in my case, because I know that my machine will do it.
185
00:23:01,070 –> 00:23:10,240
I would suggest you set yours to about 80 percent. I’ve got a small piece of tube here, which I can remove my air assist.
186
00:23:10,240 –> 00:23:17,000
And just plug air into here and now I’ve got a stream of air, it’s coming out of there. Now,
187
00:23:17,000 –> 00:23:26,830
we shall eed that stream of air because at high power it will burst into flame. We’re trying to get the mark roughly in the center of the block.
188
00:23:26,830 –> 00:23:30,910
Hold the pulse button on and count to ten seconds.
189
00:23:30,910 –> 00:23:44,440
I’m blowing air at the block. Zero, one, two, three, four, five, six, seven, eight, nine, ten.
190
00:23:44,440 –> 00:23:49,570
Look, ten seconds has driven my beam right the way through that block.
191
00:23:49,570 –> 00:23:54,760
And this time I’m going to change the power to 15 percent.
Transcript for Understanding Laser Cutting: Laser Beam Versus Intensity (Cont…)
192
00:23:54,760 –> 00:24:07,300
Zero, one, two, three, four, five, six, seven, eight, nine, 10.
193
00:24:07,300 –> 00:24:16,480
Now, let’s take a quick look at this in relation to my pencil analogy. So here’s the sharp side of the beam and here’s the blunt end of the beam.
194
00:24:16,480 –> 00:24:25,540
Hang on, this is the same beam. All I’ve done is change the power from ninety five percent down to 15 percent.
195
00:24:25,540 –> 00:24:34,360
Now, just as you would anticipate, I’ve done less damage with 15 percent power than I did with 95 percent power.
196
00:24:34,360 –> 00:24:39,250
But the other thing that’s changed is the shape of the beam.
197
00:24:39,250 –> 00:24:47,420
This is not a small, sharp beam. This is now a short blunt beam.
198
00:24:47,420 –> 00:24:52,350
If you look carefully, you’ll see that basically the diameter of the beam at the top here.
199
00:24:52,350 –> 00:24:58,500
They’re both approximately the same. Now here I’ve got a simple little LED key FOB torch.
200
00:24:58,500 –> 00:25:00,600
Wehen I shine that down onto that surface.
201
00:25:00,600 –> 00:25:08,070
I think you can clearly see the very bright light in the middle and how intensity gets less and less as we get further away from the center.
202
00:25:08,070 –> 00:25:14,790
That’s exactly how a laser beam should look. An ideal laser beam should follow this pattern.
203
00:25:14,790 –> 00:25:21,150
Exactly, which is a Gaussian distribution, in other words there’s more light intensity at the center of the beam,
204
00:25:21,150 –> 00:25:26,190
than there is at the edge. Exactly like that little torch image that I’ve just shown you.
205
00:25:26,190 –> 00:25:35,130
So if I allow this laser beam to damage material in one spot, what’ll happen is the most intense part,
206
00:25:35,130 –> 00:25:41,070
which is the center will damage material faster than the outer edge.
207
00:25:41,070 –> 00:25:49,570
And what we shall finish up with after one, two, three, four, five, six, seven, eight, nine, ten seconds is the shape that you see there.
208
00:25:49,570 –> 00:25:56,070
So when we reduce the power, it’s effectively the same as doing this.
209
00:25:56,070 –> 00:26:01,320
But it’s a blunter Gaussian form. We can interpret this picture two ways.
Transcript for Understanding Laser Cutting: Laser Beam Versus Intensity (Cont…)
210
00:26:01,320 –> 00:26:05,520
If we’ve got a Gaussian intensity distribution within our beam,
211
00:26:05,520 –> 00:26:11,550
then if we allow it to last for certain periods of time, then this is the way in which damage will occur.
212
00:26:11,550 –> 00:26:21,210
Or we can look at it the other way and say that this is effectively the shape of our sharp beam when we’ve got it working at 100 per cent.
213
00:26:21,210 –> 00:26:29,010
But when we back the power off to, say, 10 per cent, here’s what it’s going to look like and there is what it looks like.
214
00:26:29,010 –> 00:26:36,390
You could very quickly check whether your beam is a Gaussian intensity distribution using this method.
215
00:26:36,390 –> 00:26:44,340
If you start off life with a beam that’s blunt like this, it’s just a flat pancake.
216
00:26:44,340 –> 00:26:48,930
You can make the exposure time. One, two, three, four, five, six, seven, eight, nine, ten.
217
00:26:48,930 –> 00:26:53,690
And after ten seconds, it won’t look like this. It will still look like this.
218
00:26:53,690 –> 00:27:04,410
A pretty horrible blunt beam. So this beam is naturally blunt, but this beam is controllability, sharp or blunt.
219
00:27:04,410 –> 00:27:09,870
You will never be able to cut anything deep and fast with a beam like this.
220
00:27:09,870 –> 00:27:11,860
It’ll work for engraving,
221
00:27:11,860 –> 00:27:21,690
but this one will allow you to cut and engrave because you can cut with a beam like this or you can blunt it down accordingly and engrave with it.
222
00:27:21,690 –> 00:27:31,320
It’s taken me probably four or five years to fully understand and appreciate just how important the shape of the laser beam is.
223
00:27:31,320 –> 00:27:42,690
Now, I think you can probably see from the difference between these two here that the power of the laser beam is not that important.
224
00:27:42,690 –> 00:27:49,010
The power of the laser beam is used to develop the shape.
225
00:27:49,010 –> 00:27:59,400
You may well have a bad shape to start with. But if you’ve got a powerful beam with a bad shape to start with, it’s still of no use to you.
Transcript for Understanding Laser Cutting: Laser Beam Versus Intensity (Cont…)
226
00:27:59,400 –> 00:28:10,110
So power is not the most important thing. You need the correct intensity distribution within the beam and the power will then create the correct shape.
227
00:28:10,110 –> 00:28:14,430
So power is only a subsidiary part of this exercise.
228
00:28:14,430 –> 00:28:19,890
The important bit which you have no control over is the shape of the beam itself.
229
00:28:19,890 –> 00:28:26,700
Now the shape of the beam is determined by certain parts of the manufacture of the tube itself.
230
00:28:26,700 –> 00:28:39,860
So just because you buy a tube that says it’s 80 watts does not mean to say it’s a good quality tube, it could be an 80 watt poor quality tube.
231
00:28:39,860 –> 00:28:47,350
The only way you’ll ever find out is by doing this.
232
00:28:47,350 –> 00:28:56,512
Then, you’ll know, whether you bought a pup or not.
Transcript for Understanding Laser Cutting: Laser Beam Versus Intensity
Disclaimer
Last updated August 26, 2021
WEBSITE DISCLAIMER
The information provided by n-Deavor Limited, trading as Laseruser.com (“we,” “us” , or “our”) on (the “Site”) is for general informational purposes only. All information on the Site is provided in good faith, however we make no representation or warranty of any kind, express or implied, regarding the accuracy, adequacy, validity, reliability, availability or completeness of any information on the Site.
UNDER NO CIRCUMSTANCE SHALL WE HAVE ANY LIABILITY TO YOU FOR ANY LOSS OR DAMAGE OF ANY KIND INCURRED AS A RESULT OF THE USE OF THE SITE OR RELIANCE ON ANY INFORMATION PROVIDED ON
THE SITE. YOUR USE OF THE SITE AND YOUR RELIANCE ON ANY INFORMATION ON THE SITE IS SOLELY AT YOUR OWN RISK.
EXTERNAL LINKS DISCLAIMER
The Site may contain (or you may be sent through the Site) links to other websites or content belonging to or originating from third parties or links to websites and features in banners or other advertising. Such external links are not investigated, monitored, or checked for accuracy, adequacy, validity, reliability, availability or completeness by us.
WE DO NOT WARRANT, ENDORSE, GUARANTEE, OR ASSUME RESPONSIBILITY FOR THE ACCURACY OR RELIABILITY OF ANY INFORMATION OFFERED BY THIRD-PARTY WEBSITES LINKED THROUGH THE SITE OR ANY WEBSITE OR FEATURE LINKED IN ANY BANNER OR OTHER ADVERTISING.
WE WILL NOT BE A PARTY TO OR IN ANY WAY BE RESPONSIBLE FOR MONITORING ANY TRANSACTION BETWEEN YOU AND THIRD-PARTY PROVIDERS OF PRODUCTS OR SERVICES.
AFFILIATES DISCLAIMER
The Site may contain links to affiliate websites, and we receive an affiliate commission for any purchases made by you on the affiliate website using such links. Our affiliates include the following:
- makeCNC who provide Downloadable Patterns, Software, Hardware and other content for Laser Cutters, CNC Routers, Plasma, WaterJets, CNC Milling Machines, and other Robotic Tools. They also provide Pattern Files in PDF format for Scroll Saw Users. They are known for their Friendly and Efficient Customer Service and have a comprehensive back catalogue as well as continually providing New Patterns and Content.
- Cloudray Laser: a world-leading laser parts and solutions provider, has established a whole series of laser product lines, range from CO2 engraving & cutting machine parts, fiber cutting machine parts and laser marking machine parts.
