 Skip to content
 The Top Ten RDWorks Learning Lab Videos
These are the top ten RDWorks Learning Lab Videos ranked by average number of views per month. In this Video Russ Sadler demonstrates RDWorks Cutting Your First Program.
Contents
- Look at different plastics you can and cannot cut
- Hammer test to identify safe ones
- Places to go to find out about material hazards
- How to edit parameters on the Laser machine
- How to run your first program
Video Resource Files
There are no resource files associated with this video.
External Resource Links
There are no more external resource links associated with this video.
RDWorks Cutting Your First Program Transcript
Click the “Show More” button to reveal the transcript, and use your browsers Find function to search for specific sections of interest.
RDWorks Cutting Your First Program Transcript
0:00 welcome again to RDWorks Learning
0:01 Lab and today we’re going to be down in
0:04 the workshop you’ve loaded your program
0:07 in now but you want to cut something
0:09 what are you going to cut well some
0:13 materials you can cut lots of materials
0:16 will cut some materials you shouldn’t
0:19 cut because they produce dangerous fumes
0:21 or they will produce a horrible
0:23 sticky residue in your laser machine so there
0:32 are lots of there’s lots of information
0:34 out there on the internet about cutting
0:36 these materials I can’t go into it here
0:39 because it’s far too complicated but
0:41 things like printed circuit board stay
0:45 away from it this floor tile which has
0:48 got PVC in it anything with vinyl or PVC
0:51 don’t go anywhere near it it produces
0:54 deadly fumes and you don’t want to cut
0:56 it polycarbonate acrylic is good
1:02 cardboard and MDF well yeah produce lots
1:07 of films and it will produce smelly
1:08 smelly fumes that will last a long while
1:11 inside your laser machine you may or may not
1:13 want to cut those yeah it cuts
1:15 reasonably well ptg mmm go and do your
1:20 own research so basically you need to be
1:24 sure that you know what you’re cutting
1:25 because some things or they may look the
1:29 same but they’re not the same and I’m
1:31 now going to give you a simple example
1:33 of that now we have here on the floor
1:35 five pieces of clear thin material
1:40 they’re all different materials so how
1:43 do we tell them apart
1:44 some are better for laser cutting than
1:46 others well this one here I know is
1:49 polycarbonate yeah you can cut it it’s
1:51 not advisable to cut anything over a
1:54 thin film they use this stuff for bus
2:01 shelters and riot shields and you can
RDWorks Cutting Your First Program Transcript (Cont…)
2:05 see why it’s extremely strong and
2:07 durable now this material here is a
2:10 slightly thicker material
2:11 it’s something called a copolyester it’s
2:14 commonly known as PE TG and it’s the
2:17 sort of thing that’s used in fizzy pop
2:20 bottle it can soften nice and easily and
2:21 it can be blow molded into bottles as
2:27 you can see that again is pretty tough
2:29 and it has to be if it’s going to be
2:31 used in fizzy pop bottles now this next
2:34 piece of material here is again PE TG
2:37 but it’s thinner exactly the same
2:44 properties it doesn’t smash it doesn’t
2:47 crack now what about this material here
2:51 the fact that that smash is so easily
2:53 tells me it is cast acrylic that’s a
2:57 nice safe material to cut and finally if
3:01 I tap it gently you’ll see that it does
3:04 mark but then it breaks quite easily so
3:09 this is still acrylic but it’s
3:12 manufactured in a different way the
3:14 first one was cast acrylic this one is
3:17 extruded acrylic it’s slightly tougher
3:20 and it’s got more flex to it now it
3:22 might seem a fairly crude test but it
3:25 tells you very quickly what materials
3:27 you’re working with now there are a few
3:29 good websites around this one in
3:31 particular which gives a good 6 income
3:34 resource of things that you need to be
3:36 careful of with materials for example as
3:39 a heading here which says never cut
3:40 these materials and then you’ve got
3:42 another section here which says cutting
3:44 cutting but with cautions and etching
3:48 again with cautions so this website is
3:52 well worth a visit and you can study it
3:55 at length right let’s have a little bit
3:58 of a look at the machine itself and see
RDWorks Cutting Your First Program Transcript (Cont…)
4:01 how we can now run this test I’ve now
4:07 got a piece of clear acrylic here and
4:10 I’m going to probably run this program
4:13 twice so what I’m going to do is with my
4:15 knife I’m going to put a score at roster
4:19 and I’m going to remove a plastic film
4:24 from one side and we’ll use that for the
4:29 first test right although we’ve got our
4:34 file in memory it’s not exactly ready to
4:38 run yet so if we press file again which
4:42 will find that it’s probably sitting
4:44 here and it’s now available to us here
4:47 if we press ENTER again it now appears
4:53 on here we’ve got our two layer
4:56 parameters shown here if we press ENTER
5:01 again we bring the cursor across to
5:07 these two layer parameters where we can
5:10 change we can choose for example between
5:13 either of these two layers to edit to
5:16 the layer so we press ENTER to edit the
5:19 layer and here the layer is available
5:22 for us to enter now we’ve got minimum
5:25 power one minimum power – we know that 2
5:28 is not available to us so we’re only
5:30 going to mess around with minimum power
5:32 1 and maximum power 1 and to get to
5:35 these you don’t use the down arrows you
5:38 use the zu key so we’re going to move
5:41 from at the moment if you take a look up
5:43 here we’ve got the layer color active
5:46 and if we change that we can go to black
5:49 or red so now we can come down with the
5:54 ZU key to the first option and then if
6:00 we press the ZU again we then get the
RDWorks Cutting Your First Program Transcript (Cont…)
6:02 opportunity to change these if we wish
6:05 and we can do that with the arrow keys
6:07 change the numbers and then we can just
6:10 select every one of these windows with
6:14 the Z u key and when we finished we just
6:17 press Enter set up success enter don’t
6:23 escape
6:25 so we know do file again and here’s our
6:31 file that we’re going to run now one
6:33 thing I like to do before a start is to
6:36 do what they call a track so we’ll come
6:40 down to track and I’ll press enter in a
6:46 minute but I’ll show you what will
6:49 happen on the laser machine now bear in mind
6:53 I’ve got nothing on no laser
6:55 nothing at all all I’ve got is the
6:57 machine power on at the moment so we can
7:00 press enter hmm so that’s a big waste of
7:10 material we can either move the material
7:13 to suit where the laser is moving and
7:16 that may not always be possible but
7:18 let’s stay with that simple option at
7:20 this point in time track enter again
7:28 and it does stop at the top left hand
7:31 corner so we can in fact move that down
7:36 to about there and we’re now ready to
7:41 run our program accept the fact we
7:43 haven’t got the Machine switched on so
7:45 let’s go through that routine you know
7:47 first of all switching on the water pump
7:50 lots of air going through the laser we
7:54 wait for the air bubbles to clear and
7:58 there we go we can hear that they’re
7:59 virtually cleared now will now turn the
RDWorks Cutting Your First Program Transcript (Cont…)
8:02 lace on I shall now turn the extractor
8:10 fan on
8:16 and on my machine here I’ve got control
8:21 of the air pressure that flows through
8:23 the head here the air assist so I’m
8:26 going to turn the air assist on
8:29 pressure gauge
8:32 my compressor you may be a turn-on in
8:34 the back
8:37 I’ve got something like about maybe half
8:39 a psi of pressure in there
8:46 so we’re all ready to run now
8:49 we just come down to
8:55 and we’ll move this up to run and then I
8:59 should just press Enter
9:02 right here we go in
9:19 I’m gonna press pause for a second
9:22 now the reason I’ve moved the camera is
9:24 I want you to look just here
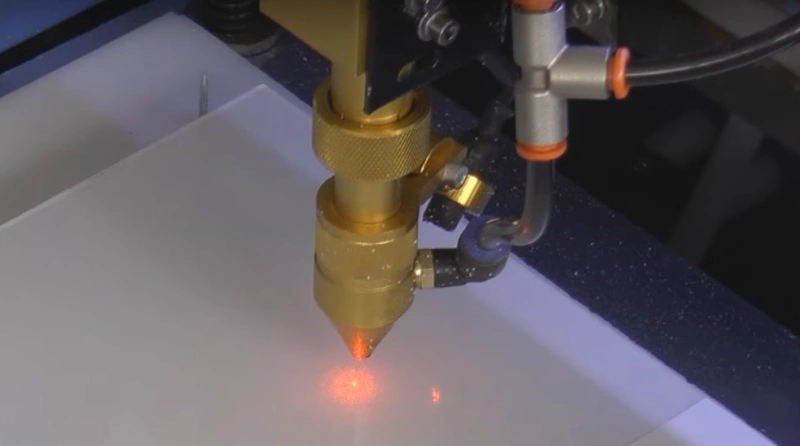
9:27 yeah there’s like a white halo down
9:30 there now that’s the acrylic when the
9:33 when the laser beam hits the acrylic it
9:35 boils off like Steam and this is like a
9:38 recon den site that’s sitting down the
9:41 side here it’s a powdery condensate I
9:43 will now turn off the air
9:50 so I’ll press the pause star
9:55 now you see we’re producing a lot more
9:56 films
10:01 but you’ll notice that we’re not
RDWorks Cutting Your First Program Transcript (Cont…)
10:03 producing
10:24 now we can see here two things first of
10:26 all when I turned the air off all of a
10:30 sudden it changed its characteristic
10:33 look Eternia powdery
10:36 residue on the surface
10:39 but
10:41 it reeked and enters on the surface and
10:43 makes a bit of a mess so it’s a
10:46 trade-off and the other thing that we
10:49 found is that we haven’t got enough
10:50 power here to cut through these items
10:54 so we need to go and modify the power or
10:58 decrease the speed which is probably the
11:01 sensible thing to do
11:04 and will come into the menu here and
11:08 we’ll press Enter
11:11 and the one that we want to change is
11:14 the cut speed which is the black one
11:17 so we press Enter
11:20 and at the moment we’ve got that running
11:21 at 15 millimetres a second I think we’ll
11:26 drop that down so we need to come down
11:28 with ZU and we need to reduce that
11:30 speed to maybe maybe we’ll take it down
11:33 to ten so we’ll move this left hand
11:36 arrow key and it’s gone under the one
11:39 will move it with the right hand arrow
11:42 key and it’s gone under the five now we
11:45 can reduce the five
11:48 ten there we go and now we can just
11:51 press ENTER, err we can now just press
11:53 ENTER I think and we should have done
11:54 all the modifications we don’t need to
11:56 change anything else
11:59 setup success okay so we’re now ready to
RDWorks Cutting Your First Program Transcript (Cont…)
12:04 file
12:08 oops
12:11 run I should just press these press the
12:14 enter button in a second when I get you
12:16 back on
12:22 and I think this time what we’ll do
12:26 would turn this round
12:29 and we’ll have a go at cutting through
12:31 the protective film
12:39 and I will turn the air on again
12:41 the air asist because I don’t want to
12:43 damage my lens
12:44 what they’re passing through the most
13:14 so it still hasn’t dropped out because
13:16 we haven’t got enough power there or
13:17 this protective film on the surface here
13:19 is absorbing
13:22 more of the engine I expect so let’s
13:25 take the film off with the front and the
13:27 back run it again the one thing I didn’t
13:30 check was the focus
13:33 it does look at the focuses and that may
13:36 well be the cause of the problem there
13:37 we go that’s the correct focus now
13:45 that’s a good reason why you should set
13:47 your focus correctly and as our end
13:49 result we’ve got a lovely crystal clear
13:51 edge the surface is covered in this
13:57 debris which will just wash off to be
14:01 honest but there’s our first test piece
RDWorks Cutting Your First Program Transcript (Cont…)
14:03 with a few mistakes that I’ve made
14:04 hopefully you won’t step into the same
14:07 problems
What Next?
Why not check out some of our other Posts:
