 Skip to content
 The Fiber Laser Learning Lab Series with Russ Sadler
In this Series, Lotus Laser have lent Russ a MOPA 20 watt fiber laser marker to “play with”. Although Russ has a moderate understanding of laser technology (his words) and how constant power glass tube systems work, pulsing fiber laser marking machines are shrouded in a deeper mystery than the glass tube machines.
They have been designed for high speed marking and the technology has been well tried and proven. There are limited “tricks” that the pulsing laser technology can perform. You enter predefined parameters for each marking “trick” you wish the machine to deliver , then stand back in amazement. Most correspondents tell Russ that they have bought their machine direct from China and received a machine and EZCAD software, preloaded with a few default parameters. No other instructions beyond the EZCAD manual are forthcoming.
Russ states “I am neither a teacher or expert in this field so you join me in my learning adventure with the warning that I have a simple but inquisitive mind and will probably make mistakes on my way to discovering the truth. I WILL oversimplify and maybe distort the scientific detail in my quest to build a simple picture of why and how this technology works. I am not trying to reverse engineer anything, just to break through the seemingly impenetrable ‘techno cotton wool’ that surrounds this amazing piece of science.”
Contents
To be completed soon.
Video Resource Files
There are no more resource files associated with this video.
External Resource Links
There are no more external resource links associated with this video.
Transcript for Fiber Laser Marker: Let’s Zoom in on Focus
Click the “Show More” button to reveal the transcript, and use your browsers Find function to search for specific sections of interest.
0:00welcome to another fiber laser learning lab today we’ve got to stop chasing
0:05those colors that we were working on because well we’re waiting for some kit
0:10to arrive but in the meantime we can do something quite useful and that’s to
0:16examine the focus and the lens on this machine now I promised I wasn’t going to
0:22take this machine to pieces but you know promises are made to be broken the only thing is this lens in here it’s
0:33very expensive hence I’ve got a piece of soft material here I don’t intend to
0:40drop it but it’s just a precautionary measure now this is a very interesting line and it’s called an F theta menace
0:47I don’t know who supplies this lens because there isn’t as far as I could
0:53see a name on it I’ve looked at the price of these from a very reputable company called thought labs and I’m
1:02holding almost a thousand pounds here so yeah this is why I don’t want to drop it
1:07we’ll just have a quick look here at the lens and it’s got a flat surface on the
1:13front which implies that it’s got a protective cover on it and we’ve got I
1:18think maybe two elements in there there’s that one there and you can probably see another reflection off of
1:25another element inside and I think if we go and look on the front we shall see the same we shall see we should see
1:32we’ve got two or three elements in there now the thing that interests me about this lens is we’ve got the working
1:38elements here I’ve had a quick look at some diagrams for this lens and they
1:44have they haven’t specified a particular place for the focal length I mean it’s
1:52quite difficult to get to a focal length if you can imagine because we can’t physically get up there and check
1:57against the lens because we’ve got this piece of flat glass protection glass in between if we look here where they
Transcript for Fiber Laser Marker: Let’s Zoom in on Focus (Cont…)
2:04specify the focal length is 250 for 10 inches but where that’s measured from we don’t
2:11know this 261 millimeters here against 254 for the lens seemed a little bit
2:19strange and here in the software they
2:24put that same number 261 focus height it was a little puzzling so I got back in
2:31touch with Lotus later and asked the question and the answer is actually very simple because it’s much easier to and
2:38more accessible to measure something externally what they’re done they’ve set
2:43that to 61 dimension from this under face here down to the table so they set
2:50the focus up by a test and then they will specify what this dimension between
2:55the table and that is so it’s a practical dimension rather than an actual focal distance what I’m going to
3:02do is to check the focal distance for myself they have their own method of
3:08setting the focal distance which is to draw a series of lines they deduce from that somehow the focal distance although
3:17I’ve got the program it doesn’t work as expected so I suspect all the powers are
3:22maybe for a 30 watt laser as opposed to a 20-watt laser but we’re gonna go ahead and we’re going to check my method of
3:29doing it and I’ll explain why I’m doing it my way so at the end of this exercise we shall
3:34see how different this method is by which this machine has been set up I
3:40believe and my method is for those of you that are still awake you’ll notice that we’re not
3:45by the laser I want to demonstrate something to you using the constant
3:52power machine so we’re using a fixed power for all of these tests [Music]
Transcript for Fiber Laser Marker: Let’s Zoom in on Focus (Cont…)
4:10you’ll notice that the speed was going up maybe set that one
4:16something strange about that one so here we’ve got my fairly crude representation
4:21of a laser beam it’s parallel because that’s exactly what we used a parallel laser beam to produce these marks here
4:28so this parallel beam with a uniform light would do damage which looked like
4:34this it would produce a square cornered groove where we have eroded or burnt or
4:41evaporated the material away in reality that’s not what we’ve got here because
4:48the light from the laser beam is not of uniform intensity the light from the
4:54laser beam is more like this where you’ve got an intense beam in the center and it gets less and less towards the
5:00outside so if I draw a graph of the intensity within that beam what I’ll
5:06find is it looks like this okay where
5:13the most intense light is at the center and the least amount of light is at the edge so that’s zero and that’s max
5:21intensity if I use that beam to damage material now I will not produce a hole
5:29that looks like this with square corners the area of intensity at the center will
5:35do the most damage to the material now light intensity is a strange thing to think about now before I proceed with
5:42this diagram I’m going to show you another couple of experiments which I hope will try and explain to you what’s
5:50actually going on inside this laser beam okay so I’ve got a nice gentle flame here and look I can pass my hand through
6:01that flame quite slowly yes I’m creating a little bit of smoke on my hand there but it’s not hurting
Transcript for Fiber Laser Marker: Let’s Zoom in on Focus (Cont…)
6:08because I haven’t reached what would be called the damage threshold for that
6:14material I can feel that flame is warm on my hand but at the moment it hasn’t
6:20done any damage to my skin it’s just warmed it up I think you’ll appreciate that if I was to do that much slower
6:27than that then the amount of energy in that flame would be sufficient to burn my hand ie
6:34it would exceed the damage threshold of my flesh but that’s only dependent upon the speed
6:40at which I pass my hand through or over that flame although it’s a fairly low
6:46intensity of heat given enough time it will damage the material that you’re
6:52trying to damage but it’s time related energy against time not much energy lots
6:59of time we still get the same damage
7:10I think the point is made I’m certainly not gonna run my hand through that the
7:15flame at the same speed that I did this one because now we’ve got a more intense
7:20energy source a very high energy flame a high intensity beam of energy and here
7:29we are this is the high intensity blow lamp now I shall be able to do a lot
7:38more damage in the same period of time with that high intensity flame than I
7:45will be able to do with the low intensity flame and that’s the basis upon which this situation happens where
7:56I’ve got very high energy I can move fast and I will still produce a mark
Transcript for Fiber Laser Marker: Let’s Zoom in on Focus (Cont…)
8:04because the high energy is in the area there but when I move the beam slowly as
8:12in this case here I will allow enough time for that part of the beam to have
8:20an effect as well as this part of the beam so when we look at this here which
8:27you’ll find that not only is it wide but it’s also got a groove in it because the
8:32central part of the beam has taken the center of that out and the edge part of
8:38the beam this low-energy part of the beam has had enough time to make the beam burn wider so as we get faster and
8:45faster and faster we should be using less and less and less only the high
8:51intensity part of the beam will eventually exist here to do any damage here at this point we’re just about on a
8:59balance with the damage threshold for the material if we go much faster we won’t make any marks at all okay
9:05let’s put the constant power laser aside now and here we are we’ve got a change
9:12of beam we’re in blue beam now that’s the fiber later but the fiber laser has still got
9:18this Gaussian distribution energy in its and it starts off at roughly 7
9:26millimeters diameter so the spec sheet says now 7 millimeters diameter is
9:31approximately 38 square millimeters after that beam passes through our F theta lens doesn’t matter what the lens
9:38is the lens will actually cause the beam to compress down to a very small area
9:44we’ve got a beam which is now point zero seven millimeters diameter and it’s only
9:50four thousandths of a square millimeter as opposed to thirty eight square
9:55millimeters so if we do this quick calculation 38 divided by point zero zero three eight we find that we’ve
Transcript for Fiber Laser Marker: Let’s Zoom in on Focus (Cont…)
10:02actually got an amplification factor of 10,000 I’ve drawn that shape there like
10:09that which looks like a nice gentle little camel hump which is seven millimeters it’s probably not far off
10:15but this is a 20 watt laser so that area under there represents 20 watts doesn’t
10:25matter what the unit is that’s what the area represents 20 watts so when I squeeze that baseline down I wonder what
10:34happens now before I explain the next part of this I’m going to give you a couple of mechanical demonstrations to
10:41try and if you like put some pictorial sense into what I’m trying to explain
10:48here because some people might not understand or believe what I’m just about to tell you so what I’ve got here
10:54is basically a light beam yeah I know it might look like a plastic bowl full of water well I’ve had to waste some of my
11:01coffee to color it it’s a bit of a shame this is intense light and as it goes
11:07down the energy drops and it becomes less intense light I’ve got a hole in the bottom here and when I pull this
11:14piece of protective cover away you’ll see that because this is a very high intensity light here at the moment it
11:21can do a lot of damage in other words it’s going to send a sprout of water right out here somewhere I hope
11:29but as the light intensity gets less you’ll see that the amount of damage it
11:35can do will get less as well and as the
11:41level goes down you’ll very quickly see the water is getting closer and closer
11:52and closer
12:05got here is a piece of silicon tube which is stretchy and it’s got a small
Transcript for Fiber Laser Marker: Let’s Zoom in on Focus (Cont…)
12:13bore another round about three millimeter bore again any interest of
12:18science I gotta waste some of my coffee just get
12:25rid of all the air bubbles in there now I’m using this just here to mark where
12:31my fluid is as I stretch this tube I’m sure you can guess what’s going to
12:37happen the bore of the tube gets smaller and smaller and smaller and basically
12:45look we’ve increased the head of fluid we’ve basically increased the energy
12:50level in that water if it wants to escape at the bottom and the more I stretch it for greater the head so as I
12:59squeeze something down it will increase its energy level so in our bottle
13:07experiment what we tried to show was that when the light intensity ie the
13:12level of the fluid was very high it could do a lot of damage because the water was coming out and going a long
13:19way away from the bottle and as the water level went down ie the intensity
13:24dropped the amount of damage we could do got less and less and less now we took
13:30that one stage further with the second experiment where effectively what we did
13:36was to show that you can get a similar sort of effect a change of head ie
13:42we were increasing the energy level in the water in my lovely coffee cup column
13:47by stretching the tube by stretching the tube effectively what we were doing was
13:53this we were making the tube gets smaller and we were making the head we
13:59were making this shape here get taller and that’s the concept that I want you
Transcript for Fiber Laser Marker: Let’s Zoom in on Focus (Cont…)
14:04to imagine alright what we’ve got is 20 Watts worth of area under that curve now
14:12when I decrease it to a factor of 10 thousand times smaller
14:17not only is this going to get smaller but I’ve got the same amount of energy under that curve so this curve is going
14:25to get hideously large right which means I’m going to have a spike of energy a
14:31long way above and below this point here
14:36which is the focal point now it gets complicated by the fact that if it was a
14:42parallel beam then that would go a long way off the paper both ways but because
14:48the beam is actually expanding beyond the focal point you get a suppression of
14:54this effect and so effectively I’ve drawn it here look we’ve got a larger
15:00diameter here so we’ve got a larger base so it’s halfway it’s it’s partway between this effect and this effect and
15:08so consequently the net result is that we’re going to get a spike of energy very similar to what I’ve drawn here and
15:15there may well be sufficient energy in that beam to damage stuff 10 maybe 15 or
15:25maybe even 20 millimeters above and below the focal point that’s not what
15:31you’d normally expect because jpt have already told us that the depth of field is only for a 254 2.31
15:40i’ve only got about 1.1 millimetres either side of the focal point I’m
15:47absolutely convinced that is not the case we’ve got a lot of power either
15:52side at the focal point and that’s one of the things that we should go out to prove later on in this session but I’m
15:58trying to give you the logic and the reason why I’m convinced that we shall find something way up and way down on
Transcript for Fiber Laser Marker: Let’s Zoom in on Focus (Cont…)
16:05the focal point in fact there’s no point in going way up we might as well just start off with our material down here
16:12and lift the beam up and up and up and we’ll only look for one half of that because whatever is happening down here
16:17will also be happening up here as well because this is the beam coming in to
16:23power and then it’s going out of power so we come back to this concept
16:29of light energy hitting a surface when the light energy hits the surface it
16:35excites the molecules on the surface into a higher state of vibration and
16:40that higher state the vibration is the molecule getting hotter and hotter and
16:46hotter the higher the light intensity the more that effect is going to happen
16:52quickly you may think this wood has burnt yeah that’s what they tell you at
16:57school but in fact in reality what’s happened is the molecules are vibrated
17:03so fast that they’ve exceeded their damaged threshold and they have flown
17:08apart because they can’t stay in the relationship they had when it was ordinary cold wood and what they’ve done
17:16they’ve changed into a different sort of chemical and what we’ve got here is a sort of a mixture of carbon and various
17:22other chemicals that have combined with those chemicals that were previously in the wood and those chemicals that are in
17:28the air so this browning effect that we’ve got here is effectively self
17:34destruction of the molecules caused by the light but the light has only
17:39vibrated the molecules into a self-destruct mode I just hope I’m getting this message over to you it’s a
17:45very strange phenomenon light intensity is the key to the way in which this
17:50laser beam works and we’ve just shown you previously that there is a spike of
17:56intense light right down the center of this beam which looks something like this this intense light may affect the
Transcript for Fiber Laser Marker: Let’s Zoom in on Focus (Cont…)
18:05material what we’re firing at on the other hand if we’ve got something like
18:10this which is acrylic it may not affect it at all this is a different structure
18:17so therefore it doesn’t respond to this sort of frequency of light so there’s no
18:24guarantee that this light intensity will have an effect on the material but it
18:30may have an effect and it may have an effect which is different for different materials because not all materials will
18:36excite at the same rate the faster you can vibrate the molecules with this intensity of light
18:43the more it will damage now why am I telling you all of this well look here’s
18:49the focal point here’s the width of the beam at the focal point and what we
18:54should do when we fire a pulse at the material what we should do is wish your prettiest a mark like this
19:01in fact that’s wrong what we should do so we should produce a mark that’s like this where we shall have in the middle
19:13of the beam we shall have a shape which looks like this because that’s the
19:19damage profile that we’re going to produce with this beam the more intense the light the more damaged the material
19:25the less intense the light the less damage but what we’re going to do is we’re going to produce a conical spot
19:32with the depression in the center which represents the energy profile of the beam that is hitting it the more intense
19:38the light the more damage we should do so we shall not get a nice clean square
19:45spot out of our dot because of the shape of the profile because of the Gaussian
19:51shape even at the focal point okay it’ll be incredibly small but it’ll still be
19:56there what happens when we decrease the power in the spot we decrease the energy
Transcript for Fiber Laser Marker: Let’s Zoom in on Focus (Cont…)
20:03level from 20 watts to say 1 watt all that’s gonna happen is we’re going to
20:11produce an energy profile and I’ll draw it like that like that we should still
20:17have exactly the same spot size but it won’t be as deep the logic that I’m
20:25trying to force on you is that the spot will not change its size just because we
20:31change the power in the spot the spot will be remaining defined by the focal
20:38point and what that means is we shall not be able to see this effect if we
20:46travel at slow speeds with a given pulse rate we shall overlap the dots like this
20:54and so the amount of dot overlap depend upon the speed and if we speed up
21:00all that will happen is the dots will get further and further apart now I’ve
21:07drawn them like this in an exaggerated form but what that means is the lion will always be the line that we cut or
21:14draw with this fiber later will always be the same width it’ll be point O 7 until we reach this
21:28part of the beam where we will expect when we run out of power if we lift the
21:34focal point and this is what we shall be looking for later until we get to this point here there is sufficient power
21:41here to do damage but it’ll do damage with smaller and smaller dots like that
21:52until we run off the end of the energy profile if we put the beam in too far
21:58and gradually lift the beam out we would have exactly the same effect this end ok
Transcript for Fiber Laser Marker: Let’s Zoom in on Focus (Cont…)
22:04if we lowered and raised the focal point that’s what we expect to see on that
22:11basis I’m going to suggest a method by which we’re going to find out where the
22:17focal point is because this is a completely different approach to that which I think Lotus lakes are using I
22:24haven’t been able to use their method at the moment because I can’t get their program to run on this machine but
22:31that’s because I think it probably is a program designed for a slightly more powerful machine and and I just can’t
22:36get the it’s not correct for this machine we know that this machine has been set up by Lotus laser to an exact
22:45point on the table where they think the focal point is my plan is to use this ie
22:51a line through there to find out where the line starts and where the line
22:57finishes lines like this where we’ll change the focal point up and down to
23:04see if we can find the start and the finish of lines of different
23:10and if I get it right what I should do I shall find all these lines look like that and the center point of all of
23:16those lines represents this focal point here let’s see if we can put some of that theory into practice and see how
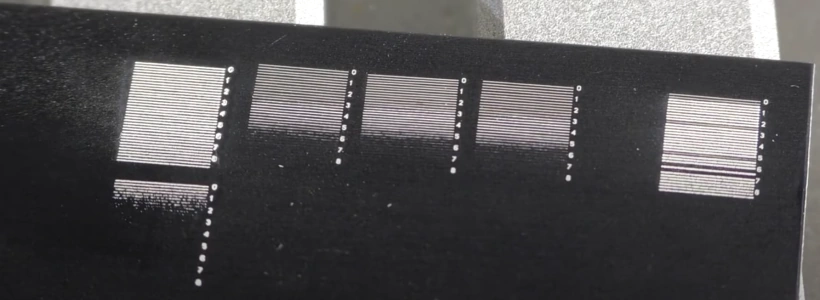
23:23much of it is right and how much of it is it on my face so here’s my program
23:29I’ve got five lines on here all done at different powers and different speeds
23:35and I’ve got the five top lines are an exact copy of the five bottom lines
23:42these are done from right to left and this copy over to make it run from left
23:48to right so I’ve got the same program running in each direction I’ve now integrated the pattern together
23:54so that it looks like that so what I’ve got here is a piece of ten millimeter thick material sitting on top of a piece
Transcript for Fiber Laser Marker: Let’s Zoom in on Focus (Cont…)
24:08top surface of this stainless steel relative to the base is half a mil plus
24:13half a mil so the top surface starts off one millimeter above the base and then it finishes up half a millimeter half a
24:21millimeter and ten it finishes up 11 millimeters above base er which whatever happens basically I’ve got a 10
24:27millimeter slope there but it’s at the center point of that slope regardless of
24:32the length of that piece of material at the centre of that piece of material it will be six millimeters above the table
24:40so if I can get my pattern completely symmetrical on there and the deepest cut
24:46happens to occur along the centre line of that material then I know that I’ve got the optimum focus point okay so now
24:53what I’m going to do is just move the material so that my pattern is
24:58symmetrically placed within the material just put my glasses on and turn the
25:04interlocks off [Music]
25:10okay now not all the lines are obvious in this artificial light there are
25:18further lines along the top there that go nearly to the end of my patent but those burn lines towards the bottom
25:25where I had a lot less power I’m measuring the width of that and it’s 80
25:30millimeters so the deepest cut is happening at the centre of my material
25:35so I have got the focus just right the midpoint of that plate is sitting at 6
25:43millimeters above the base plate so Lotus laser have set their machine up such that Z equals 0 so if I take my 6
25:51millimeters away from that it means that my setting is half a millimeter higher
25:56than their setting I feel very happy to leave their setting as it is but now you
Transcript for Fiber Laser Marker: Let’s Zoom in on Focus (Cont…)
26:02have another way in which you can check your focus if you need to so in real
26:09terms we don’t have to worry about exactly what this dimension is now this is a very interesting fact sheet and
26:14tutorial about how f theta lenses work
26:20there’s a calculation here for working out what the spot size is likely to be as well now I’m certainly no mathematician but
26:28to be honest it didn’t take a great deal of effort to do a quick calculation read through this and put the numbers in and
26:34in fact the calculation came out 2.07 for this lens now this is not
26:41necessarily a thorlabs lens so it might be slightly different and the claim for
26:46this lens is 0.065 so it’s about the
26:52same you know give or take half a hair i now understand quite a lot more about
26:57the lenses themselves and how to check and set the focal distance of this lens
27:02away from the work surface now grossly exaggerating this picture as I draw on my hand but you remember me
27:08saying there is an intensity distribution within this beam whoops which looks roughly something like this
27:16what that implies is that I shall be able to find power quite a long way below the focal point and I
27:24shall still have lots of cutting damage even though I am well below the focal
27:30point I don’t know what that level of damages I mean thinking that it could be ten maybe even as much as fifteen or
27:38twenty millimeters below the focal point but equally well what you must remember
27:43is whatever is below will also be above so if I’ve got something like this that
27:49I want to engrave for example so I should probably be able to draw off every wide logo within the focal range
27:56of this lens now it all depends on the pulse power because I’m very convinced
Transcript for Fiber Laser Marker: Let’s Zoom in on Focus (Cont…)
28:03that if you make the pulses very large then what we shall have we shall have
28:08sharp which I have much sharper shapes
28:14like this but when we start reducing the power then what we should do we shall
28:19finish up with much more softer shapes like this and we won’t have as much range so we’ll just go and investigate
28:27that a little bit and see what we can find so I’ve written a program here which
28:34starts off at position zero ie the focus point is on the table and that’s that
28:41zero there so I’ve got eight and three-quarter millimeters overall but I’m using a half millimeter test piece
28:47so therefore the focal point will be finishing up eight point two five millimeters above the work surface so
28:57this is where the two nano second pulse at 250 millimeters a second
29:23well here’s the stainless do with the two nanosecond pulse and that got about
29:30well that got to six millimeters above the surface with what I would class as
29:37damage and then there are a few speckles below this point so that got to six
29:44millimeters above the surface before it ran out of power but when we went to 200
29:49nanoseconds my goodness me okay so it ran out of lots of power just here
29:55but it carried on and it was damaging the surface in a strange sort of
Transcript for Fiber Laser Marker: Let’s Zoom in on Focus (Cont…)
30:02hammering way almost like a ball peen hammer with the focal point 12 millimeters above the surface there was
30:08still damage occurring to this surface there was even coloration occurring below that point right the way down to
30:14probably nearly 16 or 17 millimeters was still quite a lot of power in that beam
30:20at 17 millimeters above the surface as I might have mentioned to you before this
30:26material stainless steel is not what I call it binary material you can color it
30:32you can make different things happen to the surface so with aluminium you can only get two colors black and white and
30:38that’s why I call that a binary material these three here and I did them because
30:44I wanted to be to make sure that everything was repeating correctly they were the two nanosecond pedal pulses and
30:51they basically went out as far as about five millimeters before they ran out of
30:57puff now when we went to the 200 millisecond pulse here
31:05we ran all the way through to 8.75 millimeters and then we’ve gone above
31:11then we’ve gone above that and we’ve probably got as far as 12 millimeters
31:17before we run out of power but the last five lines on that pattern we’re getting
31:25thinner and thinner and thinner but they were showing the same sort of line width degradation that we were seeing on the
31:30wood with the continuous laser we were obviously reaching this is the wrong phrase to use but the pointy bit of the
31:38beam where the power is disappearing now the same was happening to this stainless
31:44steel I mean that went into this that went into this second section here where
31:49I repeated the pattern again but with a 9-mil offset that went up to about 12
31:54millimeters in total where the last five lines were gradually getting narrower and narrower so as I said to at the
32:00beginning of this session we’re now waiting for equipment to be able to look closely at these surfaces because trust
Transcript for Fiber Laser Marker: Let’s Zoom in on Focus (Cont…)
32:08me what you see through here is just mind-blowing you just cannot believe what’s happening
32:14to that surface this is only a low power system which is great because it gives me a lovely stereo view and I can see
32:21the depth of the cruise the depths of the cuts I can see the damage on the side of the cuts it’s absolutely amazing
32:26until we get a camera to stick on here you won’t be able to see what’s under there in about a week or so I hope to
32:33have another microscope where we can examine the surface very very closely but I’ve still got to wait until I get
32:40my camera from China China well they’ve got this problem at the moment that
32:45might delay things leaving China well I think that was a very useful session on focus and I think we can see that my
32:51prediction of what was likely to be happening around this focal point it appears that the long nanosecond pulses
32:58are the ones that are actually extending way way down beyond the focal point well
33:03that’s another little fragment of knowledge and information that we can put in the can and build into our analysis when we see things and it’s so
33:11sad at this moment in time that you can’t see what I can see I’ve now got the correct parameters
33:16for the Lotus laser focus test so we’re going to give that a try and see how we
33:22get on and how that compares to the results that I got
33:33they’re using a similar technique to me because obviously they’re running the power off at this end and they’re running the power off at the end but
33:40instead of just using a line they’ve drawn a scale and the most powerful part of the scale is supposed to be in the
33:47middle at zero and it’s not at the moment because we’ve got minus 3 and
33:54plus 5 hmm so it looks as though the
34:02Machine needs to go up by at least half or one millimeter this has now got a setting of 1.25 minus the thickness of
34:10material which is 0.5 so this is now point 7 5 above the material and my
34:19setting came out to 0.5 above the material so if I correct the Machine now
34:25to this calibration which I feel very very comfortable with then we will only
34:300.25 apart in our calibration techniques so for now thanks for your time and I’ll
34:36catch up with you in the next session
What Next?
Did you enjoy this post? Why not check out some of our other posts:
Disclaimer
Last updated April 25, 2024
WEBSITE DISCLAIMER
The information provided by n-Deavor Limited, trading as Laseruser.com (“we,” “us” , or “our”) on (the “Site”) is for general informational purposes only. All information on the Site is provided in good faith, however we make no representation or warranty of any kind, express or implied, regarding the accuracy, adequacy, validity, reliability, availability or completeness of any information on the Site.
UNDER NO CIRCUMSTANCE SHALL WE HAVE ANY LIABILITY TO YOU FOR ANY LOSS OR DAMAGE OF ANY KIND INCURRED AS A RESULT OF THE USE OF THE SITE OR RELIANCE ON ANY INFORMATION PROVIDED ON THE SITE. YOUR USE OF THE SITE AND YOUR RELIANCE ON ANY INFORMATION ON THE SITE IS SOLELY AT YOUR OWN RISK.
EXTERNAL LINKS DISCLAIMER
The Site may contain (or you may be sent through the Site) links to other websites or content belonging to or originating from third parties or links to websites and features in banners or other advertising. Such external links are not investigated, monitored, or checked for accuracy, adequacy, validity, reliability, availability or completeness by us.
WE DO NOT WARRANT, ENDORSE, GUARANTEE, OR ASSUME RESPONSIBILITY FOR THE ACCURACY OR RELIABILITY OF ANY INFORMATION OFFERED BY THIRD-PARTY WEBSITES LINKED THROUGH THE SITE OR ANY WEBSITE OR FEATURE LINKED IN ANY BANNER OR OTHER ADVERTISING.
WE WILL NOT BE A PARTY TO OR IN ANY WAY BE RESPONSIBLE FOR MONITORING ANY TRANSACTION BETWEEN YOU AND THIRD-PARTY PROVIDERS OF PRODUCTS OR SERVICES.
AFFILIATES DISCLAIMER
The Site may contain links to affiliate websites, and we receive an affiliate commission for any purchases made by you on the affiliate website using such links. Our affiliates include the following:
- makeCNC who provide Downloadable Patterns, Software, Hardware and other content for Laser Cutters, CNC Routers, Plasma, WaterJets, CNC Milling Machines, and other Robotic Tools. They also provide Pattern Files in PDF format for Scroll Saw Users. They are known for their Friendly and Efficient Customer Service and have a comprehensive back catalogue as well as continually providing New Patterns and Content.
- Cloudray Laser: a world-leading laser parts and solutions provider, has established a whole series of laser product lines, range from CO2 engraving & cutting machine parts, fiber cutting machine parts and laser marking machine parts.
