0:00welcome to another fibre laser learning lab um today we’re going to carry on with
0:06some stuff that we investigated a few sessions ago the strange effects of
0:14one micron light on various materials you may remember that i experimented with some glass
0:21um we’d already found out that for example that clear materials that we can see through um it appears
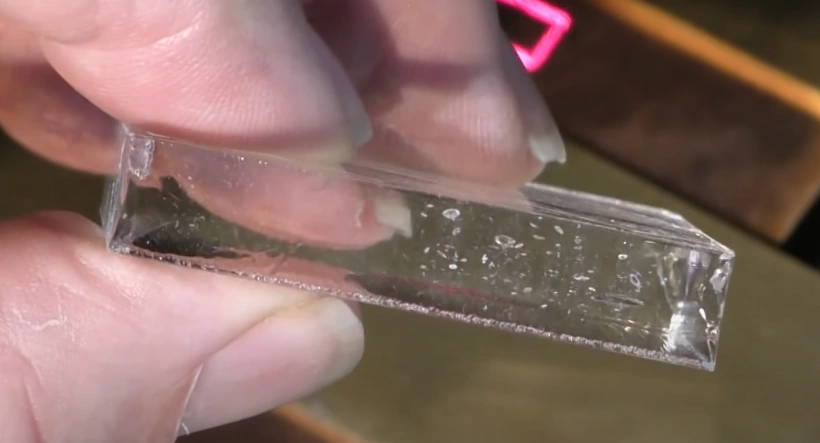
0:28that one micron light can see through here i’ve got a piece of clear acrylic
0:34it would appear that one micron light goes right through that and has no effect on the acrylic at all
0:39in the same way that has no effect on glass or on water whereas when we fire the one
0:45micron light that clear polycarbonate it definitely has an effect so it must
0:51all be down to the atomic and the molecular structure of the material itself when you fire the laser at glass and it
0:58passes right through the glass if you’ve got a piece of metal underneath the glass
1:03you vaporize the metal and you deposit the vapour onto the back of the glass fascinating
1:10process so one of the strange thoughts that i had was that can i do it on acrylic
1:18well the answer really is no because acrylic melts at 160 degrees c and it boils
1:23and vaporizes at 200 degrees c whereas vaporizing this copper
1:32is up in the over a thousand degrees c so i’m going to do some serious damage to the back surface of this acrylic
1:41hang about isn’t that what i want if i can fire the light through the
1:48acrylic bounce it off the surface of the copper or stainless steel or aluminium or any
1:54other metal i choose to use does that mean to say that i can actually engrave on the back
2:00of this i don’t want a vapor deposit any metal onto it i just want to create enough
Transcript of Fiber Laser Machine – Bubble Marking Clear Acrylic (Cont…)
2:06heat reflected off of the metal to damage the surface of the material
2:13it should be possible so let’s go and experiment bear in mind some of the other lessons that we’ve learned about
2:18this machine and we’ve been warned that we shouldn’t actually try and work below the focal point or we
2:24shouldn’t try and reflect metals back up into the lens so i’ve got this work pushed across to
2:31the side so that it’s not reflecting directly back into the lens but if it’s going to do anything it’s going to reflect off somewhere else
2:37into space so the first thing i’m going to do is set the part height to 1.5 millimeters which is the thickness
2:44of the copper so we’re actually going to reflect off of the surface of the copper because
2:49that’s the plan
3:02the answer is not a lot we’ve managed to mark the copper but we’ve
3:10not generated enough heat for long enough to damage the acrylic
3:20well again it’s done a great job of marking the oh look we’ve got
3:26something on our acrylic
3:33not a lot because look i can wipe it off so it must be basically almost smoke but let’s go down a little
3:40bit lower to 500 with our speed put more pulses in per unit of time
3:48that’s something rather interesting happening there hopefully you did as well you noticed
3:54some speckles and some sparks as it was engraving now
4:00we’ve got a really strange effect starting to happen now we have not really well we’ve marked the
Transcript of Fiber Laser Machine – Bubble Marking Clear Acrylic (Cont…)
4:07back but i don’t know whether you can catch
4:12in catch it in the light there just right something is happening inside the
4:19material because it isn’t just a mark on the back we’ve got when i catch in the light just right i
4:26can see some little sparkles in there we’ll take the speed down to 250 now
4:33and look at all that look at all that’s happening inside there
4:38now what’s happening there something weird has taken place look i’ve got a whole load of bubbles or
4:45something taking place inside the material normally we wouldn’t be able to mark this at all let’s try a different sort
4:54of material underneath here is a back reflector
4:59let’s try some aluminium won’t change the settings
5:07i’ve still got the focus basically down on this surface here
5:22so we’re busy exploding the material we must be producing bubbles inside
5:28there we must be vaporizing the material somehow inside the acrylic
5:34and it’s expanding and as you heard it pop as it exploded i certainly don’t appear to be succeeding at
5:42burning the surface of this and heating the surface of the acrylic
5:47i’ve got no idea what i am doing but hey that’s not unusual for me
5:54now because i’ve got an air gap under there now i’m going to produce the surface marking
Transcript of Fiber Laser Machine – Bubble Marking Clear Acrylic (Cont…)
6:01and i’m going to get quite high temperature ionized gas which is coming off the surface
6:08producing a that’s what that white flame is you know it’s it’s ionized gas if i put the material straight down
6:15onto the surface i’m preventing any oxygen from getting to the surface and so i’m basically preventing ionization taking
6:22place
6:29well we get a lot more noise we also get less explosive
6:36burning and what we’re picking up now is all these bubbles from underneath
6:42which is this surface here now that gives the impression that we’re doing something with a reflection
6:48now let’s try the same thing with copper what copper does as opposed to
7:00aluminium
7:06hmm we’re getting some sort of effect which is coming up from a reflected image i think the first
7:13thing we’ll do is see if we can control the damage that we’re getting in there can we stop it being quite as
7:19violent as this because look some of it is explosive and burning out so let’s put
7:24the speed back up to 500 so we’re putting less power in so let’s
7:29go back from 500 back to say 300.
7:40fuel taking place from the underneath here and we’ve got a little bit of damage on the underneath surface
7:50but as you can see the the burning the bubbles are taking place low down
7:57can i change the position of those bubbles by changing the focus at the moment the focus is set onto this
Transcript of Fiber Laser Machine – Bubble Marking Clear Acrylic (Cont…)
8:04surface here and it’s reflecting back up into this
8:10material what happens if i put the focus on the top surface i wonder let’s come right up
8:16to the top so instead of 1.5 for my part depth it’ll be 1.5
8:22plus 1.5 which is 3 plus 9.5 which is 12.5
8:28so we’ll keep the settings exactly the same but we’ll change the part we’ll change the focus
8:3412.5 to see if this is somehow related to focal depth or reflections or
8:42i’ve got no idea what it is at the moment because we shouldn’t be achieving anything inside that material
8:56when we look at it from the side there look it’s now passing fairly uniformly all through the
9:02material we increase the power by putting the
9:08speed down let’s go back to 200.
9:15see we’re getting burning at the surface now
9:21we’re definitely getting a lot of bubbles and they’re not going completely all the way
9:27through they’re from the surface down to maybe six or seven millimeters into the
9:33material that’s where the density of it is i don’t know whether you can see that look can you see this
9:40this strange pattern here look that’s a that’s a shear plane that’s an explosion plane within the
9:46material it’s actually opened up a void so we’re definitely producing gas
9:52inside the material at the moment i’ve got a pulse width of 250 nanoseconds which
9:59is quite a lot of power per pulse let’s back that off to something like maybe
Transcript of Fiber Laser Machine – Bubble Marking Clear Acrylic (Cont…)
10:04100.
10:12how you saw that shear plane open up just there at the moment the scan lines are .05
10:20we could increase the power by five times if i decrease the
10:27interval to 0.01
10:35aha we’ve got nothing coming out of the
10:43surface at the top now we’ve got some very nice bubbles in there in fact it’s
10:50most of the energy most of the bubbles are in the center so if i take a nice
10:56clean version so there’s no confusion and we’ll repeat that test
11:09we’ve got very little blowing out the top this time
11:14most of those sparks are down the inside but most of the energy is in the center
11:23at the moment i’ve got the focus set to 12.5 let me lift the focus let me lift the
11:28material thickness which will effectively pull the focal point up above the material i’m going to take it up to
11:3615 15 millimeters
11:51well it certainly has an effect i think you can clearly see there look it’s brought it right up to the top
11:58surface so whatever is happening it’s got something to do with the focus
Transcript of Fiber Laser Machine – Bubble Marking Clear Acrylic (Cont…)
12:06question is is that the focus combined with a reflection how much is the reflection
12:14playing on this uh how can we test that
12:21very simple we have a piece of paper now we know
12:27that this stuff doesn’t pass through paper so this will begin to tell us hopefully
12:36what’s going on
12:49and the answer is it’s got nothing to do with the reflection by the look of it because we’ve got no change in the
12:54result i mean we shouldn’t be able to mark this material at all because the light is passing
13:00through it so we have to ask the question how is it possible
13:06to mark the material
13:21i’m going to change that part height from 15 which is about three
13:27millimeters above the material at the moment i’m going to go right up to 20 millimeters and see what happens here we
13:34go i can see a few little flickers right
13:40down on the bottom surface now
13:46whatever it is is all down to focus let’s go the other way and drop it
13:52halfway into the material
13:57and we’re now getting an effect of some sort
Transcript of Fiber Laser Machine – Bubble Marking Clear Acrylic (Cont…)
14:04and whereas my thoughts were that it was to do with reflections and interference between
14:12beams the fact that there is no reflection there
14:19tells me it’s all to do with the focus but how can that be what is happening
14:29so after a few more experiments i’ve got what i think is a pretty good
14:36set of parameters it still doesn’t explain what we’ve got here but
14:44i’m going to run this and then we’re going to probably have a look at it under the microscope to see if we can
14:51first of all see what these so-called bubbles are they must be bubbles you’ve got to be evaporating
14:57little teeny weeny chunks of material and turning them into gas
15:04the longer pulse is actually not as good as the shorter
15:10pulse 22nd 20 nanoseconds
15:16115. yeah we’ve got a lot more sparkle in there now
15:38this one’s a shorter pulse time and it’s beginning to look quite a lot
15:44better and it’s more uniform throughout
15:50let’s try 13 nanoseconds
Transcript of Fiber Laser Machine – Bubble Marking Clear Acrylic (Cont…)
16:01it’s pretty uniform throughout look it’s gone all the way through the material there
16:06pretty but it just doesn’t look
16:13i mean it’s 3d which makes it interesting i would like to see it so it’s obvious
16:20on the surface like one of the others that we produced and we did that by pulling the focus
16:28up a little bit so at the moment it’s set to eight millimeters which is three
16:34millimeters to there and five
16:42five millimeters away from 9.5 which means it’s 4.5 into the material
16:50right well let’s give this a try shall we this is 1500 millimeters a second
16:5675 kilohertz 45 nanosecond pulse and we’ve got a point zero one interval
17:04between the line scans so we’re 4.5 into the material
17:19[Music] now as you can see that looks pretty uniform although we’ve got we’ve got
17:24some density at the top we’ve got quite a lot happening down below let’s see what sort of surface
17:29well you see that’s getting better that that’s getting because we’ve got it closer to the surface
17:36a little bit more visible on the surface itself
17:42when i put some led lights behind it look
17:52it’s looking pretty good
17:58okay so here we are in the office with my low-powered usb microscope because my big microscope is
Transcript of Fiber Laser Machine – Bubble Marking Clear Acrylic (Cont…)
18:04just too powerful to see what’s going on now it’s it’s interesting to note that what i’ve got here
18:10is a piece of pink paper in the background with some pink strands in it as you can see and you can see that they are nicely in
18:17focus the background so i’m focused through the material onto the background but look what happens when i
18:23draw the material away the background has gone out of focus so
18:30the material is already having an effect on the light
18:37and the way it’s focused so there’s some strange effects going on inside this material even with visible light
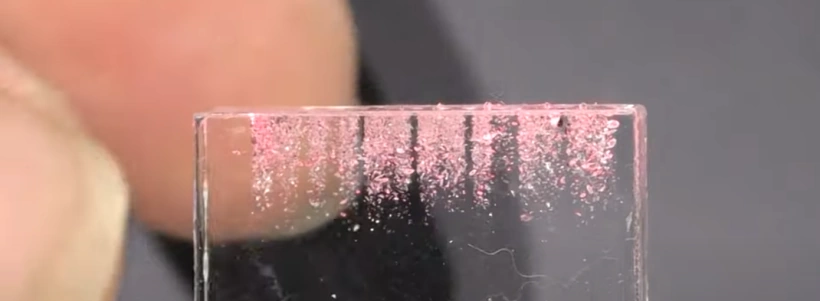
18:46now when we start looking at the bubbles that i’ve produced what we’re looking at now are the
18:52bubbles that right down on the bottom surface let’s just move across a little bit and
18:58see ah there we go now that’s not untypical of what i’m finding
19:04if we take a look here you’ll see that we’ve got like a little white blob that’s a bubble
19:11but what it’s done it’s exploded inside the material and look it’s produced this like a halo
19:18it’s almost like when i look inside this material look you’ve got all these different
19:23oval shapes look there’s one there that looks like satin look you know with its rings and all of these
19:30look like little mini universes they’re all laid at different angles and they’re all fracture planes you’ve
19:36got a little teeny weeny spot of gas that’s appeared in the middle
19:42and it’s then exploded out pushed out and managed to shear a plane around it
19:49and that’s what these are all looking like so the acrylic melts at 160 degrees c
19:57it then turns into vapor like steam at 200 degrees c but unlike steam
Transcript of Fiber Laser Machine – Bubble Marking Clear Acrylic (Cont…)
20:05it is a volatile chemical it’s got hydrocarbons in it whatever
20:12heating is taking place in there has also heated up the vapor and turned that vapor into
20:18like a material it’s almost oxidized it and turned it into a material
20:24and there’s lots of these little teeny weeny black spots around in here so we’ve got like a double chemical
20:29reaction taking place some of them are low temperature and they just produce a little teeny weeny white bubble
20:36with a fracture plane and some of you are these very dark spots where are these little spikes
20:44of energy coming from they’re spikes of energy which are doing damage to a
20:49material that would normally allow the light to pass through so we
20:54must be experiencing some sort of interference pattern between the light waves
21:00which is causing some increase in energy intensity and this
21:07shows us what happens to light as it passes through a transparent material like glass or
21:15acrylic so the light approaching the transparent material is at a fixed frequency and
21:22it hits the material and slows down now the frequency does not change
21:29because the frequency is the color of the light you can say well yeah i can see the frequency has slowed down well
21:36no what’s happened is the wavelength has shortened if you count the number of pulses
21:41passing by a single point you’ll find that there’s just as many
21:46peaks passing the point on the left and the right as there are passing any point within
21:52the glass we’ve got more peaks passing a point
21:57in the same period of time so so within the material we’ve got a lot more light waves
Transcript of Fiber Laser Machine – Bubble Marking Clear Acrylic (Cont…)
22:05but because the color of light is defined by its frequency and not by its wavelength
22:13then the light has remained unchanged in terms of its color
22:19i’m trying to make sense of why and how you can get splashes of power
22:26inside the material you do get a crowding effect of waves inside the material
22:34now the other thing that we have to take into account is the fact that the beam is not
22:41parallel we’re busy focusing the beam down so by very very definition
22:48the waves that are running down this beam are not running parallel to each other
22:54and as i’ve mentioned maybe on a couple of occasions before i’m a little bit puzzled because if the
23:00waves are traveling different distances then they are basically traveling at the
23:06same speed because as we’ve seen from the previous diagram the waves go in at one speed
23:12slow down and then they come out at the same speed so they’re both traveling these waves
23:18are both traveling at the same speed but technically they’re traveling different distances because they’re on
23:23different legs of the triangle so they therefore must get out of phase
23:30the problem with things getting out of phase is you get something called super position
23:39the waves although they’re coming from the same light source and they’re at the
23:44same frequency they’re not running perfectly together and when you get
23:49superposition of waves according to wave theory you get interference now let’s just have
23:56a quick look at another diagram that i’ve knocked up quickly and here we can see two waves
Transcript of Fiber Laser Machine – Bubble Marking Clear Acrylic (Cont…)
24:02running towards a focal point they’re gradually getting closer and closer and closer and they are
24:08the same frequency right but if they are the same frequency this wave
24:15and this wave they can exist in the same space without interfering with each
24:20other so in this case look we’ve got this wave running at a very slight angle
24:26to the other wave and when they cross over they will cross over and carry on as
24:32normal so they start off as two waves and they finish up as two waves but at the point where they physically
24:38occupy the same space something strange happens and they
24:44either become additive as in this case because we’ve got two waves that are the same frequency and the same
24:51amplitude the amplitudes add so we get double the amplitude at just a very small
24:59section where the waves try to occupy the same space now because these are coming down at a
25:04very gentle angle i mean i’ve only drawn one super
25:09plus wave there but it could well be that there are two or three or four which are gradually building to a plus
25:15and then back again and so we we don’t just get one we get a pulse of several waves but those waves the
25:23energy at that point is much more than the single wave energy whereas
25:30if they get out of phase like this and they stay out of phase then you never get this plus we’re
25:36always getting minuses okay so this is what happens when they’re in phase
25:43which is probably a very rare situation but here’s what happens when they’re out of phase
25:48okay the same applies here so you get no plus pulses so it’s only on this one special situation where you
25:55could get some very high energy pulses
Transcript of Fiber Laser Machine – Bubble Marking Clear Acrylic (Cont…)
26:00now this is the only thing that i can think of that fits the random sparkle
26:09that we’ve got in our material so we know at this point here
26:14we’ve got relatively low energy density we’re not able to do a lot of damage and
26:20it’s only when we start compressing the waves together that we increase the intensity of the light
26:26we’re not absolutely we’re not changing the amplitude of the light we’re just changing the the density of
26:32the closeness of the waves effectively putting more energy into one specific point more
26:39intensity so if we want to detune the intensity at this point here we’ve
26:47got several ways of doing it one of them is to change the amplitude of these waves and we do that
26:53with the power so we can reduce the power which means we get smaller waves which
26:58means we should get less big pulses because they won’t double up as much
27:04so that’s one way that we can decrease the power the other way that we can decrease the power is to defocus
27:12in other words we can move a long way above or a long way below the focal point and then we shall finish up with if you
27:19like waves like this where they’re quite a long way apart and they’re not going to interfere with each other and even if they interfere with each other
27:25they’re so weak at that point because they’re not crushed together that they won’t actually do any damage
27:32that we cannot get any high spikes of energy we’re going to go back to the machine if we can find
27:38the the point at which we get the maximum density of this interface
27:44the maximum density of our bubbles in the center of the material okay we
27:50should be able to detune with reducing the power
27:56to make the bubbles less so we leave the focus as it is and we
Transcript of Fiber Laser Machine – Bubble Marking Clear Acrylic (Cont…)
28:01should be able to tune tune the bubbles out we should be able to lift the focus up and lift the focus
28:09down and bring this point closer and further away from the top or the bottom of the material
28:15it’s the only mechanism that i can envisage which will excite the molecules within
28:21the material when light collides normally it’s the surface atoms and molecules
28:26that get vibrated to a higher temperature well here we’re not vibrating surface
28:32molecules to a higher temperature we’re vibrating molecules within the structure
28:37to a higher temperature so something very strange is taking place to cause little pulses
28:43of energy within the material itself to vibrate the molecules up to a high enough level
28:50where they vaporize and even within the vapor we might even be burning the vapor and
28:57turning it into a carbonyl type material it’s a fascinating idea i’ve looked around a
29:03lot and i can find nothing by way of research to explain what’s going on i’ve got a one
29:11inch block of acrylic and i’m going to stand it on edge this time so that we can see the
29:17penetration into the material rather that try and guess what’s happening through the thickness of the material
29:28you can immediately see that actually
29:40it looks as though the densest part of that is probably around about
29:45three or four millimeters down into the material so perhaps the first thing i should do
29:52is raise the height from 25 to 28 millimeters in other words i’ll lift the focus
29:58three millimeters out of the material to see whether or not it’ll drag the pattern upwards
Transcript of Fiber Laser Machine – Bubble Marking Clear Acrylic (Cont…)
30:05this one is a frequency of 75 with a 45 nanosecond pulse
30:10we’re using 100 power at 1500 millimeters a second and we’re now three millimeters above
30:18the work with the focal point [Music]
30:28and it actually looks quite nice on the surface as well doesn’t it
30:34so now i’ll go the other way and we’ll go three millimeters into the material
30:50and yes yes yes as you can see we’ve dropped it down into the material
30:57there’s no doubt it’s focus related so the one at the bottom was three
31:03millimeters high and the one at the top here is three millimeters low so this time we’ll have a go at reducing
31:11the power we’ve got a fixed pulse width of 45
31:16and the last time we did this we had just a little bit of crackle and pop on the surface
31:22so we reduce the power now to 80 percent it should reduce the density of the
31:28bubble it should reduce the density of the bubbles and also the risk of it going snap
31:34crackle and pop [Music]
31:43well that’s pretty amazing isn’t it for just a small change of power 20 percent
31:51[Applause] we’ve virtually lost it [Music]
31:57we’ll put the power back up to a hundred percent
Transcript of Fiber Laser Machine – Bubble Marking Clear Acrylic (Cont…)
32:04running slower puts more pulses into the job so let’s reduce it from fifteen hundred
32:10to a thousand and now we probably will expect to find
32:16more bubbles or more sheer planes and more crackling and popping
32:32well we’re running slower and it probably looks as though we’ve got a greater density
32:37without actually causing too much more physical damage yeah
32:44i mean it’s down below the surface
32:52[Music] so let’s leave it at a thousand and raise the part height again in other
32:57words we’ll take it three millimeters out above the surface to try and bring the pattern right back
33:04onto the surface
33:14[Music] now although we’ve taken it up to the surface
33:19we haven’t actually caused too much more damage in fact there’s less density
33:26there which is surprising i would have thought there’d have been more density there so we get more bubbles in there by
33:34probably then closing up the gap between the lines
33:41so we’re on a thousand speed hundred percent power frequency 75 pulse width 45 and
33:48line spacing 5 microns and we got a focus height of 28
33:55three millimeters above the surface
Transcript of Fiber Laser Machine – Bubble Marking Clear Acrylic (Cont…)
34:08now we’re cooking really cooking
34:16look at all that stuff going up in the air that’s gas i presume which is igniting their vapors that are
34:23igniting we’ve just burst out the top there with melted acrylic look
34:30so now we’re at eight microns line spacing
34:36[Music]
34:47that’s not bad but we did get a bit of uh popping and crackling didn’t we i tell you what i’m going to do i’m
34:53going to push the speed from i’m going to leave it where it is 0.08 where we got our crackling and popping
34:58and we’re going to push the speed up instead to two thousand from a thousand
35:07so we’ve doubled the speed and we’ve really lost most of our bubbles so here we are with
35:1330 millimeters above which is five millimeters above the surface we’ve still got our 45
35:19nanosecond pulse 800 millimeters a second and 100 power and a 0.01 line spacing
35:38i don’t think there’s any doubt about it now something to do with the focal point but
35:44we’ve got nothing that i would consider on the fro on the top there to be text it’s not
35:49readable text it’s not sufficiently dense enough so there’s our initial
35:55settings with the focus on the surface and it clearly shows that there’s something happening
36:02what three four millimeters below the focal point that’s where all this
36:08problem is occurring it’s not occurring before the focal point
36:16and we can prove that and we’ll see what happens when we push it down to say five
36:22millimeters into the material so we’ll go down to 20
36:38millimeters
36:48[Music] okay with those self-time settings now
36:54we’ll turn the job over and we’ll see what happens at 20
37:01millimeters do we lose the pattern because the
37:07energy is being absorbed before it gets to the focal point
37:12or is it going to drop the pattern down by five millimeters theoretically this
37:19material is transparent to one micron light so dropping the beam
37:25down by five millimeters should have no effect on the beam itself
37:30and our pattern should drop down by five millimeters
37:40[Music]
37:48well it certainly looks as though it might have done we’ve got some other slightly higher
37:55density patterns starting to happen just across the top there so let’s drop
38:01it another five millimeters and see what happens so the focus is now 10 millimeters down into the material
38:19[Music] you can see where it bubbles is our bubbles
38:29now bubbles is now about there that’s pretty interesting isn’t it it’s
38:35dropped it right the way down look we’ve lost it we’re no longer at the surface
38:42roughly where my thumbnail is is where the focal point is so that’s damage
38:49above the focal point so if i lift that up by about three
38:56millimeters it should bring that bubbles back onto the surface [Music]
39:10and there we are we’ve got our bubbles virtually back onto the surface
39:15but that line is where the focal point is
39:20and i think you can see it looks as though we’ve got another
39:27pattern building below the focal point as well as the one above the focal point
39:34so when i raise the focal point up to the top on this one i’ve got my bubbles here which obviously
39:42this pattern here so whatever’s happening is above and below the focal point
39:48it’s not at the focal point it hasn’t really proved the point about
39:54the wave theory idea of superposition and the addition or the extra power
Transcript of Fiber Laser Machine – Bubble Marking Clear Acrylic (Cont…)
40:01for a material that shouldn’t mark we’ve been able to market
40:07we’ve been able to create a problem inside there and we’ve got control of it now
40:14whether this is interference caused by colliding light waves adding together to increase
40:21the power at specific spots and of course it will be totally random
40:27because every pulse will be different which is why we’ve got a range there in
40:33fact we’ve got two ranges one above and one below the focus now we push one of these down to 15
40:41and we found our bubble was sitting just across there
40:47so now the focus is only five millimeters above this base [Music]
41:02how weird how weird is that that’s not
41:10building up from the top downwards all of a sudden is building up from the bottom upwards
41:18how’s that is that internal reflection off the bottom face of that material
41:27[Music] i’ll tell you what i’m going to do i’m going to try
41:3325 millimeters i’m going to focus directly on this piece of paper
41:50and much as we expected originally i don’t think we’ve got anything there have we
41:56[Music] [Applause] it doesn’t look like we’ve got anything
42:02there does that mean to say the energy has gone right the way through that block
42:08with no obstruction we have a piece of stainless steel there which will mark
42:15so if the light energy is passing right through that block it will mark that stainless steel so
42:21we’re just saying change the part height to one millimeter
42:31[Music]
42:37oh we’ve got a few little sparkles in here look we’ve got a few little sparkles at the
42:42bottom and we’ve got some energy that went through [Music]
42:50but let’s just see what the energy is by running the same test again without
42:59the acrylic in the way
43:12[Music] well that is interesting isn’t it
43:19that means that acrylic is not that
43:24transparent put enough of it in the way and it will absorb the energy
43:33so therefore i think we’re beginning to prove yes that at certain focal points within the
43:41acrylic we are creating little bundles or bursts of energy
43:48that are able to damage internally the acrylic now if you make the acrylic thin enough
43:55it will pass right through but make it thick enough and it will
44:00absorb the energy now the other thing that shows clearly
44:06is that we’ve been able to produce a nice gold finish on stainless steel that’s not the first
44:11time we’ve done that is it looking through the clear face of this perspect it’s much easier
44:18to see this little universe of spiral galaxies almost
44:24look every one of these has got a little teeny weeny bubble in the center little gas bubble
44:29which has caused these to produce all these little shear planes that go in lots of different directions
44:35so there is no uniformity about these and they’re not really bubbles the light seems to be catching
44:41like the rings around saturn it’s it’s it’s the shear planes that are picking
44:46up the light and making it look like bubbles so we started off trying to mark the acrylic
44:53by a reaction a burning reaction process we failed miserably at that but
45:01succeeded at something else that we didn’t really expect to find which is this
45:06bubble effect within the acrylic so i think the proposal that i made
45:12earlier about light wave interference patterns is not disproven
45:20but it looks credible is this of any use well i think it could
45:27be of use if you’re making trophies and things you know it could be quite an interesting trophy and especially
45:33if you can edge light it it’s certainly no good for photo replication work
45:38because the dots are so randomly scattered you’ve got no control of them but for text work you could make some
45:46quite nice text trophies maybe for instance i could imagine a very nice clock made with this because the letters would
45:52stand out well especially if you edge light it i’m only here exploring what’s possible
45:58i’m not attempting to utilize this in any way at all it’s just an interesting phenomenon that we’ve
46:04discovered about acrylic i think we’ll stop there and say thank you very much for your time and your patience and um
46:10i’ll catch up with you in the next session
 Skip to content