 Skip to content
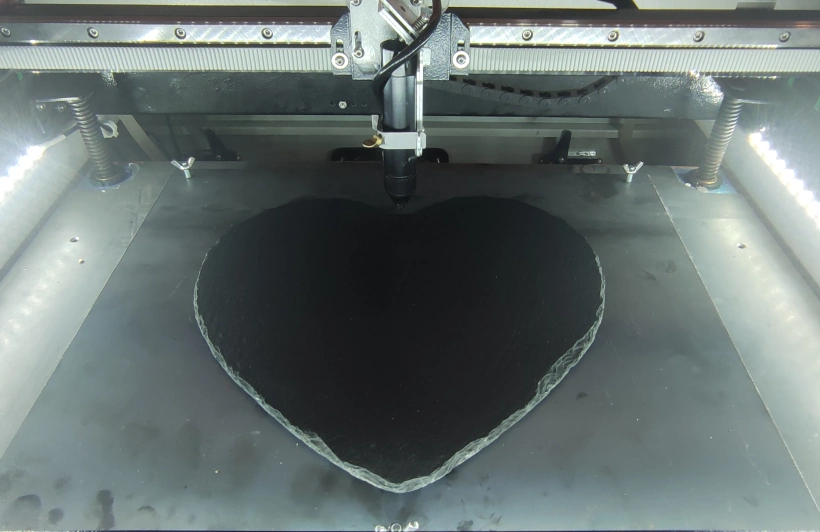
 Laser engraving is an amazing way to personalize gifts or create custom products. But for highly detailed or photo engraving, consistent focal depth is required. This is especially important when engraving natural products where the thickness of the material can fluctuate. Having an adjustable laser engraving bed or platform, will allow you to minimise any variation in the focus position across the work piece.
Why Not Just Use the Bed Supplied with Your Laser Machine?
If you have a laser machine with an adjustable height bed, it is most likely supported by 4 screw threads. On many of the Chinese manufactured laser machines, these threads are not of great quality and have not been accurately squared off against each other. This can lead to a wobble effect.
While you can level the bed off at a specific height, once you vary the height from this position the wobble in the rotation of the screw thread can cause an error. So you may find that the bed is only truly level at the adjusted position or possibly every full rotation of the threads. I actually made up a thread alignment indicator that allowed me to determine where the full rotation position was when I adjusted the height of the bed.
Check out this post and video on Setting The Work Table Level for some great hints and tips on levelling your laser bed.
Issues With Supplied Laser Beds.
Many of your laser machines will have been supplied with a honeycomb bed. These beds are not that level, as they tend to sag in the middle due to the difference in height between the honeycomb and the supported frame.
Another option supplied with laser machines are Lamella Bars. These are more suited for sheet work, and can be difficult to level as the whole frame needs to be levelled first and then you add the lamella bars themselves.
Many of the cheaper machines will be supplied with a simple thin aluminium bed, which can suffer from distortions such as bumps and dips. These make levelling of the workpiece even more difficult.
For your reference, I upgraded the supplied aluminium bed of my laser machine, with a sheet of 3.0mm thick mild steel. This proved to be flatter, more stable and assisted with air flow across the workpiece as there were no holes in the sheet. But I still needed more accuracy for photo engraving.
Desired Characteristics of an Adjustable Laser Engraving Bed
So how do we go about making an adjustable laser engraving bed? There are a few characteristics that the adjustable bed needs to make it suitable for use as a laser engraving platform:
- The bed to be perfectly flat. While you could possibly use a material that is not totally flat, you will require a larger range of adjustment to bring the workpiece level with the laser head. There is also the potential that the adjustment mechanisms can impede the movement of the laser head.
- The material used needs to be rigid enough to support the work piece without sagging.
- The material needs to be rigid enough to support the adjustment mechanisms.
- There must be no bending of the material at the adjustment area.
- If using tapped holes, the material needs to be strong enough not to strip the holes.
- The bed should not be adversely affected by moisture or heat.
- The material should not be adversely affected by accidental interaction with the laser beam.
What Material Did I Use for My Laser Engraving Bed?
I ended up using a sheet of 3.0mm thick mild steel that I had left over after upgrading the bed of my laser machine, as mentioned earlier. The sheet size was 435 x 370 mm, meaning it easily fit on my laser machine and allowed me to use the full Y-axis range of 330mm. The 435mm X-axis range would also allow for some over run when engraving at high speed.
What Other Materials Could I Have Used?
There were two alternative materials I was considering:
- Acrylic Sheet – This could have worked as it is really easy to tap 4mm acrylic. However, I only had Cast Acrylic and I know that the thickness can vary by +/- 0.5mm across a sheet. If I had a sheet of Extruded Acrylic, which has a tighter tolerance, I probably would have used it with some nylon bolts.
- Safety Glass – I had a number of small sheets of toughened safety glass that came out of an old fridge. I would have had to design and fix some adjustment brackets but that wouldn’t have been too difficult. My main concern was the possibility of impact damage and filling my laser / work area with shattered glass.
The Laser Engraving Bed Adjustment System
I chose to keep it simple an base it on a design that Russ Sadler used. Namely, just three manually adjustable M5 bolts with superglued wing nuts. Two bolts are located in the corners (15mm in) along the long side of the plate. While the remaining bolt is located at the centre of the other long side, again 15mm in from the edge.
The mild steel plate was drilled with a 4.2mm drill bit and the 3 holes were tapped with an M5 thread. The bolt head act as the base against my fixed steel bed.

How to use the Adjustable Laser Engraving Bed
Adjusting the bed is simplicity itself:
- Make sure all the adjustment bolts are roughly in mid position. This will give equal up and down adjustment.
- Place the adjustable laser engraving bed into the laser chamber and position it squarely in the centre. with the edge that has the two bolts towards the back.
- Add the product / item / sheet to be laser engraved, ensuring it is positioned within the laser machines working area and accounting for any over run that may occur with high speed engraving.
- Position the laser nozzle over the top left corner of the item and raise/lower the whole bed until the nozzle is at the correct position. I use a piece of acrylic cut to the correct focus depth as a gauge.
- Position the nozzle over the top right corner of the item and raise / lower the laser engraving bed by adjusting the right corner bolt until the acrylic gauge fits snugly. The bed is now level left to right.
- Move the laser nozzle to the bottom centre of the item and adjust the bottom centre bolt until the acrylic gauge fits snugly. The bed is now level back to front. That’s it!
A Safety Glass Laser Engraving Bed
I wasn’t planning to make one of these, but I did want to design an adjustment bracket…. So why not check if it worked! The Safety glass is 365 x 595 x 4mm in size so it was just a little too long to squeeze into the laser chamber. But I could at least prove the process. I have some 4mm thick clear acrylic so that’s what I decided to make the brackets from.
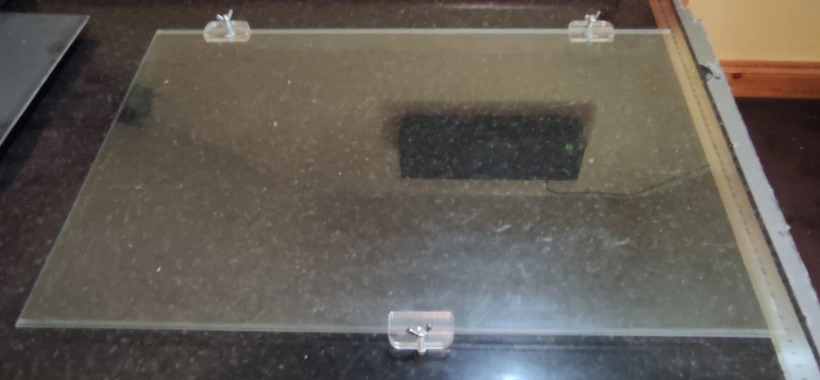

The Brackets were 50 x 25mm in size, with a 4.2mm hole. One of the smaller components were sandwiched between two of the larger components, using a 4.3mm drill bit to align the parts. The parts were then glued together using a WC123 PETG Weld Cement. Each hole was then tapped to M5. I realised that 12mm of tapped hole was going to give too much friction, so I opened up the tap each side with a 5mm drill bit and added a little mineral oil.
You can download the Lightburn File for this adjustment bracket here.
The three brackets fitted so snugly they did not even need to be glued.
What Next?
Did you enjoy this post? Why not check out some of our other posts:
Disclaimer
Last updated April 25, 2024
WEBSITE DISCLAIMER
The information provided by n-Deavor Limited, trading as Laseruser.com (“we,” “us” , or “our”) on (the “Site”) is for general informational purposes only. All information on the Site is provided in good faith, however we make no representation or warranty of any kind, express or implied, regarding the accuracy, adequacy, validity, reliability, availability or completeness of any information on the Site.
UNDER NO CIRCUMSTANCE SHALL WE HAVE ANY LIABILITY TO YOU FOR ANY LOSS OR DAMAGE OF ANY KIND INCURRED AS A RESULT OF THE USE OF THE SITE OR RELIANCE ON ANY INFORMATION PROVIDED ON THE SITE. YOUR USE OF THE SITE AND YOUR RELIANCE ON ANY INFORMATION ON THE SITE IS SOLELY AT YOUR OWN RISK.
EXTERNAL LINKS DISCLAIMER
The Site may contain (or you may be sent through the Site) links to other websites or content belonging to or originating from third parties or links to websites and features in banners or other advertising. Such external links are not investigated, monitored, or checked for accuracy, adequacy, validity, reliability, availability or completeness by us.
WE DO NOT WARRANT, ENDORSE, GUARANTEE, OR ASSUME RESPONSIBILITY FOR THE ACCURACY OR RELIABILITY OF ANY INFORMATION OFFERED BY THIRD-PARTY WEBSITES LINKED THROUGH THE SITE OR ANY WEBSITE OR FEATURE LINKED IN ANY BANNER OR OTHER ADVERTISING.
WE WILL NOT BE A PARTY TO OR IN ANY WAY BE RESPONSIBLE FOR MONITORING ANY TRANSACTION BETWEEN YOU AND THIRD-PARTY PROVIDERS OF PRODUCTS OR SERVICES.
AFFILIATES DISCLAIMER
The Site may contain links to affiliate websites, and we receive an affiliate commission for any purchases made by you on the affiliate website using such links. Our affiliates include the following:
- makeCNC who provide Downloadable Patterns, Software, Hardware and other content for Laser Cutters, CNC Routers, Plasma, WaterJets, CNC Milling Machines, and other Robotic Tools. They also provide Pattern Files in PDF format for Scroll Saw Users. They are known for their Friendly and Efficient Customer Service and have a comprehensive back catalogue as well as continually providing New Patterns and Content.
- Cloudray Laser: a world-leading laser parts and solutions provider, has established a whole series of laser product lines, range from CO2 engraving & cutting machine parts, fiber cutting machine parts and laser marking machine parts.
