 Skip to content
 The Lightblade Learning Lab with Russ Sadler
The Lightblade Learning Lab is a series of videos that Russ did for Thinklaser Limited based on using the Lightblade 4060 Laser Cutting and Engraving Machine. Thinklasers Lightblade 4060 has a 400 x 600mm bed size and was supplied with a 60W EFR laser tube. In this video, Russ gives an RDWorks Software Tutorial and shows you how to get started with your first laser cutting program.
Contents for Our First Program- RDWorks Software Tutorial
- This video uses the Beam Target as an example. (See Video 12 for additional notes on this design)
- Working with vector files, e.g. DXF, AI, etc.
- Importing a vector file
- Placing parts onto layers
- Setting speeds and power
- Checking and setting the air assist
- Cutting mode: Pen, dot, Cut and Scan
- Power and how much to use
- Cutting order of layers
- Preview (of cut)
- Path optimise
- Save As and saving ‘U’ files
- Cutting speeds
- Start-up procedure
- Vendor setting for Z direction
- Frame and Origin functions
- Cutting from file on a USB stick
- Extruded versus Cast acrylic
- Changing the power setting on a job
- The properties of different papers
- Assembling an acrylic model
- PETG and Acrylic Weld cement
My thanks go out to Tom at Thinklaser for giving permission to embed these videos on this site. If you are looking for a new laser machine from a quality supplier, then I would suggest you check out their website: www.thinklaser.com.
Video Resource Files for Our First Program- RDWorks Software Tutorial
Align Kit for Beam
There are no more resource files associated with this video.
External Resource Links for Our First Program- RDWorks Software Tutorial
https://laseruser.com/lightblade-learning-lab-12
There are no more external resource links associated with this video.
Transcript For This RDWorks Software Tutorial
Our First Program
Use the search function at the top of the page to find specific sections of interest.
00:09
welcome to this session of lightblade
00:15
learning lab. Now we’ve already tackled
00:18
all the main tools umm but to be honest
00:23
today we’re not going to really be using
00:25
many of those toolsl because we’re not
00:27
going to do any drawing here in RDWorks
00:31
as i mentioned to you before this is not
00:34
a CAD program this is an interface
00:36
program and any photographs or bitmaps
00:39
that you need to prepare you should do
00:42
that outside this program and import
00:44
them as bitmaps or pings or something
00:46
like that
00:47
today we’re going to work with vector
00:50
files now most of my work is done in a
00:53
CAD system where I export as dxf that’s
00:58
just because I’ve got an engineering
01:00
background I’m not an artist if I was an
01:02
artist i would be working probably in
01:05
adobe illustrator or something like that
01:06
but this system also handles adobe
01:11
illustrator files which affect the
01:12
drawing files so I’ve already prepared
01:14
some files and today i’m going to import
01:18
them because we can’t open them because
01:22
they’re not in this system already in
01:24
the right format so if you want to bring
01:26
files in from external system you always
01:29
import them and i’m going to be
01:32
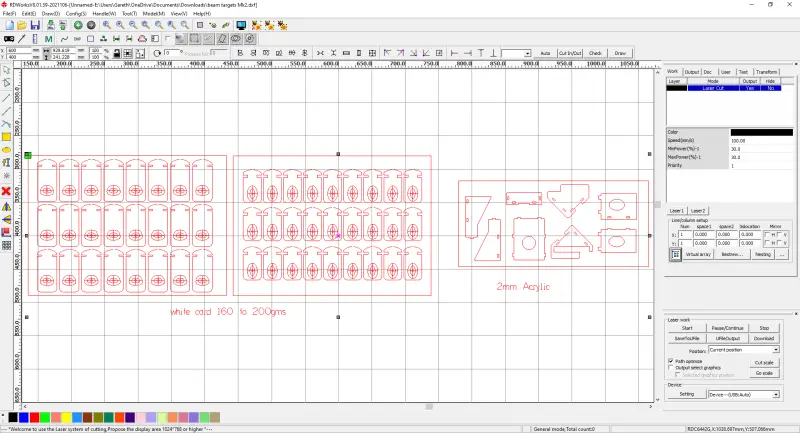
importing this thing called beam target
01:35
now it’s imported full-size but it’s
01:39
not necessarily the page size if we look
01:41
at the table there we can see we can see
01:43
these items on the table now we can see
01:46
from this look we’ve got two millimeter
01:48
critic that were using for these parts
01:50
and yet we’re using white card for these
01:53
parts now we can’t cut those both
01:55
together so although I’ve got them on
01:58
the same dxf file what would have to
01:59
happen we shall have to import the same
Transcript For This RDWorks Software Tutorial (Cont….)
02:01
dxf file twice the first time we’re
02:04
going to import it we’re going to be
02:06
ruthless and we’re gonna delete that
02:10
section we don’t want the text so we’re
02:13
going to delete that we’ve got to
02:16
remember that it’s two millimeter
02:17
acrylic and to be honest what that is
02:20
that is a frame of the piece of material
02:23
that I’m going to use to cut these items
02:26
from now going to move this job into the
02:28
middle of the screen but of course that
02:30
isn’t necessarily where we’re going to
02:31
put it on the table when we actually cut
02:34
it this is just convenience for drawing
02:37
and programming purposes now the bits
02:43
that we want these bits in the middle
02:45
here the background the outside which
02:48
I’ve just highlighted is in rate and
02:53
I could possibly put that onto a
02:56
different layer and for convenience
02:59
purposes i will do that at the moment
03:01
normally I would just delete it because
03:03
it’s not necessary but I want to show
03:05
you another feature function here while
03:07
we’re programming so I popped onto a
03:10
blue layer at the moment and that blue
03:14
layer I’m going to put it up here and
03:17
we’re going to have a double clicked on
03:19
that blue layer to open up this
03:21
parameter window and it says is output
03:25
yes or what no well if I want an output
03:31
and I want this to cut then I would have
03:33
to say yes but because this is the
03:36
outside shape of the material that i’m
03:38
going to be using I don’t want it to cut
03:41
so in this particular instance I would
03:43
answer that question
03:45
no and now everything else down here is
03:50
just unimportant because I’ve said I
03:52
don’t want an output so you can hide
03:54
certain parts of the program if you wish
03:56
by putting them on a different layer and
03:58
then using this function here is output
Transcript For This RDWorks Software Tutorial (Cont….)
04:01
so we’re happy with that so we say ok
04:05
and now we’ll go to the black layer
04:07
double click on it and it will open up
04:10
the parameter window
04:13
okay now this is where we really started
04:16
programming we’ve got to decide what
04:20
speed and feed we’re going to cut these
04:22
parts out from now there’s two
04:23
millimeter acrylic now I’ve got 18
04:26
months of experience of cutting these
04:28
materials but it is on a different
04:29
machine with a different lens and that
04:32
makes a big difference and i will
04:34
explain that to you later on in the
04:35
series so for the moment just go with me
04:39
I think I’m probably going to have to
04:41
use around about 20 millimeters a second
04:44
i might be able to get away with 25 I
04:47
can’t say because I don’t know what
04:49
lenses in this machine so the next
04:53
question the first question there was is
04:55
this output
04:56
well we’ve already seen that yes we do
04:58
need to cut so we’ve got definitely got
05:00
to answer that question yes
05:02
now there’s a question here which says
05:03
is it says if blowing yes or no
05:08
well it’s a bit of a silly question and
05:11
it’s a bit of a super first question in
05:13
a way because this is blowing or if
05:16
blowing yes or no is all to do with the
05:19
air assist now if you remember when we
05:24
did our introduction i said to you
05:26
please please please do not turn your
05:29
air assist off make sure that your air
05:32
assistance on every time you are doing
05:34
cutting and that’s because we don’t want
05:36
the smoke to go up in the lens and
05:38
disrupt the efficiency of the lens we
05:43
have the option here to turn this off
05:45
with a solenoid in the Machine and that
05:47
solenoid is not in my machine and it’s
05:49
unlikely to be in your machine either
05:50
because I don’t think think later would
05:53
put that function in here so instead of
05:56
blowing read era cyst and generally
05:59
leave the air assist on
Transcript For This RDWorks Software Tutorial (Cont….)
06:03
I would never advise you to turn it off
06:05
now we’re going to go down here to the
06:08
cutting processing mode i’m not going to
06:12
go into this involved window here then
06:14
we’ll just keep it simple and we’ve got
06:18
several options in here we’ve got Penn
06:20
dot cut and scan or scanning is for
06:24
engraving and for bitmaps dotting is for
06:28
some rather interesting cutting
06:31
facilities and pen
06:33
I’m honest I’ve got a clue but we should
06:37
find out before we get down to teach you
06:39
about that so we’re going to use cut
06:43
because that’s what we want to do cut
06:44
these parts power
06:47
well I’ve used a fairly fairly high
06:50
speed here because i’m anticipating
06:53
using a fairly high power now i’m going
06:56
to be using 65-percent and sixty-five
07:00
percent now first of all when you cut
07:04
things in general you always use the
07:07
same max or the same mean and a max
07:10
power there are exceptions but i’m not
07:15
going to cover those at the moment we’ll
07:16
keep it simple
07:18
sixty-five percent is maximum power but
07:23
I can hear you asking but the Machine
07:24
goes up to a hundred percent why can’t i
07:26
use a hundred percent you may remember
07:29
back to the first session as well are
07:31
highlighted you have an ammeter on the
07:33
machine and the ammeter basically gives
07:37
you an idea of what power you’re putting
07:39
through your laser tube now we’ll go and
07:41
explain a lot more about the laser tube
07:43
in another session but at the moment
07:45
just trust me that 65-percent is
07:49
probably the maximum power that i can
07:51
use and at that point in time I would
07:54
have reached the 22 milliamp limit for
07:58
the tube i mentioned to you before don’t
Transcript For This RDWorks Software Tutorial (Cont….)
08:01
take the default if for any reason we
08:05
get down here and we find this through
08:07
powers ticked on ticket we don’t need it
08:11
so what we set on there we’ve answered a
08:14
few simple questions and we said okay
08:18
now you might not believe it but we’ve
08:20
virtually programmed the job
08:24
the only thing that we haven’t
08:26
programmed is the order in which we want
08:29
these things to be cut there are many
08:31
ways of ordering things on this
08:34
particular piece of software one of the
08:38
ways in which you can order them as you
08:40
come up here to this layer and you can
08:42
swap the layers over so look I pulled
08:45
the black up all the black layer
08:46
underneath then there is no preferential
08:49
treatment therefore these layers what
08:51
will happen is the blue light will cut
08:52
first and then the backlight will cut
08:54
second if the black client had scan on
08:58
it regardless of whether the blue layer
09:00
is a cut the black layer will be cut
09:03
first because it’s a scan layer and
09:05
scans always take precedence over cuts
09:08
the layer order is absolutely used if
09:11
you’ve got scanning taking place but
09:13
because we only get two cuts they’re
09:15
technically the blue liar if it was a
09:17
cutting layer would cut first
09:19
because it’s not cutting it doesn’t
09:21
matter i want to go to handle and we’re
09:25
going to open handle up and I want you
09:28
to come down here to cut optimized and
09:33
there’s a little window here which we
09:36
could take order of layer i mentioned
09:39
that just now we don’t want order of
09:41
layer we could have it so that the parts
09:45
cut from the inside to the outside
09:48
hey now that makes sense because we do
09:51
want the holes cut before we on the
09:53
outside cut only the on for a minute
09:57
because i want to show you something
09:58
else start point optimized doesn’t
Transcript For This RDWorks Software Tutorial (Cont….)
10:00
matter whether that’s on off this block
10:06
handle and I cannot see question because
10:10
I’ve got no idea what it is and then we
10:14
get these directions which allows us to
10:17
cut up from bottom to up left to right
10:21
right to left different ways of
10:24
processing job I tell you what let’s do
10:26
bottom to jump
10:29
so we’ve made the selection at the
10:31
moment and I’ve done nothing to these
10:33
parts would you like to have a preview
10:36
of how these parts are going to be cut
10:40
let’s do that up at the top here we’ve
10:43
got a little television screen and if i
10:45
click that preview screen we’ve got
10:49
something here called a simulation know
10:51
what i would do is i would put these
10:52
sliders down in the first instance
10:54
towards the bottom maybe not very far
10:57
down the top 10 i would put that
10:59
probably about halfway along and the
11:01
bottom one I take it towards the start
11:05
otherwise things will happen very
11:06
quickly so we’re going to do a
11:08
simulation and let’s have a look what
11:10
this simulation does press the simulate
11:13
button and then move your move across to
11:16
the slider so that you can change the
11:18
speed
11:23
now look at the Blue Cross going down
11:26
from the right-hand side there and it’s
11:30
cutting the inside and now it’s doing
11:32
the outside we could speed it up a
11:34
little bit and it’s doing the holes on
11:37
the inside and is doing the outside
11:39
holes on the inside and then the outside
11:44
so everything’s working well
Transcript For This RDWorks Software Tutorial (Cont….)
12:02
and there we go
12:04
we’ve just proved that this job will run
12:07
perfectly and I’ve had to do no more
12:10
programming than that so i can close
12:11
this down with those settings which are
12:14
not my favorite settings but with those
12:16
settings and you would notice that it
12:19
started from the bottom and worked its
12:21
way along and up and it worked from the
12:23
inside and did the outside second on
12:26
every one of these parts
12:28
that’s almost as difficult as it gets to
12:32
program these simple parts the programs
12:34
written the only thing that we haven’t
12:36
done now is to get it into the Machine I
12:40
need to plug in a memory state to this
12:41
pc which I’ve just done we need to come
12:45
down here as i mentioned before and
12:47
check that the device is on USB
12:50
automatic the one thing that we don’t
12:53
want on is something down here which
12:55
could be on tipped pass optimized leave
12:58
the path optimized off my advice and
13:02
then this position here leave the
13:04
current position on don’t choose another
13:07
one and then we’re going to save this
13:11
the two things that you could do now the
13:13
first thing is if you like to use this
13:15
file again which is possible we need to
13:19
save it so we can save as
13:23
now you’ll note that down here it says
13:25
it’s an rld file now in rld file is
13:29
something you can save and you can open
13:31
again and again and again the file will
13:36
be saved with all these parameters the
13:38
cut parameters and so it’s a
13:41
preservation of exactly all the work
13:43
that you’ve done so i’m going to call
13:46
this beam targets
13:52
and now i’m going to come down here to
13:55
the save you file button to my removable
Transcript For This RDWorks Software Tutorial (Cont….)
14:00
disk and we’ll save it as the same again
14:05
head2 they are good and that happy sign
14:13
there i think i might have mentioned to
14:15
you before and Chinese that stands for
14:19
have a nice day ok now we need to tackle
14:24
the other item on this project we will
14:28
import the dxf file again and this time
14:33
we will be brutal and we would delete
14:36
this part of the children
14:39
and then we’ll take the top now just
14:41
remember that this is not a correct is
14:44
white card now before we delete the
14:47
border I just want you to note how
14:49
relatively tight
14:51
the job is to the material that’s
14:53
available i should mention that again
14:55
when we come to set the job up on the
14:57
machine just move this to a slightly
14:59
more central position and I said it’s
15:02
for no particular reason other than just
15:04
visual appearance and convenience
15:07
it’s got nothing to do with how we going
15:09
to set up on the machine itself here
15:13
we’ve got some lightweight card targets
15:15
that we should be firing the laser beam
15:17
at their couple of things I want you to
15:19
note about this design first of all
15:23
everything has got round corners on it
15:27
on this target
15:28
although these are ellipses for very
15:32
good reason i will explain that later on
15:35
they’re not round targets even though
15:36
the mirrors around the targets are not
15:38
round when it comes to writing the
15:41
programs we trying to achieve burn lines
15:43
only scorch lines on the surface of the
15:45
material and then we’re trying to cut
15:47
around the outside shape the outside
15:49
shape if we look carefully right at the
15:51
very top here you’ll see that it’s not
15:53
complete the line does not go all the
15:56
way around that’s purposely done so that
Transcript For This RDWorks Software Tutorial (Cont….)
15:58
these pieces stay attached to the sheet
16:01
of paper they remain in there so that
16:03
you can pull them off as you need them
16:05
so how we going to achieve these two
16:07
different power levels one for cutting
16:09
and 14 scorching the simple way is to
16:12
put the mounted two different layers so
16:14
what I’m going to do is put a marquee
16:16
and watch carefully what I’m doing with
16:18
this marquee I’m just covering all the
16:21
targets on line one
16:24
and I’m not going to let the Marquis go
16:27
you’ll notice all the targets of turned
16:30
rate I didn’t turn the outside shapes
16:33
read because the Marquis only covered
16:35
part of the shape the outside shape to
16:38
collect the shape you need to cover it
16:40
completely
16:42
ok so we’ve collected all that line of
16:44
targets what I’m now going to do is to
16:47
hold the shift key down and I’m now
16:50
going to collect the second line of
16:51
targets you’ll notice that they joined
16:56
the first line of targets now still got
16:58
my shift key held down and I’m going to
17:01
do the same thing with the third line of
17:03
targets
17:04
ok so now I’ve actually highlighted
17:07
collected whatever term you want all the
17:11
targets now I’m going to come down to
17:13
the bottom here and i’m going to click
17:14
the blue layer and watch what happens
17:17
first of all your note up here that
17:19
we’ve created a blue layer the top
17:20
right-hand corner so what I’m going to
17:23
do a double click on that blue layer
17:24
click and that will open up the cutting
17:28
parameters when I said cutting
17:30
parameters in this case they’re going to
17:32
be scorching parameters
17:33
it’s a bit of a difficult decision as to
17:36
what speed we should run at because I
17:38
could put 500 millimeters a second in
17:41
there but it wouldn’t change the speed
17:43
of the head now let me just give you a
17:45
little explanation that might help i own
17:48
a Ferrari i wish i did and and I live on
17:52
a block that is about 200 meters square
17:55
and I’d like to go racing around the
17:59
block every time I come to a corner i
Transcript For This RDWorks Software Tutorial (Cont….)
18:01
had to put the brakes on slow right down
18:03
and go around the corner then I could
18:05
put my foot down likely accelerate like
18:07
billy-o and off I go again but no sooner
18:11
had got up to about 50 miles an hour and
18:12
I’ve got to put the brakes on for the
18:14
next corner so only a hundred fifty
18:16
miles an hour
18:17
Ferrari has no benefit to me as i’m
18:21
racing around this very very small sharp
18:23
corner block
18:25
now things would be slightly better if i
18:29
lived on a 200-meter circular block
18:32
because at least I could get up to speed
18:34
and I wouldn’t have to keep slowing down
18:36
every time I got to a corner so that’s
18:41
the basic analogy that I want you to
18:42
remember when you’re doing laser cutting
18:44
every time you get to a sharp corner
18:47
the machine has to slow down stop and
18:51
change direction if you put radius
18:54
corners on your design wherever you can
18:56
and it’s not always practical then the
18:59
laser will release it will move smoothly
19:02
around the corner without slowing down
19:04
as much so that’s a very simple design
19:07
principle which I’d like you to
19:08
understand from the start and hence the
19:10
reason why I’ve got round corners on all
19:12
these targets
19:13
I don’t want the beam to slow down and
19:15
burn through in places i want the speed
19:17
to be kept as high as I possibly can
19:20
running it 500 millimeters a second is a
19:22
waste of effort because it just is never
19:24
going to get to 500 millimeters a second
19:26
so I’m choosing a number of 200 and I
19:28
think that will be fast enough to 22 not
19:31
to burn through well the first question
19:33
is always is output well yes we want
19:36
some output and so we’ve set the speed
19:38
now we go into these if blowing will
19:40
ignore that because that should be set
19:41
to yes processing mode
19:43
well we’ve got two choices we can either
19:46
scan or cut we don’t want to scan that
19:49
because i will show you how a port scan
19:52
is doing that particular job in later
19:55
episodes this is what we need to do we
19:57
need to have it on a cut
19:59
bear in mind we’re trying to only
Transcript For This RDWorks Software Tutorial (Cont….)
20:00
scratched the surface we need to have
20:03
the power as low as we can possibly get
20:05
it now I don’t know
20:07
on this particular 60 watt tube what the
20:09
minimum power is I can use in 0% because
20:13
if 0% is programmed in the later won’t
20:16
fire at all the later probably won’t
20:18
fire until about maybe a
20:20
nine ten percent somewhere in that sort
20:24
of region so i’m going to set the power
20:26
down to about ten percent and we’ll see
20:30
whether or not that’s enough we can
20:32
always edit these values on the machine
20:34
and we’ll go through that if we need to
20:37
so i’m going to set my max and min power
20:39
to ten percent later through mode is one
20:43
ticked and that’s it
20:45
we’ve only got two parameters to really
20:47
set speed and power
20:49
ok now we’ve got to work out how we’re
20:51
going to cut the outside shape and to do
20:53
that we’re gonna have to bring up double
20:55
click click the back liar again is
20:58
output this question is really asking do
21:00
you want me to include this item when i
21:02
write a program the answer is yes we do
21:05
want in the program speed
21:07
I think I’ll go for something like about
21:09
80 millimeters a second and i’m going to
21:12
probably use a power of maybe 20
21:15
possibly 25-percent there’s not it’s not
21:19
an exact science so what we got to do
21:21
now is make sure we get these things in
21:23
the right order
21:24
we want to make sure that we scorch the
21:25
target’s first and then week at the
21:27
outside shapes second now I’m going to
21:30
take you back up here to the handles and
21:35
we going to go to this cut optimized
21:38
now we’re going to have to adopt a
21:41
slightly different strategy this time
21:42
there are different ways in which we
21:44
could tackle this problem how we’re
21:46
going to cut these but let’s stay with
21:48
the cut optimized handle facilities at
21:50
the moment and this time we’re going to
21:52
use the order property we can take this
21:56
inside the outside because we’ve got two
21:59
different powers that we are using if we
Transcript For This RDWorks Software Tutorial (Cont….)
22:02
use the layer order we could ask for all
22:06
the blue layer to be done first and then
22:08
for the black layer to be cut afterwards
22:11
and that’s the sensible thing to do it
22:14
doesn’t really matter how we have this
22:16
set with we run top to bottom left to
22:18
right up to down it really just doesn’t
22:21
matter and then again the start position
22:23
to start point optimized doesn’t really
22:26
matter either but we’ll leave it ticked
22:27
we’ve decided to go for order of layer
22:31
ok and now we’ve got to look up here at
22:35
the black and the blue layer now i
22:38
mentioned to you before that the order
22:41
of these layers is the order in which
22:43
they will be cut
22:45
especially now that we’ve chosen the
22:47
layer order as the option cutting option
22:49
so we don’t want the outside cut first
22:53
we want the target to be scorched first
22:55
so we need to click on the black layer
22:59
and drag down below the blue layer so we
23:03
promote the blue layer to the top of the
23:04
list so that it will cut first and we
23:07
can check what’s happening by going up
23:09
here to the little preview screen
23:11
now my first question is why don’t we
23:15
have the targets on here
23:17
well let’s go back and have a look let’s
23:22
check the blue layer is output no yes it
23:27
is
23:29
ok
23:31
now we fix the problem let’s go and have
23:33
a look
23:36
and there we go so you can see how
23:39
useful this preview feature is and we do
23:43
the simulation and know what we’ve got
23:46
it running we can start to speed up to
23:47
see where it’s going watch the Blue
23:49
Cross going down to the bottom left-hand
23:50
corner and there we go look at is
23:53
creating all across this week speed it
23:55
up now quite considerably and is doing
23:59
all the targets and now we’re slow it
Transcript For This RDWorks Software Tutorial (Cont….)
24:01
down again and if we watch again for the
24:05
bottom right-hand corner it’s busy
24:07
cutting the targets out so we’ll just
24:10
want the simulation up again speed it
24:12
all up
24:19
there we go hundred percent success and
24:22
now all we’ve got to do is first of all
24:24
we’ve got to save this to a file which
24:26
i’m not going to do because you’ve
24:27
already seen me do that and then we’ve
24:29
got to save it to a you file again I’m
24:32
not going to demonstrate that because
24:33
you see me doing it so we’ll finish up
24:35
at the machine to see if we can start
24:38
cutting these items so here’s the piece
24:41
of material parts from now they probably
24:45
just about enough material to the job so
24:47
i don’t really want to experiment with
24:49
that I have a piece of material here at
24:53
the same time which i’ve used for
24:54
another purpose and into the machine
24:58
here i have put already a 40-millimeter
25:02
test square which i’m going to use to
25:05
get checked the cutting parameters
25:07
before we start doing the real job
25:10
ok so we’ve got our 40 millimeter square
25:13
and in-memory already so I’ll just press
25:17
enter and you’ll note here that the
25:22
moment I’ve got the speed set to 20
25:24
millimeters a second 65-percent power
25:27
now that will be my first attempt
25:29
now i’m going to drag the hay very
25:32
slightly towards zero not that 40
25:36
millimeter square is going to worry me
25:38
we’re now going to show you the startup
25:40
procedure using the autofocus which
25:42
should automatically set the focus of
25:43
whatever lens I’ve got in here to the
25:46
right position
25:47
first of all we need to press the suzuki
25:49
and that gives us all these options down
25:52
here now right at the bottom of the list
25:55
we’ve got auto focus now sorry before we start
Transcript For This RDWorks Software Tutorial (Cont….)
25:59
what I’ve got is something there called
26:01
as it move at the top you would
26:04
naturally think that if you want the
26:05
table to go up and down you would press
26:07
the up key to send it up and the down
26:10
key to send it down
26:11
no it doesn’t work like that
26:13
because as you can see the up key in the
26:15
down key rotating around the menu
26:19
let’s get back to the move to get the
26:21
table to drop down you’ll need to press
26:24
the left hand arrow key and if we just
26:27
watch with the left hand arrow key
26:29
buying what
26:32
that’s a little bit strange they seem to
26:33
be the wrong way around intuitively I
26:35
would have thought the left is a minus
26:37
key and the right there is a plus key
26:39
doesn’t do that or an interesting point
26:41
so we’re doing the table down and we can
26:45
drive it up and down manually now we’re
26:47
well clear of the the nozzle plenty room
26:50
underneath there
26:51
so now what we’re going to do is use
26:52
these down arrow keys to get to write
26:55
the bottom of the list there there’s
26:56
something called autofocus ok i’m now
26:59
going to press the enter button and
27:01
we’ll see your to focus working touches
27:07
the switch stops
27:09
backs off
27:11
that it carries forward again
27:20
manufacturer up a little bit more
27:23
and that’s the correct autofocus
27:26
position the autofocus switch is
27:29
actually about six millimeters above the
27:31
surface so we’re ready to run my 40
27:33
millimeter test square now i can either
27:36
drive to hate around or in this
27:37
particular instance because I’ve got
27:39
because I’ve got the cover open i can
27:41
actually set my material where I wanted
27:43
to be no remember and I keep stressing
27:46
this point that we’re working from this
27:48
top left-hand corner here and we should
27:51
draw a 40 mile square out here so just
27:55
to prove the point more than anything
27:56
else what I’ll do I’ll put my material
27:58
on that corner there right now I could
Transcript For This RDWorks Software Tutorial (Cont….)
28:03
have driven the mature i could have
28:04
driven the hate to that corner but I’ve
28:06
moved the material to that corner so let
28:09
me know press something on the machine
28:11
called the frame button and what it will
28:13
do it will just tell me where the hate
28:15
is going to move
28:18
yeah well just went away because i
28:22
forgot to set the origin point so let me
28:25
drive it back again to get that point
28:28
just there
28:31
and now I’ll press the origin button and
28:34
do it properly now we’ll press frame and
28:39
there we go there’s my 40 millimeter
28:40
square the sort of things i do
28:44
instinctively have got to come to you
28:46
slowly so the first thing you need to
28:49
just think about is how i got my air
28:51
assist on
28:52
yes is everything clear yes whatever
28:56
what am I missing
28:58
well there is one big thing that are
29:00
missing and that’s the extract system
29:07
but he got very protective
29:17
that did I cut through
29:19
yes I did
29:22
this frame is here this aluminium frame
29:25
is reasonable point i can actually use
29:29
that almost like a reference square in
29:31
the corner there and to make sure that
29:34
it is square because the whole table can
29:37
move around
29:38
push it to that back corner over there
29:39
and then we should know that the frame
29:41
is square with the machine basically and
29:43
then we can slide this piece of material
29:45
into that corner there then we can drive
29:48
the head
29:50
towards the corner from the cherry
29:52
so I’ve got my memory stick plugged into
29:54
the Machine and now i’m going to press
29:56
the fire button
29:59
and that will enable me to get to the
Transcript For This RDWorks Software Tutorial (Cont….)
30:03
second menu there that’s our press this
30:05
button and we get across to the unis are
30:08
compressed the enter button
30:11
and I get you just menu and I need to
30:14
read you this to start with
30:17
and on here i should find big dog and
30:21
card talk later the two files i need to
30:24
transfer into this machine so we’ll do
30:27
that while we’re here we’re going to
30:28
head tog and move within move across
30:31
popular memory
30:35
copy successful enter
30:39
card dog
30:43
copy the memory
30:47
well being
30:50
eh
30:52
escape
30:56
okay and there’s my car targets in
30:58
machine memory
31:00
so now i’m going to go back to file its
31:03
escape back to file
31:06
and now we’re going to find
31:09
on the memory
31:12
hey talk and there is in time
31:17
and we’re ready to go
31:21
so we can know press the Go button shop
31:24
wasting materi
31:54
let’s see how well let’s cut its cut
31:58
well I should be able to just lift this
Transcript For This RDWorks Software Tutorial (Cont….)
32:00
off
32:01
well that is superb
32:04
now my fear with this honeycomb paid is
32:09
that it would mark the back of these
32:11
products let me just have a look across
32:14
this age here and we’ll see whether or
32:17
not my fears are in any way
32:22
founded well vary slightly but i don’t
32:28
think anything there’s certainly no
32:30
marks on the back of the product there
32:32
and if we look along the agent I catch
32:36
in the light right let’s just see if we
32:39
can catch in the light right yeah maybe
32:41
like that you probably just can see some
32:43
little marks on the age of the material
32:46
there where you’ve got little
32:47
reflections off the honeycomb age but if
32:51
that’s as bad as it gets
32:53
then I should be very pleased what my
32:55
concern was that it would be along the
32:57
back of the product here this particular
32:59
material is two millimeter extruded
33:02
acrylic now extruded a critic has got
33:04
slightly different cutting properties to
33:08
cast acrylic cast acrylic tends to
33:12
produce a really lovely clean eh with no
33:16
birds
33:17
this has got a protective film on it and
33:19
you still having a bit of trouble
33:20
getting the protective film off but
33:23
protective film is the thing that I
33:24
think is stopping it from being damaged
33:27
and by reflections off of this surface
33:30
and it’s done a pretty good job actually
33:33
I can’t see any i can see when I hold it
33:37
up to the light and catch the light on it
33:39
I can’t see any marks on there at all
33:43
from the honeycomb one one or two just
33:48
round here there are definite marks
33:51
around the age but that’s nothing
33:54
absolutely nothing
33:56
there’s a little sharp age all the way
33:57
around the bottom each there which
33:59
happens with too much technical birth
Transcript For This RDWorks Software Tutorial (Cont….)
34:02
which happens with extruded acrylic and
34:05
you tend not to get that with cast
34:07
acrylic
34:07
the next part of the job involves a for
34:09
white card and that’s the website that i
34:13
got it from its 300 gram craft card i
34:17
bought this card for manufacturing and
34:21
christmas cards and birthday cards and
34:23
to be honest it’s not very good for
34:24
doing that sort of work to lovely card a
34:27
lovely skip card but it’s got so much
34:29
china clay in it that it actually smokes
34:31
on the surface and it produces not very
34:34
good so i use this for all sorts of
34:36
tests work and particularly what we’re
34:38
going to use it for now which is to make
34:41
these targets so gain we can tap it up
34:43
in the corner there so we’ve got a nice
34:45
reference to work with no you don’t need
34:48
to see me loading the program again
34:49
because you’ve already seen I’ve got my
34:51
programming and road now and technically
34:53
I’m sitting right in the corner of the
34:56
shape here but first this is not two
34:58
millimeter thick material this is only
35:00
probably about half a millimeter thick
35:02
so I really want to go away and do the
35:06
autofocus again so we’ll drive ahead
35:12
adding to the work area and then we’ll
35:15
use the sig Dukey and I’ll carry out
35:18
your can focus procedure
35:22
ok
35:24
I’ve got my origin still sit in the
35:27
corner there so technically I don’t need
35:29
to go back and reset my origin so what
35:31
do I will know just do spraying test and
35:35
the first thing that should happen is
35:36
the hatred drive towards the corner to
35:39
find the origin and then it will run
35:41
around and we’ve got to check that it
35:43
doesn’t run off with the paper anywhere
35:47
little bit tight there Thank You room
35:49
there
35:50
little bit of room there so really we
35:52
can do and is tight along the back there
35:55
so what we do is drive to hate forward
35:57
slightly and in slightly too much about
Transcript For This RDWorks Software Tutorial (Cont….)
36:00
there
36:02
depress the origin button there
36:05
and then we do afraid again to check
36:07
again
36:09
that’s good that’s good
36:13
that looks very tight Medicare know so
36:17
we need to come back just a shade
36:19
like that maybe one more
36:24
right there is good origin
36:26
I’m happy with that so we’re just gonna
36:28
go for it
36:29
we’ll see what happens
36:36
you had too much outlook my tobe flowing
36:40
out
36:42
that’s not good at it
36:46
press the pause button press escape
36:48
button
36:51
disaster really let’s go and have a look
36:53
at how we can edit the program
36:54
administrator
36:56
right well we need to press the escape
36:58
button to start with I think because
37:00
we’re part way through the program let’s
37:02
just check
37:10
enter again
37:13
and one more time
37:15
and all of a sudden we get the editing
37:17
menu down here for the blue layer if you
37:22
remember the blue layer was the target
37:24
itself
37:27
so we need to edit the blue layer
37:32
you come down here to the speed and I
37:34
don’t think the speed is the issue
37:36
to be honest I think it’s really the
37:38
power now I don’t know what minimum
37:40
powers i said to you I can actually
37:42
operate this machine on let’s take it
37:45
down to as low as ordered this me is the
37:49
reason
37:52
mistake on my part somewhere 65-percent
37:56
no wonder it cut
37:58
but while we’re here we will edit his
Transcript For This RDWorks Software Tutorial (Cont….)
38:00
power down to
38:05
we’ll take it down to ten percent and
38:08
we’ll see what happens and then we press
38:10
the musée du Bac Ninh game and come
38:12
down here and we correct my obvious
38:14
mistake
38:26
ten percent
38:29
setup success in time
38:32
that makes your face
38:40
parking here
38:42
he had pc that certainties
38:52
that tells me i’m using a sony of
38:55
operations between possesses
38:59
high-frequency impacting baby
39:03
now I will explain to you in another
39:05
session what that’s all about
39:09
but it makes a lot of noise as you can
39:12
hear not bad at all
39:16
and this is why would never want to use
39:17
this metric table 2 doing card work if
39:22
we look down here you’ll see clearly
39:24
where the theme has passed over one of
39:28
these and it’s giving reflections on the
39:31
back
39:32
they’re all over the price these
39:33
reflections
39:36
for high-quality card that would be
39:39
totally unacceptable
39:41
you can probably see on the frontier
39:42
what I mean about the smoky effect this
39:45
is definitely got a brown change to it
39:47
where it’s blown out and across the
39:51
surface that’s high china clay content
39:53
in here which is blowing up if we get
39:56
the different sort of paper we won’t
39:58
have this problem and in fact what i
Transcript For This RDWorks Software Tutorial (Cont….)
40:00
would do is immediately show you the
40:02
difference between different types of
40:04
paper here we have a paper that i
40:06
absolutely loved use the card work as
40:09
you can see it’s a watercolor paper and
40:12
it comes in a thick pad of a hand roots
40:18
and it’s just got a lovely sort of a
40:20
texture on the surface now I would just
40:24
take a piece of already used
40:33
I think you can probably see that this
40:35
is a much cleaner cut there’s virtually
40:37
no drowning at all around this cut here
40:44
but this would get even better this cut
40:47
if i was to use this high-impact
40:49
engraving phase which I’ve got to
40:52
investigate to find out where it’s
40:54
limited I like to run card cutting right
40:58
at the top limit of that particular
40:59
operating phase for the tube you heard
41:03
operating here at ten percent well it
41:05
may well be that i can get it up to
41:06
maybe thirteen fourteen percent and it
41:10
will still exist in which case i can use
41:12
it for cutting as well
41:16
ok well the time has come to start doing
41:18
something with these pieces now the
41:20
thing that we got to do with these is to
41:22
assemble them and we’ve actually got to
41:24
glue them together is a blue them
41:26
together we should need a special
41:29
adhesive for bonding creek now I’ve got
41:33
the material here from a company called
41:35
bond right and it is actually petg will
41:41
cement now technically I should have a
41:45
creek world cement but I know that
41:47
petg world’s men will do the job
41:51
acrylic cement won’t won’t meet etg but
41:55
it will work the other way around for
41:57
some strange chemical reason now this
Transcript For This RDWorks Software Tutorial (Cont….)
42:00
stuff will evaporate very very quickly
42:02
so you need to make sure that you always
42:04
keep the lid on they don’t want to give
42:07
you a little bubble what I do is I just
42:10
squeeze the bottle very slowly release
42:13
it so that time suck some of the fluid
42:16
which is just like water
42:18
I think probably see I’ve only got a
42:19
very small amount in the bottom there so
42:21
we put the needle on the top there like
42:23
that and now we’re going to begin the
42:26
assembly to this four pieces to this one
42:28
and four pieces to that one
42:30
now it is actually pretty obvious how
42:32
these go together so soon as that but
42:36
now what we’ve got to do is to bond it
42:38
together the way we do that is we will
42:42
try and keep my fingers away from the
42:44
actual little 10 joints will lay this in
42:48
a horizontal plane and then I don’t know
42:51
whether we can get close enough to see
42:52
it but when i took this up very gently
42:55
the fluid that’s in here which is very
42:58
watery will just flow out and it will
43:01
actually buy a capillary action flow
43:04
into the joint there is as simple as
43:08
that it produces a really neat little
43:10
joint now going to hold that for
43:11
something like about 10 seconds 15
43:14
seconds just to get it to bond and dry
43:16
off again I’m gonna run this joe gently
43:19
turn it just turn it off horizontal and
43:22
then when the bit when it runs just go
43:24
straight
43:25
after about 15 or 20 seconds that will
43:29
have fixed now i can run along this
43:33
joint as well there and they’re now I
43:42
don’t with you could say in this line
43:44
but here’s the marks that i was talking
43:46
about on the back edge there on the h
43:48
those marks haven’t affected surface
43:50
material but they have actually just
43:52
impacted along the edge there that’s the
43:54
reflections off of the Calico section
43:57
it’s not a major issue it’s just
Transcript For This RDWorks Software Tutorial (Cont….)
44:01
interesting that I can see them
44:03
well there’s our first target holder
44:05
made and will pop out target on their
44:10
the target locates here so its reach
44:14
repeatedly sitting in the same position
44:17
so that we can fire a laser beam at it
44:19
but I’m afraid you’re gonna have to be
44:21
patient to see that because we’ve got a
44:23
few more sessions before we get to doing
44:25
anything with this this next item is an
44:29
interesting item as well now i put these
44:31
two pieces together like this and i
44:35
produced up basically what looks like a
44:37
pocket here now you would normally make
44:40
that one thick piece of material and you
44:43
would Miller pocket it or you could make
44:45
this a piece of six millimeter say a
44:48
critical five-millimeter critic and you
44:49
could try engraving a sort of a pocket
44:54
in there but it wouldn’t be all that
44:56
accurate
44:57
this is a much more accurate way of
44:59
making that pocket with two pieces but
45:02
then you have the problem of how do I
45:03
stick it together
45:05
well we have got this stuff remember but
45:09
I’m not gonna be using that for main
45:11
location what we’re using we using these
45:15
bases now these pieces if you look
45:17
carefully
45:18
we’ve got tons on the end which are
45:22
twice the thickness of the material
45:23
gonna pop those through those slots it
45:28
all locates locks together nicely along
45:31
message
45:32
captain like that run along message here
45:35
like this as quickly as that and to be
45:39
honest it’s nicely held together if I
45:41
can manipulate my hand over far enough
45:43
that i might be able to rely on his work
45:50
which will save me waiting too many
45:53
seconds now the only other thing that
45:55
we’ve got to do is this piece here is a
45:57
little but only a little bit on the
Transcript For This RDWorks Software Tutorial (Cont….)
46:00
flimsy side so what I’m going to do I’m
46:02
going to run a bead of glue along that
46:04
joint there
46:05
well that’s the end of that first
46:07
programming and production project now
46:11
these items will be used at a future
46:13
date and we’ve got a couple more that we
46:16
going to manufacture that will be used
46:18
in conjunction with these during one
46:21
long session for checking the
46:23
performance of the machine so that we
46:25
benchmarked the machine
What Next?
Did you enjoy this post? Why not check out some of our other posts:
Disclaimer
Last updated April 25, 2024
WEBSITE DISCLAIMER
The information provided by n-Deavor Limited, trading as Laseruser.com (“we,” “us” , or “our”) on (the “Site”) is for general informational purposes only. All information on the Site is provided in good faith, however we make no representation or warranty of any kind, express or implied, regarding the accuracy, adequacy, validity, reliability, availability or completeness of any information on the Site.
UNDER NO CIRCUMSTANCE SHALL WE HAVE ANY LIABILITY TO YOU FOR ANY LOSS OR DAMAGE OF ANY KIND INCURRED AS A RESULT OF THE USE OF THE SITE OR RELIANCE ON ANY INFORMATION PROVIDED ON THE SITE. YOUR USE OF THE SITE AND YOUR RELIANCE ON ANY INFORMATION ON THE SITE IS SOLELY AT YOUR OWN RISK.
EXTERNAL LINKS DISCLAIMER
The Site may contain (or you may be sent through the Site) links to other websites or content belonging to or originating from third parties or links to websites and features in banners or other advertising. Such external links are not investigated, monitored, or checked for accuracy, adequacy, validity, reliability, availability or completeness by us.
WE DO NOT WARRANT, ENDORSE, GUARANTEE, OR ASSUME RESPONSIBILITY FOR THE ACCURACY OR RELIABILITY OF ANY INFORMATION OFFERED BY THIRD-PARTY WEBSITES LINKED THROUGH THE SITE OR ANY WEBSITE OR FEATURE LINKED IN ANY BANNER OR OTHER ADVERTISING.
WE WILL NOT BE A PARTY TO OR IN ANY WAY BE RESPONSIBLE FOR MONITORING ANY TRANSACTION BETWEEN YOU AND THIRD-PARTY PROVIDERS OF PRODUCTS OR SERVICES.
AFFILIATES DISCLAIMER
The Site may contain links to affiliate websites, and we receive an affiliate commission for any purchases made by you on the affiliate website using such links. Our affiliates include the following:
- makeCNC who provide Downloadable Patterns, Software, Hardware and other content for Laser Cutters, CNC Routers, Plasma, WaterJets, CNC Milling Machines, and other Robotic Tools. They also provide Pattern Files in PDF format for Scroll Saw Users. They are known for their Friendly and Efficient Customer Service and have a comprehensive back catalogue as well as continually providing New Patterns and Content.
- Cloudray Laser: a world-leading laser parts and solutions provider, has established a whole series of laser product lines, range from CO2 engraving & cutting machine parts, fiber cutting machine parts and laser marking machine parts.
