00:15
well welcome to another lightblade
00:18
Learning Lab
00:20
in the last session we changed the tube
00:23
in this machine
00:26
and today we’re going to look at ways of
00:30
characterizing that – over time the tube
00:34
is going to gradually decrease in power
00:36
no it was just drop off the edge of a
00:39
clip unless something seriously
00:41
mechanical goes wrong with the tube and
00:43
that’s very very great most of the time
00:46
what will happen is this tube will run
00:47
perfectly okay for months and months and
00:50
months you may determine that you’ve got
00:52
a little bit less power losing power can
00:56
happen at several places throughout this
00:58
system as we’ve talked about before in
01:00
earlier sessions you have three mirrors
01:02
you have a lens and each one of those
01:06
stages typically you would expect to
01:09
lose maybe three percent power now I’m
01:12
not going to get too anal about that
01:13
number because you know three percent is
01:15
just an average if it gets to five
01:17
percent loss ie you’ve got one two three
01:20
four features four five is twenty
01:24
percent that’s one-fifth of your power
01:26
that you’re losing before you get down
01:28
to your work surface and that would be
01:31
very noticeable if you’re used to
01:33
cutting for instance something at ten
01:35
millimeters a second and then all of a
01:38
sudden you find that if they’ll you cut
01:39
through what do you do well your first
01:43
reaction might be well I’ll put more
01:45
power into the system well if you’re
01:48
already burning it be a maximum
01:49
allowable current you can’t do that
01:52
because you saw short in your tube life
01:54
the only solution is to do one of two
01:57
things
01:57
short-term if you’re in a hurry you
Transcript for Measuring Laser Tube Power (Cont…)
02:00
might decide to turn the speeds down so
02:03
that you get good cutting it
02:05
because that’s a temporary fix what you
02:07
really got to do is to go into your
02:09
machine and find out whether you’ve got
02:11
lots of power on your tube or whether
02:14
you’ve got lots of power because of one
02:16
two or three mirrors being dirty or
02:19
maybe you need to clean or you might
02:22
need a new things you’ve got to find out
02:26
where the problem is and that’s
02:29
partially what we’re going to be talking
02:31
about today
02:33
now characterizing the tube basically
02:36
means what we’re going to do is we’re
02:38
going to try and establish the
02:40
relationship between the tower that
02:43
we’re putting on the keyboard the
02:45
milliamps that we can see on the a meet
02:48
up that’s on your machine and the
02:50
physical lots of power that are coming
02:53
out of the tube so we’ve got for a
02:56
draught that relates all those three
02:58
things together and in addition to that
03:00
there’s a very interesting section of
03:03
the tube performance called a pre
03:07
ionization zone which is where the tube
03:10
is just starting to fire and it can’t
03:14
make up its mind whether to run on a
03:16
full beam or a partially there the
03:19
strange startup characteristic that
03:22
varies between tubes and it varies
03:25
between power supplies and machines but
03:27
it is important that you understand
03:29
where that zone is on your machine
03:31
because it can be very useful and it can
03:34
be very annoying at times when I first
03:37
got my original China blue laser machine
03:41
it had a very very poor quality tube in
03:44
it and I struggled for a long time to
03:47
prove that the power in that tube was
03:51
not as claimed I spent a long time
03:53
trying to devise ways of measuring power
03:56
through calorimetry techniques and in
03:59
the end I had to give up and I searched
Transcript for Measuring Laser Tube Power (Cont…)
04:02
the internet for a reasonably priced
04:05
power meter that enabled me to measure
04:08
the power coming out with my – on the
04:10
surface of it it looks like a meat
04:12
thermometer with a blob of aluminium
04:15
Harold itíd to the stem and in essence
04:18
that’s what it is but it’s a very
04:21
expensive piece of equipment relatively
04:24
speaking for a hobby use this cost me
04:27
around about three hundred and fifty
04:30
dollars because I couldn’t buy anything
04:32
like this in the UK I had to get it
04:34
specially imported from the states this
04:36
is a company called Mackin Instruments
04:38
and this is the cheap end of their
04:41
product range think Laser don’t use
04:44
anything like this because they’ve got
04:45
very sophisticated equipment that’s
04:47
capable of operating at different
04:49
frequencies different wavelengths of
04:51
light and their kit is in the region of
04:54
about maybe two and a half to three
04:56
thousand pounds that’s not the sort of
04:58
price that you can afford to spend to
05:00
check the performance of your machine
05:01
here you don’t need a piece of
05:03
sophisticated digital measuring
05:05
equipment to measure the power on your
05:07
machine what you really want to
05:08
something which is maybe not quite as
05:10
accurate something maybe something like
05:13
this that will do the job but you know
05:17
it doesn’t cost a fortune oh I invested
05:19
in this and it did a superb job of
05:22
telling me everything I wanted to know
05:23
about the machine it’s still out of the
05:26
price range of many people and so
05:28
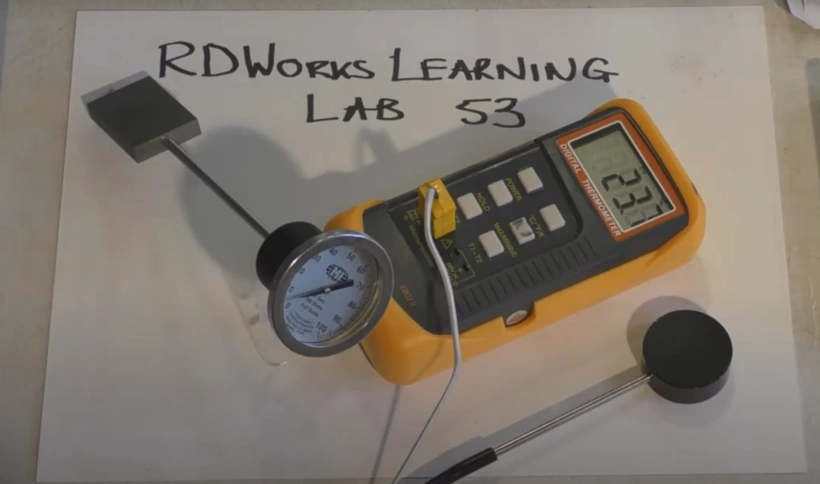
consequently on this site here Rd Works
05:32
Learning Lab 53 I’ve done an analysis of
05:36
how this works and I’ve designed my own
05:39
simple version cheap version that will
05:42
do the same task as this this reads out
05:46
what’s directly this does not read out
05:50
what’s directly it’s it’s a compromise
05:52
we get the same answer but we have to
05:55
put a little bit more effort in what
05:57
we’re going to be doing today is to use
05:58
this piece of kit and I’ll show you that
Transcript for Measuring Laser Tube Power (Cont…)
06:00
relatively speaking it is still very
06:02
simple to use
06:03
now whether we use this piece of
06:05
equipment or this piece of equipment
06:08
they’re both based on in essence heating
06:13
up this block of anodized aluminium
06:17
and to do that you have to put the power
06:20
in for a fixed period of time the fixed
06:24
period of time is something that we’ve
06:27
generated a program to do and all the
06:29
information about that program is
06:31
available on the 5th place website think
06:36
Lisa can supply this piece of equipment
06:38
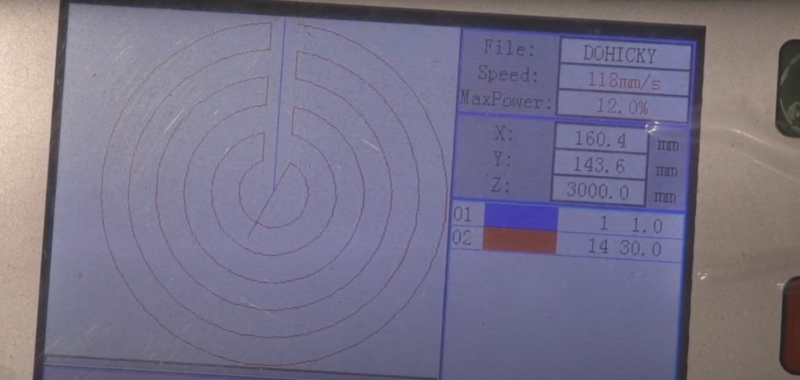
so before we to start any testing we
06:42
need to put a test program into the
06:45
machine and that test program let’s find
06:47
it there we go it’s actually called
06:51
doohickey and here’s what it looks like
06:54
now we’ve got a starting point here
06:58
which is the blue and the first thing
07:02
that happens is at a speed of one
07:05
millimeter a second we Travis outwards
07:09
by about 10 millimeters so that means
07:13
it’s going to take 10 seconds to run up
07:16
the blue line and at the end of that
07:19
period 10 seconds we start running
07:22
around this red spiral getting closer
07:25
and closer towards the center now that
07:28
red spiral has been very carefully
07:31
designed its length and its speed has
07:34
been set to 14 millimeters a second
07:37
because that will give us the correct
07:40
amount of exposure time for the
07:43
calibration to work
07:47
so we don’t have to panic when we press
07:50
the start button because we get nothing
07:53
happening over the blue line for the
07:55
first 10 seconds we’ve got the power set
07:57
to 1 percent and 1 percent will not work
Transcript for Measuring Laser Tube Power (Cont…)
08:01
the laser so we have a little bit of
08:04
relaxation time from the time we press
08:07
the button to the time we go around to
08:08
the back of the Machine and get ready
08:11
for the test to start now it really
08:16
doesn’t matter where you place the laser
08:17
head but somewhere into the middle of
08:19
the Machine is a good idea
08:21
and then press your origin button
08:23
whenever I’m firing the laser down into
08:26
the Machine I always like to put a
08:29
little tub of water in the bottom of the
08:32
machine because let me just show you so
08:37
after 10 seconds the power switch is on
08:39
and we’ve got it set to maximum power at
08:42
the moment which is 67%
08:46
and there we go you can see the effect
08:48
of the energy going into the surface
08:51
it’s actually causing the water to boil
08:55
and produce steam
08:57
[Music]
09:07
so that energy would normally be
09:09
partially reflected off this surface and
09:11
that’s a risk I don’t want to take so I
09:14
always fire my beam into a little puddle
09:17
of water heating affecting the water is
09:19
virtually nil because there’s relatively
09:21
speaking such a small amount of power
09:23
there but it is just causing the surface
09:27
of the water to heat up so much that
09:29
evaporates it only got to go maybe half
09:33
a millimeter into the surface of the
09:34
water and it has no effect at all okay
09:37
so that’s the program set up and all the
09:39
safety precautions so we need to close
09:41
the lid now what we have got to do now
09:44
is to keep changing the parameters in
09:48
this program and to do that we shall
09:51
press enter enter and what we’re trying
09:55
to do is we’re going to change the
09:56
parameter that the power parameter on
09:59
the red layer so we need to use the Z
Transcript for Measuring Laser Tube Power (Cont…)
10:03
Joo button where we use the arrow button
10:05
initially because the blue there tells
10:07
us that we’ve got this selected so we
10:10
can select the red layer so we come down
10:12
to power by using the Z due button now
10:15
the first thing that I’m going to do is
10:16
to wind the power on this machine and
10:19
this is minimum power I’m going to put
10:21
it to 90% and then we’re going to step
10:24
down to maximum power and we’re going to
10:27
set that to 90% as well the speed set at
10:31
40 millimeters a second and the power
10:34
set to 90% so that’s our first test that
10:38
we’re going to run now the fact that I’m
10:40
running this at 90 percent means that I
10:42
shall probably be driving this milliamp
10:44
meter more than the recommended maximum
10:48
for the tube I should be over driving
10:50
the tube but don’t let it worry you for
10:53
such a short period of time this is not
10:56
going to damage your tube there’s
10:58
warnings are all sorts of other covers
11:00
but there isn’t a particular warning on
11:02
here
11:03
but believe me it’s just as dangerous to
11:06
take this cover off and use the machine
11:08
as it is to undo any of the other panels
11:11
so we’re basically going to beat the
11:15
safety system here so I need to
11:17
reinforce that you must at all stages be
11:21
very very careful and I will try and
11:23
explain to you how you can do this
11:25
safely okay now I’ve got to open the lid
11:29
to show you what’s going on but you will
11:34
have to operate this with the lid closed
11:36
because of the safety systems preventing
11:38
the tube from firing when we open the
11:40
lid now one of the most important things
11:43
that we’re going to need is a bucket of
11:46
water now this water here is has been
11:50
sitting here for seven days and it has
11:53
assumed an ambient room temperature now
11:57
that’s most important we need a
11:59
consistent starting point when we do
Transcript for Measuring Laser Tube Power (Cont…)
12:02
every one of these tests using this
12:04
equipment or even using this equipment
12:08
because they’re based on a temperature
12:12
change away from room temperature okay
12:16
before we start let’s take a quick
12:18
close-up look at this little instrument
12:20
now the top button here is an on/off
12:24
button and that’s no registering the
12:27
temperature that it’s seeing in the
12:30
black doohickey probe beside my hand
12:33
there
12:35
now the button at the top right hand
12:37
side we can choose degrees C degrees F
12:42
or degrees absolutely we’re going to use
12:45
the degrees C scale which is the default
12:47
scale and we can see that just up at
12:49
this top right hand corner here now
12:51
underneath that we’ve got a whole bunch
12:54
which we don’t need to use but the one
12:57
button that we do need to use is this
12:58
button that I’ve marked black and I’ve
13:01
marked it black because it’s very
13:03
confusing and sometimes you might press
13:06
the wrong button
13:07
because you read that the number is
13:10
underneath the button and so you think
13:12
we’ll max mean average let’s press this
13:14
button because that’s what you can seed
13:15
and effect that’s wrong so if I’ve
13:18
marked that button so we never make a
13:20
mistake the reason why I’ve marked that
13:22
button is because if we press it once we
13:25
get max if we press it a second time we
13:29
get min and if we press it a third time
13:31
we get average when we turn the power
13:34
off it resets everything and we turn the
13:39
power on and we get nothing so the first
13:41
thing that we must do is press the black
13:43
button which says max and what that will
13:47
now do is that will register the maximum
13:49
temperature that ever the seen by the
13:52
doohickey probe and that’s an important
13:55
number that we need to capture now when
13:59
it comes to doing the test itself what
Transcript for Measuring Laser Tube Power (Cont…)
14:02
we’re going to do is we’re going to put
14:03
this little lollipop in front of the
14:06
laser beam coming out of the tube just
14:09
here
14:10
but I’m going to move it around just so
14:13
we don’t get any intent peeking on one
14:15
particular spot so under all
14:17
circumstances make sure that you keep
14:20
your hand resting on this bottom corner
14:21
of the enclosure because that will
14:25
ensure that your hand is never in the
14:27
later theme park itself even though
14:30
you’ve got the heart covered over by
14:32
this if for any reason you jump somebody
14:35
sneezes somebody finds you you don’t
14:38
want to do this and finish with the beam
14:41
on your fingers so safety safety safety
14:44
please look and think what’s going to
14:48
happen okay
14:50
safety let you out of the way let’s get
14:52
on to do the job okay so the first thing
14:56
that we’re going to do is we’re going to
14:58
put the probe into the water bar and
15:01
we’re going to swirl it around turn the
15:05
meter off and back on and that will be a
15:09
live temperature the doohickey is misery
15:15
and when it’s stable and at the moment
15:20
is 23 22.9 get up take point two point
15:27
three in the fury see it’s stable and
15:30
it’s at around about twenty two point
15:32
eight I’m going to turn that meter off
15:37
now and I’m going to walk down to the
15:40
front of the machine and I’m going to
15:42
press the start of the program back okay
15:46
now we’re in our immediate panic we can
15:50
turn the meter on and we press the max
15:52
power 23.1 is the number that I want to
15:57
sit here we go we can see the belt movie
Transcript for Measuring Laser Tube Power (Cont…)
16:03
and that tells us that we are got
16:07
something going on
16:12
23.1 was our starting temperature
16:14
remember
16:20
there we go it’s finished so we need a
16:24
little piece of paper to write this
16:26
information down 90% power 23.1 was the
16:34
starting temperature now we can take a
16:36
look on the meter and we can see that it
16:38
says fifty five point four okay that’s
16:42
two pieces of vital information that we
16:44
need the starting temperature rule and
16:46
the finishing temperature now there’s
16:48
one other thing that we need to go and
16:50
look at now because we don’t have six
16:52
pairs of hands or five pairs of eyes if
16:56
you’ve got some help then maybe somebody
16:58
else can read this for you but if you
16:59
haven’t got help then you’ll need to run
17:02
the program again as I will do here and
17:05
of course it’s safe to run it because
17:07
we’re running into a bucket of water and
17:10
what we shall need to do now is to make
17:12
a note of the current once the program
17:17
is running 24.5 probably okay so that’s
17:21
basically what I’m recording power 90%
17:24
start temperature twenty three point one
17:27
maximum temperature that we established
17:29
fifty five point four and our milliamps
17:32
tricky four point five those are the
17:34
four numbers that we need to record so
17:37
we no need to come back to here and we
17:40
need to press the enter button and enter
17:43
again press the arrow key to get across
17:46
to the red and then the zi jue to get
17:48
down to the minimum power button and at
17:51
that point we’re going to change the
17:52
minimum power to eighty ten percent
17:56
steps is good enough to get a reasonably
17:59
good calibration graph you could run it
Transcript for Measuring Laser Tube Power (Cont…)
18:01
at five percent two percent it really
18:04
depends on how fussy you are so Max and
18:08
min are both set to 80 percent ater
18:10
enter and now we go through the same
18:14
procedure again and we do that for 70 60
18:17
50 40 30 all the way down to 10%
18:22
now at 10% things start to change just a
18:26
little bit I’ll carry on and do all the
18:28
test results down to 10% and then we’ll
18:31
come back and have a look a bit closer
18:33
at what’s going on at 10% the last set
18:35
of data for 90% it’s slightly different
18:38
to the one that you’ve seen on the film
18:40
because I went away for a meal and when
18:42
I came back I decided that I’d start the
18:44
whole thing again because I do like to
18:46
make sure that I get consistent set of
18:48
results with no time lag in between so
18:52
this set of data is a consistent set of
18:54
data so there was a temperature rise
18:56
injected into that little doohickey by
18:59
virtue of the amount of power that was
19:01
being fired at it he made a thief that
19:02
was being fired at it because what we’re
19:05
going to do we’re going to put the final
19:06
temperature into a calculation 57.5 and
19:13
then we’re going to subtract the start
19:17
temperature from it which was twenty
19:19
four point four
19:24
and that gives us an answer of thirty
19:27
three point one now that’s thirty three
19:30
point one degrees C now for the speed
19:34
that I’m running this at there is a
19:37
multiplication factor of two so if I put
19:41
times two into there the answer that
19:44
comes out at sixty six point two now
19:47
that’s sixty six point two Watts there
19:51
is a calibration chart that you can work
19:54
to but to be honest if you’re running at
19:57
fourteen millimetres a second then just
Transcript for Measuring Laser Tube Power (Cont…)
20:00
taking the difference and multiplying it
20:02
by two gives you the Watts it’s a nice
20:05
simple for most mental calculation this
20:09
doohickey works over three different
20:11
ranges it works up to forty forty Watts
20:14
up to 80 watts and up to up to one
20:17
hundred and sixty watts none of this
20:20
stuff is very complex maths if you like
20:22
you have to be a little bit
20:23
inconvenienced but then the doohickey is
20:25
a very cheap way of measuring the power
20:28
and to be honest you don’t have to worry
20:30
about these calculations because I’ve
20:32
done a spreadsheet here which subtracts
20:35
these two numbers from each other and
20:37
produces a temperature increase and that
20:39
temperature increase is multiplied by a
20:41
factor of two here to give you the power
20:44
output
20:46
and then we also at the same time
20:48
checked that percentage power and the
20:52
watts against the current that was
20:55
showing on the current meter and so
20:57
there we are we’ve drawn this
20:59
characterization for the tube now this
21:03
blue line here is power watts and this
21:08
red line here is current milliamps now
21:12
technically this machine does not
21:16
deliver power when you put percent power
21:20
into your program what you’re really
21:23
doing is putting in a percentage of five
21:27
volts DC and that five volts DC is what
21:32
is used a percentage of that five volt
21:35
DC is what is used to control the
21:37
current that is allowed to flow through
21:40
the tube that current should therefore
21:43
be linear and give or take a little bit
21:46
of my estimation and the accuracy of the
21:50
milliamp meter as you can see it is it
21:52
is pretty well approximately linear so
21:54
the power that comes out of this tube is
21:56
not directly related to the current that
22:00
you’re using to drive the tube with this
Transcript for Measuring Laser Tube Power (Cont…)
22:02
is not a linear relationship people get
22:05
rather confused and they think that I’ve
22:06
got the 60 watt – therefore if I put in
22:10
50% power I’m going to get 30 watts out
22:13
well look 50 percent power is in fact
22:16
going to generate something like about
22:18
55 watts
22:19
that’s not halfway up the scale and you
22:22
can see why it’s not halfway up the
22:24
scale because this is a nonlinear
22:26
characteristic now it’s a very strange
22:28
characteristic because as I said we work
22:31
down to 10% power and I hoped that I
22:34
would get down to 10% power and you can
22:36
see that I’ve just about got there
22:38
because probably if I drive this down
22:41
much lower I might be able to get down
22:44
to possibly nine and a half percent and
22:48
I should get no power out of this device
22:50
at all so as you can see it is quite a
22:53
rapid increase to start with and then it
22:55
drops off into a much shallower curve
22:57
the other vital piece of information
22:59
that we must get from this graph now is
23:02
what is the maximum current that we can
23:06
allow to drive this machine at you would
23:08
normally expect to be able to drive a 60
23:10
watt tube to a maximum drive current of
23:13
22 milliamps so let’s just find where 22
23:18
milliamps is is here okay now 22
23:23
milliamps
23:29
if we draw them up there like that
23:33
we get two bits of information one is
23:38
75 76 77 maybe 78 percent
23:52
and the other piece of information is
23:54
that at 78% we’re getting
Transcript for Measuring Laser Tube Power (Cont…)
24:02
sixty-two for
24:10
so this to a 60-watt tube is delivering
24:13
64 watts at 78% power
24:19
and provided we don’t program seven more
24:21
than 78% into this machine then we shall
24:25
not be exceeding the 22 milliamp limit
24:28
for a 60-watt – now those are crucial
24:32
pieces of information that you need to
24:35
know and you would not be able to get
24:36
this information without the use of a
24:39
power meter so now we’re very
24:41
confidently characterized this machine
24:44
now there’s one other piece of
24:46
information that we might not get on
24:49
this graph here and we may draw a
24:51
completely separate graph to look at
24:53
what’s going on in this little area down
24:56
here and this is something called the
24:58
pre ionization zone now that normally
25:02
happens somewhere in the region of maybe
25:04
four to six milliamps we’re going to run
25:07
and we’re going to check what’s going on
25:09
on this machine between nine and
25:11
thirteen and fourteen percent now we’re
25:14
going to run the same test again but
25:17
what we’re going to do this time is to
25:19
take a look at the tube itself we’re not
25:22
going to worry about the power because
25:23
we can see what the power is doing now
25:25
to do this I’m going to turn the lights
25:27
out so that you can see what’s happening
25:29
in the tube and here we go oh we’ve got
25:31
something happening there at 9% power
25:33
you can just about see right at this end
25:36
here a very faint glow so we have got
25:40
some power there at 9%
25:43
and yes we’ve just got a small amount of
25:46
color at this end of the tube here now
25:49
if we start looking along the tube we
25:52
should find that we have got no no real
25:56
discernible beam along the middle of the
25:58
tube just at the end here
Transcript for Measuring Laser Tube Power (Cont…)
26:02
so here’s what 11% looks like and now
26:05
we’re starting to get more along the
26:09
tube but it still isn’t all the way
26:11
along the tube it’s only part way along
26:13
the tube up to this label here look
26:19
and you can see how the beam is jumping
26:21
around at the end there okay now this is
26:24
12% you can see the beam is getting
26:28
stronger and it’s also getting longer
26:30
look it’s gone beyond that label now
26:32
it’s nearly making it all the way along
26:36
the tube
26:41
and again look how jumpy the beam is at
26:43
the front here we know going up to 13%
26:46
which is where we think the beam is
26:49
nearly going to make it along the tube
26:54
he’s still jumping around a lot at this
26:56
end as you can see and there is just the
27:01
faintest glow that goes more or less all
27:04
the way along the tube look
27:07
but it’s still not what I would call a
27:10
continuous beam because look we’ve still
27:12
got it jumping around at the end there
27:14
and that jumping around is a
27:16
characteristic of this pre ionization
27:19
now this is 14% yes you can see we’ve
27:22
still got a jumpy beam there and we’re
27:26
getting a much stronger beam and it’s
27:28
more or less well it is all the way
27:31
along the tube now but
27:35
we still got this jumping characteristic
27:37
there on that cathode well we’re now at
27:41
15% it’s still a bit jumpy there and
27:47
we’re getting quite a good solid beam
27:48
all the way along but you can see how
27:52
it’s the whole thing is a little bit
27:53
jittery
27:56
okay now this is 16% and look we’re
Transcript for Measuring Laser Tube Power (Cont…)
28:00
switching pretty good now we’ve got a
28:05
steady beam can you see that it’s
28:07
flipping but it’s basically a nice
28:10
steady beam it’s no longer jittery and
28:17
just to verify that here we are driving
28:19
it twenty percent and as you can see
28:22
we’ve got a nice steady pink beam all
28:25
the way along here and a little bit of
28:28
movement on the cathode but it’s not
28:30
jittery movement it is just like a
28:33
little teeny-weeny pulsing movement now
28:36
we should be able to go backwards and we
28:38
should be able to find that at 15% that
28:41
different characteristic fifteen percent
28:44
was the upper threshold of this pre
28:47
ionization zone
28:50
now you can see that jittery behavior
28:53
[Music]
28:55
on the cathode and if you listen
28:57
carefully
29:00
you may be able to hear it hissing now
29:02
look it’s gone to steady mode now so
29:05
it’s on a on a cusp of being stable and
29:09
unstable at 15% so therefore I think the
29:13
limit probably is 14% so let’s just drop
29:16
back to 14% nothing here we are at 14%
29:21
as you can see it’s it is a week looking
29:23
theme it isn’t a lovely solid pink beam
29:26
it’s a bit with speech
29:30
but it’s just jumping around
29:31
characteristic that is the thing that
29:34
gives away this pre ionization okay so
29:40
there we are anywhere between nine and
29:42
fourteen percent for this particular
29:45
tube is the pre ionization zone
29:48
okay so I’ve marked the pre ionization
29:50
zone on this graph now as you can see is
29:53
between nine and fourteen percent and at
29:55
fourteen percent it means that we’re
29:57
actually somewhere in the region of
29:59
around about 12 watts so we don’t get
Transcript for Measuring Laser Tube Power (Cont…)
30:03
steady power out of this tube until
30:05
twelve watts now if you really want to
30:09
be exploratory and fussy you can check
30:12
one percent points through this range
30:16
and out the other side but you’ll find
30:19
that it really doesn’t do anything
30:21
strange it tends to just follow this
30:24
curve so there’s nothing strange about
30:26
the power output curve in relation to
30:29
the percentage power or basically in
30:33
relation to this steady rise in drive
30:35
current but this characteristic here has
30:40
got some interesting and strange
30:41
properties and that’s something which
30:43
should discuss in a future session ok
30:46
well armed with this piece of paper now
30:49
we’ve got a great deal of confidence
30:51
about how we’re going to be able to use
30:53
this machine now remember back to when
30:56
we were doing parameters and I said the
30:58
real thing that you need to do is to
31:00
measure power and instead of specifying
31:03
percentages in your descriptions of
31:07
parameters you need to put in real power
31:11
but this is how you’ll be able to do it
31:13
you’ll be able to refer to this brass
31:15
nickel
31:16
and if you have parameters in there for
31:19
a previous to you and my previous to you
31:21
ran at 67% this one runs at 78% so it’s
31:26
a completely different graph but it’s
31:28
not going to be a difficult job for me
31:30
to run through my parameters and correct
31:32
those parameters for this machine so
31:34
hope you can see know the advantage of
31:37
investing in a a small piece of kit like
31:39
this and it doesn’t matter which piece
31:41
of kit you use because the result would
31:43
be the same this is a very affordable
31:44
tool it takes a little bit more
31:47
inconvenient but it does the job that
31:50
you want to do and of course the other
31:52
great thing about this is which will now
31:55
be able to go around each mirror and
31:58
we’ll be able to check the power in the
Transcript for Measuring Laser Tube Power (Cont…)
32:01
power out of each mirror so we can
32:03
determine that power losses across the
32:05
mirror and the power losses across our
32:07
in now the problem is when you get to my
32:09
age you find that you’ve only got one or
32:12
maybe 1.5 gray cells left and you really
32:16
don’t want to overload them so just as a
32:18
little reminder I’ll put that on there
32:23
so that I don’t forget that’s the
32:26
maximum programmable power that I can
32:29
put into this machine that without
32:30
overdriving the tube 78% that’s the
32:34
magic number I hope you’ve got some very
32:36
quick from today’s session and I was
32:39
just going to say cheerio to you but
32:45
as I stand here I’m looking over at that
32:49
keyboard where I’m using these keys
32:52
I’m very quickly going to start wearing
32:55
off the letters I think I’ve worn
32:59
through these two sheets of plastic on
33:00
quite a few of these and we’re talking
33:03
about only six or eight months well for
33:05
probably about eight months I’ve had
33:06
this machine so I think on the next
33:09
session what we gain has to do is to
33:12
make something that I’ve made for my
33:14
other keyboard and that’s a little clear
33:17
protective screen so you can see that I
33:21
push on the buttons through this
33:25
flexible membrane and the buttons
33:27
themselves do not get damaged
33:33
the problem with this is on this machine
33:36
I haven’t got as much room and as you
33:39
can see this is going to get in the way
33:42
of closing the door so I’m going to have
33:45
to change the design of this in some way
33:47
so that it can be used on this machine
33:51
and we’ve worked out how I’m going to do
33:53
that yet but maybe that’s a project for
33:56
next time
33:58
well this time I’ll try not to get
Transcript for Measuring Laser Tube Power (Cont…)
34:00
distracted so for real this time
34:03
curio and I’ll see you in the next
34:05
session
 Skip to content