0:14In the previous session we designed and manufactured a little rotary fixture for
0:21use on this machine and today we’re going to put it to the test. No this is
0:27not a weapon this is in fact a rolling pin and what I’m going to do I’m going to
0:32engrave on here a pattern for biscuit making first of all we’re going to take
0:37a look at the file itself in RDWorks and then we’ll come back to the machine
0:41and we’ll show you how we’re gonna set the Machine up. Well here’s the file that
0:45I’ve drawn it’s a pretty simple pattern and the rectangle that I’ve got here
0:52well first of all the width is the width of the roller and the height of this
0:59pattern here this rectangle is the dimension of the circumference around
1:05the outside of the rolling pin I’ve converted it into a flat surface and
1:09then I fitted an appropriate number of hole patterns into that rectangle now
1:14the key thing to look at here is the gap at the top and the gap at the bottom two
1:19very small gaps which will allow me to have a small amount of mismatch in the
1:25pattern without it showing. In other words if this gap that I finish up with
1:30is a little bit bigger or a little bit smaller it’s not an issue the last thing
1:34I really want is for the patterns to overlap so I can simplify life a lot
1:38by making that as the whole pattern now I have put the little green square which
1:45is the head position right at the top center there because that guarantees
1:50that I can align the nozzle with the center point on the rolling pin a quick
1:58look at the parameters I think speed wise we’re going to have
Transcript for Testing our DIY Laser Engraver Rotary Attachment (Cont…)
2:02that up at around about 200 millimetres a second, is blowing well this is an
2:08engraving process and I don’t have a blowing for engraving I turn it off so
2:14it’ll be no, it’s a scan, power well I don’t think we’re going to be we’re
2:23going quite fast we’re in a beechwood I want it to burn
2:28maybe a millimeter millimeter and a half deep here’s where we’re guessing
2:33I shall go for 40% now I think we’ll try and put some ramp effect in here put a
2:39slope on the side of the cut okay let’s go and see if we can make this happen
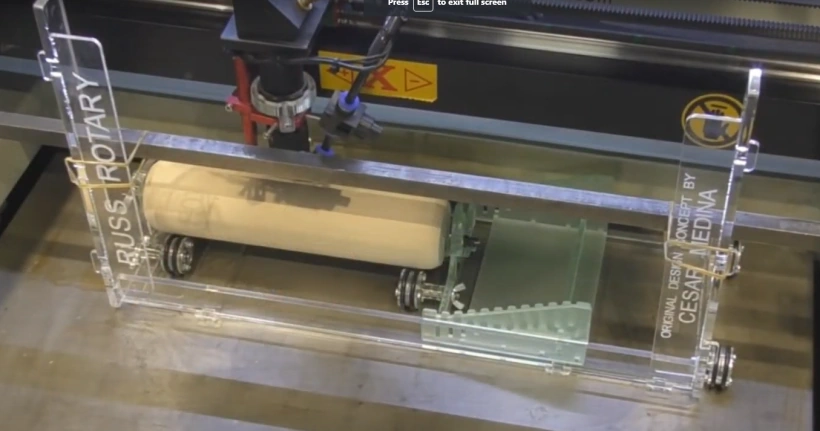
2:43here we’ve got everything that I need to do the job one of the most important
2:49things you’re going to need apart from the fixture is a flat surface to roll it
2:53on now I don’t mind what flat surface you use it could be a piece of acrylic a
2:58piece of glass a piece of steel a piece of MDF a piece of plywood anything
3:02that’s flat that will allow this to roll backwards and forwards so certainly a
3:08honeycomb bed or a slatted bed you’ll need to cover now you saw me manufacture
3:12these parts but I never did mention them the last time because they’re not
3:16actually part of this fixture now I mentioned how this worked before by
3:21pressing against the gantry now the only problem with that is in this instance
3:26the head is going to run to one side and to the other and smack into these
3:32depending on what length of job I do so I don’t want to run that risk so what
3:37I’ve done I’ve adopted a slightly different strategy basically what I’ve
3:41done I’ve extended the gantry forward how on earth can you do that but
3:45basically this piece here is a sliding shoe that sits on the Y rail and pushes
3:49up against the bearing block we have one for this side as well so let’s put the
3:58head towards the back and put that block on
Transcript for Testing our DIY Laser Engraver Rotary Attachment (Cont…)
4:03and now what I have here is a piece of square steel bar it’s quite heavy it’s
4:13about half inch square now before I drop that into place I’m just going to do
4:20something a little bit silly and I’m going to put four small elastic bands on
4:26it now you’ll see why when they come into play in a minute.
4:30so we drop the bar into there and basically what that bar is done it’s
4:37acted a bit like a cowcatcher on the front of a car or a bumper that
4:43is now sitting across the front here and make sure that when the head comes
4:49forward like this and of course it’s being pushed forward by the bearing
4:54blocks so it stays completely parallel and doing exactly the same thing as the
5:00gantry but it’s some four inches further forward it will then catch the
5:07 rotary device and push the rotary device forward as you can see there if we go
5:12too fast and we nudge the rotary device
5:20it responds and bounces away from the bar I know we haven’t got any weight on
5:26here at the moment but this is very very light but that’s a risk that we can’t
5:30afford to take I have made sure that this bar and our fixture stay together
5:36and we’re doing that by hooking this
5:44over there like that
5:53now that means that when I send it forward
6:02it stays completely tied up to the bar okay it’s a bit crude a rubber band but
Transcript for Testing our DIY Laser Engraver Rotary Attachment (Cont…)
6:12it’s functional along with the rest of this fixture which is crude but
6:17functional and actually elegant in its simplicity. As far as it will go is when
6:25it hits the back frame of the machine now although this is a 400 millimeter
6:31depth machine the only depth that we’ve got to work with for rotary engraving is
6:37this depth here because the time this gets to the front here and hits that’s
6:42when we run out of stroke so we can’t engrave a picture or a logo any bigger
6:48than say 250 millimeters tall now I know the graphic for this is well and truly
6:54less than that so the first thing we’re going to do is to take it apart we’ve
6:59got to set this up on the lowest possible position because that means
7:05that then that pair and that pair are parallel to each other and I think from
7:11where it is at the moment it’s probably not far off
7:20the right depth, there we go, so the roller end stops are now set but what we do
7:26we push that against the back so that it’s just lightly against the back and then
7:30we’ll bring the head forward until it just touches and takes it away from the
7:36back so now we can guarantee that we’re nice and parallel we’ve got the bearing
7:42blocks all connected up to this bar and everything is running nice and true so
7:48what we’ve now got to do is to set the head so that the head is in the centre
7:52of the job that’s the most convenient way to set it up in the centre and say
7:57that’s 2 1 5 or 2 1 6 we’ve set that up to 108 so that’s where I’m going to set
Transcript for Testing our DIY Laser Engraver Rotary Attachment (Cont…)
8:06my datum my origin and I’ve already designed this so that the centre line of
8:15head always comes to the center line to the component so I don’t have to worry
8:19about looking at it this way because that’s part of the design when I
8:23manufacture the thickness of the arms and all of this I took this into account
8:26so we’ll put some extraction on and I will close it, because I certainly don’t
8:32want to put smoke anywhere onto the job I’d like to try and keep it nice and clean
8:55so we just watch what happens at the end of the stroke
9:01nothing began to get pulled away and leaves the
9:06job where it is well for a budget cost I think that jig was probably a success
9:14so I should just go away and wash that in soapy water just to get rid of the
9:20Burn smell but of course it won’t get rid of the cut. Okay well having met the
9:24challenge of rotary engraving on wood
9:28that was parallel that was quite an easy shape to deal with, maybe we should up
9:35the ante a bit and change the shape to something a bit more challenging and
9:43also the material which is glass this is one of my wife’s favorite wines she says
9:49it reminds her of me mainly because it’s a bit dry and fruity and nothing to do
9:56with the name on the label now before we start engraving on glass there are a
10:02couple of things that you really need to understand first of all glass does not
Transcript for Testing our DIY Laser Engraver Rotary Attachment (Cont…)
10:08cut and it does not burn but we can etch it and that’s because of some
10:14interesting mechanical phenomena that happens when you fire infrared energy at
10:21a glass surface now in one of the previous sessions when we were talking
10:25about engraving on stainless steel we talked about the laser beam either
10:32being absorbed by or being reflected by the surface that it hits so here we are
10:39with a nice parallel laser beam that passes through a lens and then focuses
10:50down to a very small area where the energy density gets huge. When we fire it
10:59at a piece of glass I’m going to look at that little spot there in a magnified
11:05way
11:08so here we are with the beam coming down to hit the surface now remember it’s a
11:15beam of light at this point in time it’s not heat and it’s not until it hits this
11:19surface and gets absorbed into here that it starts turning into heat now glass is
11:27a very very poor conductor of heat and so consequently what happens is this
11:33little teeny-weeny area here starts heating up at a tremendous rate of knots
11:39and it expands because it’s getting hotter and everything that gets hot
11:45expands but the background is still cool cool cool
11:51all the way around and what that causes is at this point here where my arrow is
11:59it causes a lot of stress to occur expanded glass / non-expanded glass and
Transcript for Testing our DIY Laser Engraver Rotary Attachment (Cont…)
12:07what actually happens is the there is a fracture that occurs between the hot and
12:12the cold zone and you get a little teeny-weeny shard of glass popping out
12:16the closest I can get to imagine that it’s like a stone chip on your
12:20windscreen this is a mechanism basically of little stone chips and of course when
12:29you get a stone chip you could see it because the light gets reflected and
12:34refracted off different surfaces within the chip and so what looks like clear
12:39glass all of a sudden becomes frosted glass when you start putting hundreds
12:45and thousands of little teeny-weeny chips beside each other now
12:49these chips are not exactly scientifically measurable or
12:53controllable every one could be slightly different it just depends how the glass
12:58shards if you’ve looked into glass engraving you will see that there are
13:04lots of hmmm Call them tricks for trying to engrave glass nicely I use the word
13:14nicely in inverted commas because how do you make something chip nicely
13:21now one of the oldest and simplest tricks for engraving glass is to coat
13:26the surface of it with soapy water now what does the soapy water do well first
13:36of all the soap in the water ensures that you get a nice even film across the
13:42surface of the glass but it’s really the water that you want hanging on the
13:47surface of the glass now a film of water will do a very good job of absorbing the
13:53the infrared light that’s fired at it and so therefore our beam hits the
13:59surface of the water and it is the surface of the water that is boiling and
Transcript for Testing our DIY Laser Engraver Rotary Attachment (Cont…)
14:04creating heat, that heat then gets transferred quickly but in a slightly
14:10less dramatic fashion to the glass that’s underneath but of course it’s
14:17almost instantly vaporizing the water and so yeah there isn’t a great deal of
14:24difference between firing the beam at the water and firing the beam at the
14:29surface of the glass so soapy water is not necessarily a very effective way to
14:35make the engraving action gentler so the next trick that’s used is to hold the water
14:42onto the surface in a different way and that’s with wet kitchen towel so now
14:48you’ve got two substances that are absorbing the energy the first one is
14:53the water which will immediately vaporize and then of course you’ve got
14:57the kitchen towel which will effectively start to burn and what’s happening is
15:03again you’re reducing the heat intensity to the surface of the glass underneath
15:09you’re absorbing the energy before it hits the surface of the glass but there
15:14is some transmitted heat that then passes to the surface of the glass that
15:19hopefully will cause a similar sort of rapid expansion and sharding but it may
15:26well take place over a larger area and so consequently it may
15:32have a slightly softer feel to the sharding that takes place now there is
15:38another technique that you can use and that’s this stuff masking tape now again
15:47let’s just examine what’s going on with masking tape same principle really
15:52you’ve got the masking tape sitting on the surface with a glue of some sort
15:56underneath it and the light arrives at the surface turns into heat energy as it
Transcript for Testing our DIY Laser Engraver Rotary Attachment (Cont…)
16:03starts to burn the masking tape and then that local heating effect has the
16:09sharding effect on the glass underneath it’s locally heating the glass
16:12underneath in every one of these instances the mechanical mechanism for
16:17engraving the glass is the same but what you’re doing is basically attenuating or
16:22moderating the heat to various degrees now a technique that I personally use is
16:28something I discovered after I’d experimented with molybdenum disulphide
16:34on the surface of stainless steel understanding how the molybdenum
16:40disulphide acts the same as all these moderating layers here but it’s much
16:46more efficient at converting the heat and then producing a much wider it
16:55absorbs the heat and starts to spread it out more because it is a metallic based
17:01substance and so consequently you get a much bigger wider pool of heat and so
17:10you get a much gentler sharding action with molybdenum disulphide than you do
17:15with any of these other techniques the problem with the masking tape is if you
17:19want to do a dot picture you’re going to finish up with lots and lots of little
17:24bits of masking tape on the surface that you can’t easily pull off if you just
17:29want to mask up for a logo then masking tape probably does a reasonable job I
17:34would steer clear of these two techniques personally that one has got
17:38some merit to it but this one is what we’re going to demonstrate
17:42today you paid your money and takes your pick right try to find something
17:49challenging to put on the bottle is interesting now this again brings up
17:54another interesting lesson this is a black horse on a white background
Transcript for Testing our DIY Laser Engraver Rotary Attachment (Cont…)
18:02basically as you all know when you frost glass it turns white or grey so we
18:10shall need to reverse this image eventually from white and black to black
18:17and white to get the desired effect on glass also the size of this picture is
18:24too big really to go on the bottle about 190 millimeters tall half that size
18:30would be more appropriate let’s check with a bitmap handle before we do
18:34anything and we find that the resolution is a hundred and sixty pixels per inch
18:38so what we’re going to do is we’re going to set the padlock closed and we’re
18:43going to reduce this number to fifty percent we’re going to reduce the
18:46picture to half its size okay now let’s go back and check what the bitmap handle
18:51now says it was a hundred and sixty now it’s gone up to a resolution of 320
18:57which is far too high for what we’re trying to achieve especially as I’ve got
19:04a two inch lens in this machine so we’re going to set the resolution down with
19:10this tick box here set the output resolution to 160 and then we’re also
19:16going to invert the color and apply to view and apply to source that’s what
19:24we’re going to get again you’ll notice that we have got this at the top now
19:29depending on which way we’re going to set the bottle up will depend on which
19:33way we set this picture round. So let’s go and have a look at how we’re going to
19:37set the bottle well you don’t think I’m going to use a full bottle of wine do
19:41know so here we’ve got our bottle prepared with Moly sulphide on the
19:47surface and looking at this we’re going to have to use
19:54this end for the parallel end and this end to try and keep it parallel we shall
20:03have to raise this up to several levels higher and also probably reset
Transcript for Testing our DIY Laser Engraver Rotary Attachment (Cont…)
20:10this so that the wheels are further apart maybe even five
20:15let’s just see what five looks like, five may cause the bottle to touch the bottom
20:22but let’s just give it a try. But bear in mind we’re trying to get a contact
20:26angle and probably somewhere around about ninety degrees that looks good
20:31I think this probably needs to go together one more so we set this in by one then we’ll
20:38find out the height that we have to be
20:43to get it running parallel now I’ve got a nice wooden spirit level here which
20:49won’t damage the surface of my material and that looks pretty good
20:56we’ll set the height in a minute but the whole purpose that this was if you
21:00remember to work out which way our drawing is going to have to go so we
21:06want ears to the right because this picture here will come out exactly the
21:13same as if we were engraving it on the table
21:16there’s no reversals no amplification of any sort in any direction in an
21:22anti-clockwise direction which is minus 90 like that
21:29okay now we’ve still got our start point in the center at the top so that’s good
21:36so that enables us to decide approximately where we want the picture
21:40on the bottle so we need to set the focus up to about seven and a half
21:48we’ll push the head further back and we’ll push the frame as far back as it
21:56will go and pull it forward just a shade and then we’ll bring the table forward
22:02and we’ll pull it forward just a shade more watch the bearings here because
Transcript for Testing our DIY Laser Engraver Rotary Attachment (Cont…)
22:08this is where it’s going to contact don’t look for anything here
22:14and there we go we’re just about to make contact now, there we go. And we’ve pushed it
22:18forward we can now make sure that it’s pushed back against the bearing blocks now
22:23you shall need to set it roughly towards the middle here let’s try that it’s not
22:32that important in this particular instance so we set the origin there air
22:37assist yeah I think we do need some air assist this time but maybe not complete
22:43full air assist so let’s think about our cutting parameters well they’re not
22:48cutting their engraving so it’s a bitmap and it’s scan so yes we’ve got scan on
22:55speed hundred, bearing in mind we are doing a dot image and I think therefore
23:02maybe it would be a good idea to keep that back closer to about a hundred and thirty
23:08maybe and the power well the power we need to keep that quite low because we
23:17don’t want to if you like crack through the glass so my guess is that we’re
23:23going to set this to probably something like about 15%, 15% maybe even lower than
23:30that so let’s try 12% if I get it wrong well I can soon empty another bottle!
23:36Pitch now that’s an interesting point because we’re doing a dot graphic we
23:41really ought to make the pitch match the graphic so 25.4 divided by 160
23:49pixels per inch equals point one five eight seven, point one five eight seven
23:59okay and I think we’re ready to go now as I
Transcript for Testing our DIY Laser Engraver Rotary Attachment (Cont…)
24:03mentioned to you before I don’t like the smell of molybdenum disulphide
24:09it’s a bit suspicious so I’m going to close the lid and let the Purex
24:13extraction unit make things safer I’ve not done this before so this is a
24:21brand-new experiment for me
24:47I think the first thing you can see, is we’ve got an image on there of some sort
24:52question is what sort of image let me just clean up half the bottle because if
24:59I need to we can try and image on the other side because it’s only gone a
25:04little way around
25:09well I have to say, on balance that’s not too bad
25:16a little bit pixelated but generally not too bad I wonder whether I could
25:21increase the resolution slightly
25:27and maybe increase the size of the picture
25:31but I’ve got room on the other side of the bottle so I think that’s what we’ll do
25:36for test number two okay well we’ve done several things this time
25:41we’ve changed the resolution to 240 dots per inch and the interval
25:47accordingly we just make sure that we press these
25:51up against the end stops there, we’re in roughly the same central
25:56position so we should be okay and I’ve increased the picture or rather instead
26:02of decreasing the picture to 50 percent, I’ve decreased the picture to 75 percent so
Transcript for Testing our DIY Laser Engraver Rotary Attachment (Cont…)
26:08we should get a bigger picture higher resolution and I’ve increased the power from 12%
26:14to 13% so we’ve got a fraction more power okay let’s see what we’ve got this
26:21time well I would say that’s looking pretty good before we take the Molly off
26:27I have to say I think that is pretty impressive
26:31now with the molybdenum disulphide this finish comes out silky smooth just as if
26:38you were to fine sandblast it or bead blast it and of course as I said the
26:44glass turns white because it’s basically what I call a binary material and the
26:49only way that you can see the black of the black horse that’s on there is by
26:54having a black background now sadly this is not wine that I’ve put in here this
27:03is black coffee that result there was a starting point a bit patchy not very
27:08good but it does show that larger size finer resolution even with a two inch
27:16lens in this machine I’m able to get some pretty good results with the
27:21pictures if you choose the right picture and get the sort of contrast factor
27:25right. All in all I’m extremely pleased with that
27:29um but of course we mustn’t forget the real star of the show which was this
27:37little piece of kit here so yeah it’s served its purpose and it also enabled
27:44me to test my dotting Theory on some glass which I’ve never done before and
27:51it’s a step in the right direction for what we should probably be exploring in
27:56a future session trying to improve the resolution of the pictures because my
28:01dotting stuff was all about working with organic materials now I know that there
Transcript for Testing our DIY Laser Engraver Rotary Attachment (Cont…)
28:06are great gains to be had when we move away from organic materials into
28:09minerals such as glass slate even things like anodized aluminium hold great
28:17promise so I think that’s all for a future session but for
28:22the time being I’m getting ready with another bottle to test so yeah I shall
28:28see you in the next session I think because yeah I am feeling fruity now
28:32bye
 Skip to content