0:00 in this video we’re going to do a quick
0:03 walkthrough of some of the basic
0:04 features of light burn so what you’re
0:08 looking at is the default layout of
0:10 light burns interface I have already
0:1 3gone through the device setup if you
0: 15haven’t done that you should so what you
0: 20see here are the toolbars with the
0: 21various options that you get for drawing
0:24and arranging your shapes light burn has
0:27all of these items that you see here
0:30also listed in the menus and if you look
0:35at the items in the menus they have all
0:37of their hotkeys listed so if you like
0:40me like hotkeys these are handy
0:44the basics are created in file open an
0:49existing file save the file you have
0:51import import takes graphics from an
0:54external vector file like an adobe
0:57illustrator file or a PDF file spgs or
1:00DXF you’ll probably be using this button
1:04more than just about anything you can
1:06also use drag and drop so for example I
1:09can use the import button to bring in
1:12one of my graphics I can also just grab
1:15it from my file explorer or finder and
1:19wherever you drop it in library is where
1:22the graphic goes undo and redo are here
1:27if you look in the menu you can see what
1:29the last action I performed was if I
1:34draw I can see I created an ellipse if I
1:38undo that now the last action is import
1:41the light burn dragon so you can tell
1:43what it is that you need to throw what
1:45you’re undoing and redoing cut copy and
1:49paste and delete are pretty
1:50straightforward and they work very
1:51similar to other tools if I copy and
1:55then move my cursor and paste wherever
1:59the cursor happens to be is where the
Video Transcript for LightBurn Tutorial – User Interface Walkthrough (Cont…)
2:00paste goes if you use the copy and paste
2:04buttons on the toolbar or menu items
2:07your paste lands with an offset from the
2:11original it doesn’t go where the cursor
2:12is the cursor is not on the page but it
2:15shifts it slightly to one side so you
2:17can see it if you don’t want that to
2:20happen you can use the duplicate option
2:23duplicate creates an exact copy of
2:25something in place so if I select the
2:28dragon again hit control D to duplicate
2:30you can see that my new copy is exactly
2:33on top of the old one
2:36delete destroy it throws away your
2:40graphic obviously I can undo it redo to
2:42get everything back the backspace key or
2:45delete key will also do that zoom and
2:49frame are useful if I click them here
2:53they zoom relative to the center of the
2:56page you can also use your mouse scroll
2:58wheel to zoom in relative to where the
3:01cursor is if I draw a shape over here I
3:05can zoom in relative to that shape by
3:08just pointing at it ditto for down here
3:11so that’s useful for navigation as well
3:13if you hold the middle mouse button you
3:16can drag the view and pan around
3:20Blackburn also has a frame key which
3:24will allow you to frame whatever your
3:26current project is or whatever your
3:28current selection is so if I select this
3:31graphic here and say frame brings it to
3:35fill the window if I don’t select
3:38anything and I say frame if frames the
3:41entirety of my document so those are
3:44useful navigation tools in preview will
3:50show you a preview of what your current
3:52cut looks like so it basically just lets
3:56you walk through what your laser is
3:58going to do you can also show traversal
3:59moves I think that’s on by default in
Video Transcript for LightBurn Tutorial – User Interface Walkthrough (Cont…)
4:01fact so I can see here the laser came in
4:05from the origin starts drawing the eye
4:08then does the out the outline shape when
4:11that’s finished it goes over it does it
4:12circle the preview is adaptive so if I
4:17move these two things closer together
4:18and bring it up again in preview just
4:20starts with those shapes filled you can
4:22also
4:23zoom in and out pan around at the
4:25preview like you can in the regular edit
4:28window and if you double click the
4:29preview it resets these shaped or pardon
4:38me these tools up here allow you to do
4:40things like mirror and arrange that’s
4:42like an vertical mirror horizontal
4:45mirror if you have more than one thing
4:48chosen for example if I wanted to
4:51perfectly Center the light burn dragon
4:53in this circle or move the circle around
4:56the light for a dragon I can align the
5:01Centers of the selected objects
5:03horizontally or vertically you can also
5:06do things like align the left or right
5:08edges top and bottom edges so these are
5:13really useful for placement making sure
5:15that things line up properly and then
5:17the make same width and make same height
5:18tools allow you to stretch shapes to
5:23match so if I line up the middles and
5:25say I want to make these two things the
5:27same width I can perfectly fill this
5:31this is useful for text for example if I
5:35use my text tool and type light burn and
5:39I wanted to make sure that that was
5:41perfectly the same width as my shape
5:44click it and you can see that it now
5:47matches that messes with the aspect
5:50ratio if you want that not to happen if
5:53you hold shift while you make the same
5:55width
5:55it actually makes them the same way that
5:57locks the aspect in place and so that’s
Video Transcript for LightBurn Tutorial – User Interface Walkthrough (Cont…)
6:00also useful in general a lot of the
6:05hotkey modifiers you won’t see I sort of
6:08like holding ctrl or shift sometimes do
6:10special things you won’t see those
6:11called out in the menu items but they
6:14are in the health and notes if you go to
6:17hotkeys you’ll see that stuff all listed
6:19here and it’s also in the documentation
6:22which we now have online over here we
6:27have the basic shape creation tools the
6:32pen tool lets you draw lines the lines
6:36will snap
6:37two existing vertices so end objects as
6:41well actually so if you have a need to
6:44draw a line in exactly a particular
6:47location for example if I wanted to
6:50start a line right at the end of this
6:51tip light burn automatically snaps it so
6:54the further resuming you can see that’s
6:56actually really accurate it will auto
6:59snap to vertex is on an existing shape
7:02as well as center points on shapes so if
7:08I need lines to be exact I can place a
7:12couple of circles or squares or
7:14something like that where I want the
7:15line centreline points to go and you can
7:19see as I get to the middle of these
7:21shapes the lines snap so you can use the
7:25existing drawing tools to sort of create
7:27your own guides for things which ends up
7:30being fairly helpful and then when I’m
7:33done and I want to get rid of these you
7:34can just select them and delete like
7:37burn also has two different selection
7:40modes one is what’s called an enclosing
7:43selection so if I draw from top down and
7:46let go of this rectangle only the shapes
7:50contained in that rectangle are selected
7:53if I draw from bottom up and let go the
7:57shapes that cross that selection
7:59rectangle are selected and so that’s
Video Transcript for LightBurn Tutorial – User Interface Walkthrough (Cont…)
8:01useful if you’re trying to grab
8:02something that’s outside of the screen
8:04for example if I was doomed in like this
8:06it’s very difficult for me to draw an
8:09enclosing rectangle around the dragon
8:11but it’s really easy for me to cross
8:12over it and you can also of course use
8:14just straight click to select the
8:18crossing selection and the click
8:21selection also use the shift key to add
8:24items to the selection the control key
8:27to toggle items in the selection and
8:29then a combination of control and shift
8:32is to remove so also over here so
8:40rectangle and ellipse we’ve already seen
8:43those when you’re creating rectangles or
8:46ellipses holding the shift key locks the
8:48ass
8:49so you get a perfect square our perfect
8:51circle holding the control key creates
8:55them from the center out instead of from
8:56the corner so if I click right here in
9:00the middle of the light burn dragon and
9:02I wanted to put a circle around it
9:04holding the control key lets me drag the
9:08circle from center out instead of from
9:09one of the corners this is the node
9:17editing tool so if you have a shape
9:20selected and you go into node editing
9:23mode you can move the vertices of the
9:25shape around you can also convert the
9:29shape from hard lines like this to
9:33smooth lines by hitting s over a
9:35highlighted point that creates tangent
9:38handles at that vertex and lets you
9:41manipulate those and then we have the
9:46text tool which again you’ve already
9:48seen but you can click existing texts
9:52and edit it you can also modify things
9:56like the font on the fly so as I scroll
Video Transcript for LightBurn Tutorial – User Interface Walkthrough (Cont…)
10:00through or bring up the font selection
10:02box you can see that the text changes in
10:07real time and modifications of size and
10:11someone do the same thing so it’s useful
10:13you can just click here and edit as well
10:19as changing where the text is aligned so
10:21I want it to be from where I selected a
10:24line on the left edge where I selected
10:26aligned on the right edge or centered
10:28which is the default also over here we
10:32have the click to locate laser tool this
10:37is when you have a laser connected
10:40basically you select this tool and
10:42clicking anywhere on the page will jog
10:44the laser to that location which is
10:47useful if you’re trying to line up a cut
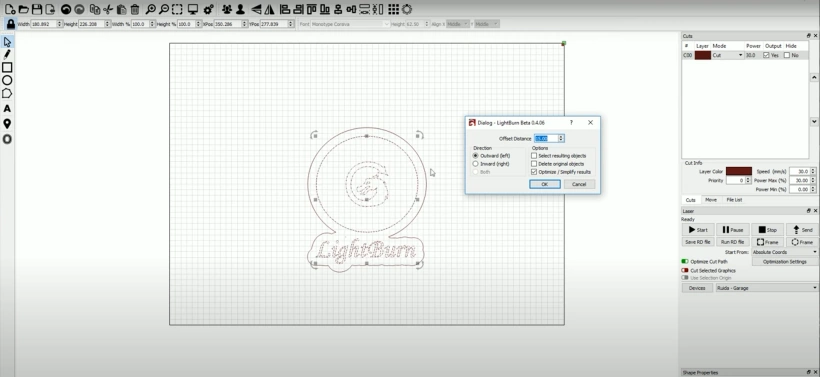
10:49and then we have the offsetting tool
10:51which is one of my personal favorites
10:53you clean this up a little bit offset is
10:57really cool for doing
11:01so if I wanted to wrap this in something
11:05like an outline click offset and as I
11:10increase the offset distance will see
11:12that the offset shape is basically just
11:15a shape that is some distance from my
11:18selection later on we’ll generate new
11:22graphics after the exact distance from
11:25your original source shapes and you can
11:27also use the mouse wheel to just create
11:29that and or move it dynamically when you
11:34have something you like it okay the
11:37resulting shape is grouped automatically
11:41so if I go back to there if I do a
11:45smaller one here you can see I’m getting
11:52some inside shape now inside the dragon
11:55and here inside this lettering if I make
11:57it just a little bit bigger that little
Video Transcript for LightBurn Tutorial – User Interface Walkthrough (Cont…)
12:00bit inside the dragon I probably don’t
12:03want that will be part of this shape as
12:08a group if I ungroup the shape by
12:11clicking here or using the ungroup uh
12:13key now I can delete those straggly bits
12:17there
12:24that’s most of the creation tools and
12:28alignment tools you also have the sizing
12:34tools here so I can size and move by
12:37numeric controls for example so if I
12:39wanted to make sure that the center of
12:41this text was exactly aligned with the
12:43center of the dragon you can see that
12:46the like dragon is at 350 the text isn’t
12:49if I type in 3 5 0 the text lines up
12:56perfectly this is your preview you’ve
13:00already seen that this will give you an
13:04exact walkthrough of the cut that light
13:09burns going to send to the laser so it’s
13:11a good way to figure out if everything
13:13be cutting the order that you want it to
13:15and figure out whether it’s doing an
13:19optimal job or not
13:21over here in the laser panel there’s an
13:24optimization settings button and the
13:26optimize cut path button if I turn off
13:29optimization and I preview light burn
13:34will draw things in whatever order you
13:36created them in and that’s not
13:38necessarily the order that you want so
13:40for example if you look at this G it’s
13:44drawing the outline and then drawing the
13:47inside shapes generally that’s
13:49inadvisable what will often happen is if
13:52you cut out a letter and then you cut
13:54the holes in the letter the letter will
13:56shift a little bit as it’s released from
13:58the material so you usually want to cut
Video Transcript for LightBurn Tutorial – User Interface Walkthrough (Cont…)
14:00inside shapes first that’s one of the
14:04options here so cut inner shapes first
14:06cutting layer order reduce travel moves
14:08all of these options we can change and
14:10the preview will reflect those changes
14:12so I’ve turned on the cut-in inside of
14:17order and so now you can see it cuts
14:21middle pieces of the G followed by the
14:24outline and it’ll do the same thing over
14:27here for the B and so on optimization
14:33settings are a really good way to reduce
14:35the time it takes to do a cut if I turn
14:39off all optimizations and bring up the
14:41preview you can see like for any
14:42estimates how long that job is going to
14:44take and how much distance it moved so
14:47in this case 971 millimeters worth of
14:50rapid moves which isn’t bad but if I had
14:54a more complicated scene get rid of this
15:00way to shrink this down it’s also worth
15:06noting this lock is the aspect lock so
15:10whenever I change width or height here
15:15either as a measurement or a percentage
15:18with that lock button clicked or
15:21selected it will lock the aspect ratio
15:24so I wanted to make
15:26125 percent of its size it grows in both
15:31directions if I disable the lock and
15:34shrink it you can see now the aspect
15:37ratio wasn’t preserved so this is a
15:39useful tool as well with this if I leave
15:47my optimization settings off and draw my
15:53cut plan you can see that there’s lots
15:56and lots and lots and lots of red
15:59that’s the rapid moves moving from one
Video Transcript for LightBurn Tutorial – User Interface Walkthrough (Cont…)
16:01shape to another in fact it’s actually
16:04doing more rapid movement that it is
16:06cutting which is pretty terrible if I go
16:10to optimization settings and say enter
16:12shapes first and reduce travel moves
16:15that’s the big one bringing up the
16:18preview now shows that now there’s
16:21significantly less rapid movement than
16:24there is cut movement and if you scrub
16:28through the preview you can see that
16:32it’s generally moving from shape to
16:35shape that are close to each other this
16:37does a really good job of speeding up
16:40your cut making the overall cut time
16:41lower and it will still do the proper
16:46inside outside shape planning and so on
16:50and so on you can turn all of these on
16:54for the most part there is not really a
16:56reason to leave them off cutting layer
16:58order is kind of a special one if I have
17:01things that I want to make sure are
17:03going to cut blast or cut first I can
17:06select those specific things so for
17:09example if I wanted to make sure that
17:10this shape and this shape were the last
17:14things to cut I can just put them on
17:17their own cut layer and set cut in layer
17:21order and now if I bring up the preview
17:25you can see that those things are the
17:28last things to cut and so right there
17:31and it’ll cut everything else first
17:33these options are very common if you’re
17:36used to Rd works or
17:38other laser software most of this stuff
17:41is probably familiar if you never use
17:44laser software before the stuff is
17:46probably not familiar this is all listed
17:49in the documentation as well so be sure
17:52to go through that that’s it for now
 Skip to content