0:00 well thanks for joining me and my little
0:03 tangerine tiger here tonight um it’s a
0:06 bit cold in this workshop but
0:07 a the things i do for the love of
0:09 education
0:11 well i’m starting a little bit early
0:12 this year i’ve got my christmas mug out
0:14 trying to get a bit of christmas spirit
0:17 going i mean it’s been a funny old year
0:19 um whichever part of the world you’re in
0:22 i’m sure that you’ve been um
0:24 suffering a little bit whether it’s
0:26 through uh
0:28 a pandemic or whether it’s through
0:30 politics
0:31 um i’m sure we all suffer the same
0:33 problems so um
0:35 my heartfelt sympathies go out to all of
0:37 you last time
0:38 we tackled the what i call the flaky
0:40 part of grayscale engraving
0:44 you would think that grayscale engraving
0:48 and grayscale photographs would go
0:51 together
0:51 and make a perfect marriage i think we
0:54 demonstrated that
0:56 it was rather difficult and probably not
0:58 a very good
1:00 stable process today we’re going to
1:02 tackle the more credible part
1:03 of grayscale engraving and that is
1:07 3d engraving in the same way that
1:09 grayscale
1:10 photo engraving could only be done on
1:13 certain materials
1:14 there had to be materials that would
1:16 scorch grayscale
1:19 3d engraving can only be done on certain
1:22 materials
1:22 and it won’t be the same group of
1:24 materials for instance
1:26 we can’t 3d engrave a piece of card or
1:28 paper
1:29 it has to be a piece of wood with some
1:31 thickness on it for example
1:33 leather i’ve never tried to engrave
1:35 leather but i suppose it’s possible but
1:37 i’m sure it would be
1:38 very difficult to charcoal it by the
1:40 time you finished plastics
1:42 materials like corian for example which
1:44 are basically
1:46 a powder filled acrylic material you’ll
1:48 be able to
1:49 engrave acrylic all sorts of woods like
1:52 mdf
1:52 woolly grave plywood
1:56 ordinary wood many many ordinary woods
1:58 but
1:59 one of the problems with many ordinary
Transcript for 3D Laser Engraving With Grayscale (Cont…)
2:01 woods is the
2:02 huge change in the material texture
2:06 as you go within the wood itself because
2:09 you’ve got
2:09 resin you’ve got hard parts you’ve got
2:12 soft parts depending on the growth rings
2:14 that take place in the wood
2:15 the molecular makeup of the wood changes
2:18 and so consequently it’s very difficult
2:20 to get nice uniform
2:22 engraving with some woods now i’ve put
2:25 my little test pattern back into
2:26 photoshop
2:27 and i’ve converted it into a grayscale
2:29 image and then i’ve modified these first
2:32 five pixels here as you can see such
2:35 i’ve got black
2:36 three quarters black half black half
2:39 white which is mid gray
2:41 then we’ve got a quarter grey and
2:44 something that’s nearly white
2:46 so we’ve got a fairly reasonable quick
2:48 change over those first five pixels
2:50 but then when we look at the signals to
2:52 create the power
2:54 for these we should get an idea of
2:55 what’s going on
2:57 now i anticipate that for instance for
3:00 that pixel there it’ll be 100
3:02 on for this pixel here it’ll be roughly
3:04 50
3:05 on 50 off and this one here will be
3:07 nearly all off it’s not just a matter of
3:09 having this
3:10 grayscale on here we have to tell
3:13 rd works that we want to use grayscale
3:16 in other words we want to make
3:18 the signals for these colors
3:21 proportional to
3:22 the color and we do that by putting this
3:25 switch on here it’s called
3:26 output direct what we can do we can
3:29 choose here
3:30 min power and max power at the moment
3:33 i’ve got it set at one
3:34 for minimum power and a hundred percent
3:37 maximum power now what that means is
3:40 that i’m gonna use one percent to
3:43 represent white
3:44 two five five and 100
3:48 to represent 0 which is black so i’m
3:51 going to burn
3:52 as much as i can for black and as little
3:54 as i can for white
3:55 that’s fine until we look at the
3:56 calibration graph for this machine
4:00 now the tube itself is
Transcript for 3D Laser Engraving With Grayscale (Cont…)
4:04 it should technically be linear but in
4:07 reality
4:08 it doesn’t look as though the output is
4:09 linear it’s not bad
4:11 it’s it’s sort of linear but not
4:14 exactly if i was to choose 50 power here
4:18 i would get roughly 50 black and 50
4:21 white in other words i’d get a mid gray
4:23 it gets a little bit more complicated
4:25 than that
4:26 because below 10 we don’t mark the
4:28 material
4:29 so there isn’t any point in going down
4:31 below 10
4:33 so what we do we set that to 10 percent
4:36 and now what happens is this gradation
4:39 256 grades of black and white
4:43 are spread over 10 to 100
4:47 not over 1 to 100 so whatever range you
4:51 specify here
4:53 the grace go 250 divisions get divided
4:57 into the a scale that you set here the
4:59 max and min that gets subdivided into
5:01 256 parts
5:04 because of the pwm we have the choice of
5:07 a frequency of anything from 0 to 25
5:10 kilohertz
5:11 as a mechanical engineer i’m struggling
5:13 a little bit to try and work out
5:15 what the best combination is we’ll set
5:18 that to
5:20 20 kilohertz and we’ve got a speed
5:24 here of 100 millimeters a second
5:30 and there we go we’re expecting to see
5:33 if you remember
5:34 20 pulses per pixel
5:38 these are the first five pixels look
5:40 there’s a black one on permanently more
5:42 or less
5:42 this one is slightly lighter and it’s
5:46 off
5:46 for some of the time this one is mid
5:48 gray and it’s roughly 50
5:50 on 50 off this one is lighter
5:54 so it’s off more than it’s on and this
5:56 one is nearly white so it’s nearly off
5:58 most of the time and just a little bit
6:00 on
Transcript for 3D Laser Engraving With Grayscale (Cont…)
6:01 so if i change this frequency here to
6:03 say one
6:05 so that i get one pulse per pixel
6:08 and not not 20 pulses per pixel one
6:12 thousand
6:17 and there’s my first pixel there’s my
6:19 second pixel
6:21 there’s my third pixel my fourth and my
6:24 fifth pixel here are two things that are
6:26 exactly the same
6:27 relatively speaking they don’t look the
6:29 same but
6:31 i can either choose 20 kilohertz
6:35 and here are my pixels
6:39 we can see here the black one the dark
6:41 gray one
6:42 the 50 50 mid gray one then the lighter
6:45 gray one and the nearly white one
6:47 i mean the nearly white one is mainly
6:48 off and only just a little bit on and
6:51 here it’s 50
6:52 on 50 off but look i’ve got exactly the
6:56 same situation here
6:58 when i run instead of a 20 kilohertz
7:00 time base
7:01 if i run a one kilohertz time base i’ve
7:04 still got my power on
7:06 per pixel this is fifty percent power on
7:09 and fifty percent power off and this is
7:12 fifty percent power on
7:13 and fifty percent power off which of
7:15 them produces
7:17 the biggest burn let me try and put this
7:20 into some sort of humorous perspective
7:23 that helps me to try and analyze the
7:25 amount of damage
7:27 that would take place under these two
7:28 different circumstances
7:30 if i was intent on committing suicide i
7:33 could jump out of the ground floor
7:35 window
7:35 20 times or i could go to floor number
7:40 20
7:40 and jump out once now i know it’s a
7:43 fairly brutal
7:44 analogy but i’m going to do a lot more
7:45 damage when i jump out from the 20th
7:47 floor
7:48 than if i’m going to jump out 20 times
7:50 from the ground floor if i leave it set
7:52 at 20 kilohertz
7:53 then this will automatically adjust
7:55 itself to whatever size pixel and
7:57 whatever speed i’m running and it’ll put
7:58 an appropriate number of pulses
Transcript for 3D Laser Engraving With Grayscale (Cont…)
8:01 in to each pixel but it doesn’t mean to
8:03 say i’m getting the best
8:04 amount of power out of this machine into
8:07 every pixel
8:08 if i want to try and do the analysis
8:10 carefully as i’ve done
8:12 with my spreadsheet and calculate
8:15 what the optimum frequency is to get
8:19 one pulse per pixel as opposed to
8:23 20 pulses per pixel i think i’m going to
8:25 get a much more
8:26 efficient burn out of this machine
8:29 okay now i’ve devised a very simple test
8:32 we’ve got a mid gray test square 10
8:35 millimeter square
8:36 like this now i’ve got a four inch lens
8:38 in here because i know from
8:40 previous experience with 3d engraving
8:43 that you actually need a long focus lens
8:47 previously i’d used a two and a half
8:49 this time i’m going to try and use a
8:50 four inch lens so this first test
8:53 is the 20 kilohertz test
8:56 [Music]
9:03 wow there’s a lot of material being
9:05 removed there now we do the one
9:06 kilohertz test beside it
9:18 so we’ll just do a quick measurement
9:19 approximately a millimeter
9:24 no different color no different
9:28 finish no different so it appears i’m
9:31 worrying unnecessarily
9:33 they come out to the same result i had
9:36 the air assist on
9:37 so i was blowing the smoke back down
9:38 onto the job i’m going to turn the air
9:40 assist off now
9:42 and see what effect it has
9:48 okay so that’s good that’s hardly made a
9:51 mark on it at all look it’s
9:52 pretty clean so we’re not blowing the
9:54 crap down onto the job
9:56 so that’s the one kilohertz
10:00 as opposed to 20 kilohertz
Transcript for 3D Laser Engraving With Grayscale (Cont…)
10:04 let’s just try the 20 kilohertz beside
10:06 it this time
10:08 just to be sure that we’re comparing
10:11 eggs with eggs
10:13 now i look at that and i think to myself
10:14 i’ve got more damage along this bottom
10:16 edge here
10:18 with 20 kilohertz that i have
10:21 doing it the other way around i saw it
10:23 there and i thought
10:24 maybe that’s an exception but no it’s
10:26 repeated here as well so the one
10:28 kilohertz gives a cleaner engraving
10:30 result
10:30 we’re going to go and search on google
10:33 for
10:34 3 d
10:39 engraving
10:42 bitmaps and we get all these images to
10:45 look at so let’s just click on some of
10:47 these just click on the images
10:48 and these are special bitmaps you can’t
10:52 just
10:53 take any photograph and do an engraving
10:56 you have to have a special especially
10:59 prepared bitmap
11:01 because these bitmaps have got a strange
11:04 look to them they look almost like wax
11:06 this is a good example of what i mean
11:08 basically
11:10 if you could regard remember black is
11:13 zero and white is two five five
11:17 and there are all these levels of gray
11:19 in between those two numbers
11:21 so if you look at a survey map say a
11:23 mountain
11:25 there will be little rings around the
11:27 top of the mountain and
11:28 the size of the rings will tell you what
11:30 the shape of the mountain is as you go
11:31 further down the mountain
11:32 the rings will get bigger and they will
11:34 get all sorts of funny shapes but
11:36 the line that’s drawn that funny shape
11:39 is the height of the mountain it’s like
11:41 a slice
11:42 through the mountain well that’s
11:44 effectively what this is this is a 3d
11:46 object that has been sliced
11:48 this way and the lines that are on top
11:50 the layers that are on top
11:52 are white and the layers that at the
11:54 back are black
11:57 and that’s how we’ve got 3d nus into
11:59 this picture we’ve used the color
Transcript for 3D Laser Engraving With Grayscale (Cont…)
12:02 as a 3d feature
12:05 so you can’t just take an ordinary
12:07 photograph
12:08 and use it because it doesn’t have this
12:10 information in it
12:11 the color codes the third dimension
12:14 file import and there we go 100 no no no
12:17 no no
12:18 no we were running 100 millimeters a
12:21 second and taking big chunks out
12:23 i think we’ll run that around about 200
12:25 millimeters a second
12:26 i’m just guessing these parameters uh
12:30 advance it doesn’t make any difference
12:32 we’ll set it to 20 kilohertz
12:35 because we found that it makes no
12:36 difference and
12:39 minimum power here’s the difficult bit
12:42 because i don’t know at what level power
12:44 we shall see
12:46 nothing so i’m going to leave it set at
12:48 five
12:49 and a hundred we’ve got our output
12:50 direct switched on
12:54 and our swing um
12:57 i very much don’t we’re going to get
12:59 point one with a four inch lens it’s
13:01 probably going to be 0.2
13:04 so maybe
13:07 mind you if i do point one i should get
13:11 like a double cut
13:15 so yeah i think we’ll leave it at point
13:16 one the question is what should we
13:19 try and engrave if i engrave a piece of
13:22 plywood like this
13:24 then i’m going to get different layers
13:26 in it now that might be interesting
13:28 to see different layers in here
13:31 different colors
13:32 nice and grainless this popular plywood
13:34 this is very
13:35 soft so it should burn quite easily
13:41 i’m just putting the uh magnets on here
13:43 just to
13:44 just to hold it in place my focus should
13:46 be set to 15 but what i’m going to do
13:49 i’m going to set it to 14 so that is
13:54 probably going to go two or three
13:55 millimeters deep now this is a very long
13:57 focal length lens so it’s not going to
13:59 make a great deal of difference
14:00 to the focal distance if i change it by
Transcript for 3D Laser Engraving With Grayscale (Cont…)
14:03 a millimeter basically i’ve now set my
14:05 focus roughly one mil inside the
14:07 material this has got quite a big
14:09 program there’s a lot of information in
14:11 here
14:12 and i’ve probably mentioned to you
14:14 before what i do as soon as the pro
14:16 as soon as the head moves i’m going to
14:18 press pause
14:19 because the program is going to take
14:20 quite a long time to download
14:22 and i don’t like the machine to try and
14:23 walk and talk at the same time
14:25 okay so i’ve turned the air assist off
14:27 now because i don’t want air assist on
14:30 we’re just going to close the lid and
14:31 let the smoke get sucked away i just
14:33 remembered we did say that one
14:35 kilohertz was better because one
14:38 kilohertz actually
14:39 gave a cleaner result so we’re now going
14:42 to close the lid
14:43 getting a very very deep cut i think
14:46 it’s too brown
14:46 i think we should start again it’s
14:48 already doing a superb job
14:50 but i would like it to go faster not
14:52 quite such a deep cut we’ll change the
14:54 speed to
14:55 slightly less smoke because we’ll be
14:57 converting less
14:59 solid into gas so there’s our first pass
15:03 we’ve already got some quite nice
15:04 profile into it
15:06 and i’m just going to put a little mark
15:07 on here because that’s past number one
15:10 we have to do this multiple times you
15:13 could take a look in the middle here and
15:14 you’ll see there’s a little white
15:16 spot in the middle there where it hasn’t
15:19 cut
15:22 it’s the same as the outside here so
15:25 that has basically that’s the mountain
15:27 top
15:27 where we’ve got if you like no cutting
15:30 that’s five percent power which is not
15:34 having an effect at all
15:36 and this bit around the outside here is
15:38 100 power which is
15:40 digging away a lot deeper
15:43 so we just run the same program again
15:45 and again
15:46 and again to get deeper and deeper and
15:48 deeper because
15:49 whatever shape we’ve got there
15:51 proportionately the same percentage will
15:53 come off
15:54 every time so the more that came off
15:57 this time
15:58 the more will come off next time and so
16:00 the profile will gradually get more
Transcript for 3D Laser Engraving With Grayscale (Cont…)
16:02 3d as we take passes
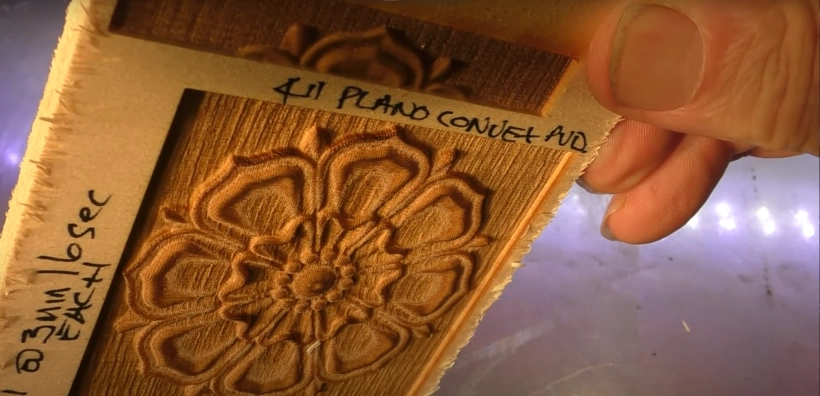
16:07 okay we’re gonna run the fourth cut
16:10 and you can see it from the front
16:40 so there it is with all its information
16:44 looking at it front on you can’t really
16:46 see
16:47 how 3d is
16:52 when we look at it from the side
16:55 look at that using quite incredible the
16:59 definition
17:00 you’re getting on these features in the
17:02 middle here
17:10 well we did anticipate that this was
17:12 going to be one of the machines
17:13 strengths
17:14 because you only have to look at a
17:16 company called kerns
17:18 and they specialize in this sort of
17:19 stuff using rf lasers so
17:21 you know i knew that it was going to be
17:23 good but i have to say
17:25 that’s exceeded my expectations
17:29 took a little bit longer than i thought
17:30 but on the other hand it’s still not too
17:32 bad for 30 watts we found a way of
17:36 balancing the speed the material
17:39 extraction and the least amount of
17:42 damage
17:43 it’s a pale brown it’s not burned it’s
17:45 not barbecued
17:47 i’m very happy with the result and the
17:49 crispness and the the quality of it is
17:51 superb there isn’t even there’s no hint
17:54 of curtains on there at all
17:56 or those funny lines that i had
17:58 previously on my other machine
18:00 that only took about three and a half
Transcript for 3D Laser Engraving With Grayscale (Cont…)
18:01 minutes for a pass
18:03 and there was four of those so that’s
18:05 what 12 13 minutes
18:07 i suppose that’s not bad it’s nice to
18:09 find something really positive about
18:11 this machine even though it is rather
18:13 niche
18:14 well i think that basically concludes
18:16 our first very quick
18:17 preview if you like of what this
18:19 machine’s capabilities are
18:21 i think what we’re going to do now is
18:23 gradually go back to the beginning
18:25 start looking in much more detail at
18:28 things like photo engraving
18:30 and order engraving on different
18:33 materials
18:34 to see what the problems are and i
18:35 suspect that for that quality of work
18:38 on this price of machine kerns can’t get
18:41 anywhere near it
18:42 the only thing that limits us really is
18:44 30 watts
18:46 with 60 watts we’d ever been able to run
18:48 twice as fast we’d probably be able to
18:49 run it a thousand millimeters a second
18:51 thank you very much for your time and
18:52 patience again
18:53 and i hope this has been an interesting
18:55 session it certainly has been for me
18:58 and i’ll catch up with you next session
19:00 bye now
 Skip to content