0:00 welcome back to another Rdworks
0:03 Learning Lab today I’ve been distracted
0:06 onto a slightly different subject it’s
0:08 all to do with etching but it’s not real
0:11 edging because we can’t do any edging on
0:14 this machine we can’t cut or scratch the
0:18 surface of metal because there’s just
0:20 not enough power so this is this is
0:23 proper laser etching where you’re able
0:26 to cut into the surface of stainless
0:28 steel but you need a very powerful
0:31 machine to do this now this has been
0:33 done with a nitrogen assist gas which
0:36 means that you get a nice clean finish
0:39 oxygen will burn that surface and make
0:41 it into a black edging now we can’t do
0:44 that on this machine hmm but what we can
0:47 do is a sort of a pseudo etch I’m
0:50 reluctant to call it itching or
0:52 engraving because it’s certainly not
0:53 that what we’re really going to do is to
0:56 paint a substance onto the surface of
0:59 the stainless steel so we’re using the
1:01 heat of the laser and the CNC element of
1:05 the laser to produce the very accurate
1:07 shapes to produce a bonding action
1:10 between the steel and the chemical that
1:12 we’re putting onto the surface so it’s
1:14 not really itching and it’s certainly
1:16 not engraving but at the end result we
1:20 get quite a nice finish now this is just
1:23 a couple of experiments that I did
1:25 earlier just to test out something that
1:28 I had I’ve not done in the test work
1:31 with this product apart from these two
1:33 little test items which I’ve checked
1:35 I’ve done some fairly serious scratching
1:37 on this part here I mean here we’ve got
1:40 a piece of stainless steel
1:49 and as you can see it’s well and truly
1:52 Bandhu on that surface and it isn’t
1:54 going to come off so I don’t think we’ve
1:56 got any problem with durability we’re
1:58 just going to find out now what sort of
1:59 powers that we need and what sort of
Transcript for Laser Marking Metal (Cont…)
2:01 problems we’re going to come across when
2:03 we did carry out this process now told
2:05 my client yes I can get hold of this
2:07 this marketing product it’s not that
2:09 expensive until I start to checking it
2:12 out and what I found was that here in
2:14 the UK a can of this stuff is going to
2:17 cost me over 140 pound that’s $200
2:20 whereas if I bought it in the US with
2:23 shipping and I lived in the US it would
2:26 cost me half that price about $100 so
2:28 still quite an expensive product this
2:30 spray-can product has got some flammable
2:33 chemicals in it and consequently that’s
2:36 part of the reason for this excessive
2:38 cost here it has to be carried as a
2:40 hazardous chemical via an aeroplane so
2:44 shipping costs an arm and a lake to get
2:46 it to the UK it’s still expensive in the
2:49 States because it has to go UPS or
2:51 something like that as a hazardous
2:53 chemical so I checked up I checked up on
2:55 the website and found that they make a
2:57 non hazardous chemical version now which
3:01 is basically a water-based version of
3:03 the same product which you can ship as a
3:06 non hazardous material and this is an LM
3:09 m60 60 after I’d ordered this material I
3:13 did a little bit more research and found
3:16 out from various sources that you can in
3:20 fact achieve nearly the same result a
3:23 much cheaper way this is the cheaper way
3:28 it’s a molybdenum disulfide dry
3:32 lubricant
3:33 this has got some ceramic material in it
3:37 which is why it’s called sir mark but
3:39 having said that a lot of the material
3:42 in this product is molybdenum and of
3:46 course the main product in this is
3:48 molybdenum as well so we stand these
3:53 side-by-side and we find that this one
3:58 even shipped to me now I bought that for
Transcript for Laser Marking Metal (Cont…)
4:01 around about 60 pounds courtesy of a
4:05 friend in the States and I bought this
4:07 of my local eBay for 12 pounds about $17
4:13 for less than a tenth of the price
4:15 I’ve probably got 10 times more material
4:17 here and what we’re going to do today is
4:19 to carry out a comparison test between
4:23 these two products because this is an
4:24 aerosol can we should take a quick look
4:26 at the safety precautions there are no
4:29 specific safety precautions or chemical
4:31 hazards in here apart from those that
4:33 you would normally expect to find on a
4:35 spray can because it’s got a propellant
4:36 in it it has done do not expose to
4:38 temperatures exceeding 50 degrees C may
4:41 cause irritation to skin and eyes
4:43 repeated exposure may cause skin dryness
4:46 and cracking wear suitable gloves okay
4:51 well I’ve now read the very very very
4:55 small print on the bottom of the bottle
4:57 here and decided I ought to probably
5:00 take a few precautions because I’m not
5:03 allowed to swallow it I’m not allowed to
5:05 snort it oh inhale it sorry and I’ve got
5:09 to protect my clothing and I must keep
5:11 it off my skin it could give me lung
5:15 cancer it may affect my liver hmm I’m
5:21 just wondering whether I should even
5:22 open the bottle and this is the safe
5:24 product
5:31 I think it’s all American legislation so
5:35 let’s throw caution to the wind as you
5:44 can see in here this is a very gloopy
5:46 solution which I’ve stirred up now and
5:48 I’ve put a small amount in there and in
5:51 the ratio of about three or four to one
5:54 I’ve put some acetone solution in there
5:57 and given it a jolly good mix up with a
5:59 paintbrush
Transcript for Laser Marking Metal (Cont…)
6:00 now they recommend that you use a foam
6:02 brush rather than a head paint brush but
6:05 I don’t have a foam brush so we have to
6:08 make do with what I’ve got what I’ve
6:09 also done now has laid on a fairly thick
6:13 coating as even as I can with a
6:15 paintbrush it’s not totally even but I’m
6:19 sure it will work and now we’ve got to
6:21 leave that for around about 20 minutes
6:23 half an hour to dry I’m still not dead
6:26 so we put the cap on
6:27 I’m not even dizzy and we’ll put this
6:30 very dangerous chemical away now because
6:32 we painted this surface here with an
6:34 acetone mixture it’s already sort of
6:37 self cleaned itself just in case there’s
6:40 any risk of contamination on this
6:43 surface here I would just make sure I
6:44 clean the surface with acetone and in my
6:52 carefully constructed spray booth which
6:56 will try product number two number two
7:00 just like paint it needs to be well and
7:02 truly shaken because it has it has it
7:05 does settle out so this product is much
7:11 easier to
7:14 apply just a thin coat everywhere okay
7:24 here are the two products now bear in
7:25 mind we mustn’t expose this one to heat
7:27 so it says I’m highly flammable but what
7:33 the hell rules are made to be broken
7:41 and I think you can say at a glance this
7:44 one is already ready to use it’s dry
7:47 this one not yet
7:53 okay that’s more or less drying now and
7:56 so what we’ll do we’ll do it we’ll do it
7:58 the wrong way around will we use this
Transcript for Laser Marking Metal (Cont…)
8:00 one first and this one has now got a
8:03 little bit of heat in the metal so I’ll
8:06 leave that to carry on baking nice and
8:08 dry but that one is I do
8:12 just check the focus on that which i
8:14 think is about right that’s not far out
8:15 and we’ll run a program now I’m going to
8:20 be very careful about throwing the fumes
8:22 outside and we’ll just start the program
8:25 off like this and then unusually for me
8:28 I’m going to close the lid
8:33 so as you can see it’s very unexcited
8:37 even though the fumes are being
8:39 extracted backwards I can still smell
8:41 here just a little bit a strange almost
8:46 like burning matches smell it’s
8:48 something different but it’s that sort
8:50 of smelly get when you strike matches
8:53 when I did my first number two samples
8:56 that you saw I got a bit of a hint of
9:00 this strange smell and I decided that I
9:03 really ought to check out what happens
9:06 when you burn molybdenum because bearing
9:10 in mind this is a molybdenum spray that
9:12 we’re testing at the moment and the
9:14 other product even though it doesn’t say
9:16 on the label when I look at the contents
9:18 of it on the website there’s a fairly
9:21 high molybdenum content and what happens
9:24 is when you heat molybdenum it produces
9:27 something called molybdenum trioxide
9:30 because the molybdenum combines with the
9:32 oxygen that’s in the air now molybdenum
9:35 dye trioxide is actually a hazardous
9:38 substance if I can point you towards the
9:40 New Jersey Department of Health and
9:43 their hazardous substance fact sheet
9:45 about molybdenum trioxide you can see
9:49 for yourself just why I’m being a little
9:51 bit cautious I don’t want to breathe any
9:55 of this stuff because it says it can
9:57 affect you when breathed in eye and skin
Transcript for Laser Marking Metal (Cont…)
10:00 contact can cause irritation the dust or
10:03 mist can irritate the nose throat and
10:04 lungs causing cough and or tightness in
10:07 the chest
10:08 molybdenum trioxide can cause weight
10:10 loss or I could do with some of that
10:12 diarrhea for muscle coordination while
10:15 I’ve already got that headache and
10:18 muscle or joint aching repeated exposure
10:21 can reduce red blood cell count anemia
10:24 and molybdenum trioxide can affect the
10:28 liver and kidneys
10:29 bear in mind whether you’re using the
10:32 cheap or the expensive version of this
10:34 product I urge you to take adequate
10:37 ventilation precautions I know I might
10:40 have joked about the safety aspect of it
10:42 to start with but this part of it is not
10:45 something to be joked about I don’t
10:46 think now I’m going to lift the lid just
10:49 for a moment so we can see what’s going
10:50 on because look at that doing very much
10:53 it’s just burning the bone in the
10:55 chemical off the surface by the look
11:00 now I would suppose it’s fairly
11:02 excusable why there’s no warnings on
11:04 here about burning this product because
11:08 it was never designed to be used in the
11:11 way that we’re using it but I’m not so
11:13 sure about that product I’m fairly sure
11:16 there should be some warnings on there
11:18 but when this product is burnt it could
11:20 produce further have hazardous chemicals
11:23 or gases I’ll leave you to make up your
11:25 own mind we’re yet to find out whether
11:27 or not these two stack up against each
11:29 other this might be cheaper nasty this
11:32 might be expensive and fantastic
11:33 well here’s our end product we’ll just
11:38 get our other panel underway
11:43 so let’s set that panel going now we’ll
11:47 take a a look this is like magic
11:50 painting in Reverse because hopefully
11:52 what this will tell us
11:55 how good various speeds are and feeds
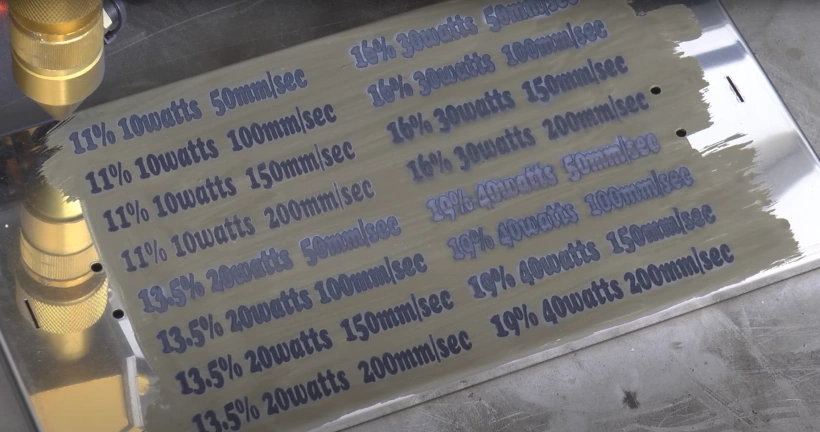
11:59 what you can see on here I’ve got four
Transcript for Laser Marking Metal (Cont…)
12:02 and eleven percent power which is ten
12:04 watts for at 13.5 percent which is 20
12:09 watts for at
12:12 30 watts and for at forty watts
12:17 and each one of these watts I’ve got
12:20 fifty hundred hundred and fifty and two
12:22 hundred millimeters a second so we’ve
12:24 got a good matrix of data here that we
12:28 can play with and this is what I hope I
12:31 should be able to do with it
12:34 with some acetone
12:40 we should be able to get this stuff off
12:43 and then what we should be left with
12:49 for the parameters that work 50
12:51 millimeters a second that one is just
12:54 barely etched into the surface this one
12:57 at 20 watts has marked the surface but
13:01 it’s not very black this one at 30 watts
13:04 has done a good job at 50 millimeters a
13:07 second but once you start getting up to
13:10 100 millimeters a second it’s not very
13:12 good and this one at 40 watts is good as
13:16 well and even at 100 millimetres second
13:19 it’s starting to drop off so whichever
13:21 way you look at it it would appear that
13:23 speed is the controlling factor and that
13:27 makes sense because I’ve got a one and a
13:30 half inch lens on here which has got a
13:33 very powerful hit very powerful amount
13:37 of energy density but provided I keep
13:39 the high energy in one spot for long
13:41 enough it will burn this chemical into
13:43 the surface but as soon as I start
13:45 moving across quickly there’s not enough
13:47 time to build up any heat to burn the
13:50 chemical into the surface so this makes
13:53 perfectly logical sense that we need to
13:55 run at a reasonably medium to high power
13:58 30 40 50 watts but in a fairly slow
Transcript for Laser Marking Metal (Cont…)
14:01 speed that’s an entirely acceptable
14:04 black mark and the end result of our
14:07 expensive product I think we should do
14:09 the same thing again we’ll take it off
14:10 with acetone
14:19 well let’s take them out for a proper
14:21 daylight comparison I think you can see
14:25 you get what you pay for
14:28 there’s obviously a sweet spot here for
14:30 the cheap product which I think you’ll
14:39 agree it’s still very very durable and
14:41 if you get this one at about the right
14:44 speed then yes it works extremely well
14:48 and that was 30 watts 50 millimeters a
14:51 second that was definitely the best one
14:52 because when you start going 40 watts
14:55 for some reason or other there’s not the
14:58 buildup and there’s a bit more
15:04 distortion in the surface this one has
15:08 got a small amount of distortion in the
15:11 surface these have got the same sort of
15:18 thing because we’re running at the same
15:19 speed it’s actually causing a slight
15:21 distortion in this one point two
15:23 millimeter thick stainless whereas in
15:25 fact when we start running a bit faster
15:27 at 30 Watts hundred millimetres a second
15:32 100 millimetres 150 millimetres a second
15:35 that’s still not bad we’re losing it a
15:38 little bit here for some reason over but
15:42 this has got more of a buildup on the
15:43 surface you can see as I’m scratching it
15:45 off but it still leaves a nice mark
15:50 behind even if it scratched off what can
15:52 I say if I had the choice I would
15:56 probably still go for this product here
15:58 because at that sweet spot it gives a
Transcript for Laser Marking Metal (Cont…)
16:01 good result if I have a very delicate
16:04 product to mark then this is undoubtedly
16:08 the right product to go for because look
16:10 with as little as 10 10 watts and 50
16:13 millimeters a second you get a good
16:17 H on the surface without causing any
16:21 distortion to the product in the
16:23 background so with this product we’ve
16:26 only got one good sweet spot whereas
16:31 this one there are quite a few sweet
16:33 spots depending on what thickness of
16:35 material you’re working on but generally
16:37 that one there is the best well I can’t
16:42 tell you any more than that other than
16:43 whichever one of these products you use
16:46 be careful with the ventilation you pays
16:49 your money and you takes your pick thank
16:54 you very much for watching
 Skip to content