 Skip to content
 The Fiber Laser Learning Lab Series with Russ Sadler
In this Series, Lotus Laser have lent Russ a MOPA 20 watt fiber laser to “play with”. Although Russ has a moderate understanding of laser technology (his words) and how constant power glass tube systems work. The pulsing fiber laser marking machine is shrouded in a deeper mystery than the glass tube machines.
They have been designed for high speed marking and the technology has been well tried and proven. There are limited “tricks” that the pulsing laser technology can perform. You enter predefined parameters for each marking “trick” you wish the machine to deliver , then stand back in amazement. Most correspondents tell Russ that they have bought their machine direct from China and received a machine and EZCAD software, preloaded with a few default parameters. No other instructions beyond the EZCAD manual are forthcoming.
Russ states “I am neither a teacher or expert in this field so you join me in my learning adventure with the warning that I have a simple but inquisitive mind and will probably make mistakes on my way to discovering the truth. I WILL oversimplify and maybe distort the scientific detail in my quest to build a simple picture of why and how this technology works. I am not trying to reverse engineer anything, just to break through the seemingly impenetrable ‘techno cotton wool’ that surrounds this amazing piece of science.”
Contents
To be completed soon.
Video Resource Files
There are no more resource files associated with this video.
External Resource Links
There are no more external resource links associated with this video.
Transcript for Fiber Laser Marking Machine: A palette of Sparkly Colours
Click the “Show More” button to reveal the transcript, and use your browsers Find function to search for specific sections of interest.
0:01welcome to another fiber laser Learning Lab I think we’ve been quite successful in trying to find out how these colors
0:08actually exist what causes them how they come about and how we can generate
0:14different textures on the color those that are smooth tend to be very light
0:20sensitive and those that have got a texture to the surface like those that
0:25you can see on the top row there they’re much more durable you can see the colors
0:30in many different directions so they do change texture depending on the way the
0:36light catches them but they’re not the sort of things that disappear to black now my definition of a production color
0:42something that can be created quite quickly most of the colors that I’ve seen being produced have been these
0:50smooth colors which are lighter sensitive very very fine pitch and very
0:56very slow speed that in turns means they take a long time to cover an area with a
1:03color my aim is to try and find ways of producing the color quickly and durably
1:09just as an example here we’ve got a gold just there at 3 it’s 2,000 millimetres a
1:17second and 1 micron pitch to do that little square probably takes 4 or 5
1:23seconds this one at the bottom is exactly the same color not quite as
1:29sparkly but it’s certainly a production worthy Gold which probably takes less
1:37than half a second because it’s done at 60 microns pitch and two thousand
1:44millimeters a second with a 30 nanosecond pulse I’m getting the feel
1:51for the way that these colors operated there they are in a way very temperature sensitive but not sensitive to the
1:58atmosphere but sensitive to the temperature that you can induce into the surface with pulses and power so I’m
Fiber Laser Marking Machine: A palette of Sparkly Colours (Cont…)
2:05getting quite a warm cuddly feeling about being able to create these colors
2:13so from my experience so far what I’ve done I’ve actually put I’m producing
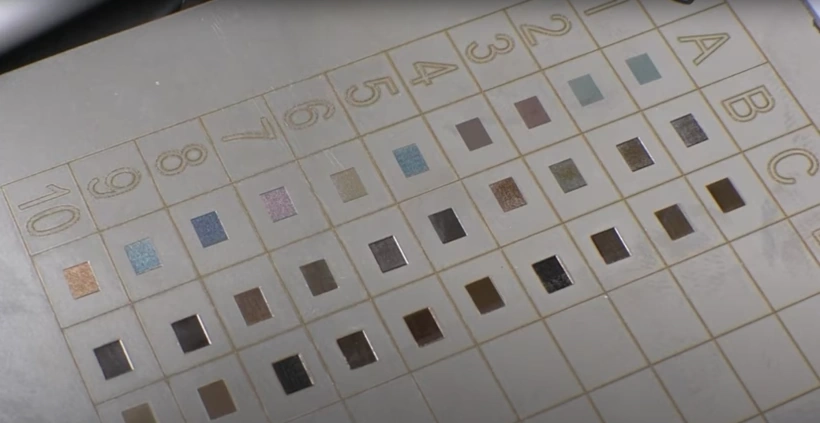
2:20what I would call a color search it’s a prospecting swatch which allows me first
2:26of all I’ve decided that the range of colors that I’m looking for are going to be sparkly colors in this range I’m
2:32around about 1,200 to 2,000 two millimeters a second and I also know
2:38that it’s very likely that the colors that I’m going to be looking for are roughly between four microns and one
2:44micron they may be down at 0.5 of a micron but I’m not going to be looking at that at the moment we’re just going
2:50to do a prospecting search between these two microns and these two speeds and
2:56we’re going to do it for every single pulse width now to be honest I got to
3:03the bottom of this page here and we got as far as 30 nanoseconds pulse and if we
3:10look at these results again you’ll clearly see that once we got to the end
3:15of this column here we almost ran out of color there is no color in these second
3:23and third rows here in the B’s and C’s so b1 was the end of the six known a
3:31second pulsus that’s where our color stops I ought to be just looking in the two four and six down a second polish
3:38region for the colors I did push on to the bottom of the page because hey I like things to round off nicely this
3:44here was the bottom of hide page 30 nanoseconds 1200 millimeters a second
3:50with a 1 micron spacing now that gave me a very nice really nice matte black but
3:58then all these other colors here there’s no color in them so when I arrived at this point here with a 30 nanosecond
Fiber Laser Marking Machine: A palette of Sparkly Colours (Cont…)
4:06pulse 1200 kilometres a second and a 1 micron line spacing I got dead jet black
4:14very nice but I’m already getting the message Hey there aren’t any more decent
4:21colors to be found at this end of the range there’s no point in increasing the pulse length anymore all
4:26do is finish up burning a hole through the material if I’m not careful so let’s stop at this point and consider whether
4:32or not there is something hiding below this black well I mean below this black
4:38can we reduce the power on this black patch and find some color well there are
4:44two ways that we can reduce that the power into that black patch this is done at 1200 millimeters a second so the
4:51first thing that we could do is increase the speed which decreases the number of dots horizontally the next thing we
4:58could do would be to increase the pitch from one micron to 10 microns so this
5:04one is 10 microns and two thousand millimeters a second so we’ve significantly decreased the number of
5:11pulses per square millimeter and we’ve changed it from black to dark brown okay that’s very good let’s let’s
5:19see what else we can do we can’t change the speed anymore because we’re really running maximum speed ie we’ve got the
5:25minimum number of dots across so the only option left for us now is to increase the line spacing so here we’ve
5:31increased the line spacing from 10 to 20 microns hmm it’s improved it a bit it’s
5:39turned into a slightly lighter brown just a bit of a almost like a pale gold so let’s go one more step and we’ve
5:47taken up to 40 micron spacing we’re getting a little bit better gold now and
5:53here we are at 60 microns spacing yes 60 microns that’s one beam width and we’ve
6:01got a lovely gold you know at the end of the last session I showed you the pattern for what looked like a matte
Fiber Laser Marking Machine: A palette of Sparkly Colours (Cont…)
6:08black but this one is not going to fall your eye this is exactly what it looks like matte black this is done at 90
6:16kilohertz so now with the speed at 2000 filmy is a second you can actually see
6:22the pulses this is the line that created this pattern up here this is the last
6:28line just here where my finger is so let’s just go and have a look at this pattern I’ll just move that up off the
6:34screen ok the contrast changes I mean there’s no doubt you can see that the general background there is black
6:39but what are those little white pieces well it’s zooming have a look because these are little blobs of stale so go
6:46we’ll gradually raise the table up and bring the top of these little elements
6:53here into focus just there now that’s
7:00120 let me raise it up by 20 microns 40
7:08microns 50 60 microns and we’re still
7:14not at the bottom of the pit yet 70
7:19microns 80 microns
7:30just about there somewhere around about 82 or 85 microns that is a very very
7:39rough surface let’s go down a further
7:44magnification
7:49you can see the last line here and you can see the wake this rubbish has
7:57created on either side of the line sitting here so as we move up so we’re leaving these little wakes of globs of
Fiber Laser Marking Machine: A palette of Sparkly Colours (Cont…)
8:06Steel which is sticking up above the background thought you might be
8:11interested because this all helps to paint a picture of where color comes
8:17from in this particular instance we’re seeing no color even at this level but
8:23sometimes you can see color and you still get black but I’m going to have to
8:28investigate all these lower powers but particularly the ones here in the 2 4 &
8:346 known a second region because they’re the ones where I think I’m going to discover the colors that I’m looking for
8:41this next bit is going to be a very tedious task for me I’m gonna have to sit by the Machine and I’m just gonna
8:47have to play with a few factors I hope to do it in a fairly logical way and hope that at the end of it we should be
8:53able to produce a nice palette of colors so I’m off to do quite a few hours worth
8:59of work and I’ll come back and report to you when I’ve got some interesting results this is a tedious job but it’s
9:06fascinating I said that wasn’t gonna
9:11involve you and I’m not going to involve your great deal but I thought you might
9:17like to see a little bit of the method or procedure that I’m going through to
9:22try and get these colors because I’m got I’ve got a little bit of an intuitive
9:28feeling about where these colors are and how I can get them now and I’ve got a list here so far of about 14 colors that
9:35I’ve identified nice clean crisp colors that I think we should be able to use if
9:41we want to do some artwork I’ve still got a lot of colors to add into my palette but slowly slowly with building
9:49this list for example oh look at my a3 swatch and I say that’s quite a nice
9:55sort of maroon color dark purple start off just there and see how we can
10:03develop from that color so d3 800 millimetres a second with the 20% power
Fiber Laser Marking Machine: A palette of Sparkly Colours (Cont…)
10:10and the pilot mode 30% so I’ve actually increased the power to get a lighter
10:15color on this swatch now I’m sure you can see in this light that that is a very dark maroon and underneath it we’ve
10:23got a slightly lighter dark purple and then we go on to a sort of a Apostoli
10:29color here which is a a lilac e pink that color there is only skin-deep
10:37it is only manipulating the oxide layer the mop the molecules in the oxide layer
10:44and changing their colors the colors I’m looking for are disrupting the surface
10:50of the metal underneath as well and I’m producing a texture that’s what gives me the sparkly effect now the current range
10:57that I’m going to be finding will be probably significantly different than
11:02the range that I could find if I was looking for these superficial surface colors now the surface colors are what
11:09everybody else is looking for and everybody else is identified eventually I’ll probably go back and try and track
11:14these down as well because there’s probably a much wider range of colors to be found but that’s not my first task
11:22because they take so long to produce they’re very very slow they’re not what I would classes production colors and
11:28the whole point about this is you want to use these colors for something it shouldn’t just be a gimmick to sell the
11:34machine we’ve gotta first of all try and recreate d4 and that’s my starting point
11:40it’s completely repeatable ideally I’d like that color to be sparkly and as
11:48dense as that so here are my starting parameters 800 millimeters a second well
11:55I know I’m not going to get sparkly colors at 800 millimetres a second I need to be a thousand or 1200
Fiber Laser Marking Machine: A palette of Sparkly Colours (Cont…)
12:02millimeters minimum to get sparkly colors so if I change that to 1200
12:09millimeters a second this is this is less of a predictable thing I don’t know whether their power
12:15is linear or not when I’m using for nanoseconds I know that I’m using a
12:21frequency of 500 kilohertz so the kilohertz is fixed therefore the
12:29only variable that I want to play with is the number of pulses per square
12:35millimeter as I increase the gap between the lines I’m reducing the power and as I reduce
12:42the speed I’m increasing the power using this little general rule about pulses per square millimeter provider don’t
12:50fiddle with any of these factors here what I can say is look I’ve reduced the
12:56pulses per square millimeter horizontally because I’ve increased the
13:01speed and I’ve increased it by better third what I ought to do is to decrease
13:07this by a third so really to take this down to something like point zero zero
13:15zero six so I’ve gone faster on the speed and and smaller on the pitch net
13:23result is it’s probably still going to take quite a long time to produce this color but I might be able to make it as
13:29a sparkly color now because you know I’m playing with the same numbers the same nerve repulses roughly the same number
13:35of pulses per square millimeter okay well that was reasonably successful wasn’t it considering I’m not using a
13:40calculator I’m just guessing what we’ve now got is 1200 millimeters a second that’s the age of my sparkly region
13:47problem is we haven’t got a sparkly finish because the pulses are seriously
13:54limited because we’re only using 30% power so all the spike enos of this
14:00sharp pulse is not there so we’re doing very little damage to the surface of the material that we need to do is now push
Fiber Laser Marking Machine: A palette of Sparkly Colours (Cont…)
14:07the percent power up now if we push the percent power up we’re going to change
14:12the color now this is where I say percent power is a difficult thing to play with while I’m just playing we pick
14:18pulses per square millimeter as you can see I can really easily guess what’s going to
14:24happen as soon as I start messing around with the power mmm I’m joking off the
14:30edge of the cliff and I don’t know what’s at the bottom let me put the power to something like 50% to make the
14:38pulses sharper it means I’m putting more power into the job now there are two ways to get rid of the power number one
14:45I tell you what we do we’ll leave it at 50% and I’ll show you what happens well
14:52there we go that’s what’s happened we’ve produced a lovely sort of like pink lilac e color now of course what you can see here with
15:01the previous two calluses they’re not as bright because when you turn them to the
15:07light they’ve got this surface proper look they disappear you can only see
15:13those colors in certain lights but look at the move at the bottom as I turn them
15:19over and it’s remaining there’s a slight change of colour there but we’ve now
15:25messed around with the surface texture that’s by increasing the power to 50%
15:31okay so now we’ve got the texture of the surface there what we’ve now got to do
15:36is try and get the color back now what we’ve done we’ve increased the power so
15:43now we’ve got to find a way of decreasing the power and there are two ways that we can decrease the power first thing is we can increase the speed
15:51now we know that increasing the speed is only going to make it more sparkly from
15:561,200 let’s go it to 1600 and see what effect that has now hopefully that’s
Fiber Laser Marking Machine: A palette of Sparkly Colours (Cont…)
16:02going to bring us bring the color back down closer to these darker colors let’s
16:10give that a try so that didn’t work quite as planned we didn’t finish up with the darker mode
16:16we finished up with a latte coffee color it’s a very nice color which I shall
16:21have to make a note of on my palette and instead of changing the pulses
16:28across which is what the speed is doing we’ll try and change the pulses vertically in the y-direction by
16:35changing the pitch so we’ll change the pitch back from six tenths of a micron
16:42to one micron and see what effect that has so we went when we went from 1,200
16:50to 1,600 millimeters a second we reduced the power so much in the horizontal
16:56direction that we caused the coffee color so what we’ve now done is we’ve decreased the speed in the horizontal
17:04direction to increase the number of pulses again but this time I’ve offset
17:09the increase in pulses in the horizontal direction by decreasing the number in
17:15the Y direction by increasing the pitch from 0.6 of a micron to one micron and
17:23we’ve got our move back again so if I reduce the power even more can I get
17:30back to a darker move and the way that it looks as though I’ve got to do that is by changing it in the vertical
17:36direction and not messing around with the speed so I leave the speed at 1200
17:41and this time will change to something like about 1.5 microns it’s only going
17:47to be a small micron change to affect this quite dramatic change in the amount of heat that we’re putting into the
17:53surface well we’re losing our color again and we’re going back to a sort of a latte color so I can’t change the
18:00color the way that I want it to change by decreasing the pitch let’s change it
Fiber Laser Marking Machine: A palette of Sparkly Colours (Cont…)
18:07the other way just in case well we are getting it back again let me take it
18:12right the way down then to something like about zero zero zero two point two
18:19of a micron that’s a silly a number let’s see how dark I can get it look even down at two tenths of a micron it’s
18:26made no difference to the color can I take the speed up and change the color
18:32now and 1400 is taking us towards pink
18:38Brown so let’s go down to a thousand that’s a long way back eight hundred and
18:46stubbornly refuses to change color but what it does demonstrate is the huge
18:53range of parameters over which you can find these colors we’ve put that nice
18:58latte color in our color swatch I think we ought to have one of these nice lilacs in there as well all I’ve got to
19:04do is find out which one of those was the fastest that’s the process that I’m
19:09going through very tedious but I’m enjoying hunting for these colors as you can see I can chase these colors around
19:15by just understanding how the colors come about the amount of heat going into
19:22the surface here we’ve got a couple of dark purple or maroon colors which are
19:28not sparkly colors so I can’t actually get these colors into my sparkle range
19:35but they have proved very very useful in telling me something about the way these
19:42colors are produced and the way this machine works now in the easy CAD software just here I have the option to
19:50change the way in which scanning takes place I’ve got I think five options
19:58we’ve got this one here which scans backwards and forwards and also joins up
Fiber Laser Marking Machine: A palette of Sparkly Colours (Cont…)
20:05the ends of the scan lines we’ve got this one here which looks as though it
20:12might be an intermittent scan I don’t really know because I haven’t looked it
20:19up in detail we’ve got another one here which is a unilateral scan which means
20:26that it only scans in one direction and the red lines indicate the flyback lines
20:32to the beginning then we’ve got this one here and the red lines on the end
20:39indicate the fact that it flies from one end up across
20:46across up when the ups are not included in the cut it’s only the backwards and
20:52forwards bi-directional scanning which are included and then finally we’ve got
20:59this funny one which is a circular one which is a really strange one and I don’t know why you’d want to use this
21:04because I’ve got an idea that it gets that the actual beam gets slower as it
21:09gets towards the center but whatever is we have got these five different scanning options and only that one I
21:17think as a usable scan the unidirectional scan you can see the
21:22strange color marking on this top pattern here it almost looks like a graph that’s the bi-directional scanning
21:30the one underneath which is the nice uniform pattern is the unidirectional
21:36scanning this one here is the dotted
21:41line scanning this one here is one of those it’s got the joined up ends and
21:48you might not be able to see that very easily but there are basically little diagonals little dark diagonals that
21:55come out from the center and the centre itself is dark that’s the spiral scanning so of the
22:00five scanning possibilities that this machine offers only one of them looks as
Fiber Laser Marking Machine: A palette of Sparkly Colours (Cont…)
22:06though it’s going to be suitable for using to try and track down in the colors now I have been using both the
22:12bi-directional and the unidirectional scanning and it has probably accounted for some of the strange results that I
22:18have been getting now as I’ve mentioned to you before there is no exact formula
22:24for any one color there may be a range and some of the colors that I’ve discovered have got huge range of
22:32opportunities you’ve heard me mention several times that I’m looking for what I call production colors now production
22:38color to me is something that can be done quickly and efficiently with a good stable color and not one of these colors
22:45that you have to look at in a certain light to see what it’s really like to make bought to make things a little bit more accurate in my comparison I’m going
22:53to run a ten millimeter by ten millimeters and this will tell me how long it takes to engrave a hundred
22:59square millimeters
23:11so that’s about 66 67 seconds okay so I’ve loaded another set of
23:17parameters in here and you’ll hopefully spot something quite significantly different this time apart from the time
23:31but slow there wasn’t I it was about four and a half seconds bit different 66
23:36seconds isn’t it now we can move those goals around in all sorts of lights as you can see and they do change in
23:43texture a little bit but you however you look at them you can see that they are gold whereas some of these other colors
23:50on here disappear to black well we’re
23:56back in the office now because after several hours in the cold workshop producing lots and lots of color
24:01swatches it’s always interesting because I’m learning a great deal about where these colors are coming from and how you
Fiber Laser Marking Machine: A palette of Sparkly Colours (Cont…)
24:08can chase them around a little bit and how you can modify them now we’ve just come off of talking about how some of
24:13these colors are very fragile look at that lovely salmon pink and Moe they’re
24:19fantastic colors provided you look at them from just the right angle you move
24:25it slightly and they almost turned to black they lose all their colour that’s
24:31what I define is a fragile colour now something that I have discovered which
24:36undoubtedly other people already know is that we’ve got these two colours here
24:43and decide them we’ve got a plus and a minus but they’re not really plus and
24:48minus because what I discovered was that if I do a single scan which is what the minus means it means a scan in that
24:55direction then I get this salmon pink but if I use exactly the same parameters
25:01and I change my scanning technique to a double scan it scans across to start
25:07with and then vertically I get a different color so I’m modifying the
25:12surface film by doing the thing twice if I scan across it this direction twice I
25:19don’t get that color but if I scan it in the opposite direction I get a completely different color the
25:25difference is that the single scan this one takes one minute 39 seconds to produce a hundred square millimetres
25:31this one takes three minutes six seconds which is more or less double the time to
25:37produce a group reached a point where I think we ought to sit down and summarize
25:42what the goals this project our because I could spend hours and hours chasing colors around on
25:49bits of stainless steel it’s fascinating I’m learning a great deal but I have to
25:56stop and say how do I know what I’ve achieved a goal I haven’t even set any goals I need to
26:03put boundaries on where we’re going to go now we’ve just seen with the two gold examples how one was done quickly and
Fiber Laser Marking Machine: A palette of Sparkly Colours (Cont…)
26:11the other was done relatively quickly you could view them in different lights and they would still look like gold on
26:18the other hand there were other colors that we talked about which were I think I used the word fragile which meant that
26:26they they were lovely colors provided you looked at them in the right light from the right angle so what I’ve done
26:33I’ve sat down and worked out a quick ranking table for how I would judge a
26:39color can it be viewed in different lights and still maintain a reasonable
26:46semblance of the color that you thought it was and be can it be produced
26:51cost-effectively the realization of this came about when I started to do these examples this here
26:59took one minute 25 to produce this one took one minute 48 still reasonably fast
27:11this one which I never finished was already about 30 or 40 minutes in before
27:18I decided to abort it because it was going to take an hour and a half to make me two hours to produce this now as I
27:25was messing around with these small swatches I realized that there was a difference in the time taken to produce
27:30some of them but I wasn’t putting any quantifiable data down that enabled me
27:35to say yeah this is rubbish or this is not rubbish so that’s what I’m about doing here with my ranking table a
27:42b-grade color is something that it may not have the widest viewing angle and it
27:48might not have the widest color tolerance but it’s reasonably durable and it can be deposited in
27:56when I say a reasonably cost-effective manner these are very all subjective
28:01judgments I have now settled on 10 by 10 millimeters which is one square centimetre hundred square millimeters
Fiber Laser Marking Machine: A palette of Sparkly Colours (Cont…)
28:08for the standards and not only am i logging the parameters I’m also logging
28:15the time taken to do the one square centimeter you’ve got to choose a number
28:20for yourself what is cost-effective for you but when you’ve got a twenty thousand pound machine I would have
28:27thought that if you’re spending more than a minute to do a square millimeter it’s not really cost-effective that’s
28:34just me speaking as an X production engineer you know I want things to happen quickly and efficiently so
28:41anything that’s a C and a degrade color is out the ballpark as far as I’m
28:46concerned C grade colors may be very very pretty but they will have a very narrow viewing angle as we’ve just
28:52discussed they they’re not very durable two different light sources you know
28:57different colors in different lights and they can’t be done in a cost-effective
29:03time okay so now I’ve got a white LED light that I’m shining on them
29:10nice colors aren’t they hang on that was a nice pink a few minutes ago that’s now
29:17looks almost like an orange now so let’s just change the angle of the light if I can there we go
29:24there is a very a very much suppressed range of colors in LED light it’s very
29:30white there’s not much red or orange in it so what we’re picking up has a
29:37completely different sort of reflected color range depending on the light that
29:43we use to view these colors in ideally we’re looking for colors like this which
29:49regardless of how you look at them in the light most of them remain pretty stable we’ve got one there that he’s not
29:56you’ll see that changes color dramatically as I look from gray to black and then when we shine LED lights
30:03on it they’re still pretty much the same
Fiber Laser Marking Machine: A palette of Sparkly Colours (Cont…)
30:08they’re gold and Silver’s and then we’ve got basically degrade colors which is the worst of everything very poor viewing
30:15angle very poor tolerance the light takes an age to produce most of the colors that we’re going to come across
30:20that I want to know about our eyes and bees there are certain strange
30:26properties happening when you do crosshatch it’s been a revelation because it means that I can go quite
30:32fast I can get some quite amazing durable colors with cross hatching an
30:38ivory color on here is a durable a grade or B grade color because we’ve got this silver here which is basically rubbish
30:45it’s a serie degrade got a lovely gold here which takes 3.9 seconds to produce
30:5010 square millimeters now that’s a pretty good deposition rate and that’s a production color as far as I’m concerned
30:56we’ve got another gold here which takes a second longer for 0.8 seconds so okay
31:02so it takes 25% longer we’ll come back and look at the difference between these two colors under the microscope in a
31:09minute because why would I use one in preference to the other this is a
31:14slightly brighter lighter gold and maybe this has got a slightly better light durability I mean when we get down to
31:21here for example we’ve got these Browns these these matte Browns look eleven point six fifteen point four twenty
31:28three point three they’re all the same parameters except one was done with the 20 minute 20 micron spacing one was done
31:35with a 50 micron spacing am almost done with a 10 micron spacing okay so that’s
31:41the reason why we’ve got greater times as I close up the lines it takes more time to scan the same area but there is
31:50no difference in quality so why would I go for 23.3 when I can have 11.6 now
31:57black is a particularly difficult color you can’t get a decent black without
32:02spending time on it and yeah okay so this took 34 seconds to produce that
Fiber Laser Marking Machine: A palette of Sparkly Colours (Cont…)
32:09black. Black as a color you might want to steer clear off unless you’re absolutely desperate. So it would appear that golds
32:16and Silver’s and whites are the colors that you can go for. So let’s just take a quick look at this caliper
32:22here we’ve got these pinks and rubbish colors down here which lovely but
32:28they’re not they’re too fragile they’re not production colors and they also take one minute thirty nine three minutes six
32:36minutes I mean even these lovely Pink’s down here the one lesson that I have
32:42learned is look we’ve got two blues that are exactly the same and we’ve got two
32:47Pink’s at the bottom here that are exactly the same the difference is time. It would appear that I don’t need double
32:55scanning if I produce a rough surface in the first pass but I can’t get those
33:00colors faster that’s part of what I’ve been trying to do find a color and then
33:06see how far I can push it in terms of speed and still retain the color some
33:12colors you just can’t get the speed out of and that demotes them to possibly a
33:19flea grade where the color is good it’s got a wide tolerance of light capability
33:24but it ain’t very quick that’s the difference between an A grade and a B
33:30grade color mainly the amount of time it takes to produce them. So we’re gonna close the session with a few minutes of
33:35looking at some of the colors under the microscope now this is the salmon color
33:40that we talked about a mixture of pink and yellow and the pink predominates but
33:46this you know this there’s probably 50% yellow in that picture with a hint of
33:51pale lion green but you don’t see any of that with the naked eye you only see the
33:58pink. The other thing that I want to point out here are these striations lines that you see on here you can see through the film to the material that’s
Fiber Laser Marking Machine: A palette of Sparkly Colours (Cont…)
34:05underneath now there is a bit of hint on there of lines going up and down that’s
34:11the scan lines because this is the second pass. So it’s got the lines are going vertically now amazing in that
34:18just one pass different then all of a sudden the surface texture has still remained flat but the color has changed
34:25because we’ve changed the thickness of the film that’s on the surface now we
34:30take a look at those two golds the first one was the slightly of the two golds the Mexicans know all
34:38those colors look at them they’re superb which had a scanning interval of a hundred microns so what we’ve got here
34:46is a beam width of 60 microns and another beam width of 60 microns so
34:53we’ve got 40 microns between which have not been touched well not entirely true
34:59because you’re gonna ask the question what are these marks across here
35:04these regular marks well that’s the first scan that went across but this is a crosshatch scan so if we look here
35:12carefully you might just be able to pick up the beam shape the striations for the
35:19beam shape going across there on this channel and you could certainly pick up the beam striations in this channel here
35:26look at the rainbow of colors on there and yet that comes out as just a sparkly
35:32gold now let’s compare that to that to the lighter gold this has only got 60
35:37microns spacing between the lines as opposed to 100 microns. Which is why it took a little bit longer and look here
35:44we can see the 60 microns here with virtual joints between the lines but
35:50again we’ve got our marks that run across here look that little mark there in that little mark there so there’s the
35:5660 microns for the first pass going across there so as you can clearly see there is not as much rate in this
36:03picture it is more yellow and some blues and greens and that accounts for maybe
36:10why visibly this looks a slightly lighter gold this is 400 times
36:16magnification and it’s not what your eye sees that’s 50 times magnification and
36:21even that you wouldn’t say is going to give you a nice bright gold. Now that’s really pretty isn’t it but that that’s
36:29the one that gives you the redder gold now this brings us nicely back to the
36:35 situation that I described very early on as to about how we came across these patterns. This could quite easily be the
36:43regular pattern that we saw on butterfly wings now it’s the regularity of that pattern
36:48that’s probably allowing us to see the dispersion of light in many different directions and it gives that color its
36:55durability in one of the earlier videos we’ve seen black before and sure enough
37:01is that black that should be a dark gold
37:07according to what we see here we’ve got our 10 micron lines but every time we
37:14move across 10 microns what we’re doing we’re leaving a debris trail that’s down the side of the burn so what we’ve got
37:22here is a series of plowed field effect type buildups behind the beam as it
37:29moves across finally we’ll take a quick look at my B grade pinks and blues as
37:36you can see we move in and out of focus to all sorts of things there it’s a distorted surface is broken up
37:44surface so that’s why it’s glittery we’ve got some pink in there but we’ve
37:50got a lot of dark green and yellow so the interesting question is why is this
37:56coming out such a nice bright glittery pink okay now this is our durable blue
38:02that takes too long to produce so it’s a bit grade we’ve got a scale on here
38:09which is naught to 10 microns now we’ve got a 4 micron pitch which we
38:17can’t see any sign of to be honest on this screen at all yeah we’ve got some horizontal lines but we certainly can’t
38:24see the 4 micron pitch so what happens when we put the second scan on top of it so we’ve got some predominating vertical
38:31lines on here there so there’s still no indication of our four or five micron pitch across this way and yeah it is
38:39still blue we’ve got a little bit more dark color in it this time bit more green but I think we’re the only shadow
38:47of a doubt you would believe that to be a blue and it happens to come out blue so you don’t always see what you get on
38:54this screen so I think with that pretty picture on the screen we will this session off and say thank you very
39:00much for your time and I’ll catch up with you in the next session
What Next?
Did you enjoy this post? Why not check out some of our other posts:
Disclaimer
Last updated April 25, 2024
WEBSITE DISCLAIMER
The information provided by n-Deavor Limited, trading as Laseruser.com (“we,” “us” , or “our”) on (the “Site”) is for general informational purposes only. All information on the Site is provided in good faith, however we make no representation or warranty of any kind, express or implied, regarding the accuracy, adequacy, validity, reliability, availability or completeness of any information on the Site.
UNDER NO CIRCUMSTANCE SHALL WE HAVE ANY LIABILITY TO YOU FOR ANY LOSS OR DAMAGE OF ANY KIND INCURRED AS A RESULT OF THE USE OF THE SITE OR RELIANCE ON ANY INFORMATION PROVIDED ON THE SITE. YOUR USE OF THE SITE AND YOUR RELIANCE ON ANY INFORMATION ON THE SITE IS SOLELY AT YOUR OWN RISK.
EXTERNAL LINKS DISCLAIMER
The Site may contain (or you may be sent through the Site) links to other websites or content belonging to or originating from third parties or links to websites and features in banners or other advertising. Such external links are not investigated, monitored, or checked for accuracy, adequacy, validity, reliability, availability or completeness by us.
WE DO NOT WARRANT, ENDORSE, GUARANTEE, OR ASSUME RESPONSIBILITY FOR THE ACCURACY OR RELIABILITY OF ANY INFORMATION OFFERED BY THIRD-PARTY WEBSITES LINKED THROUGH THE SITE OR ANY WEBSITE OR FEATURE LINKED IN ANY BANNER OR OTHER ADVERTISING.
WE WILL NOT BE A PARTY TO OR IN ANY WAY BE RESPONSIBLE FOR MONITORING ANY TRANSACTION BETWEEN YOU AND THIRD-PARTY PROVIDERS OF PRODUCTS OR SERVICES.
AFFILIATES DISCLAIMER
The Site may contain links to affiliate websites, and we receive an affiliate commission for any purchases made by you on the affiliate website using such links. Our affiliates include the following:
- makeCNC who provide Downloadable Patterns, Software, Hardware and other content for Laser Cutters, CNC Routers, Plasma, WaterJets, CNC Milling Machines, and other Robotic Tools. They also provide Pattern Files in PDF format for Scroll Saw Users. They are known for their Friendly and Efficient Customer Service and have a comprehensive back catalogue as well as continually providing New Patterns and Content.
- Cloudray Laser: a world-leading laser parts and solutions provider, has established a whole series of laser product lines, range from CO2 engraving & cutting machine parts, fiber cutting machine parts and laser marking machine parts.
