0:00 welcome to another fiber laser learning lab
0:02 that last time we built a foundation on laser fiber
0:06 the color gold today we’re going to try
0:10 and consolidate that foundation a little
0:12 bit more because we can’t really build
0:15 up all the walls of the house until
0:16 we’ve got a good foundation and there
0:20 are a couple of big questions that I
0:23 would like to answer before I go forward
0:25 I’ve heard that there are three major
0:27 problems with putting color on to
0:30 stainless steel there’s a fairly narrow
0:32 range of parameters for each color well
0:35 I think last time we discovered that
0:37 there was a very wide range of
0:39 opportunity for gold now I only tried it
0:45 for nanosecond pulses but within that
0:47 four nanosecond pulse there was a huge
0:50 range of possibilities that existed for
0:52 finding gold but I want to look at the
0:54 other possible problems today as well
0:56 one of them is the thickness or the if
1:00 you like the thermal conductivity of the
1:02 material which will pull heat away from
1:04 the actual work surface and it will
1:07 change the color so unwarned and
1:09 unrelated to that thermal conductivity
1:12 is air temperature in other words if
1:15 it’s a hot environment you will get
1:17 different color results to have it’s a
1:19 cool environment so we’re going to test
1:22 the stability of the Gold’s that I found
1:24 was it fool’s gold or is it the real
1:27 thing that will resist changes of
1:30 temperature and changes of thermal
1:32 conductivity in the material as we saw
1:34 last time there are many types of gold
1:38 those that are gold but don’t show up
1:41 only in a certain light and there are
1:45 those sorts of gold here and here which
1:48 are pretty good at being viewed in all
1:52 sorts of lighting conditions now these
1:54 are the goals that I want to look at
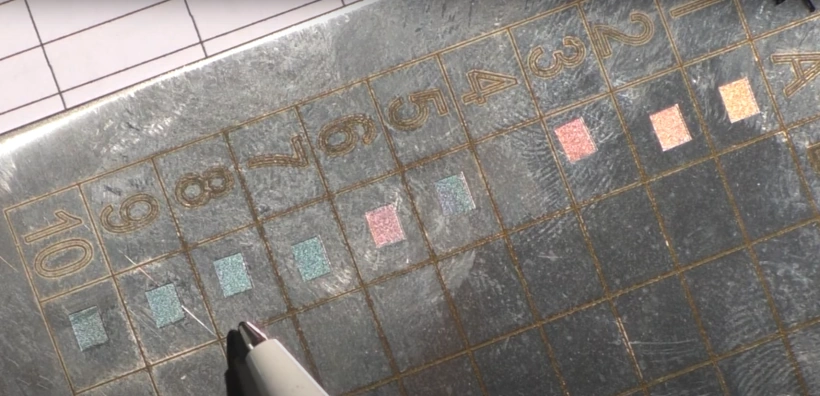
1:56 today I’ve searched through the color
1:58 swatch that I produce last time and
2:00 identified or highlighted here those
Transcript for Fiber Laser Marking: Is this Fools Gold? (Cont…)
2:03 colors that were sparkling six or seven
2:07 of them which are what I call good
2:11 quality gold what I want to find out is
2:13 are there
2:13 any common factors that give us some
2:15 clues as to what produces what type of
2:18 gold I think the answer is yes there’s a
2:21 bit of an odd one there at twelve
2:23 hundred and fifty millimeters a second
2:24 but most of the sparkly ones if you
2:26 notice are up here in the sixteen
2:28 hundred to two thousand millimeters a
2:30 second range and then we start taking a
2:34 look at the gold we had a light gold and
2:37 then we had the slightly coppery colored
2:39 what I would call rose gold so we’ve got
2:42 four three and two point five which
2:44 produces light gold and if you remember
2:47 when we looked at the pulse per square
2:50 millimeter density we’ve got numbers
2:53 here which are in that which are a
2:54 hundred K now when we went to rose gold
2:58 the parameters have tightened up quite a
3:01 bit although we had fifteen ninety seven
3:03 there that’s basically the same as 1600
3:05 and they’re both the same so you would
3:07 expect those two to be the same but then
3:09 we’ve got this one here at two thousand
3:11 with a slightly smaller pitch one point
3:14 six microns and that gave rose gold as
3:16 well and again when we looked at the
3:18 pulses per square millimeter these are
3:20 in the hundred and fifty six K so there
3:22 appears to be a color difference that we
3:25 can identify from pixels per square
3:27 millimeter and tie that in with the
3:29 microns that we’re using it gets us a
3:32 nice rose gold color so we’re gonna
3:34 start off today by just reproducing this
3:37 result here which should be a nice rose
3:40 gold okay so we’ve got a nice solid gold
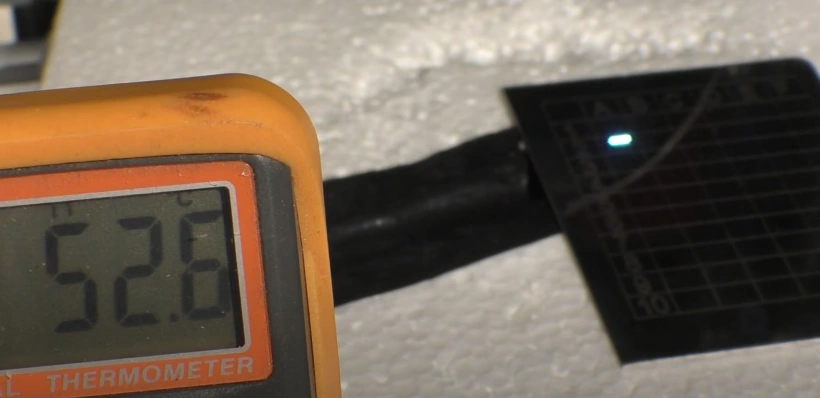
3:43 there okay so the first test I’m going
3:46 to carry out is using my thermocouple
3:48 here my k-type thermocouple which is
3:51 sitting directly under the heated area
3:54 now
3:58 this will just basically check the
4:00 thermal conductivity of the heat zone
Transcript for Fiber Laser Marking: Is this Fools Gold? (Cont…)
4:03 through this very thin point five or 0.7
4:06 thick stainless steel so probably my
4:09 hand heat has pushed the temperature up
4:11 a little bit the air temperature in here
4:13 is around about probably 10 degrees C so
4:16 I’m a few degrees higher than the
4:18 ambient but let’s not get too concerned
4:21 about that
4:29 and hey you saw what the temperature
4:31 went up to 70 degrees C okay so let’s
4:36 turn this little cold workshop into
4:38 summer should we turn this piece of
4:41 metal into something about 40 degrees C
4:45 it’s a pretty
4:52 there we go one warm summer’s day
5:05 warder 65 color change what do you think
5:14 so there’s myth number two blown out the
5:16 water it’s not very temperature
5:18 sensitive at all
5:19 let’s go myth number three which is
5:23 thickness of material now haven’t got
5:25 any really thick stainless steel but for
5:27 the purpose of this very very small test
5:29 we’ve gone from 0.5 to something like
5:32 about 1.6 so we’re more than three times
5:35 the thickness and what I’m going to do
5:37 I’m going to do the test right in the
5:38 middle right in the middle of the piece
5:40 of material so I’ve got the maximum
5:42 amount of heat being sucked away this is
5:44 basically the heat being pulled away
5:46 from the surface by a much larger
5:48 thermal mass so let’s see whether this
5:51 has an effect on the color that I’m
5:53 producing it’s also a mechanically
5:55 polished stainless steel this time as
5:58 opposed to a piece of bright annealed
6:00 maybe slightly redder than these first
Transcript for Fiber Laser Marking: Is this Fools Gold? (Cont…)
6:03 two so it is possible that there is some
6:06 small degree of variation with
6:10 temperature or with heat sinking so
6:14 we’re not going to dismiss it completely
6:17 but what I would say is it looks as
6:19 though it’s fairly resilient to the two
6:21 extremes that I’ve just tested so it
6:24 takes my fear away from the possibility
6:27 that I may have discovered fool’s gold
6:30 now I think it’s pretty real and that we
6:33 can work with general workshop
6:35 parameters and not worry too much about
6:37 the color and we have just shown that at
6:39 2 microns it’s a pretty durable color
6:43 resisting both heat sinking and
6:46 temperature rise but what these results
6:50 seem to indicate sparkle over here and
6:54 color over here because here we’ve got
6:58 the first four results between four
7:00 three and two and a half giving us a
7:02 light gold and then we’ve got these
7:05 second three results here which are
7:08 giving us a rose gold two and 1.6 micron
7:13 pitch so the indication here is that if
7:15 we go from say
7:17 – which is what we’ve seen our nice rose
7:20 gold s 2.05 in other words half a micron
7:26 pitch that’s a fairly significant change
7:28 in the heating effect that we’re going
7:30 to see into the material are we going to
7:33 push this rose gold towards a purple or
7:35 a moe let’s give it a try that’s a
7:38 pretty nice powder blue sparkly powder
7:44 blue
7:44 so my first shot will be to calculate
7:47 quickly how many pulses per square
7:49 millimeter it took to achieve that and
7:52 then we’ll try a few more variables to
7:56 see whether we can repeat that color
7:57 with different parameters I’ve just
8:00 calculated post density for powder blue
Transcript for Fiber Laser Marking: Is this Fools Gold? (Cont…)
8:02 and it’s six hundred twenty-five
8:04 thousand so I’ve done a quick
8:06 calculation and to check the extremes of
8:09 what we found before for spark cleanness
8:11 roughly two thousand and twelve hundred
8:14 the pitch becomes naught point four
8:17 microns and naught point six six microns
8:20 we’ll try those two numbers and see
8:22 whether we can replicate powder blue now
8:25 that is weird because that’s sixteen
8:28 hundred millimeters a second half a
8:31 micron two thousand millimeters a second
8:34 point four of our on twelve hundred
8:38 millimeters a second point six sixth of
8:41 a micron a thousand millimeters a second
8:44 point eighth of a micron nine hundred
8:48 millimeters a second twenty nine of a
8:51 micron and eight hundred millimeters a
8:54 second one micron the rule seems to hold
8:58 up except that one there’s nothing wrong
9:01 with my calculations these are all done
9:03 with exactly the same calculation in a
9:05 spreadsheet I really don’t understand
9:07 why that should be different the
9:09 principle involved here is very simple
9:11 we’ve got exactly the same number of
9:14 pulses per square millimeter which
9:17 technically means we should have exactly
9:20 the same heating effect per square
9:22 millimeter the only difference is we’ve
9:25 changed the relationship between the
9:28 pulses across
9:29 and the lines down in general it looks
9:33 as though it doesn’t make any difference
9:35 but in this particular instance for some
9:37 strange reason it does
9:40 that’s a bluey green that’s a nice
9:41 powdery blue I suppose and these are I
9:45 suppose edging towards a green rather
9:48 than a blue I can see clearly that that
9:51 one has got a smoother effect to it as
9:55 we decrease the speed we’re putting more
9:57 pulses in in the horizontal direction
9:59 and we’re producing a smoother effect it
Transcript for Fiber Laser Marking: Is this Fools Gold? (Cont…)
10:02 would appear that the roughness or the
10:04 texture on the surface comes from
10:06 running at the higher speeds as I
10:08 anticipated before I mean to get blue
10:10 we’ve got actually got to drive right
10:12 through this color range here to get
10:15 towards the hotter part of the spectrum
10:18 and obviously by closing up the pitch
10:20 we’re putting more heat into the
10:22 material I mean logically it does make
10:24 sense that I should move from here to
10:27 blue although I didn’t didn’t think that
10:30 it was going to be as Extreme as that I
10:31 thought it would move from there from
10:34 that to rate first as we start moving in
10:36 towards the hot razón we won’t know
10:38 until we really go and have a look at
10:39 these under the microscope okay so
10:42 here’s a puzzling image it’s a sort of a
10:44 a purpley gold so that was when we
10:48 changed to say point five five look a
10:53 half a micron and there’s no apparent
10:57 difference so let’s go down half a
11:00 micron it looks like the same picture
11:02 because that’s what the color is on the
11:04 surface it’s it’s exactly the same
11:06 colour when you look at it in normal
11:08 light okay so let’s go back to this
11:12 image which is the starting image and
11:15 this time instead of changing the pitch
11:18 we’re going to reduce the speed to 1900
11:21 which means we’re going to reduce the
11:23 number of pulses in this horizontal
11:25 direction we’re giving a little less
11:28 mode and a little more blue so now we
11:32 reduce it to 1800 though we’re getting a
11:36 lot more blue and a lot less pink
11:39 although the yellow hasn’t changed very
11:40 much
11:41 so now we reduce it to 1600 a little
11:44 less pink we’ve got some green coming in
11:47 a bit now but it’s still rough as you
11:51 could see from the texture now we’re at
11:53 1600 and we’ve virtually lost all the
11:56 yellow and we’re just in two shades of
11:58 blue and green now and sure enough the
12:01 color is coming out as a very nice blue
Transcript for Fiber Laser Marking: Is this Fools Gold? (Cont…)
12:03 now we’re at 1500 still a nice sparkly
12:07 texture more green less blue no yellow
12:12 now we’re going out to 1400 ah now look
12:16 what’s happening now 1400 can you see
12:20 all these sort of blotches coming in and
12:24 these blobs we’re getting much more of a
12:28 flatter surface now this is what this
12:30 indicating although we’ve still got some
12:32 spark cleanness in there we’ve got areas
12:35 where the surface is basically flat and
12:39 now we come down to the final test which
12:42 is 1,300 still got a moderately rough
12:45 surface there it is sparkly now what you
12:50 must remember is there is no green in
12:53 these temporary colors so these colors
12:59 that we’re seeing here there must be a
13:01 combination of light rays which are
13:03 creating colors that are not really
13:07 there and these are the colors that we
13:09 can see at high magnification once they
13:13 get drawn away and get to your eye
13:15 these colors don’t exist what you see is
13:18 an amalgam of these colors I haven’t
13:20 done the calculations at the moment to
13:22 see what degree of variation we’ve got
13:24 in the pulses per square millimeter
13:26 count across this range of colors I will
13:30 go and do that shortly
13:31 we’ve just come across coppery gold
13:34 again okay so let’s run again with two
13:39 microns or I have to say it’s a bit
13:42 difficult to say what that color is it’s
13:45 it’s almost just a blank brown it’s
13:49 certainly not sparkly
13:52 so I think we’ll try and put some
13:53 Sparkle into that by increasing the
13:55 speed which is the formula for spark
13:58 leanness so far we’ll push the speed up
Transcript for Fiber Laser Marking: Is this Fools Gold? (Cont…)
14:03 to 1600
14:04 okay now by pushing the speed up we’ve
14:09 decreased the heat and we’ve got our
14:14 copper color back again which is
14:17 virtually the same as these two here
14:20 let’s see if we can lighten the gold by
14:22 putting the speed up leaving the picture
14:25 2 microns well yeah we’ve gone lighter
14:28 and we’ve also gone spark Leah and those
14:32 two there were done with a for
14:35 nanosecond pulse but this time we’ve got
14:37 our nice coppery gold rose gold at 6
14:42 milliseconds as opposed to 4 nanoseconds
14:44 so I wonder what happens if we go two
14:48 thousand and something like point five
14:54 point five of the micron well the answer
15:00 is it gets us back to this strange brown
15:03 color that we had here it’s not sparkly
15:07 it’s it’s a dull brown so I’m not
15:11 interested in that really I mean it’s
15:12 obviously part of the color spectrum
15:14 it’s going to take a long time to
15:15 produce it at point zero at point five
15:19 of a micron so I’m trying to see if I
15:21 can get nice color and relatively high
15:25 speed let’s jump up to another power
15:27 band let’s try eight nanoseconds which
15:31 will be at two hundred and fifty
15:32 kilohertz and we’ll start off again what
15:36 should we say 1200 let’s say 8 microns
15:41 well we got a a sparkly coffee color
15:46 there that’s nearly gold but not quite
15:48 it’s like a a white coffee and we’ll do
15:53 two things we’ll first of all put the
15:55 speed up to 2000 and see what happens
15:59 so we’re decreasing the power which
Transcript for Fiber Laser Marking: Is this Fools Gold? (Cont…)
16:01 means we might move too
16:03 – sparkly gold again yeah
16:06 that’s actually not bad that’s even more
16:10 that’s a bit of a copy but this one or
16:12 some of these here and these down here
16:16 so we found rose gold again at another
16:20 set of parameters yeah we’ll take the
16:23 vertical lines down to 6 micron 6 micron
16:26 spacing so we’re adding some heat now
16:31 which might drive us towards blue yeah
16:36 there’s definitely a blue tinge in there
16:37 it’s no longer copper so let’s push it
16:41 one more down to 4 microns which
16:46 increases the power permit per square
16:48 millimeter and that’s done something
16:50 really weird we’ve got a sort of a green
16:54 on the ends and a gold in the middle now
16:58 that must create that must be created by
17:00 some really weirds heating effects
17:02 because we are scanning like this so it
17:09 means we’re getting double a heating
17:11 effect at each end like that hot there
17:18 turn round hot there so this is very hot
17:21 this area and then as we scan across
17:23 this middle area here we’ve got a cooler
17:26 zone and that’s exactly what that
17:31 pattern there seems to be showing I’m
17:32 sure you could see that in this light
17:34 let’s just zoom in on that
17:35 there we go look you can see that
17:37 clearly there now gold in the middle and
17:39 green at the ends so does that mean if I
17:42 go down to 2 microns I might be finding
17:45 a sort of a peppermint green well the
17:48 answer to that question is no we’ve
17:50 we’ve gone to a very nice coffee color a
17:55 very nice sort of a but you’ll notice
17:58 something else in here as well look
18:00 we’ve got the same effect that we had
Transcript for Fiber Laser Marking: Is this Fools Gold? (Cont…)
18:02 here we’ve got the ends which are a
18:06 different color to the center well
18:10 although this is very interesting and
18:11 we’re getting further and further away
18:13 from gold but we are
18:15 effectively trying to see if there are
18:18 any patterns in the data that we’re
18:21 getting I’m still trying to see whether
18:23 or not there are any rules for colors
18:26 and this one here again it’s a color
18:30 that’s at two microns
18:32 that’s a nice coincidence that we’ve
18:34 come across many times before and at two
18:38 thousand millimeters a second with a
18:40 different pulse now we came across this
18:44 lovely but very positive meter brown and
18:48 if we take a look here look at the
18:50 texture of the surface we’ve got all
18:52 these little blobs on the surface here
18:54 little raised portions so let me just
18:57 bring one of them into clear focus and
19:02 that’s 41 microns let’s just see how
19:07 that relates to the background right
19:09 there and that’s 39 38 so that’s about a
19:16 three micron difference in depth which
19:22 is substantially more than the thickness
19:25 of the film itself so we must be
19:27 disrupting the surface of the metal to
19:30 make that amount of distortion so I did
19:34 the calculations for that mid Brown and
19:35 found it was sixty-two thousand five
19:37 hundred pulses per square millimeter now
19:41 I changed from two thousand at two
19:45 microns to one thousand at four microns
19:50 okay now that looks like a modern
19:54 artwork but even though that is
19:59 different it still comes out looking the
Transcript for Fiber Laser Marking: Is this Fools Gold? (Cont…)
20:03 same mat made of brown now is a huge
20:08 change in terms of the speed going from
20:11 two thousand two one thousand and the
20:14 line width from two microns to four
20:17 microns we get no apparent change of
20:19 color even though you can see that it is
20:22 significantly different down at this
20:24 level so here we are at three microns
20:27 and thirteen hundred and thirty three
20:30 millimeters a second again that we’ve
20:33 got these little raised blobs here but
20:36 they’re not as pronounced as they were
20:37 in the first one but we still got lots
20:39 of yellow in the background and we’ve
20:42 still got the same apparent meat brown
20:45 despite this different slightly
20:46 different surface texture so we up the
20:50 speed again to sixteen hundred
20:51 millimeters a second and dropped the
20:54 pitching to 2.5 microns
20:57 we’ve got blocks here with modes and
21:00 browns and we’ve got yellow in the
21:03 background and gold and red the net
21:07 result of this is still a meat brown so
21:12 we’ve got a very very wide range of
21:15 opportunity to get this lovely meat
21:18 Brown blank color I think I’m going to
21:21 have to produce a separate swatch with a
21:23 record of each one of these colors on it
21:26 so that we can see what our progress is
21:28 and what the lovely range of colors that
21:31 I should be able to put onto this
21:33 palette so although I’ve been supplied
21:35 with a recipe of colors from Lotus laser
21:39 I have to say I’ve not opened the files
21:41 at all I’m going my own way at finding
21:45 colors with my method because I’m
21:48 looking for a different sort of color
21:50 that normally you see on these pallets
21:53 now I’m feeling fairly happy with that
21:56 swatch because even in this white LED
21:59 light we’ve got some nice colors this is
Transcript for Fiber Laser Marking: Is this Fools Gold? (Cont…)
22:03 not daylight this is this is a thing
22:05 that was defeating other systems that
22:09 should be green those should be I think
22:15 that’s pink and that one’s gold
22:19 that one’s gold I think these are
22:24 supposed to be a pub a purple and I
22:27 think these are silver this one is
22:29 supposed to be like a sky-blue and it’s
22:32 come out as a sort of a bit of a grey
22:33 here the color recipe that I’ve been
22:36 given is nothing like the recipe that
22:40 I’m
22:40 yet here no we accidentally came across
22:45 this setting doesn’t look particularly
22:48 different to some of the golds that
22:50 we’ve seen you know it’s it’s got like
22:53 pieces in it yellow pieces a little bit
22:56 of pink in it some blue what color do
23:00 you think that’s gonna come out to look
23:02 at that isn’t that beautiful
23:04 cuz look I can get that I can get the
23:07 top of that lock into focus now let’s
23:10 call that 90 well the bottom is just
23:13 here somewhere I’ll just bring that
23:15 little bit of brown into focus there and
23:18 that’s only 88 so that’s only 2 microns
23:22 difference what color would you think
23:24 that that is going to come out at okay
23:32 you’ve had enough time the answer is
23:34 matte black don’t ask me why just
23:42 mention it in your prayers tonight see
23:44 if you get an answer so thanks again for
23:48 your time and patience and I’ll catch up
23:50 we’re doing the next session
 Skip to content