00:15
well welcome to another light blade
00:18
learning lab today we’re going to do
00:22
another very important initiative
00:25
session before you go flying off on this
00:28
machine and try and do all sorts of
00:30
wonderful things there are still a few
00:32
basics that you must grab hold off as i
00:36
pointed out to you guys when I first
00:38
started these sessions off i’m learning
00:40
this machine the same as you
00:43
I’ve not been used to this system here
00:45
which is an autofocus system to me I’ve
00:49
always has
00:50
if i want to lay the table i press the
00:53
button and the table comes up now my
00:56
table doesn’t do that
00:57
this table has got a lot of over right
00:59
now that you noticed stop the button and
01:02
it carries on for another two seconds i
01:04
use the button
01:05
two seconds it takes two seconds to stop
01:09
unless ok this might switch here
01:18
stop that table a lot quicker than the
01:20
manual shift button so if we look just
01:23
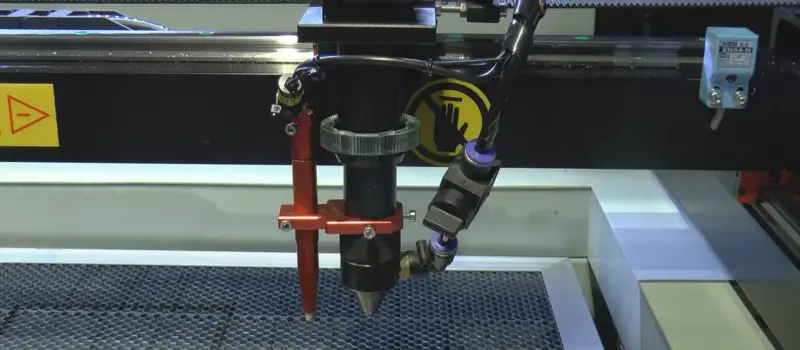
under here you’ll see that we’ve got a
01:25
microswitch that microswitch there is in
01:31
fact detecting the top of this table
01:33
stroke and there is an interplay between
01:35
that switch and this which here which
01:39
sets up the autofocus system what we do
01:42
want to know is how to make sure that we
01:46
don’t damage this micro switch system
01:48
called a pen and for obvious reasons you
01:51
can see what’s called a pen
01:52
I’ve already had a Gallic trying to wipe
01:54
this pin out because of my stupid he
01:56
might experience
01:57
ok so i had been stupid but i’d like to
Transcript For Understanding Your Laser Cutter Autofocus (Cont…)
02:00
pass on the experience that I gained
02:02
from that stupid t to you so that you
02:04
don’t run the same risk of wiping out
02:06
this pen microswitch so what I’m going
02:09
to demonstrate to you is a standard way
02:12
that you should approach autofocus
02:14
setting is going to change the thickness
02:16
of your material and all the way in
02:19
which your bed is configured at the
02:20
moment we’ve got it configured with
02:22
that’s on it and a few moments time
02:23
we’ll put that he counted on and we’ll
02:25
start off with a honeycomb be okay we’ll
02:28
start by looking at the control panel
02:30
itself and if you remember the last time
02:31
to control the bay going up and down you
02:34
press the blue button and at the top
02:37
there we’ve got that move which allows
02:39
you to make the table go down
02:41
or raise the table up they can do that
02:44
manually and you can get it me where you
02:46
want it you don’t have to you can just
02:50
leave it where ever it last time and we
02:54
can start from there
02:55
so if we jump down to autofocus but
02:58
before I press the enter button i’m
02:59
going to focus on the job so that we can
Transcript For Understanding Your Laser Cutter Autofocus (Cont…)
03:01
see what’s gonna happen know what I got
03:03
to do first of all it’s partly sunny San
03:05
been no I could be wanting to mark
03:09
something like that
03:13
now obviously that was going to their so
03:16
what I would have to do would be to
03:18
press the down key to start with to even
03:22
get it under there so i have to drift
03:24
look drop the table to start with but
03:26
under the user much worse case than that
03:28
which is going to test the machine to
03:30
its list and that’s have been facing
03:32
material that make it easier to see
03:36
what’s going on we can bring the tech
03:37
bring the hate towards us now I’ve set
03:41
the Machine up before i press the auto
03:43
focus button stop and think always stop
03:48
and think what haven’t I done well the
03:51
one thing I haven’t done and I want to
03:53
make a big point of this because this is
03:56
most important
03:57
now I’ve got a little extension handle
03:59
on here which we’ll talk about in a
Transcript For Understanding Your Laser Cutter Autofocus (Cont…)
04:00
minute but I want you to first of all
04:03
undo the hate and slide it right up to
04:08
the top of its stroke and lock it up
04:11
that is the most important lesson that
04:14
you will ever learn about autofocus and
04:18
now we can go and we compress the
04:20
autofocus button enter
04:36
now you notice the noble heavy touched
04:40
the table is doing a bit of farm dunk
04:45
let’s play game right leg out and now
04:50
it’s backed off your dimension that is
04:53
about eight millimeters below the nozzle
04:57
I say about
05:02
it’s a dimension that has been decided
05:04
and set for the focus of that lens now
05:07
all lenses are set to the same clearance
05:10
here and we’ll talk about that in a
05:12
completely separate session about lenses
05:13
at the moment this is autofocus day so
05:18
we have now set the auto focus up
05:20
successfully and we can go away and we
05:22
could cut a job without touching
05:25
anything
05:25
now the important thing here is and i’m
05:29
going to show you this we can drive this
05:31
state to the extremities and it touches
05:35
nothing we can drive it to the back
05:38
extremity and it touches nothing
05:43
we can drive over here and it touches
05:47
nothing i will show you something about
05:49
that position in a few minutes time
05:51
which is why I want you to understand
05:54
the first and most important lesson is
05:57
lift the head up will check the last
Transcript For Understanding Your Laser Cutter Autofocus (Cont…)
06:00
position
06:01
there’s nothing airport to hit scenario
06:04
number two we successfully complete that
06:06
job using the honey contains we’re not
06:09
going to remove that ago table i’m going
06:12
to be going to use the flat instincts
06:14
and will now ask it to reset the
06:17
autofocus
06:19
think think think this is already at the
06:23
top of its stroke so i don’t have to do
06:26
that again
06:29
oh yeah
06:39
the table is basically gone up to the
06:42
microswitch tested the microswitch
06:44
position two or three times backed off
06:46
to a position a safe position now only
06:51
now can we do this now what we’re going
06:54
to do now is we’re going to drop this
06:55
pen down by the way at all times you can
Transcript For Understanding Your Laser Cutter Autofocus (Cont…)
07:01
undo these screws and this will
07:06
got these diner finger tight because I
07:09
know when I don’t want to run the risk
07:10
of stripping the trades at all stages
07:12
look this thing can be loose the correct
07:17
setting position for this it down on its
07:20
collar
07:21
ok that’s now secure is not moving
07:23
around be beat but we’re going to try
07:27
and do now is we’re going to drop this
07:28
down to get the to get the sensor to
07:33
just about touch and service
07:36
we’re not trying to make the switch we
07:38
just try to get it within half a meal or
07:42
a millimeter of the surface and then
07:44
we’ll tighten up and lock in that
07:50
position
07:54
now we’ll go back and we’ll try the
07:56
autofocus
07:59
Walter focused into
Transcript For Understanding Your Laser Cutter Autofocus (Cont…)
08:18
now bear in mind that i’ve got one and a
08:22
half millimeter material on there at the
08:24
moment you couldn’t get much done in
08:27
that except card but what I’m now going
08:30
to do is to demonstrate some way that
08:33
you can easily make a mistake if you
08:35
don’t follow these rules will drive the
08:39
head to the back and we can see that the
08:41
sensor is well clear of this surface
08:44
because it’s a 16 plus whatever gap you
08:48
can see there now on this side of the
08:50
machine here there is no way the sensor
08:55
can ever get to this back point here
08:59
because it’s always sitting forward of
09:02
it so there’s no way that sensor can
09:04
touch even if it’s set wrongly can
09:07
attach this back face here or this age
09:09
and it can’t get to this edge because
09:12
it’s on the wrong side and not always
09:14
clear this surface
09:15
let’s see what happens when we get to
09:17
the other end of the stroke now at that
09:19
point there
09:20
the sensor is becoming at risk
09:27
we’re not at the end of the stroke yet
09:29
but the center is still well clear of
09:33
this surface here there we are now at
09:39
the end of the stroke that the sensor
09:40
goes beyond the extremity of the stroke
09:43
of the Machine and that’s why it’s most
09:45
important that you go through this
09:47
correct setting procedure
09:49
otherwise you will like this essentially
09:51
if ever you drive over to this H
09:53
position so i mentioned in a previous
09:54
session about moving them hate around
09:57
with the XY buttons i want to just
Transcript For Understanding Your Laser Cutter Autofocus (Cont…)
10:00
notice how quickly hate stops when I
10:03
lift my finger though it move move the
10:10
point I want to make there is if you run
10:11
it 200 you’ll get an overrun and you’ve
10:15
got to anticipate the end of the stroke
10:17
with a hundred millimeters per second
10:20
it’s completely snapped responses and
10:23
it’s still fast enough to move around
10:24
the job really quickly
10:26
you have got to be that patient to wait
10:28
for it we’re going to change to another
10:30
table format now and this is a table
10:33
format that I have designed for myself
10:37
this is not anything to do we think
10:39
later they may decide to adopt this is
10:42
an alternative but if not you can make
10:46
one yourself
10:48
now is this is a pin table for cutting
10:53
card particularly for card not have is a
10:58
series of dolls which dropped show this
11:00
to show the table
11:03
and they locate on the steel surface
11:06
underneath so all the pins for the same
11:08
length and by the time we finish up with
11:10
a series of pins on here we should
11:12
finish up with effectively a pin
11:13
projections of this flat surface like
11:17
this
11:22
ok now
11:24
I’m not going to go too far with this
11:26
other than the fact that one of the
11:28
problems is gonna have it because we
11:30
want to cut paper and we also focus on
11:32
paper could be a little tricky card
11:37
well card is generally around about half
11:39
a millimeter thick and so we got to half
11:42
millimeter thick stainless steel there
11:44
and that’s what i should use for setting
11:48
up Mike autofocus let’s go through the
11:52
same routine again the more we do it the
11:55
safe would be because it’ll be ingrained
11:57
into our brain to get the procedure
11:59
right so before I press the auto focus
Transcript For Understanding Your Laser Cutter Autofocus (Cont…)
12:03
button
12:03
have I got my head raised right up yes
12:07
autofocus check check check again
12:10
yes
12:33
ok now
12:36
the fact that i’ve got the head right up
12:38
means that there’s no chance ever so
12:41
that’s going to get anywhere near any of
12:43
these external surfaces so when you see
12:46
that
12:47
hi you’re completely safe so now i can
12:49
go ahead like put my card or paper on
12:52
there and it would be company in focus
12:53
now something else that I regularly use
12:57
particularly for cutting acrylic I don’t
13:01
have a honeycomb paid on my other
13:02
machine and so in general what I try to
13:05
do is when cutting acrylic are usually
13:09
little things still play magnets
13:15
fantastic and what that allows me to do
13:20
is to raise the acrylic off the surface
13:24
so that i can get airflow underneath and
13:29
quite often I we used to
13:30
rather than you can have whatever
13:33
thickness you like it’s a space this is
13:36
my approach is another cheat approach to
13:39
the same problem
13:41
get yourself a set of matched donuts and
13:46
they would do the job just as well i
13:49
personally wouldn’t use donut or
13:51
anything like that all magnets for
13:53
supporting card which reducing card work
13:57
in a future session and i’ll show you
13:59
the importance of a pin beach and just
Transcript For Understanding Your Laser Cutter Autofocus (Cont…)
14:02
ride the lesson home
14:07
with one last attempt
14:11
so we’re going to set the auto focus on
14:13
this job this time
14:15
that’s five millimeter acrylic is packed
14:18
up who knows too white
14:21
it doesn’t matter so we go to the
14:25
autofocus and before we push the
14:28
autofocus enter button check check check
14:32
are we at the top of the stroke yes
14:43
so now we’re doing the barn down we’re
14:48
not in quite the right position so we
14:51
have to let this down let it down onto
14:55
and lifted up from the half a mil
15:05
so now we can try the autofocus again
15:08
for the last time
15:10
autofocus yes everything’s okay
15:32
there we go
15:35
so I hope after half a dozen uses of the
15:37
autofocus in different positions the
15:40
message is sticky now just before we
15:43
close this session i did say earlier on
15:45
that I would have a quick talk about
15:48
this as you can see the not that
15:50
supplied with the machine has got
15:52
something to grips on it here but to be
15:55
honest I found it very difficult to find
15:59
it on my day off I mean I never have to
Transcript For Understanding Your Laser Cutter Autofocus (Cont…)
16:01
touch this on my chinese machine that
16:04
I’ve got over there because it hasn’t
16:05
got also focus on it but this has become
16:08
quite an important feature for an
16:10
autofocus machine to be able to quickly
16:12
and easily undo this nut and i found it
16:16
difficult to undo it
16:18
so I’ve made myself an eight-millimeter
16:21
acrylic adapter
16:27
and you can see it works wonderfully
16:32
well required for it let’s do a nice
16:39
solid lock on there and I’m sure that
16:43
they will be a copy of this file sync
16:45
later if you do need
16:52
now although i have made you don’t not
16:55
as being a reasonable alternative to
16:58
make it something I must reiterate that
17:01
this steel plate is not something that
17:03
comes as part of the inflator kit so if
17:08
you don’t have the facilities to make a
17:11
flat steel plate that will fit on here
17:14
and you want to use the existing
17:16
honeycomb page you can use the donut
17:22
again as I described to you earlier or
17:26
you could use small ball bearings say
17:31
six or eight millimeter ball bearings
17:33
will get more sit in the honey co now
17:36
both of these options are certainly
17:40
cheaper than making a pin base for
17:42
yourself
17:43
the only problem is that anything that
17:47
is much more than a pinprick if the
17:51
laser beam part is over it it’s going to
17:53
produce a reflection mark and so you’ve
17:56
got to be very careful about how you
17:58
place these under your job must again
Transcript For Understanding Your Laser Cutter Autofocus (Cont…)
18:01
stress i’m not think later employee this
18:04
is not a things like the machine this is
18:06
my machine which are personalizing but I
18:09
am trying to produce a series of videos
18:12
you guys to follow using a standard
18:15
think laser machine which is why i’m
18:16
giving you all the options in the
18:18
alternatives but thanks very much for
18:20
your attention
18:22
I think you’ll probably soon be able to
18:23
swim without your arm bands on and we’ve
18:26
got one or two more little more
18:29
important sessions to do with that will
18:31
make you more efficient at programming
18:34
and giving you a a wider understanding
18:36
of how this machine works or how the
18:38
software works so thanks for watching
18:42
and I’ll see you at the next decision
 Skip to content