 Skip to content
 The Lightblade Learning Lab with Russ Sadler
The Lightblade Learning Lab is a series of videos that Russ did for Thinklaser Limited based on using the Lightblade 4060 Laser Cutting and Engraving Machine. Thinklasers Lightblade 4060 has a 400 x 600mm bed size and was supplied with a 60W EFR laser tube. In this video, Russ discusses the often underused RDWorks Software Feature of setting the processing order. When used correctly, this RDWorks Software feature can save you both time and money.
Contents
- (This video makes use of the Lightblade Reference Beam design, a device for creating a visible reference beam)
- Doing a complete project (after the design has been done)
- User of layers for different types of cut
- Cutting speeds for small text
- Order of cutting
- Handle/Cut optimise
- Preview/Simulation to check the order of the cutting
- Path optimise (un-checking it)
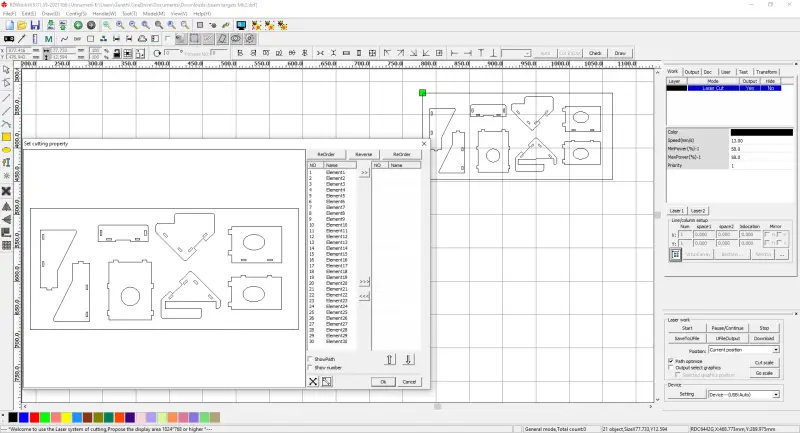
- Edit Cut Properties to set order of cutting, using groups to simplify this, techniques in selecting objects.
- Saving the file
- Residues caused by cutting acrylic – difficult to clean off honeycomb
- Use of steel bed and magnets
- Airflow
- Cleaning bed with acetone or white vinegar
- Assembling the device that has been made
- Acrylic cement
- Mounting the device on the laser cutter
My thanks go out to Tom at Thinklaser for giving permission to embed these videos on this site. If you are looking for a new laser machine from a quality supplier, then I would suggest you check out their website: www.thinklaser.com.
Video Resource Files For RDWorks Software Feature
There are no resource files associated with this video.
What Software Is Used for Laser Cutting
Two of the most commonly used laser cutting software packages for Chinese manufactured laser cutting and engraving machines are:
- RDWorks: Because it’s based on the popular Ruida Controllers and comes free with laser machines using this controller, and
- LightBurn: Because it’s an excellent laser cutting software package that covers a large variety of laser machines and types of controllers.
External Resource Links For RDWorks Software Feature
There are no more external resource links associated with this video.
Transcript For RDWorks Software Feature
Click the “Show More” button to reveal the transcript, and use your browsers Find function to search for specific sections of interest.
00:15
welcome to another session of lightblade
00:17
learning lab and today we’re going
00:20
to do a complete project we’re going to
00:24
start off with a drawing that I have
00:26
already created in another program and
00:28
as I’ve already mentioned to you this
00:30
program rdworks is not a CAD program
00:34
it’s not a drawing program it’s an
00:35
interface program so you will need to do
00:38
design work elsewhere and then import
00:41
your file now I’ve imported my file here
00:44
series of parts which when we look at
00:48
them you see that they’ve got outside
00:49
shapes they’ve got holes in and we’ve
00:53
got some text now this text was created
00:56
in my cad program and it’s been
00:58
specially created as a single line text
01:01
i purposely haven’t used the sort of
01:05
texts that you would normally think of
01:06
which has got some with to it and some
01:10
character to it
01:11
the reason I’ve done that is because I
01:15
want to keep this session as simple as
01:16
possible and we can actually cut this
01:19
text as opposed to engraving it or
01:21
catching it now engraving is a subject
01:24
all on its own which we will tackle in
01:26
another session so I’m not wanting to
01:29
complicate this session too much because
01:30
we’ve got enough to deal with any way
01:32
we’re going to be cutting the text and
01:35
we’re going to be cutting the outside in
01:37
the shapes but we don’t want the text to
01:40
go right the way through so we’ve got to
01:43
use a different power a different speed
01:46
we’ve got to process the text
01:48
differently to the rest of the items on
01:50
this page to do that we’re going to have
01:53
to put it onto a different layer
01:56
let’s go through how we do that to start
01:58
with first of all we will remove the
Transcript For RDWorks Software Feature (Cont…)
02:00
handles that happen to be defaulted when
02:02
you import it and now we need to mark
02:04
this text now you need to be very
02:07
careful because we’ve got to put a
02:09
little marquee round each piece of it on
02:13
its own so we’ve got lightblade there
02:15
and you’ll notice that is turned rate
02:17
that’s fine that means we’ve captured it
02:19
now we must press the shift key on the
02:22
keyboard without catching any other
02:25
complete object and you’ll see that i
02:28
can start off outside the outside shape
02:31
steer clear of the whole i can go across
02:35
steer clear of that hole on the right
02:37
hand side and steer clear of these that
02:39
all slots at the bottom and I can
02:44
collect that one as well so now i’ve
02:47
added all of these pieces together into
02:50
a little group we haven’t actually
02:51
defined them as a group but they have
02:53
just been marked as a group we will now
02:56
go down to the bottom left-hand corner
02:58
here and we will select any one of these
03:01
colors but let’s just check the select
03:03
the blue layer because we’ve already got
03:04
a black layer on the page
03:05
ok so now our text has become blue and
03:10
you’ll notice up at the top right hand
03:12
corner here we’ve got a blue layer
03:14
that’s been added
03:15
let’s just take a quick look at that
03:17
blue layer by double clicking on the
03:19
blue patch
03:20
ok so how do we go about selecting the
03:23
speed and the power
03:25
well it all comes down to experience in
03:27
a way thinklaser have supplied you with
03:30
a little memory stick with this machine
03:32
now I only suggest that you go in and
03:35
take a look at that memory stick because
03:36
you’ll find data on their referring to
03:39
speeds and feeds for your machine they
03:42
will be typical but they’re at least a
03:45
start
03:46
I’ve got some experience which i will
03:49
call upon and point out to you one or
03:52
two things first of all we’re cutting
03:54
small characters remember the background
03:58
grid on this picture is only five
Transcript For RDWorks Software Feature (Cont…)
04:00
millimetres so that means these
04:02
characters only three millimetres tall
04:04
now
04:06
how fast can the Machine accelerate
04:09
can’t get up to a hundred millimetres a
04:12
second and back down to nothing in three
04:14
millimeters
04:15
I doubt it so the chances are this these
04:20
characters are going to be speed
04:23
controlled by the machine itself not by
04:26
you
04:27
so even if you put 500 millimeters a
04:30
second in there it’s going to make no
04:32
difference told to the speed at which
04:34
these letters are going to be cut so you
04:36
might as well plant something reasonable
04:38
in there hundred millimeters a second is
04:40
still unlikely to be achieved by the
04:42
machine but we don’t want the machine to
04:45
cut all the way through so we need to
04:48
keep the speed fast so that it stays as
04:51
fast as the machine can go the next
04:54
issue is the power we’re going to be
04:55
using three millimeter thick acrylic to
04:58
do this job and even if we were to apply
05:02
maximum power the full 60 watts of my
05:04
machine we would not be able to cut
05:06
through this material at hundred
05:08
millimeters a second
05:10
so therefore it really doesn’t matter
05:13
but what we’re going to do is back the
05:15
power right down to something like
05:17
thirty percent so that we can make sure
05:20
that we scratch the surface rather than
05:23
go deeply in and now we’ll go to the
05:28
black layer which is the cutting liar
05:30
and we’re going to choose some
05:32
parameters for cutting well as i did
05:35
mention to you were using three
05:37
millimeter acrylic on this job from
05:40
experience I would know that cutting
05:42
three millimeter acrylic with probably a
05:44
one-and-a-half inch lens which is a
05:46
quite a powerful cutting lens i would be
05:50
able to probably get up to maybe 20
05:52
maybe even 25 millimeters a second but
05:56
we’re going to be using a
05:57
two-and-a-half-inch maybe 2-inch lens
05:59
which means that its power density is
Transcript For RDWorks Software Feature (Cont…)
06:02
less that’s a completely different
06:03
subject but it does mean to say that i’m
06:05
going to choose a very conservative
06:07
number here and I think 12 probably 12
06:10
is ok maybe even 10 let’s settle with 12
06:14
we can always check it out on the
06:16
machine if we get it wrong we can modify
06:19
the parameters on the machine and power
06:22
well we want the power its maximum now
06:25
you may remember the previous session we
06:27
established that the maximum power I can
06:29
use with my 60 what to buy this machine
06:30
is sixty-seven percent if i run anymore
06:34
than that i will be over driving to tube
06:37
and shortening its life i’m just being a
06:40
good boy and I’m sticking to the 67%
06:42
cutting yes blowing yes output yes job
06:50
done when we cut the first program we
06:53
use the honeycomb paid now i’m going to
06:57
use a slightly different approach this
07:00
time and it means the parts are going to
07:03
physically drop out
07:05
it’s a good way to remember that you
07:09
must ensure that you do your engraving
07:11
or you’re cutting first you must do your
07:16
holes first before you cut your outside
07:20
shapes because once the part has been
07:22
cut it will fall out and you’ve got no
07:25
chance of coming back to cut the holes
07:28
so cut your holes before you cut your
07:31
outside shape so that does mean to say
07:34
that we’ve got to put some logic into
07:36
the way that we order the cuts the
07:40
processes and we talked about how you
07:43
would do that in a previous session and
07:45
we looked at this thing here called
07:48
handle
07:49
and we had something called cut
07:51
optimized if you remember we would have
07:53
order of layer and then we would cut
07:56
inside to outside the order of land
07:58
meant that we could do the blue layer
07:59
first and then we could do the black
Transcript For RDWorks Software Feature (Cont…)
08:02
layer second which is fine but then we
08:07
had a further control within the black
08:09
clay which said that we could cut inside
08:11
to outside on single objects so that
08:15
meant that we would cut all the holes
08:17
before we cut the outside shape all the
08:19
holes before we cut the outside check
08:21
which was perfect that’s exactly what we
08:23
wanted start cut optimized start point
08:27
optimized well yeah you can have it or
08:29
not have it it really isn’t a big issue
08:32
with a small job like this so we could
08:35
say okay let’s see what we’ve just
08:38
created before we go anywhere near the
08:40
machine will go to the previous screen
08:42
we do a simulation and we’ll put that to
08:44
half speed so that we can watch it
08:46
working and sure enough it’s going to
08:49
create the text first weekend no speed
08:53
it up because we don’t sit around here
08:54
too long
08:55
oh it’s doing some outside shapes now
08:57
that’s fine
08:58
now it’s doing some holes first and then
09:01
it’s going to yes it does do the outside
09:03
shape so it’s did behaving itself well
09:05
we could say at that stage
09:07
let’s go to the machine that process
09:10
works most of the time I’ve come across
09:13
quite a few drawings where despite
09:16
setting those features it doesn’t behave
09:19
in the way in which you would predict
09:21
and so consequently I don’t rely on cut
09:25
optimized at all i remove
09:29
these features I on tick every box in
09:33
here and i’m happy to leave that is a
09:35
nothing box and I come down here to the
09:39
right-hand corner and there’s something
09:41
down here called path optimized now that
09:45
could be ticked by default
09:48
make sure you uncheck it ok so now I’ve
09:53
got complete control over how I want
09:56
these pieces cut
09:58
ok so what’s the alternative well
Transcript For RDWorks Software Feature (Cont…)
10:01
there’s a very powerful alternative that
10:03
we can use and that’s a feature up here
10:05
called edit cut property click on that
10:10
and we open up this lovely box let’s
10:13
just move that out the way a minute
10:15
because what we’ve got here is every
10:18
single element on this drawing has got
10:21
its own cutting command and the order in
10:25
which it’s cut is defined by this list
10:28
let’s just take a look for example at
10:32
that outside shape there which are just
10:35
highlighted oh look there it is very
10:38
conveniently on this list its item 20
10:41
what about holes that hole there that’s
10:46
item 19 mm okay so that means that hole
10:50
will be cut before the outside shape but
10:53
hey we don’t want to go around in order
10:55
let’s have a look how many items we’ve
10:57
got on this list we’ve got hundred
10:59
elements on this list that’s a hell of a
11:00
lot of items to rearrange in the order
11:03
in which we want them arranged
11:05
we’re not going to do that we are going
11:07
to use this edit cut property box but
11:10
before we start going in there
11:11
what we’re going to do is we’re going to
11:13
organize yourself into a much smaller
11:17
group of parts and the keyword in that
11:20
sentence was group
11:23
let me just explain we’re going to first
11:26
of all pick up these four holes across
11:28
the bottom here for example and we’ve
11:31
put them into a little selected group
11:34
now we’re going to change them into a
11:36
real group and I keep reinforcing the
11:39
word group because it’s a very powerful
11:41
word so we got here to this command we
11:44
click group so now if we look I can
11:47
click on this one item here and it will
11:50
mark the whole of the group so I’ve got
11:56
to be a little bit smarter with my
11:58
marquee this time because what I’m going
Transcript For RDWorks Software Feature (Cont…)
12:00
to do I’m going to use my market to
12:02
select just four of those external
12:04
shapes but i haven’t selected the
12:08
complete group of holes and so
12:11
consequently the group of holes remains
12:12
black but the outside shapes have gone
12:15
rate i’m not going to press down my
12:17
shift key and it doesn’t matter i could
12:21
for instance come back to hear and I
12:24
could now select
12:27
doesn’t matter them riesel ecting the
12:30
red group but what I haven’t done
12:32
selected the whole of the black group
12:34
and now I’ve managed to capture the
12:36
whole of the group that I wanted which
12:38
is the external shapes along the bottom
12:40
there and I’m going to put those into a
12:42
group now if it had been smart about it
12:46
when I selected these parts to go onto
12:50
this blue layer at the same time I would
12:54
have also put them into a group now I
12:58
didn’t want to preempt this grouping
13:01
technique at that early stage but just
13:05
remember when you’re selecting parts for
13:07
a layer
13:08
it’s very good to group them as well so
13:10
that you’ve already got that job done so
13:14
let’s go back and select my blue parts
13:16
shift key down
13:25
check they’re all rate and we put them
13:28
into a group job done
13:32
ok now I no need to select the holes on
13:35
this part as a group I could start at
13:39
the top here with my marquee and I could
13:42
drag it right towards the bottom here
13:44
and i’ve captured the l of lightblade
13:49
as well so if i leave the l out I should
13:54
just capture the holes which I have done
13:58
shift key down and we’ll capture the
Transcript For RDWorks Software Feature (Cont…)
14:02
rest of the holes so we put all the
14:04
holes on that pattern there as a group
14:06
click group now I don’t have to worry
14:12
about the outside shape at the moment
14:13
because we’re not going to put that into
14:15
a group so now we can put this group of
14:18
holes here into a group and there will
14:24
capture very carefully with a marquee
14:26
not capturing the outside shape the
14:29
holes for that group and the same for
14:34
that group
14:38
I could have captured all of those holes
14:41
and put them into a group not a good
14:45
idea generally in this instance I don’t
14:50
think it would have made any difference
14:51
at all because it’s a very small project
14:55
but in general try and cut your outside
14:59
shape as soon as you cut your holes that
15:03
way you’ll have no miss registration
15:05
possibility between the outside shape
15:08
and your holes if i move if i do this
15:13
pattern here and then move off and do
15:14
all sorts of other things
15:16
there’s always a risk a very low risk
15:19
but there’s always a risk that by the
15:21
time I come back to cut this shape the
15:24
holes may well have moved very slightly
15:26
most of the time it doesn’t matter but
15:28
in certain key jobs like this one it
15:31
would matter so as a general practice i
15:34
would advise cut the holes first and
15:36
immediately cut your outside shape right
15:40
now that we’ve done a grouping process
15:41
let’s go and have a look see what effect
15:43
its had on our cut list edit cut
15:46
property
15:47
well there we go from a hundred elements
15:50
we now down to 11 elements that’s a much
15:53
more manageable list for us to edit so
15:56
we will start off by clicking on the
15:59
part that we want to run first which are
Transcript For RDWorks Software Feature (Cont…)
16:01
the holes and you’ll notice they have
16:03
highlighted and we can see in this list
16:07
that element number five we don’t need
16:09
to click on that because it’s already
16:10
highlighted for us we can just go to the
16:12
double arrows at the top of the list and
16:14
do click and it will transfer that item
16:17
to a new list as number one in the list
16:20
and then we’ll do the outside shape
16:24
click
16:26
then we’ll do the text here click then
16:30
we’ll do the holes click outside shape
16:36
make sure you highlight the outside
16:39
shape then we’ll get the whole highlight
16:41
outside shape missed it outside shape
16:49
holes
16:55
actually shape
17:00
holds
17:04
actually shape
17:07
and there we go there’s our well ordered
17:09
list so we can now say okay and to be
17:16
honest once you organize that list like
17:19
that you don’t ever need to go up here
17:23
to preview again because you could be
17:26
totally confident that the machine will
17:28
do what you want it to do
17:30
we’ll just go and have a look to prove
17:32
the point of making the simulation will
17:34
be perfect
17:35
trust me holds outside shapes along the
17:40
bottom text next holes next outside
17:44
shape inside holes outside shape and an
17:52
outside shape at the moment we’re still
17:54
programming remotely we’re not on the
17:56
machine if we’re on the machine we would
17:59
be doing a download but because we’re
Transcript For RDWorks Software Feature (Cont…)
18:02
not on the machine we’re saving the file
18:04
to a memory stick
18:05
so we need to go to save to you file i
18:10
would advise you as a general practice
18:12
go here first file save as
18:18
now if you’ve started to on a very
18:20
complicated program i was just that you
18:23
go and save as at a very early stage and
18:27
we’ll save this as beam ref now this get
18:32
saved as a a dot rld file which means
18:35
that it is readable by rdworks again
18:38
and again whereas when we go to save to
18:42
you file what it does it creates a
18:45
machine code program which you cannot
18:48
open and you cannot read so don’t try
18:52
and open in rd file in here because you
18:55
won’t succeed
18:57
although rdworks is fairly bulletproof
19:01
there are times when you can get it to
19:03
crash
19:05
and if your part way through your
19:06
programming and it may be a big program
19:09
and the program crisis you are going to
19:12
be a little bit frustrated now you
19:17
notice how just zoomed out there with my
19:20
scroll if we took take a look up at the
19:22
top left hand corner we should find that
19:25
this is the eight dot 0 1 dot 18 thats
19:29
issue 18 there have been lots of issues
19:31
of this program and something which has
19:36
been fixed and hasn’t been fixed and if
19:39
I scroll down far enough
19:41
completely Oh
19:48
I can’t scroll back again program has
19:51
crashed close the program that’s the
19:53
only choice we’ve got so if we haven’t
19:55
saved we’re going to be a bit upset
19:58
fortunately we saved it before we
Transcript For RDWorks Software Feature (Cont…)
20:01
crashed it so i can now open this file
20:04
as beam reference this Honey Can bed
20:07
it’s it’s better than I expected it to
20:10
be but it’s still got some problems
20:12
which I foresee for the future and I
20:15
don’t want to make this bait sticky one
20:21
of the problems with acrylic is it
20:23
changed to produce a watery residue a
20:27
bit like steam that condenses into a
20:30
sticky goo around the place it can go
20:33
into your filters it can go into here
20:36
and it would make this sticky which
20:39
further attracts dust i use a still play
20:45
now the steel plate is got several
20:47
advantages first water on here look I
20:50
can I can stick to magnets so we can
20:53
support put the support right on the
20:55
corner so they’re not likely to be cat
20:57
for we don’t have to worry about it and
21:00
we’ll just check where that one goes in
21:03
relation to the program but i think it’s
21:06
going to be clear of the program and as
21:08
it’s working i would explain why i’ve
21:10
done that so it’s about it’s about 10 or
21:13
12 millimeters clearance underneath
21:14
there now i’m going to make sure that
21:19
the magnets are sitting in the corner
21:21
somewhere away from the work itself in
21:24
other words where I’m going to cut the
21:26
program but it’s
21:29
I think I put one in the middle there
21:37
yep that’s that’s quite nicely supported
21:40
their first task autofocus so we will
21:46
drive onto the job
21:49
check that wilfully up with her head
21:59
okay so it’s not making the autofocus
Transcript For RDWorks Software Feature (Cont…)
22:01
sensor
22:07
what that means is we’ve got to gently
22:12
drop the probe down and so it just about
22:16
but not quite touches the surface which
22:19
is lifting attach it and lift it off and
22:22
now we press autofocus again
22:45
right now the other thing that I’m going
22:46
to do is to ask you to look carefully at
22:49
the flow of the smoke that’s coming out
22:53
underneath the fumes and because what
22:56
I’m going to do at the moment i’m
22:58
running this machine with the lead open
23:00
where I’m going to do is to close the
23:03
lid and we’re going to look at the
23:04
difference between the air flow with the
23:07
lead open and the lead closed i’m going
23:10
to turn the extraction system on the
23:13
program
23:20
you can see the smoke puffing away
23:26
and redrawn nicely at the back of the
23:29
machine but
23:31
I suspect that’s going to get a lot
23:32
better
23:37
I think it proves the point the FBI was
23:39
actually better with the lid open
23:41
it’s just the airflow is being strangled
23:45
by the holes in the league
23:49
with the lid closed the fumes were
23:51
egging up in the case not waiting up
23:54
here
Transcript For RDWorks Software Feature (Cont…)
24:00
but if you notice the film is underneath
24:20
ok so there’s the job cut quite often
24:22
when you’re cutting acrylic you will get
24:24
a watery residue left on the surface
24:28
here and it’s very sticky if there is
24:33
just hate it there
24:36
although on this occasion I’ve not
24:40
created the sticky it’s a little bit but
24:42
i haven’t created the sticky goo that
24:45
often happens when you’re cutting
24:46
acrylic but what I’d normally do is I
24:50
would use then acetone 20 yes it’s
24:55
definitely sticky and how to fill this
24:57
dragging i would put use it with use
25:00
acetone to clean them off but recently
25:02
somebody said to me why use a dangerous
25:04
chemical when all you really need is
25:06
white vinegar and that does a superb job
25:09
my argument really is if it’s condensing
25:13
on here and I can wipe it away it’s not
25:16
going down into the machine or into the
25:18
extraction system now there is one more
25:20
obvious advantage of housekeeping
25:22
advantage over using the honeycomb bait
25:24
then there is this
25:31
all our pieces now with the film
25:34
stripped off and we’re going to need as
25:39
an assortment of parts which I would
25:41
describe as we go along but there will
25:43
also be a listing of this and probably
25:46
on the thing place of website now the
25:49
one thing that won’t be fined is this
25:53
now I defy anybody to say they haven’t
25:56
got at least half a dozen of these click
25:58
pens around in there draw that either
Transcript For RDWorks Software Feature (Cont…)
26:00
don’t work or that they don’t need well
26:02
now you’ve got a use for them because
26:04
inside here is a valuable resource and
26:10
there it is
26:10
we’ll need two of those Springs if you
26:18
can find a matching pair
26:19
briggen if they don’t match don’t get
26:22
too upset
26:24
ok now the first item we’re going to
26:26
pick up as the this one with all that
26:29
because in the middle and if you look
26:32
carefully you’ll see that around about
26:33
ten o’clock here we’ve got a little hole
26:36
3 millimeter hold now we need to pick up
26:40
this piece as well and again you’ll find
26:43
that you cannot put this one on and
26:46
match the holes up unless you put on the
26:48
right way so that sits in front of their
26:51
want that then you turn them over one of
26:58
those and then two of these
27:00
ok now the moment I’ve got my hole down
27:02
here at about five o’clock or six
27:05
o’clock to slide this place off for a
27:07
moment and we’re going to put the one
27:10
with the hexagon in front of the one
27:12
with the Holy and then we’re going to
27:17
put those tons into that hole there so
27:22
the hexagon is facing this center hole
27:26
and then we’re going to take this piece
27:28
i’m going to drop it over
27:35
they’re like that and that should sit in
27:37
there and that should all look in there
27:40
nicely now like a little corner
27:42
reference angle now we’re going to do
27:50
exactly the opposite over this corner
27:51
here this little piece here will drop
27:54
over and cross lap with that one and
27:58
plug into the matchup a hole in here
Transcript For RDWorks Software Feature (Cont…)
28:00
with the whole in here and we’re going
28:03
to slip this one over the top
28:06
technically it doesn’t need glowing at
28:09
all because everything is nice and snug
28:12
in there but i would advise you to glue
28:16
it going to use this bond right cement
28:18
again which technically as I keep
28:20
telling you should be acrylic cement
28:22
this is petg well cement which will
28:26
perform satisfactory on a critic who
28:28
drops to the bottom of that ball that’s
28:30
enough to do the job I would suggest
28:32
whenever you’re using this stuff you do
28:33
it over or on a piece of kitchen towel
28:37
because it is quite aggressive two
28:40
surfaces and also you don’t really want
28:43
running anywhere so it does if there’s
28:45
any excess go through to the other side
28:46
it will automatically soak up in here
28:48
now the light may or may not be right
28:51
for you to see this when i pop that in
28:53
there and tip it up i should be able to
28:57
get a little bead to run down there and
29:00
i’ll get a little bit to run down there
29:02
as well and one down here
29:11
one down here now feel is already run
29:17
through the back onto my fingers so just
29:19
like the back off the next place
29:22
involves these llamas they look like
29:24
llamas or reindeer is if you look
29:28
carefully you’ll see that three of them
29:31
have got noses and one of them doesn’t
29:36
so the one that doesn’t have a nose on
29:40
it
29:41
topic 2 aside for a minute now if you
29:44
can read that text then right about here
29:47
at about eight o’clock time you’ll see
29:48
there’s a small hole
29:52
it should be a matching hole in the disk
29:55
so you should be able to line them up
29:58
but the reason why I’m asking you to do
Transcript For RDWorks Software Feature (Cont…)
30:01
this is because these have got to go on
30:04
the back of this so we turn it over and
30:10
one of those with the nose on going to
30:12
very carefully try to get it through
30:16
both thicknesses that could be quite
30:22
stiff we’re not rely on anything other
30:25
than friction to hold this together so
30:28
it is not if it’s not a snug fit then
30:32
realistically we’ve got to go back and
30:35
we’ve got to remake these holes here to
30:39
make this snow fit now that’s a
30:42
completely different design exercise
30:44
which I need to go through with you at
30:45
some future date how you’re going to
30:47
design parts to fit because it depends
30:51
on the lanes that you’re using and
30:53
various other things about the material
30:55
that you using the 50 you’re going to
30:57
get now what we need is this little
31:01
thing here now this is only a few paints
31:04
off of ebay and it is in fact a laser
31:08
diode so pretty came through the whole
31:11
to start with and then very gently
31:15
because these cables here are delicate
31:18
that should
31:20
sit snugly between the reindeers the
31:28
nose of the reindeer should fit in a
31:30
slot that’s round here and that will
31:33
lock that in place so this needs to be
31:35
pushed in
31:35
make sure you’ve got the nose or the
31:37
reindeers pushed in
31:39
then we need the reindeer or the llama
31:41
without the nose on as the last one now
31:45
before you put that one in if you take a
31:48
look your savings it was circuit board
31:50
on there make sure that that circuit
31:51
board is not projecting anywhere to get
31:53
in the way of the llamas that should be
31:55
sitting between somewhere between the
31:58
lovers if these little pigs sufficiently
Transcript For RDWorks Software Feature (Cont…)
32:01
stuck in these holes they should be
32:04
completely solid in here and knock
32:06
around at all
32:07
now if you really need to you can glue
32:11
the bottom there and you can even put a
32:13
blob of glue down against the data gets
32:17
the laser diode as well the point is the
32:21
diode must not move
32:23
it’s got to be rock solid now in normal
32:27
engineering circumstances I would
32:30
suggest you drove her out where we put a
32:32
hole through there and I would
32:33
physically be tapping putting attack
32:35
through there but understand that
32:37
probably most of you guys might not have
32:38
tapping facilities and what I’ve done
32:41
I’ve arranged to put a nut in their
32:44
in-state for attack toll
32:47
ok so we put a nut in there and we put
32:50
one of these long one each plastic
32:53
screws through there
33:00
but make sure that it doesn’t stick out
33:02
about this surface with the two screws
33:05
at the top and the lightblade
33:09
description sitting the right way round
33:12
you will see that this little piece of
33:16
the back here if you look carefully
33:20
you’ll see that is greatest
33:22
it’s curved and it sits in these little
33:27
slots here and if you rock it around
33:32
you’ll find that it rocks around very
33:39
easily into planes now the idea of that
33:42
mechanism is at the front face of the
33:47
LED always remains in the same position
33:51
in space is the back end of the LED
33:54
which is swinging around not the front
33:57
and now the next part of the assembly I
33:59
need you to make sure they go together
34:00
like this with the holes lining up with
Transcript For RDWorks Software Feature (Cont…)
34:03
each other and before you start using
34:07
these springs which we cut down so
34:11
they’re probably 15 about 15 mil longer
34:14
springs but then I want you to get hold
34:16
of the end of the spring where you cut
34:18
it and physically just bend it out like
34:26
that
34:27
can you see that so that sticks out
34:29
about three millimeters
34:31
now the reason you’re doing that is
34:34
because the spring will actually sit
34:36
down and jam inside the hole and we
34:40
don’t want that to happen at three
34:41
o’clock we’re gonna go any three screw
34:43
through and then we’re going to put the
34:45
spring on with its tail against the
34:48
plastic and then you’re going to put the
34:51
nut on as you can see the spring is
34:53
about the same length as the screw
34:56
itself so that’s an ideal guy just how
Transcript For RDWorks Software Feature (Cont…)
35:00
long the spring has got to be cut down
35:01
and then we need to wind and not on so
35:04
that it’s just flush with the screw the
35:07
one that’s at six o’clock we need to do
35:09
the same tingly
35:10
ok now if you
35:11
grab hold of these two holes opposite
35:14
the springs you should find the whole
35:18
thing will flex up and down and you’ve
35:22
got a nice little sort of fancy
35:24
compression flexi sisters your other 2m4
35:28
nuts and put those behind there there is
35:33
a there is a cavity behind there to take
35:35
the nut house in the cavity and put your
35:39
screw through from the front
35:40
ok so hopefully we’ve now got a nice
35:43
gift nice little game board led pointer
35:48
now I’m just gonna go with my soul
35:50
during iron and attached some extension
35:52
leads to these here we’ve got a cheap
35:56
battery box with a couple of AAA
35:58
batteries in it with a switch on it so
36:02
it’s a nice convenient portable tool you
Transcript For RDWorks Software Feature (Cont…)
36:06
could buy these as a fireball diode and
36:10
you could probably hook it up to your US
36:13
based system somewhere but i thought
36:16
that the 3 volt version would work
36:19
better with a battery box but here i
36:22
have about a meter and a half away from
36:27
the war we’re projecting this onto and
36:29
I’ve got a spot there is about probably
36:32
four millimeters diameter as i close in
36:39
to what six inches it might have dropped
36:43
three millimeters it’s not changing
36:45
significantly the flare pattern or the
36:48
interference pattern around the outside
36:49
is changing but the actual dot itself is
36:52
not changing
36:53
let’s see where it goes and what we’re
36:55
going to be able to do with it right
36:59
here is going to be able to drop their
37:00
in there like that make sure i’m not
37:03
support back into the slots know that
37:06
should be flat back of the front face of
37:08
the water jacket
37:11
no we can turn it on
37:14
and you may remember in one of our
37:18
earlier sessions now that we made this
37:20
is our first project and this is a
37:24
little target holder if we open up the
37:26
side door of the Machine a little target
37:28
holder sits on top of that mirror plate
37:33
there make sure it sits tight against
37:35
the plate at the bottom so they’re
37:37
sitting back nice and flat is the
37:41
beamline up on center one way and now
37:45
i’m adjusting screws the line-up on
37:46
centre the other way now move that one
37:51
out of the way or we can leave it in
37:52
place and just remove the target because
37:55
the beam is designed to pass through
37:57
there so we could leave that in place
37:58
like that and here we have the other
Transcript For RDWorks Software Feature (Cont…)
38:02
target holder that you made and that
38:04
fits snugly over this mirror number
38:08
three fit snugly back against it we can
38:14
hit the target in the top there and
38:24
we can see how we lined up on that one
38:26
so that immediately tells me that
38:30
there’s some sort of problem with the
38:32
alignment of the mirrors on this machine
38:33
which I’m gonna have to look at sooner
38:37
rather than later so maybe that will be
38:40
the next session now that we’ve got this
38:42
tool i could tweak it up coming to the
38:47
right place because the fact that i’ve
38:52
said it correct on mirror number two so
38:55
that’s now more or less correct mirror
38:57
number three at the extremity of the
38:59
beam path
39:00
let’s just go back and check what it is
39:04
at mirror number two
39:06
well that’s what mirror number two looks
39:09
like it’s a bit high but it’s still
39:16
hitting the mirror because it’s still
39:19
within one target ring and we’ll talk
39:26
about what those rings mean in the next
39:29
session
39:30
thank you very much for your time again
39:32
i hope this has been an interesting one
39:34
I think it’s going to be even more
39:35
interesting in the next session actually
Transcript For RDWorks Software Feature
What Next?
Did you enjoy this post? Why not check out some of our other posts:
Disclaimer
Last updated April 25, 2024
WEBSITE DISCLAIMER
The information provided by n-Deavor Limited, trading as Laseruser.com (“we,” “us” , or “our”) on (the “Site”) is for general informational purposes only. All information on the Site is provided in good faith, however we make no representation or warranty of any kind, express or implied, regarding the accuracy, adequacy, validity, reliability, availability or completeness of any information on the Site.
UNDER NO CIRCUMSTANCE SHALL WE HAVE ANY LIABILITY TO YOU FOR ANY LOSS OR DAMAGE OF ANY KIND INCURRED AS A RESULT OF THE USE OF THE SITE OR RELIANCE ON ANY INFORMATION PROVIDED ON THE SITE. YOUR USE OF THE SITE AND YOUR RELIANCE ON ANY INFORMATION ON THE SITE IS SOLELY AT YOUR OWN RISK.
EXTERNAL LINKS DISCLAIMER
The Site may contain (or you may be sent through the Site) links to other websites or content belonging to or originating from third parties or links to websites and features in banners or other advertising. Such external links are not investigated, monitored, or checked for accuracy, adequacy, validity, reliability, availability or completeness by us.
WE DO NOT WARRANT, ENDORSE, GUARANTEE, OR ASSUME RESPONSIBILITY FOR THE ACCURACY OR RELIABILITY OF ANY INFORMATION OFFERED BY THIRD-PARTY WEBSITES LINKED THROUGH THE SITE OR ANY WEBSITE OR FEATURE LINKED IN ANY BANNER OR OTHER ADVERTISING.
WE WILL NOT BE A PARTY TO OR IN ANY WAY BE RESPONSIBLE FOR MONITORING ANY TRANSACTION BETWEEN YOU AND THIRD-PARTY PROVIDERS OF PRODUCTS OR SERVICES.
AFFILIATES DISCLAIMER
The Site may contain links to affiliate websites, and we receive an affiliate commission for any purchases made by you on the affiliate website using such links. Our affiliates include the following:
- makeCNC who provide Downloadable Patterns, Software, Hardware and other content for Laser Cutters, CNC Routers, Plasma, WaterJets, CNC Milling Machines, and other Robotic Tools. They also provide Pattern Files in PDF format for Scroll Saw Users. They are known for their Friendly and Efficient Customer Service and have a comprehensive back catalogue as well as continually providing New Patterns and Content.
- Cloudray Laser: a world-leading laser parts and solutions provider, has established a whole series of laser product lines, range from CO2 engraving & cutting machine parts, fiber cutting machine parts and laser marking machine parts.
