 Skip to content
 The Lightblade Learning Lab with Russ Sadler
The Lightblade Learning Lab is a series of videos that Russ did for Thinklaser Limited based on using the Lightblade 4060 Laser Cutting and Engraving Machine. Thinklasers Lightblade 4060 has a 400 x 600mm bed size and was supplied with a 60W EFR laser tube. In this session, Russ shows you how to derive and document your own CO2 laser cutting parameters.
Contents
- Cutting parameters – documents yet to be made available.
- Parameters needed for different type of work, e.g. cutting, making lines, dotting mode, scanning (various types).
- Percentage power best measured with a power meter.
- Cutting, a somewhat misleading term.
- MIA (Perhaps included cutting laser board and not using air assist?)
The Process to Determine your Own CO2 Laser Cutting Parameters
- Process for determining the required cutting parameters:
- Draw a simple test program, e.g. 25mm square.
- Choose material.
- Place the job above the bed on something (Russ uses ‘dome’ nuts as stand-offs)
- Adjust the focus
- Set the power to the maximum
- Use maximum air assist
- Set the speed to 4mm per second
- Turn on extraction
- Perform the cut. On card in the example, if there is smoke you know you haven’t cut through.
- Examine the result. On card in the example the edge was sooty so we increase double the speed and try again – use an iterative process to find the best speed.
- Beam ‘dragging’.
- Using a small pot of water to get a visible indication of the air assist rate.
- Air assist should be minimised on organic matter.
- Changing the lens height of the job.
- Filling in your parameter table including:
- Potentially adding an example on the sheet.
- Checking the resulting size of the test square.
- Using a power meter to measure the available power of the laser (See Video 11)
- Defocusing the lens to reduce the energy density and prevent etching its anodised aluminium surface.
- Running the power test program (available here) and establishing the available power.
- Repeating with the other lenses available.
- Carrying out test cuts on different materials and filling in the data into a record sheet.
Using the RDWorks Library to Record your CO2 Laser Cutting Parameters
- Looking at the RDWorks configuration files located in C:\RDWorksV8\
- The Layer Parameter window and the Parameter Library.
- Saving a set of parameters and notes for a specific material.
- These library entries appear in Param.lib inside the RDWorksV8 folder.
- Examining the Param.lib file with the Microsoft ‘WordPad’ application.
- Editing the library entry manually
- Loading the parameters for a particular material.
- Noting that you can’t properly edit the library entries in RDWorks.
My thanks go out to Tom at Thinklaser for giving permission to embed these videos on this site. If you are looking for a new laser machine from a quality supplier, then I would suggest you check out their website: www.thinklaser.com.
Video Resource Files of How to derive your own CO2 Laser Cutting Parameters
Power Test Program
There are no resource files associated with this video.

External Resource Links of How to derive your own CO2 Laser Cutting Parameters

There are no more external resource links associated with this video.
Transcript of How to derive your own CO2 Laser Cutting Parameters
Click the “Show More” button to reveal the transcript, and use your browsers Find function to search for specific sections of interest.
1
00:00:15,270 –> 00:00:19,640
Hello again. Now welcome to another light by learning lab.
2
00:00:19,640 –> 00:00:29,430
And today, apart from drinking coffee.
3
00:00:29,430 –> 00:00:33,870
We’re trying to look in this red book now.
4
00:00:33,870 –> 00:00:40,740
I don’t tell my wife, but this red book contains all my old girlfriends telephone numbers in code not being serious now.
5
00:00:40,740 –> 00:00:49,830
What we’re going to tackle today is a very important subject that at last we’re coming onto, and that’s cutting materials,
6
00:00:49,830 –> 00:00:56,070
cutting parameters of probably some of the most important things you’ll need to know to make your machine work properly.
7
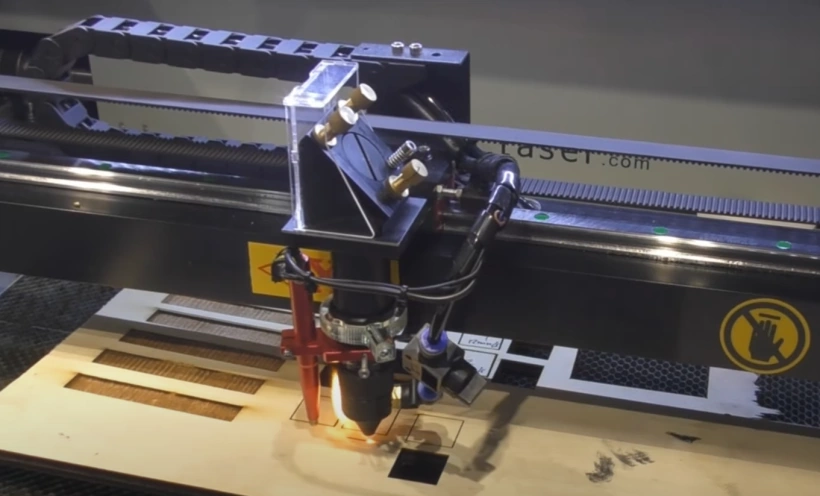
00:00:56,070 –> 00:01:03,750
Now we’ve touched all the other things, like the laser tube that mirrors all the individual parts of the machine that you need to look after,
8
00:01:03,750 –> 00:01:09,720
because none of those are really anything to do with what you bought the machine for, which is to do some work,
9
00:01:09,720 –> 00:01:19,680
be creative and to be honest, until you get some parameters in your head and understand what they are.
10
00:01:19,680 –> 00:01:24,750
You still can’t be creative. So today is a very important day.
11
00:01:24,750 –> 00:01:35,400
Now, as I mentioned in the previous setting, cutting parameters that are supplied to you at this moment in time are really not worth a great deal.
12
00:01:35,400 –> 00:01:39,420
They point you in the right direction, but that’s all they do.
13
00:01:39,420 –> 00:01:46,590
These are a series of word documents which I will make available to you through the fake laser website.
14
00:01:46,590 –> 00:01:52,710
So today we’re going to get down to the nitty gritty of cutting parameters.
15
00:01:52,710 –> 00:02:00,030
Now I say cutting parameters, but we’ve got a book here with a sheet in it for cutting parameters.
Transcript of How to derive your own CO2 Laser Cutting Parameters (Cont…)
16
00:02:00,030 –> 00:02:07,800
We’ve got another one here for marking or outlining parameters, which basically is cutting but not cutting through.
17
00:02:07,800 –> 00:02:16,890
So, you know, you may want to defocus depends what you want to do with your line, but basically he’s drawing with the drawing with the laser.
18
00:02:16,890 –> 00:02:21,240
So that’s another set of parameters that you need to understand if you want to do that.
19
00:02:21,240 –> 00:02:29,130
Then we’ve got dotting mode, dotting mode. Now Dotti mode has got all sorts of uses.
20
00:02:29,130 –> 00:02:36,930
Some people use it for, for instance, if they’re doing leather work, they may decide to align stitching marks along their products,
21
00:02:36,930 –> 00:02:44,010
so they will use adopting a perforation mode that puts dots at a regular interval around the outside of their product.
22
00:02:44,010 –> 00:02:50,550
Now that’s one use for it, and another thing is for putting perforation lines if you want to fold a sheet.
23
00:02:50,550 –> 00:02:56,310
But to be honest, the most important part of dotting is if you can cut with Dottie.
24
00:02:56,310 –> 00:03:04,180
And you can cut very difficult materials with Dottie. And that’s something which is very rarely touched upon.
25
00:03:04,180 –> 00:03:08,920
Now we move on to scanning. Yeah, if you’ve got, for instance,
26
00:03:08,920 –> 00:03:18,160
just ordinary text that you’ve drawn in Ardi works and you want to scan it to make it thick, filled in engraved text.
27
00:03:18,160 –> 00:03:22,810
Then this is what you would use standard continuous scanning.
28
00:03:22,810 –> 00:03:30,190
But there is more than just one type of scanning. There’s another process, which is.
29
00:03:30,190 –> 00:03:41,230
Bitmaps pictures now pictures can either be things like a logo, which is a black and white bitmap.
30
00:03:41,230 –> 00:03:49,330
One set of parameters. Maybe it’s a desert bitmap like the sort of pictures that are produced in newspapers, lots of dots.
31
00:03:49,330 –> 00:03:57,700
Well, that’s another set of parameters you need to understand. And then we got a grayscale bitmap.
32
00:03:57,700 –> 00:04:02,980
Well, you know where we get into a lot of parameter pages here?
Transcript of How to derive your own CO2 Laser Cutting Parameters (Cont…)
33
00:04:02,980 –> 00:04:07,330
It’s not simple. And that’s what I tried to mention to you last time.
34
00:04:07,330 –> 00:04:13,810
The fact that you know, there are there are very basic guidelines out there, but at the end of the day,
35
00:04:13,810 –> 00:04:20,290
you would need to generate your own parameters for your machine, although there will be guidelines.
36
00:04:20,290 –> 00:04:26,710
There will only be one set of real guidelines and recipes for your machine, and they’re the ones that you produce.
37
00:04:26,710 –> 00:04:33,230
Okay, so you spent ages creating all this lovely data.
38
00:04:33,230 –> 00:04:39,980
And a year, six months, two years down the road, you decide you need another machine.
39
00:04:39,980 –> 00:04:47,030
Either the same or different. Maybe it’s going to be an 80 watt machine as opposed to a 60 watt machine.
40
00:04:47,030 –> 00:04:51,680
Who knows what you’re going to change to, how do these parameters work for you,
41
00:04:51,680 –> 00:05:00,530
then you need to be very careful because you’ll be putting all this information here in something called percentage power,
42
00:05:00,530 –> 00:05:03,890
which is what you see on this on the display here.
43
00:05:03,890 –> 00:05:07,160
That’s that’s what this machine works in percentage powers.
44
00:05:07,160 –> 00:05:15,620
It doesn’t work in watts, so all the parameters you’ve got in here could actually be quite meaningless if you move to another machine.
45
00:05:15,620 –> 00:05:24,320
By that, I mean, to say that 20 percent power on a 40 watt tube is not the same as 20 percent power on a 60 or 90 watt tube.
46
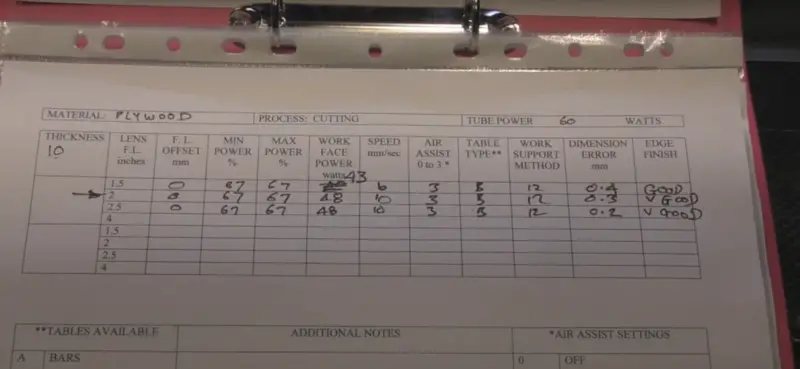
00:05:24,320 –> 00:05:28,760
So how do you overcome that problem and make your results meaningful?
47
00:05:28,760 –> 00:05:37,430
So when you first get your machine? Good advice would be to say about a power meter of some sort so that you could physically measure
48
00:05:37,430 –> 00:05:44,210
the power coming out of your tube to generate this calibration graph against percentage power.
49
00:05:44,210 –> 00:05:51,380
And then if you get another tube, you can draw the same graph and you can work out what the power differences are.
50
00:05:51,380 –> 00:05:57,230
Then between percentage power of a city, what tube and the same percentage power on a 40 watt tube.
51
00:05:57,230 –> 00:06:03,380
And you can start to adapt and modify these parameters without going through the whole process again.
Transcript of How to derive your own CO2 Laser Cutting Parameters (Cont…)
52
00:06:03,380 –> 00:06:10,580
Over a period of time, we will gradually tackle every one of these subjects and start filling in the parameter shapes.
53
00:06:10,580 –> 00:06:13,490
The first one is cutting now.
54
00:06:13,490 –> 00:06:24,770
The wood cutting is, in some ways, a bit of a misnomer because you’re not really cutting what you’re doing and burning organic materials like wood,
55
00:06:24,770 –> 00:06:29,060
leather, paper card, they’re all burning materials.
56
00:06:29,060 –> 00:06:40,640
The process by which you cut them is burning. Acrylic is a unique material in that it suddenly makes you fight heat at it and it evaporates.
57
00:06:40,640 –> 00:06:47,390
Never lose sight of the fact that your laser beam is not a innocuous beam of light.
58
00:06:47,390 –> 00:06:53,490
It’s a very powerful beam of fire just over the thickness of a hair.
59
00:06:53,490 –> 00:07:03,810
And it can do a lot of damage, but it is fire, heat, concentrated heat energy and it will burn and it will char and it will smoke.
60
00:07:03,810 –> 00:07:11,370
I’m going to show you the procedure that I use to quickly get to cutting parameters and the optimum cutting parameters.
61
00:07:11,370 –> 00:07:14,580
We don’t spend too much time initially filling in this sheet.
62
00:07:14,580 –> 00:07:21,270
What we’re trying to do is quickly get to the parameters that we can record in here as being the correct recipe.
63
00:07:21,270 –> 00:07:30,300
So where do we start? Well, the first thing we need to do is choose a material and we’re going to start off with something nice and simple.
64
00:07:30,300 –> 00:07:37,260
Here I’ve got a piece of one eight three point one two five cardboard.
65
00:07:37,260 –> 00:07:40,080
It’s a high density fiber board.
66
00:07:40,080 –> 00:07:48,690
I would recommend that you get yourself a program built into your machine here, which is a 40 millimeter square or a 50 millimeter square.
67
00:07:48,690 –> 00:07:58,050
Something small and compact like that. So you can draw that in art works and program it up with cutting parameters.
68
00:07:58,050 –> 00:08:03,270
It doesn’t matter what the parameters are that you put in because we’re going to edit those here on the machine itself.
Transcript of How to derive your own CO2 Laser Cutting Parameters (Cont…)
69
00:08:03,270 –> 00:08:09,170
Now to do this cutting, we could use this table.
70
00:08:09,170 –> 00:08:18,260
The problem is, people think that you get good extraction through this table, but look how much extraction of mine are going to get through here.
71
00:08:18,260 –> 00:08:27,560
The answer is very little. The way to get good extraction is actually to let it happen underneath the job like that.
72
00:08:27,560 –> 00:08:35,270
So what I’m going to do is to pack that job up. Now I’ve mentioned to you before things like these, these are donuts.
73
00:08:35,270 –> 00:08:39,110
Anything will do for packing up.
74
00:08:39,110 –> 00:08:46,460
We’ll just put these round the corners of the job, so they’ve got lots of air underneath and lots of our over the top and in on this two inch lens,
75
00:08:46,460 –> 00:08:50,870
I need to set the focus to five millimeters above the surface.
76
00:08:50,870 –> 00:08:55,060
So, yeah, I’m nearly at the top there. I’m not going to use autofocus at the moment.
77
00:08:55,060 –> 00:09:01,810
Final are. Well.
78
00:09:01,810 –> 00:09:07,480
Get my suggestion is always use the maximum power that you can.
79
00:09:07,480 –> 00:09:12,580
I’m going to set the parameters of 67 percent, which is the maximum I can run on this machine.
80
00:09:12,580 –> 00:09:19,630
And then I’m going to set a fairly slow speed if the square does not drop out.
81
00:09:19,630 –> 00:09:24,490
We’re going to fast. And if the square does drop out, we’re not going fast enough.
82
00:09:24,490 –> 00:09:31,750
So we can’t lose whichever way we go. We’ve eventually got to get to the point where the square doesn’t drop out,
83
00:09:31,750 –> 00:09:36,340
so we start off at something like maybe four millimeters a second, very slow.
84
00:09:36,340 –> 00:09:44,170
The other thing I want you to know is I have got maximum airflow on here.
85
00:09:44,170 –> 00:09:52,870
This air assist is fully open. You don’t want any smoke basically coming back up onto the surface if it comes back.
86
00:09:52,870 –> 00:09:56,950
It will get blown down again and it will produce a brown mop around the edge of your cut.
87
00:09:56,950 –> 00:10:05,300
So I’ll now turn the extraction. Well.
Transcript of How to derive your own CO2 Laser Cutting Parameters (Cont…)
88
00:10:05,300 –> 00:10:12,090
You see, we have some good news. Look how clean the cat is.
89
00:10:12,090 –> 00:10:24,720
The second thing is that this dropped out, as I mentioned to you, all organic materials burn and burning produces smoke and charring on the edge.
90
00:10:24,720 –> 00:10:29,280
Now, one of the ways of knowing whether or not you’ve got a good cuts or you’re
91
00:10:29,280 –> 00:10:36,290
getting close to the maximum you can achieve is to carry out this simple test.
92
00:10:36,290 –> 00:10:44,400
Get a piece of white. Kitchen towel and try rubbing it along the edge.
93
00:10:44,400 –> 00:10:49,920
OK, we’ve got nothing coming off the air at the moment. But.
94
00:10:49,920 –> 00:10:54,420
That may be because this is a this is not a pill woods.
95
00:10:54,420 –> 00:10:58,050
This is a manmade woods with raisins in it, which were actually hard.
96
00:10:58,050 –> 00:11:06,840
Not it looks very, very black, looks quite nice, but it looks black and I’m not expecting it to be that much.
97
00:11:06,840 –> 00:11:09,860
Double it. Let’s go to 8mm in a second.
98
00:11:09,860 –> 00:11:17,060
We could go up in single steps and spend ages doing it predictably, because the worst is going to happen is it doesn’t work.
99
00:11:17,060 –> 00:11:22,460
And in which case we know that the result, the good result is somewhere between four and eight.
100
00:11:22,460 –> 00:11:28,630
So we go through this halving process, doubling and halving to get to a quick result.
101
00:11:28,630 –> 00:11:35,680
Now if we see smoke coming back off the surface there. We should know that we haven’t.
102
00:11:35,680 –> 00:11:42,070
Cut through. I don’t see any smoke.
103
00:11:42,070 –> 00:11:54,370
We still got a beautifully clean cut edge. Can you see how this one is black and this one is becoming brown?
104
00:11:54,370 –> 00:12:02,200
Now that tells me we’re getting towards a good cut. The less charring, the better.
Transcript of How to derive your own CO2 Laser Cutting Parameters (Cont…)
105
00:12:02,200 –> 00:12:08,240
I’m pretty confident. We’re not going to be able to double that again to 16.
106
00:12:08,240 –> 00:12:15,180
So I’m going to make a judgment based on the age that I can see.
107
00:12:15,180 –> 00:12:20,850
But my next step will be 12. Just make sure we’re nowhere near the.
108
00:12:20,850 –> 00:12:29,150
Any of the support points? OK, I was wrong.
109
00:12:29,150 –> 00:12:39,170
Now I’m hoping that you can see there. Black, brown and even lighter brown.
110
00:12:39,170 –> 00:12:46,830
Maybe we could go. Maybe we could have gone to 60mm a second.
111
00:12:46,830 –> 00:12:55,910
Well, I’ll just pick myself up off the floor. It’s important that I keep showing you this.
112
00:12:55,910 –> 00:12:59,500
You can see the color differences.
113
00:12:59,500 –> 00:13:05,170
Between one, two, three and four, they’re getting lighter and lighter and lighter as we’re getting faster and faster.
114
00:13:05,170 –> 00:13:16,980
And the. We can’t go to 32, but we’ll add another form of up to 20.
115
00:13:16,980 –> 00:13:29,580
Now, I suspect, oh. I was just going to say, I suspect the theme was dragging a bit there, because if we compare these last two results here.
116
00:13:29,580 –> 00:13:33,600
You can see the burning, the browning around the edge.
117
00:13:33,600 –> 00:13:39,700
That’s not there. So we’ve reached a point where.
118
00:13:39,700 –> 00:13:45,840
The smoke is beginning to just back up a shade and come out on top.
119
00:13:45,840 –> 00:13:53,320
There’s a color comparison. We could push it to 22 and see what happens.
120
00:13:53,320 –> 00:14:07,940
Now, it’s just not falling out with all that’s happening is it’s hanging right on the corners because what’s happening is the cut as it travels along.
Transcript of How to derive your own CO2 Laser Cutting Parameters (Cont…)
121
00:14:07,940 –> 00:14:12,620
Is actually this shake. The theme is driving.
122
00:14:12,620 –> 00:14:21,570
So when it gets to the corner. There’s a little bit there.
123
00:14:21,570 –> 00:14:29,970
Which is not quite cut, and then it starts coming towards us from the corners here, which are hanging.
124
00:14:29,970 –> 00:14:35,400
You can see clearly that we’ve now got. Some frown on here.
125
00:14:35,400 –> 00:14:43,060
We have reached a limit, but what we’ll do, we’ll go beyond the limit 22 to 24.
126
00:14:43,060 –> 00:14:51,010
This time we’ll look for some smoke that might be coming off the.
127
00:14:51,010 –> 00:14:58,120
Again, we could say that this is actually cut, it’s done a superb job on the underneath here.
128
00:14:58,120 –> 00:15:05,250
And that’s another trick that I will point out to you. You don’t always cut a product like this.
129
00:15:05,250 –> 00:15:09,360
Face side up. Yeah, and that’s just hanging in on the corners again.
130
00:15:09,360 –> 00:15:16,460
OK, now you might think that we found the limit after the extraction of so that we can hear what we’re talking about, right?
131
00:15:16,460 –> 00:15:24,780
Let’s just have a quick summary. We’ve held the power constant at 67 per cent. We’ve held the air flow constant at full on and
132
00:15:24,780 –> 00:15:30,180
we do everything else the same the distance off the deck and the air flow through the air.
133
00:15:30,180 –> 00:15:36,300
So everything has been constant and we’ve been using speed as our marker of success.
134
00:15:36,300 –> 00:15:42,390
So now we’re going to change another variable to see whether we can have any major effect.
135
00:15:42,390 –> 00:15:47,910
Now, one of the most underrated variables is this thing here.
136
00:15:47,910 –> 00:15:54,000
Air flow. Another reason why I’ve tried the extraction off is so that you can hear the airflow coming out of the nozzle.
137
00:15:54,000 –> 00:15:57,990
But when I turn it down, is it on? Is it off? Is it working?
138
00:15:57,990 –> 00:16:04,140
Is it not working? What’s happening? You can hear it when there’s lots of airflow.
Transcript of How to derive your own CO2 Laser Cutting Parameters (Cont…)
139
00:16:04,140 –> 00:16:11,460
Then you can hear it when there’s no air flow. But it’s that in-between, which is actually quite crucial.
140
00:16:11,460 –> 00:16:19,200
I’m going to show you a little trick that I found extremely useful. A little pot of water, which I keep handy.
141
00:16:19,200 –> 00:16:25,060
I get the end of my tube in there so I can just I can get I can make a lot of lot of problems.
142
00:16:25,060 –> 00:16:30,810
I mean, even with it actually fully turned off. I’ve still got a small amount of air leakage past there.
143
00:16:30,810 –> 00:16:39,190
So that means if I’ve got air coming out of there, when I fly that back in, the only place for it to escape is that,
144
00:16:39,190 –> 00:16:46,080
oh, here we’ve got just enough air coming out there to stop the lens from fogging up.
145
00:16:46,080 –> 00:16:54,690
But it’s not enough to force the tar laden air bag down onto the surface of the job and make it brown.
146
00:16:54,690 –> 00:17:01,080
So now what’s going to happen is hot air will come up and the extraction system will
147
00:17:01,080 –> 00:17:05,910
take it away before it gets a chance to blow down and re condense on the surface.
148
00:17:05,910 –> 00:17:13,860
No, no. It might seem totally counterintuitive that you turn the air supply off to cut wood.
149
00:17:13,860 –> 00:17:23,420
I’m hopefully going to demonstrate that to, you know? So we basically turned the air system off.
150
00:17:23,420 –> 00:17:40,130
But left enough on to protect the lens. We’re still doing 24 millimeters a second, which is this last one here.
151
00:17:40,130 –> 00:17:46,310
Did you notice anything? A lot of smoke. It actually cut quite nicely.
152
00:17:46,310 –> 00:17:51,570
But the thing that I really want you to look at is this. Smoke.
153
00:17:51,570 –> 00:18:06,280
No smoke. Let’s look at it again. Observe what’s actually going on, because part of the process of getting the best parameters for using your eyes.
Transcript of How to derive your own CO2 Laser Cutting Parameters (Cont…)
154
00:18:06,280 –> 00:18:22,690
Take a look carefully this time at what’s happening to the smoke. Can you see how he’s blowing up from the surface?
155
00:18:22,690 –> 00:18:27,400
And then what’s happening is it’s getting carried away by the air.
156
00:18:27,400 –> 00:18:33,480
Now I’ve got the door open at the moment. So what I’ll do oppose the door.
157
00:18:33,480 –> 00:18:37,500
Because you would normally be operating this machine with the door closed.
158
00:18:37,500 –> 00:18:42,390
And as I mentioned to you in the last session, I’ve got a big gap underneath the door,
159
00:18:42,390 –> 00:18:54,690
which means I get a very high jet that passes through the machine.
160
00:18:54,690 –> 00:19:00,060
But thing you see here there, see how the smoke is actually drifting upwards.
161
00:19:00,060 –> 00:19:07,230
I mean, the edge is beautifully clean. Don’t get me wrong. He’s done a superb job with this product.
162
00:19:07,230 –> 00:19:14,580
It might not do the same with wood, but with this product, he’s done a wonderful job without the air assist.
163
00:19:14,580 –> 00:19:23,470
Just look at the difference in color. Off the edge. Slower, slower, faster, faster, faster.
164
00:19:23,470 –> 00:19:30,910
No air assist. But it’s a product.
165
00:19:30,910 –> 00:19:39,910
On its own, this MDF, it’s not the same as normal wood, because this is manmade wood.
166
00:19:39,910 –> 00:19:49,740
We should just record the results as we go. And when I say no air assist.
167
00:19:49,740 –> 00:19:57,720
We talk about just enough to protect the ladies. So we think we’ve got to a maximum speed of 24 millimeters a second.
168
00:19:57,720 –> 00:20:02,740
Let’s see if we can improve that in any way at all. You might remember.
Transcript of How to derive your own CO2 Laser Cutting Parameters (Cont…)
169
00:20:02,740 –> 00:20:17,790
This was set to five mm. I’m now going to look this down to.
170
00:20:17,790 –> 00:20:23,820
I did warn you that these foods are flammable. It has only just about cut.
171
00:20:23,820 –> 00:20:30,520
So what we do will go the other way and we lift the nozzle out and then.
172
00:20:30,520 –> 00:20:44,110
Said it to six mm. So lift up onto the six military.
173
00:20:44,110 –> 00:20:52,430
And we certainly didn’t get any flames that time, the product just about falls out still.
174
00:20:52,430 –> 00:21:03,440
You still got quite a nice, clean surface finish. So we seem to get the best results when we took the air assist off.
175
00:21:03,440 –> 00:21:11,690
Certainly minus one was giving us planing, and it was only just making it through, but then again, it was only just making it true on all of these.
176
00:21:11,690 –> 00:21:16,220
So whichever one of these we chose, it was right on the limit of cutting.
177
00:21:16,220 –> 00:21:24,560
So we’ve reached that limit at 24mm a second. We’ve now got a look to see what other attributes we would like to get out of our cut.
178
00:21:24,560 –> 00:21:28,580
The cleanest age is probably the best thing that we can go for.
179
00:21:28,580 –> 00:21:38,060
Now this one here minus one, although we were producing all sorts of flames, we didn’t damage the surface.
180
00:21:38,060 –> 00:21:45,260
But I think this one here. No air assist. Normal five mm optimum focus.
181
00:21:45,260 –> 00:21:55,630
I think the optimum focus 24mm was probably the best one to go for.
182
00:21:55,630 –> 00:22:05,120
So we’ve settled on several things then for this material, 24mm a second, 67 percent power.
Transcript of How to derive your own CO2 Laser Cutting Parameters (Cont…)
183
00:22:05,120 –> 00:22:14,870
No air assist. On stand up, these are these all look nice and crisp and clean on the surface at the top.
184
00:22:14,870 –> 00:22:22,500
This was the first one that we did very, very slowly. And one thing I’d like you to note on this one.
185
00:22:22,500 –> 00:22:34,910
Just how burnt the bottom edges, can you see how charred? And Brown Fat Bottom Edge is once we started getting a little bit faster.
186
00:22:34,910 –> 00:22:38,540
We get lovely, clean bottom edges.
187
00:22:38,540 –> 00:22:45,890
So there’s some other factor that tells you whether or not you’re going fast enough or whether you’re going to slow.
188
00:22:45,890 –> 00:22:53,900
And that’s with you. Getting smoking on the bottom edge right now is the time to start filling in some data in our book here now.
189
00:22:53,900 –> 00:23:11,950
High density and fiber hgf. 3MM, let’s say it’s three point one to five foot three mm now, the important thing is here we were using a two inch.
190
00:23:11,950 –> 00:23:21,770
Legs. And so all the data is going to be filled in across this column here.
191
00:23:21,770 –> 00:23:29,720
The offset of the focal length we tried minus one and it flamed up.
192
00:23:29,720 –> 00:23:37,460
We tried flush one. I think it was OK, but optimal was probably zero.
193
00:23:37,460 –> 00:23:44,020
So the offset? Was there a minimum time?
194
00:23:44,020 –> 00:23:54,940
Well, when you’re cutting, there are exceptions, but in general, minimum power and maximum power are always set the same.
195
00:23:54,940 –> 00:24:02,140
The reason why you use me on power is for cutting is a specialized subject, which I will tackle at a later date.
Transcript of How to derive your own CO2 Laser Cutting Parameters (Cont…)
196
00:24:02,140 –> 00:24:09,920
So at the moment, we had 67 percent and 67 percent.
197
00:24:09,920 –> 00:24:14,420
I don’t know what the word face Paris. We’ll check back in a minute.
198
00:24:14,420 –> 00:24:23,690
We do know what the speed was. The optimal speed that we found was 24 millimeters a second.
199
00:24:23,690 –> 00:24:28,220
Now they are assessed zero to three.
200
00:24:28,220 –> 00:24:32,750
We’ve got code here. Zero is off.
201
00:24:32,750 –> 00:24:38,210
One is just on. Two is low flow and three is maximum.
202
00:24:38,210 –> 00:24:45,110
I would say that we had one. Because it wasn’t turned off.
203
00:24:45,110 –> 00:24:52,070
You saw it bubbling the work support method.
204
00:24:52,070 –> 00:25:05,750
If we just put a dimension down, that would tell me that we’ve just lifted it 12 millimeters off the deck, now it’s finish.
205
00:25:05,750 –> 00:25:20,190
It’s interesting here, we call that good. In fact, I would call that very good.
206
00:25:20,190 –> 00:25:30,960
They don’t charge. So, you know, you can we keep what we have, we’ve got the opportunity here, if we want,
207
00:25:30,960 –> 00:25:40,070
we could footnote one there, for example, and down here we’ve got additional notes and we could put one.
208
00:25:40,070 –> 00:25:58,290
And if you really want to. If you’re keeping these in a book, as we might do, you might even stick on that those air systems one.
209
00:25:58,290 –> 00:26:04,880
Table type, what were you using? We were using the honeycomb chain.
Transcript of How to derive your own CO2 Laser Cutting Parameters (Cont…)
210
00:26:04,880 –> 00:26:10,700
So that would be missed two things out dimensional era.
211
00:26:10,700 –> 00:26:13,970
I thought I’d put a 45 40 program in there. Hang on.
212
00:26:13,970 –> 00:26:18,680
That’s not 40, that’s probably 25 for 25, which is another program.
213
00:26:18,680 –> 00:26:29,600
I’ve got loaded in the machine there. So what we need to do is knowing that this was 25 by 25.
214
00:26:29,600 –> 00:26:41,560
Just check the zero yet zero zero. Now, this was supposed to be 25 by 25 to start with, is finished up at twenty four point eighty eight,
215
00:26:41,560 –> 00:26:58,700
so twenty four point nine mm twenty four point eighty six, so on average, each lost point one five.
216
00:26:58,700 –> 00:27:04,580
So the dimensional era. Minus.
217
00:27:04,580 –> 00:27:09,230
Naught point one five. Now that’s a very important piece of information,
218
00:27:09,230 –> 00:27:17,450
because if you’re trying to make pieces that fit together snugly and tightly, you need to know what the error is.
219
00:27:17,450 –> 00:27:24,320
Now, bear in mind that this is and I really ought to put is plus or minus.
220
00:27:24,320 –> 00:27:33,540
I want to put any dimension on that plus or minus, because if you’re producing a shake like this, it’s going to be minus.
221
00:27:33,540 –> 00:27:44,940
But if you’re producing a whole, it’s going to be plus. So technically, it looks as though that cut with the curve is point three.
222
00:27:44,940 –> 00:27:48,240
In other words, it leaves a 0.3 gap all the way round.
223
00:27:48,240 –> 00:27:57,080
One vital piece of information that’s missing off here is what power we were actually using to do that work with.
224
00:27:57,080 –> 00:28:03,350
And the only way we can find that out is by measuring the power that comes out of that nozzle with a power meter.
Transcript of How to derive your own CO2 Laser Cutting Parameters (Cont…)
225
00:28:03,350 –> 00:28:07,250
Here’s my apparently to one that you’ve seen me using before.
226
00:28:07,250 –> 00:28:15,920
Necessary in this case to have it on a little stand because you can’t use the machine with the lid open.
227
00:28:15,920 –> 00:28:27,830
But we can close the lid and we can pull this piece outside, the way that this stand is designed is such that it’s got a location pin under here,
228
00:28:27,830 –> 00:28:33,590
which sits under the center point of this thing, which I call it doohickey.
229
00:28:33,590 –> 00:28:40,460
Now, even if this rotates, it won’t really matter because the center point will remain the same.
230
00:28:40,460 –> 00:28:48,500
They’re going to move ahead to a position on the center of this target here.
231
00:28:48,500 –> 00:28:54,290
There we go. That’s not far out because the beam is focused through the lens.
232
00:28:54,290 –> 00:29:04,340
If we drop that down to just five five millimeters, which is the focal point, it will do a nice engraving job on the surface of that black aluminum.
233
00:29:04,340 –> 00:29:11,600
Now that’s anodized aluminum, which is 100 percent absorptive to the rays of energy that come out of here.
234
00:29:11,600 –> 00:29:15,980
The heat energy natural aluminum is reflective.
235
00:29:15,980 –> 00:29:23,300
Anodized aluminum is 100 percent absorbed if we’ve got a drop down about two inches.
236
00:29:23,300 –> 00:29:30,230
But it really isn’t that crucial, provided it’s more than a certain distance.
237
00:29:30,230 –> 00:29:37,790
And then I’ll just put a piece of card on the surface and we must make sure we turn the air assist off.
238
00:29:37,790 –> 00:29:41,300
Otherwise, it will cool that surface down, and we don’t want that to cool down.
239
00:29:41,300 –> 00:29:46,220
We want to heat it up. So I’ve got posts now at 15 percent and what I can do,
240
00:29:46,220 –> 00:29:55,190
I can just gently post that and we should see that we’ve got about a two and a half millimeter diameter.
241
00:29:55,190 –> 00:30:03,160
I’d like to see that at about three millimetres, so we’ll drop the distance down a little bit further.
Transcript of How to derive your own CO2 Laser Cutting Parameters (Cont…)
242
00:30:03,160 –> 00:30:12,420
But. And we don’t have a pulse.
243
00:30:12,420 –> 00:30:16,060
That’s better. That’s more like three millimeters.
244
00:30:16,060 –> 00:30:24,510
OK, now the reason we’re doing that is so that the energy density is low enough and that it doesn’t damage the surface of that.
245
00:30:24,510 –> 00:30:31,890
We’re going to move it around anyway. Now this this whole system is basically calorimeter based.
246
00:30:31,890 –> 00:30:38,050
It isn’t really a true calorimeter because it has to be calibrated against a known standard.
247
00:30:38,050 –> 00:30:46,170
Now, if you want to understand more about how this system works and how power meters the cheaper end of the market power meters work,
248
00:30:46,170 –> 00:30:51,840
there’s a whole session of describing how they work on My Body Works Learning Lab series,
249
00:30:51,840 –> 00:30:57,270
and I can’t remember what number it is, but it’s somewhere in the middle of probably about 45 or 50.
250
00:30:57,270 –> 00:31:06,000
I haven’t got a direct watt output. I work against a calibration chart, but the calibration chart is nice and easy to remember.
251
00:31:06,000 –> 00:31:12,240
This particular calibration is temperature difference times to just beside the machine.
252
00:31:12,240 –> 00:31:18,460
Here we have a bucket of water, which has been sitting in this workshop.
253
00:31:18,460 –> 00:31:35,620
For weeks. So it’s established a nice temperature, ambient temperature, and we’re just dry off and we’ll put it back in its stand so that.
254
00:31:35,620 –> 00:31:43,040
It’s roughly lined up with the shape that’s underneath.
255
00:31:43,040 –> 00:31:48,470
Just to make it easy for us to line up underneath the nozzle and as we’ve got the lid open,
256
00:31:48,470 –> 00:32:01,700
I will do everything in one spot so that you can see what’s going on.
Transcript of How to derive your own CO2 Laser Cutting Parameters (Cont…)
257
00:32:01,700 –> 00:32:18,150
So the number that we need to remember is about. 8.4, we’ll start the system off to start with.
258
00:32:18,150 –> 00:32:47,060
I’ll set the maximum now, so 8.4. So I’ve already put that into my calculator, 8.4.
259
00:32:47,060 –> 00:32:53,240
We just wait for the temperature to max out twenty nine point eighty eight point four.
260
00:32:53,240 –> 00:33:01,810
Minus twenty nine point eight. Because don’t worry about the sign times to.
261
00:33:01,810 –> 00:33:09,670
Because forty two point eight, so we’ve got 43, what’s coming out of sixty?
262
00:33:09,670 –> 00:33:11,170
What’s in?
263
00:33:11,170 –> 00:33:20,290
So that’s the important bit now that could be the result of the lens rather than the mirrors that will be making getting some losses across the lens.
264
00:33:20,290 –> 00:33:28,960
But at the end of the day, 42 40 say 43 watts is the power that we’ve got to put down into our chart.
265
00:33:28,960 –> 00:33:33,190
So workplace power is 43 watts.
266
00:33:33,190 –> 00:33:41,260
It’s a 60. What do we put that at the top there? And now what we’ve got to do is exactly the same thing again.
267
00:33:41,260 –> 00:33:48,250
But this time we’ve got to do it for one and a half inch lens. And then I should do the same thing for two and a half inch lens.
268
00:33:48,250 –> 00:33:51,270
And I’ll also try and do the same thing for four inch lens.
269
00:33:51,270 –> 00:34:02,260
And what you will then see is the comparative power that it takes to force each one of these lenses through that material.
Transcript of How to derive your own CO2 Laser Cutting Parameters (Cont…)
270
00:34:02,260 –> 00:34:13,060
In other words, we may be able to get better than 24 millimetre per second out of a one and a half inch lens on this thin material.
271
00:34:13,060 –> 00:34:17,140
But I suspect when we get up to two and a half, it will drop down.
272
00:34:17,140 –> 00:34:22,060
But it really depends on what power is coming through the actual lens itself.
273
00:34:22,060 –> 00:34:23,670
So.
274
00:34:23,670 –> 00:34:33,010
Again, I’m just trying to make it clear to you, there are so many variables in here that only you can find out what happens correctly on your machine.
275
00:34:33,010 –> 00:34:37,710
So this war is raging. 7.1 Press Max.
276
00:34:37,710 –> 00:34:46,730
3.7, 3.6 six twenty eight point three.
277
00:34:46,730 –> 00:34:52,470
With a power meter, says forty nine point two watts.
278
00:34:52,470 –> 00:34:58,260
So this is what I call my every day power meter, and this one is my Sunday best.
279
00:34:58,260 –> 00:35:16,610
This is the one I use for reference work. Just to assure myself that everything’s still working, OK?
280
00:35:16,610 –> 00:35:26,950
She asked about my 250th. Just about made it to 50, these two meters are reading the same, I’m happy with that.
281
00:35:26,950 –> 00:35:36,850
Today’s another day. I haven’t changed a thing since I did this test yesterday.
282
00:35:36,850 –> 00:35:42,880
The temperature is about the same in here. The only difference is that the machine has just been turned on.
283
00:35:42,880 –> 00:35:48,640
And yesterday we’d been working the machine for an hour or so.
284
00:35:48,640 –> 00:36:00,990
And so today we seem to have 49 watts at the workplace, so I don’t really know what to believe.
Transcript of How to derive your own CO2 Laser Cutting Parameters (Cont…)
285
00:36:00,990 –> 00:36:19,620
We change this lens. The inch and a half lens flat side down.
286
00:36:19,620 –> 00:36:29,570
And this one and a half inch lens has got a focal point for focus distance below the nozzle of 6.5 mm.
287
00:36:29,570 –> 00:36:42,320
Thank you. Would just fill in the details here for the one and a half inch lens we had zero offset was the best 67 percent power, 67 percent power.
288
00:36:42,320 –> 00:36:49,940
The power the work face where we checked it earlier was 49 watts.
289
00:36:49,940 –> 00:36:57,480
Speed 24 Air Assist. Well, we got fully air assist on.
290
00:36:57,480 –> 00:37:12,250
So we got three. We’ve got a honeycomb table, the support method again, 12mm dimensional era.
291
00:37:12,250 –> 00:37:17,740
We’re not even going to bother to check it because we’re not going to take those results as being valid.
292
00:37:17,740 –> 00:37:33,350
The finish was OK. So we need to fill the data in because we need to know which of these lenses is the best lens.
293
00:37:33,350 –> 00:37:42,970
And at the moment, we probably have settled on the right one to start. So we now move on to the two and a half each lens and see what happens there.
294
00:37:42,970 –> 00:37:50,790
She’s the one and a half inch lens is a loose system, but it’s something I’ve made myself that sits down there inside the nozzle,
295
00:37:50,790 –> 00:37:57,460
whereas in fact the two and a half inch lens sits right back there and there.
296
00:37:57,460 –> 00:38:03,820
Lock it up. Lens changed.
Transcript of How to derive your own CO2 Laser Cutting Parameters (Cont…)
297
00:38:03,820 –> 00:38:21,010
Put some extraction on and away we go. I don’t really expect that to cut at 24 millimeters a second.
298
00:38:21,010 –> 00:38:32,730
And it hasn’t. Give this a try to see whether we can get it to drop out at 20 millimeters a second.
299
00:38:32,730 –> 00:38:43,930
We knew that it wasn’t cutting through or we could see that it wasn’t cutting through because of all the brown stuff on the surface that.
300
00:38:43,930 –> 00:38:51,960
And it’s not cutting through again because we’ve got lots of brown stuff on the surface.
301
00:38:51,960 –> 00:39:01,810
So this is 60mm a second. We’re still getting some ground on the surface.
302
00:39:01,810 –> 00:39:10,280
But it’s just about fallen out. Yeah, it has fallen out.
303
00:39:10,280 –> 00:39:15,600
Look at the difference between that and the cherry trees.
304
00:39:15,600 –> 00:39:25,430
So it’s certainly not as efficient at cutting. So that’s about as fast as we can go.
305
00:39:25,430 –> 00:39:28,670
We could try it without air assist, but again,
306
00:39:28,670 –> 00:39:37,760
I’m not going to bother with doing the air assist test because we already know that this is not the right lens for doing this material,
307
00:39:37,760 –> 00:39:42,610
so we can fill in what data we have collected and not bother about the rest.
308
00:39:42,610 –> 00:39:51,620
Right. So let’s fill in the data for that. Two and a half inch lens offset zero power 67 67.
309
00:39:51,620 –> 00:39:59,450
Work face power 48. Speed.
310
00:39:59,450 –> 00:40:09,960
Well, we got down to 16. Air Assist was on full speed, 12.
Transcript of How to derive your own CO2 Laser Cutting Parameters (Cont…)
311
00:40:09,960 –> 00:40:20,610
Dimension error. Well, we’re not going to be worried about that because we’re not saying the result was OK.
312
00:40:20,610 –> 00:40:29,580
And I hgf here, I’m going to change it to India because I did a little bit of research and I think this is something called laser
313
00:40:29,580 –> 00:40:39,000
grade and the only reason it’s called laser grade MDF is because it has a lower formaldehyde emissions content.
314
00:40:39,000 –> 00:40:46,360
How much lower? It’s difficult to find out, but basically it’s MTF.
315
00:40:46,360 –> 00:40:51,520
Now, as I said, I think MDF is going to perform differently to wood,
316
00:40:51,520 –> 00:41:00,220
so we’re going to go with a little piece of wood next to see what the difference in results.
317
00:41:00,220 –> 00:41:07,570
Here we’ve got a piece of 10 millimeter plywood, and we’re going to try, first of all, with this,
318
00:41:07,570 –> 00:41:14,820
two and a half inch lens will work the other way around this time because we have to have the two and a half inch lens in.
319
00:41:14,820 –> 00:41:22,200
We’re going to start this test off somewhere in the middle. Let’s just say 10 millimeters a second, we’ve got full power on again.
320
00:41:22,200 –> 00:41:36,930
We’re going to turn the air assist on. We’re running at 10 millimeters a second, 67 percent power.
321
00:41:36,930 –> 00:41:46,000
And that looks like it’s cutting through very cleanly because we’ve got no browning on the surface.
322
00:41:46,000 –> 00:41:56,550
We just checked the edge and we check it with the tissue. We appear to have virtually no browning at all on that.
323
00:41:56,550 –> 00:42:04,160
Let’s leave the air on at the moment, and we’ll find out how fast we can run.
Transcript of How to derive your own CO2 Laser Cutting Parameters (Cont…)
324
00:42:04,160 –> 00:42:08,600
So if we can get it to run at 14 mm and it hasn’t cut through.
325
00:42:08,600 –> 00:42:19,790
So 14mm is one step too far and see the obvious difference between going low here and even lower here, I’m going high.
326
00:42:19,790 –> 00:42:25,630
Here is. Zero. Minus one.
327
00:42:25,630 –> 00:42:38,150
Minus two. And this is plus one. Zero and plus one look about the same.
328
00:42:38,150 –> 00:42:43,700
Minus one to minus two. First of all, the lines are getting thicker as the beam gets thicker.
329
00:42:43,700 –> 00:42:48,500
And secondly, they’re also burning more. They’re doing a lot more charring.
330
00:42:48,500 –> 00:42:53,360
So let’s have a look at the back of that +1 and see what that looks like.
331
00:42:53,360 –> 00:43:01,050
That’s the back of the +1. And again, what we can see is that it hasn’t really cut through.
332
00:43:01,050 –> 00:43:09,390
More or less so, we’re on the edge. We’ve reached that point where, no, we accidentally found the perfect settings.
333
00:43:09,390 –> 00:43:20,330
The very first time we touched it drop the speed very slightly because we were right on the edge at 10 million.
334
00:43:20,330 –> 00:43:37,280
Now, the first thing we know as we drop the story, as we drop the nozzle down, we’re getting a little bit more burning on the top surface.
335
00:43:37,280 –> 00:43:46,760
But it has dropped out. Maybe just a bit more, Charles.
336
00:43:46,760 –> 00:43:52,970
I think we find out you do setting for 10 mm plywood.
337
00:43:52,970 –> 00:43:59,170
Know, I don’t know what sort of plywood this is. This is a very light grade of plywood. It may be what they call.
338
00:43:59,170 –> 00:44:13,690
Baltic. This is sort of wood that’s used for packing cases, it’s it’s it’s a low density speech and a low grade, but it’s a pretty good grade because.
Transcript of How to derive your own CO2 Laser Cutting Parameters (Cont…)
339
00:44:13,690 –> 00:44:21,820
There are very few voids in this one of the one of the standard problems with plywood as you
340
00:44:21,820 –> 00:44:28,750
get voids between the floor is sometimes where they join the flies together and you know,
341
00:44:28,750 –> 00:44:32,410
it’s a matter of what you can’t see inside. You should worry about.
342
00:44:32,410 –> 00:44:38,800
But for later, cutting it makes a big difference because if the brain cuts across an air pocket,
343
00:44:38,800 –> 00:44:43,390
it will produce smoke, which will stop it from cutting right the way through.
344
00:44:43,390 –> 00:44:52,050
So you get an intermittent cut in for our scrap plywood 10 mm thickness zero offset for focus
345
00:44:52,050 –> 00:44:58,960
power 67 work face power was 48 from what we found out with the two and a half inch lengths,
346
00:44:58,960 –> 00:45:02,920
10 millimeter per second speed air assist was full on.
347
00:45:02,920 –> 00:45:13,110
We were on the honeycomb table. Work support method was 12 millimeters above the surface dimensional era.
348
00:45:13,110 –> 00:45:20,000
Average twenty four point eight. And this way.
349
00:45:20,000 –> 00:45:27,020
Varying, but about twenty four point eight.
350
00:45:27,020 –> 00:45:35,540
So that’s two mm point to not point to.
351
00:45:35,540 –> 00:45:45,840
Now we really ought to check, to be sure, to be sure. This dimension in here is actually twenty five point two.
352
00:45:45,840 –> 00:45:52,130
Which it is. So, yes. The era.
353
00:45:52,130 –> 00:45:56,790
It’s definitely point to. And I finish.
354
00:45:56,790 –> 00:46:00,740
Well, I would say that we’ve got that on good. Very good.
Transcript of How to derive your own CO2 Laser Cutting Parameters (Cont…)
355
00:46:00,740 –> 00:46:09,180
It might be a good idea to keep it in a box of these samples so that you can always go back and check what quality you had.
356
00:46:09,180 –> 00:46:16,950
This is a 2.5 inch focal length lens, and this one was a two inch.
357
00:46:16,950 –> 00:46:38,070
Focal length lens. So we know the conditions under which we got these ideal cuts.
358
00:46:38,070 –> 00:46:48,470
Shows you how flammable the smoke is. It’s not produced any charred edge is brown.
359
00:46:48,470 –> 00:46:58,700
But not burnt. The burning was taking place on the surface here when there was no air assist.
360
00:46:58,700 –> 00:47:04,490
Both the top and the bottom of the cut and look back so with a two inch lens.
361
00:47:04,490 –> 00:47:10,220
Zero focus 67. 47, 48.
362
00:47:10,220 –> 00:47:14,470
We haven’t checked, but that was what we found out earlier.
363
00:47:14,470 –> 00:47:20,000
Speed 10. Air Assist three.
364
00:47:20,000 –> 00:47:25,590
Table type, the method 12 dimensional error.
365
00:47:25,590 –> 00:47:35,960
Twenty four point seven. Twenty four point seven.
366
00:47:35,960 –> 00:47:40,600
So dimensional error. Naught point three.
367
00:47:40,600 –> 00:47:53,970
Question is, should it be stupid and try the 1.5 lens?
368
00:47:53,970 –> 00:48:05,020
So one and a half inch lens that’s nearly cut through. 10MM the second.
Transcript of How to derive your own CO2 Laser Cutting Parameters (Cont…)
369
00:48:05,020 –> 00:48:13,610
Now that’s got a very, very short focal length on that lens.
370
00:48:13,610 –> 00:48:24,720
So what I’m going to do. We’re going to drop that down by two millimeters to.
371
00:48:24,720 –> 00:48:33,510
5.5 down to 3.5. Local five, four five five 3.5.
372
00:48:33,510 –> 00:48:46,770
There we go. Definitely has had no beneficial effect.
373
00:48:46,770 –> 00:49:04,410
So let’s try four point five. This is 4.5, 10 millimeters a second.
374
00:49:04,410 –> 00:49:08,910
Well, this is the cut that took place that was 10 millimeters a second,
375
00:49:08,910 –> 00:49:20,520
and it was at zero focus offset that was minus two into the material that was minus one inch of the material and that was plus one above the material.
376
00:49:20,520 –> 00:49:29,170
So you can see. The difference. So we’ve got the maximum penetration at zero.
377
00:49:29,170 –> 00:49:51,590
That means that we can do a cut, but we may well have to drop down to possibly as little as maybe 8mm a second to get the cut to go through a.
378
00:49:51,590 –> 00:50:02,770
Forty three and a half what’s now? Similar to the results we had yesterday.
Transcript of How to derive your own CO2 Laser Cutting Parameters (Cont…)
379
00:50:02,770 –> 00:50:11,190
OK, well, we finished up with our final results for plywood, which is the 1.5 inch lens, which we thought might be a bit hopeful.
380
00:50:11,190 –> 00:50:16,580
And it was hopeful but interesting and revealing. I’m.
381
00:50:16,580 –> 00:50:20,450
We found that the best results. Surprisingly enough. Who is it?
382
00:50:20,450 –> 00:50:32,240
Zero offset. Now all the books and everything will tell you that I should have had that lens probably set to three millimeters into the material.
383
00:50:32,240 –> 00:50:37,070
Same with these lenses. It appears not so said.
384
00:50:37,070 –> 00:50:44,300
We always use max power and we would decide on the speed that we can get for the maximum power.
385
00:50:44,300 –> 00:50:50,480
And here we found that we were able to get the same speed for two and two and a half inch lenses.
386
00:50:50,480 –> 00:50:56,370
So which one would you choose? Difficult to say at the moment.
387
00:50:56,370 –> 00:51:06,810
With the 1.5 inch focal length lens, we Riney able to go six millimeters a second, which was a little bit surprising,
388
00:51:06,810 –> 00:51:13,770
but then again, it was a thick wood and hard work for it, for such a short focal length lens.
389
00:51:13,770 –> 00:51:22,970
But the puzzling thing was, as I said, the fact that I had to have the lens set right on the surface to get the best penetration.
390
00:51:22,970 –> 00:51:33,410
Now, the air assist was right up at the top maximum, and the interesting thing here was that I was getting some really strange results
391
00:51:33,410 –> 00:51:38,120
in terms of the dimensional error that you can see the best dimension error,
392
00:51:38,120 –> 00:51:43,030
the tightest dimensions were actually on the 2.5 inch lens.
393
00:51:43,030 –> 00:51:48,930
And the surface was good and the finish was good. So.
394
00:51:48,930 –> 00:51:56,170
On balance, I suppose, for 10mm, I’ve got to say that I would probably.
395
00:51:56,170 –> 00:52:04,410
Favor. The two and a half inch lens. But I hope you’re getting an idea now of the way in which I’m going to be
Transcript of How to derive your own CO2 Laser Cutting Parameters (Cont…)
396
00:52:04,410 –> 00:52:08,610
using these charts in the way in which they point you in the right direction.
397
00:52:08,610 –> 00:52:12,710
It tells you which lens to use, what speed you use, whether or not you should have.
398
00:52:12,710 –> 00:52:19,320
You shouldn’t use air assist the surface finish of your product. Everything is built into this chart.
399
00:52:19,320 –> 00:52:22,290
You may or may not have this chart on your desk.
400
00:52:22,290 –> 00:52:28,980
And so it might not be the most convenient thing in the world for you to carry around once you do this chart.
401
00:52:28,980 –> 00:52:36,870
We can make life a little bit easier for you. So let’s go back into the office and take a look at artworks somewhere on your machine.
402
00:52:36,870 –> 00:52:46,210
You will find an I.D. Works V8. Which is the file that contains all the I.D. works information,
403
00:52:46,210 –> 00:52:50,500
even though you load different versions on what’ll happen is it’ll always find
404
00:52:50,500 –> 00:52:56,900
this I.D. worked version eight and overwrite it with the latest version.
405
00:52:56,900 –> 00:53:04,070
So if we click on that and we take a look, what’s in here, you’ll find it, we’ve got something here called parameter manager.
406
00:53:04,070 –> 00:53:09,650
And that’s as much as you’ll find about parameters. So let’s close this for a minute and never come back here,
407
00:53:09,650 –> 00:53:15,470
and we will look at the top of this parameter layer and we find there’s something called a parameter library.
408
00:53:15,470 –> 00:53:19,370
Now there’s a really weird way to fill in the parameter library.
409
00:53:19,370 –> 00:53:24,170
There’s a certain amount of logic to it, but you have to get your head around it.
410
00:53:24,170 –> 00:53:31,070
So the first thing to do is to decide what parameters you want in here for a particular material.
411
00:53:31,070 –> 00:53:38,150
So I’ve got my big red book in front of me, and we’re going to be putting the parameters in to suit 3mm MDF.
412
00:53:38,150 –> 00:53:42,680
So we decided that the best speed was 24 millimeters.
413
00:53:42,680 –> 00:53:46,730
A second blowing yes, process was cut.
414
00:53:46,730 –> 00:53:51,410
Yes. We won’t worry about anything and advanced the power number one.
415
00:53:51,410 –> 00:53:56,660
Yes, 67 and 67. Fine. We don’t want any of this stuff down here.
416
00:53:56,660 –> 00:54:03,330
So. So as far as artworks, works is concerned with defined everything speed and power.
Transcript of How to derive your own CO2 Laser Cutting Parameters (Cont…)
417
00:54:03,330 –> 00:54:10,650
Yes, I think we know a little bit different now. So let’s now go to the parameter library.
418
00:54:10,650 –> 00:54:15,770
What we want to do is to save these parameters, so we save as.
419
00:54:15,770 –> 00:54:24,560
And it will tell me what I want to say as well. The title is bear in mind, these are likely to be ordered in number in alphabetical order.
420
00:54:24,560 –> 00:54:30,230
So we’ll put in m d f three mm.
421
00:54:30,230 –> 00:54:35,360
Let’s move this out the way. Let’s move this out.
422
00:54:35,360 –> 00:54:44,960
This supposed this, so I won’t let me do that. So now you’ve got to remember what might be in this library underneath there because you can’t see it.
423
00:54:44,960 –> 00:54:59,500
What I will suggest you do now is to put all the stuff that you can’t put into this parameter library into your notes f l offset because.
424
00:54:59,500 –> 00:55:06,340
Zero. You can just do a carriage return.
425
00:55:06,340 –> 00:55:17,550
No, you damn well, can’t say, OK, we’ve saved as.
426
00:55:17,550 –> 00:55:22,080
So we can always get back to this parameter 3mm MDF.
427
00:55:22,080 –> 00:55:30,550
Let’s close this now exit. Let’s go back to the file manager, and now we shall find above the parameter manager.
428
00:55:30,550 –> 00:55:37,180
We’ve got something called parameter library, which is appeared. We started creating a library.
429
00:55:37,180 –> 00:55:45,630
Now if I double click on that. It will say Windows can’t open this file.
430
00:55:45,630 –> 00:55:53,950
So you can select a program. From your list of installed programs to look in this library.
431
00:55:53,950 –> 00:56:02,100
Now. Depending on what version of Windows you’ve got, you might be able to look into it with Notepad.
Transcript of How to derive your own CO2 Laser Cutting Parameters (Cont…)
432
00:56:02,100 –> 00:56:08,370
It’s got to be a fairly advanced version of Windows. I think you probably notepad might not work.
433
00:56:08,370 –> 00:56:20,300
I think you may well have to look in word pad. OK, now we’re in word pad.
434
00:56:20,300 –> 00:56:31,050
We’ve got all these things that we can look at. But the thing that’s important to us is what’s at the top here.
435
00:56:31,050 –> 00:56:40,920
OK, now we can’t use a carriage return. We found out what happens off set equals zero.
436
00:56:40,920 –> 00:56:50,210
Double space. Air Assist, which was shortened to AA, equals three.
437
00:56:50,210 –> 00:56:58,040
Double space. Table and we’ll put the spacer after it 12mm.
438
00:56:58,040 –> 00:57:03,290
Table 12 table space. And then we have dimensional error.
439
00:57:03,290 –> 00:57:14,440
Dim equals naught. Point one five. And of course, the final thing that’s missing from here is wfll equals two inches.
440
00:57:14,440 –> 00:57:19,090
Safe. So now we go and open up this parameter library.
441
00:57:19,090 –> 00:57:24,950
Or the perimeter layer? And we’ll find all the dimensions in here.
442
00:57:24,950 –> 00:57:32,140
Let’s change this one, for example, to two. They’re all rubbish parameters.
443
00:57:32,140 –> 00:57:38,990
So we go to our parameter library and we open up MDF 3mm click.
444
00:57:38,990 –> 00:57:45,380
We get all our information, additional notes across the bottom there and.
445
00:57:45,380 –> 00:57:52,800
All our information about the parameters here. So what we need to do is press load.
446
00:57:52,800 –> 00:58:00,770
And those will automatically get transferred. Back in to here now, I’ve put the wrong.
Transcript of How to derive your own CO2 Laser Cutting Parameters (Cont…)
447
00:58:00,770 –> 00:58:08,910
Dimensions in here purposely. Because what I want to do now is to show you how to edit things if you need to.
448
00:58:08,910 –> 00:58:14,010
So we we really want those to be 67 and 67.
449
00:58:14,010 –> 00:58:22,160
After we’ve corrected the parameters, we need to select the parameter library and we need to do a saber’s.
450
00:58:22,160 –> 00:58:27,520
And we need to save it as exactly what this file name is here. But.
451
00:58:27,520 –> 00:58:37,350
And here is the but. If you do just this, what I’m going to do and I’m not going to do it if I say MDF.
452
00:58:37,350 –> 00:58:44,870
Space. Three 3mm. We have all my notes going.
453
00:58:44,870 –> 00:58:53,640
They’re not there. So what you’ll do, you’ll wipe out the parameters that you’ve laboriously spent time putting into your library
454
00:58:53,640 –> 00:58:59,600
so you can edit the library in this what would appear to be a fairly simple and logical way.
455
00:58:59,600 –> 00:59:06,280
Cancel. Cancel. We’ve got to go back to the parameter library.
456
00:59:06,280 –> 00:59:12,910
And you notice that once we’ve opened the parameter library with a known program, it’ll continue to keep opening for us.
457
00:59:12,910 –> 00:59:19,960
So what we’ve now got to do is to find out where our problem was and the problem was here in our smacks and mean speed,
458
00:59:19,960 –> 00:59:26,570
and we need those edited to 67. And 67.
459
00:59:26,570 –> 00:59:33,170
And now we can save it. And when we open up our library now parameter library.
460
00:59:33,170 –> 00:59:45,460
MDF 3mm load. All our parameters are still there, including our notes, and we can load those parameters into here 24, 67 67.
461
00:59:45,460 –> 00:59:51,040
Job done. OK. I’m sorry, that’s a bit of a drag.
462
00:59:51,040 –> 01:00:01,210
I’ve had to purposely make mistakes to try and reinforce to you how this system works is not logical and straightforward.
Transcript of How to derive your own CO2 Laser Cutting Parameters (Cont…)
463
01:00:01,210 –> 01:00:08,270
Well, you may remember when I was decrying the credibility of existing parameter files.
464
01:00:08,270 –> 01:00:15,210
Did I say to you, I haven’t I haven’t got a whole list of these files because I’m too damn lazy.
465
01:00:15,210 –> 01:00:20,680
You could see what a tedious, laborious process it is. But.
466
01:00:20,680 –> 01:00:31,150
You can also see, hopefully now that it is a very necessary process to gain understanding of materials and various aspects of your machine.
467
01:00:31,150 –> 01:00:37,170
I can accept that what we’ve just been watching for the last hour has been very, very, very boring.
468
01:00:37,170 –> 01:00:45,680
Hopefully, when you get to do it, you’ll find it slightly more exciting because if you get it wrong, your job will be wrong.
469
01:00:45,680 –> 01:00:45,860
Well,
470
01:00:45,860 –> 01:00:56,150
I suppose it could be likened to somebody asking you to knit a parachute and then make you wear it and jump out the plane to see whether it works.
471
01:00:56,150 –> 01:01:05,153
I’ve changed the picture on the screen because this is what you might see. I’ll leave you with that thought, and I’ll see you next time.
What Next?
Did you enjoy this post? Why not check out some of our other posts:
Disclaimer
Last updated April 25, 2024
WEBSITE DISCLAIMER
The information provided by n-Deavor Limited, trading as Laseruser.com (“we,” “us” , or “our”) on (the “Site”) is for general informational purposes only. All information on the Site is provided in good faith, however we make no representation or warranty of any kind, express or implied, regarding the accuracy, adequacy, validity, reliability, availability or completeness of any information on the Site.
UNDER NO CIRCUMSTANCE SHALL WE HAVE ANY LIABILITY TO YOU FOR ANY LOSS OR DAMAGE OF ANY KIND INCURRED AS A RESULT OF THE USE OF THE SITE OR RELIANCE ON ANY INFORMATION PROVIDED ON THE SITE. YOUR USE OF THE SITE AND YOUR RELIANCE ON ANY INFORMATION ON THE SITE IS SOLELY AT YOUR OWN RISK.
EXTERNAL LINKS DISCLAIMER
The Site may contain (or you may be sent through the Site) links to other websites or content belonging to or originating from third parties or links to websites and features in banners or other advertising. Such external links are not investigated, monitored, or checked for accuracy, adequacy, validity, reliability, availability or completeness by us.
WE DO NOT WARRANT, ENDORSE, GUARANTEE, OR ASSUME RESPONSIBILITY FOR THE ACCURACY OR RELIABILITY OF ANY INFORMATION OFFERED BY THIRD-PARTY WEBSITES LINKED THROUGH THE SITE OR ANY WEBSITE OR FEATURE LINKED IN ANY BANNER OR OTHER ADVERTISING.
WE WILL NOT BE A PARTY TO OR IN ANY WAY BE RESPONSIBLE FOR MONITORING ANY TRANSACTION BETWEEN YOU AND THIRD-PARTY PROVIDERS OF PRODUCTS OR SERVICES.
AFFILIATES DISCLAIMER
The Site may contain links to affiliate websites, and we receive an affiliate commission for any purchases made by you on the affiliate website using such links. Our affiliates include the following:
- makeCNC who provide Downloadable Patterns, Software, Hardware and other content for Laser Cutters, CNC Routers, Plasma, WaterJets, CNC Milling Machines, and other Robotic Tools. They also provide Pattern Files in PDF format for Scroll Saw Users. They are known for their Friendly and Efficient Customer Service and have a comprehensive back catalogue as well as continually providing New Patterns and Content.
- Cloudray Laser: a world-leading laser parts and solutions provider, has established a whole series of laser product lines, range from CO2 engraving & cutting machine parts, fiber cutting machine parts and laser marking machine parts.
