0:00 today we’ll be going over the new tabs
0:02 functionality in the latest version of
0:03 light burn
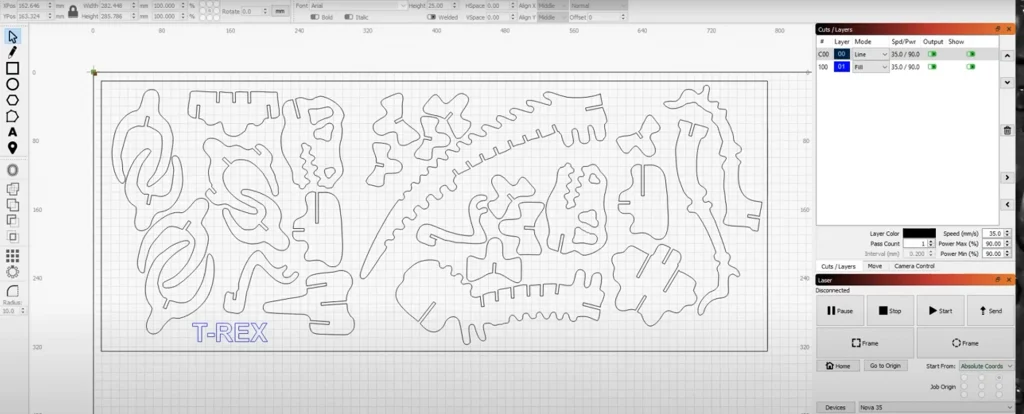
0:04 let’s take for example that you’ve got
0:06 this dinosaur puzzle
0:08 you’d like to cut out each of these
0:09 shapes and have them contained
0:11 in this larger section of panel that’s
0:14 cut out from your material
0:15 and have them not fall out now the way
0:17 that you can do that is with tabs
0:19 a tab is basically just a small section
0:22 of any path
0:23 where the laser skips cutting for a
0:26 brief
0:26 distance that allows that shape to stay
0:29 connected
0:30 to the overall sheet that it was cut
0:31 from without falling out
0:33 but for it to be able to be pushed out
0:36 of the sheet relatively easily
0:38 this was something that could be
0:39 somewhat simulated with the perforations
0:42 options previously
0:43 but the new tabs feature is much more
0:45 suited to the task
0:46 now before we move on you may need to go
0:48 to settings and
0:49 uncheck beginner mode otherwise the tabs
0:52 features will not show up
0:54 now that we’ve done that you can see
0:56 there is now an add tabs button over on
0:59 the toolbar
1:00 so to add tabs you can click on that you
1:03 must select
1:04 the shapes you want to add tabs to first
1:06 as you can see these are grouped
1:08 that’s okay this will work across any
1:10 level of grouping
1:11 you can also do a box selection of the
1:14 shapes that you’d like to add tabs to
1:16 and then simply hover over a shape look
1:18 for that tabs cursor that shows up
1:20 and click along the path where you’d
1:22 like to add a tab
1:24 now you may want to know what this looks
1:25 like in practice so we’re going to go to
1:27 preview
1:28 we’re going to zoom in on that vertebrae
1:30 section there’s not much to see at first
1:32 but once i get closer you can see here
1:34 there’s a small section that it skips
1:37 this tab is currently only set to 0.5
1:39 millimeters in width
1:41 and the size that that needs to be will
1:43 depend somewhat upon
1:45 the material that you’re using the
1:46 thickness of that material it’s
1:48 something that you’ll have to play with
1:49 a little bit to get it just right so
1:50 that the parts
1:51 pop out without causing any issues
1:56 you can also click and immediately
1:59 move a tab you can see that blue denotes
Transcript for LightBurn Tabs and Bridges Tutorial (Cont…)
2:02 that it is
2:04 currently being moved you can click on
2:06 an existing tab and move it
2:08 including to other shapes again those
2:11 shapes have to be
2:12 previously selected by the tabs tool you
2:15 can double-click
2:16 to remove a tab you can shift-click to
2:19 remove a
2:21 and another thing to note with manually
2:23 adding tabs is that
2:25 if i come over here and hover over the
2:26 text you’ll see there’s a warning cursor
2:28 instead of the usual tabs cursor
2:30 that’s because if we look over in the
2:32 cuts and layers window
2: 34 the blue cut layer is set to fill
2:37 note the tabs will only work with line
2:39 mode not
2:40 fill and not fill inline
2:44 now adding all of these manually to the
2:46 entire sheet would be kind of a pain and
2:48 we’ve got you covered there
2:50 so if instead we double click on the cut
2:53 layer
2:54 you can see that there’s now this tab
2:56 generation section it’s default set to
2:58 manual and there’s that 0.5 millimetres
3:00 that i mentioned earlier
3:02 but instead we can click on automatic
3:05 and it will automatically populate tabs
3:07 across everything within this specific
3:09 cut layer
3:11 right now we’re set to even spacing 50
3:13 millimetres apart
3:14 i can change that to whatever i want
3:17 as you can see it’s going to place them
3:20 every 40 millimeters in this case and
3:22 that is basically it breaks down each
3:25 shape into its
3:26 smallest contiguous path and then we’ll
3:29 place a tab
3:30 every 40 millimetres along that path and
3:33 note here
3:34 the green marks denote that it’s an
3:36 automatic tab
3:37 as opposed to a manual tab which you saw
3:39 previously
3:40 another option which is sometimes
3:42 helpful for designs like this
3:43 is instead of even spacing to use tabs
3:47 per
3:47 shape so i’m going to click on that
3:49 option it defaults to one but
3:52 i think that three will probably work
3:53 better for this and yeah that looks
3:55 pretty good
3:56 those should stay in there without
3:58 falling out but be easy enough to pop
3:59 out
Transcript for LightBurn Tabs and Bridges Tutorial (Cont…)
4:00 and the last option that I’m going to
4:01 show you right now is the skip
4:03 inner shapes option now if i click on
4:06 that
4:07 that’s not exactly what you would expect
4:09 but i did this very intentionally to
4:11 make a point here so for now we’re going
4:13 to cancel out of this
4:15 and the reason why all of the tabs in
4:17 the middle disappeared
4:18 is that skip inner shapes will look at
4:20 an entire cut layer
4:22 and any shapes that are completely
4:25 contained
4:26 by another shape for example this border
4:29 that we’re going to cut everything out
4:30 of
4:31 any shape that’s inside of that will
4:34 have the tabs skipped on it
4:35 so the solution to that is we need to
4:38 basically just
4:39 select this outer border and then move
4:41 it to another cut layer
4:43 once we’ve done that we can go back into
4:46 the cut settings
4:48 we can turn automatic tabs back on
4:51 we’ll go back to tabs per shape and
4:55 i can select skip inner shapes and now
4:58 if you’ll notice
4:59 this skull section is actually the one
5:01 that i wanted to do this for
5:03 there are these intersections that it
5:05 doesn’t really matter if those parts
5:06 fall out as long as the
5:08 overall shape stays within that sheet
5:10 and this allows us to skip those tabs on
5:13 those intersections
5:16 now another thing that you can do let’s
5:18 say that we’ve got these automatic tabs
5:20 added
5:21 i’m going to select all of the shapes
5:23 again well
5:24 try to there we go we’ve got all the
5:26 shapes selected
5:29 and i don’t like this tab
5:32 right here on the tooth i’m worried
5:34 about that breaking something well i can
5:36 just click
5:37 drag it turns blue to show that it’s
5:39 being moved and move it over there onto
5:41 the nose of the skull
5:42 and as you can see all of these tabs
5:45 have turned red
5:46 denoting that they’re now manual a layer
5:48 can have
5:49 either automatic or manual tabs but not
5:52 both so moving them will automatically
5:54 change it you can confirm that
5:56 going into the cut settings it’s changed
5:58 it back to manual you can still see
Transcript for LightBurn Tabs and Bridges Tutorial (Cont…)
6:00 it’s greyed out tabs for shape three but
6:03 we switched back to manual mode which
6:04 means that they’re just placed wherever
6:06 we put them
6:08 so for example you can add more tabs to
6:11 shape if you think it needs it you can
6:12 remove
6:13 tabs from a shape if you think that it
6:15 needs it now another thing to note now
6:17 that these are all manual
6:19 if we go back to the cut settings we can
6:21 switch them back to automatic
6:23 however if there are manual tabs plus it
6:25 will warn you
6:26 because it’s going to remove any
6:28 manually placed tabs and it will go back
6:30 to fully automatic mode so you may lose
6:32 some of your placements that’s why it’s
6:33 confirming this
6:34 so i can click yes and confirm that the
6:37 other option here
6:38 is that there’s clear tabs so if at this
6:41 point i’ve decided i don’t want any tabs
6:42 on this cut layer i can click on clear
6:44 tabs
6:45 and now you can see Transcript for LightBurn Tabs and Bridges Tutorial (Cont…) still in tab
6:47 mode but we can’t see any tabs here
6:49 they’re all gone so that’s it for the
6:51 tabs feature thanks for watching
 Skip to content