0:01 hi there today we’re going to do a quick
0:05 walkthrough and demonstration of how to
0:07 use the new text upon a path feature in
0:10 light bar so this is something that’s
0:13 been requested
0:14 more than pretty much anything else on
0:16 our feature request site so we’re pretty
0:18 pleased with it so let’s get started so
0:20 to put text on to a path or curve of
0:24 text first of all you will need some
0:26 text this feature only works with single
0:30 lines of text so you can’t enter
0:32 multiple lines and wrap them onto an
0:34 object you will have to do the text one
0:37 line at a time so create some text and
0:41 then create a path or a shape that you
0:44 want to put the text on so in my case
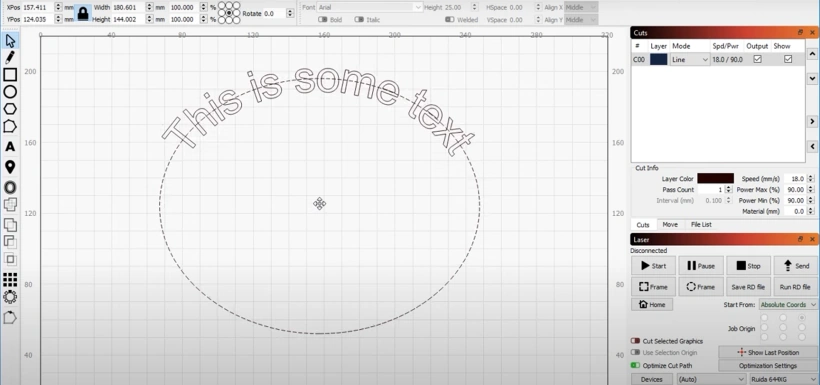
0:46 I’m going to use a circle or an ellipse
0:49 select both objects it doesn’t matter
0:51 what order you select them in you can do
0:53 the text first and then the shape you
0:55 can drag select the two of them together
0:56 however you like go to tools apply path
1:00 to text and now the text is locked onto
1:03 the shape in this case the shape itself
1:08 has a starting point down here on the
1:10 bottom that’s where the first node is in
1:13 this object and it traverses this way so
1:15 there’s no 0 node 1 node 2 node 3
1:19 programmers count from 0 if you want to
1:23 put the text on the top of the curve
1:26 which is something that I would like to
1:28 do you can just rotate the ellipse
1:32 object or the path 90 degrees like that
1:35 and now the text is at the top what you
1:38 can’t do is rotate the text once it is
1:42 attached to a path or shape it is locked
1:45 on to that shape and can’t be
1:47 manipulated directly with a few
1:50 exceptions and I’ll show you what those
1:51 are in a moment
1:52 so I’m going to rotate my ellipse 90
1:56 degrees so that the text is up top I can
1:59 scale the ellipse
Transcript for LightBurn Text On Path Tutorial
2:01 manipulate it in the same way that I
2:04 normally used to be able to or normally
2:06 could if I grab and rotate the whole
2:09 thing the text goes with it because the
2:11 text is anchored to it a few other
2:14 things that are worth noting if I select
2:17 the text I can still modify the height
2:20 of the text you can also change the
2:23 alignment of the text now this is kind
2:25 of important if we go back to the
2:28 ellipse shape and I show you where the
2:30 starting point is again so here’s the
2:32 start so it traverses around this way
2:35 if I tell the text to attach itself or
2:40 to align itself to the left the left
2:42 edge of the text is now at that starting
2:45 point if I say right align the text now
2:49 the right edge of the text is aligned to
2:51 that starting point and if I say middle
2:54 now the text is centered on the past
2:56 this is more evident if the path is a
3:00 line or a curved shape that’s open you
3:05 can also align the text vertically so
3:08 right now the center line of the text is
3:11 what’s anchored to the curve if I say
3:13 align the top of the text to the curve
3:15 you can see that the top of the capital
3:18 letters are what’s anchored to the curve
3:20 if I say align the Y to the bottom now
3:22 the bottom of the text is what is
3:24 aligned to the curve a couple of
3:27 interesting things if I take this curve
3:32 and move it this way you’ll notice that
3:34 the text stays attached to its bottom
3:38 edge but now the text is on the inside
3:41 of the curve instead of the outside you
3:44 can use this to your advantage if you
3:48 are trying to manipulate the text into a
3:51 particular arrangement if I stell the
3:53 text if I want it attached to the top
3:55 now it’s attached to the top when it’s
3:57 down here if I grab this shape and pull
Transcript for LightBurn Text On Path Tutorial
4:00 it up the text is still anchored to the
4:02 top of the text inside that shape you
4:06 can
4:07 get the same results by flipping the
4:10 thing inside out the other way if I move
4:12 this scale it inside out left to right
4:16 it has that same effect just be aware of
4:20 how this works it may take a little bit
4:24 of playing with to get a feel for it
4:26 it’s a little bit more obvious if you
4:29 use just a straight line so if I draw a
4:32 line from the left side to the right
4:34 side of the screen and then I draw
4:37 another line from the right side to the
4:39 left side of the screen if we look at
4:42 both of these shapes and we see their
4:44 starting points so this one says I’m
4:46 starting here going this way this one
4:48 says I’m starting here going this way if
4:50 I create a couple of lines of text I’m
4:59 going to attach this text to that line
5:03 and I’m going to attach this text to
5:06 that line now you’ll notice that the
5:10 text attached to the line that is going
5:13 from left to right
5:15 standard North American reading order is
5:18 above the line and the text that is
5:21 attached to the line going from right to
5:25 left is underneath the line if i know’d
5:30 edit this and pull the line the other
5:33 way now the text is up right again this
5:38 is useful to know it allows you to
5:42 control where the text is going to
5:45 appear it’ll also save you some
5:47 headaches if you’re trying to figure out
5:48 why the text popped on to a particular
5:50 side of your line it’s also worth noting
5:53 that in note editing mode the text is
5:56 attached and is live so if I take this
5:59 line for example and I make it a smooth
Transcript for LightBurn: Text On Path Tutorial
6:01 line I can grab the line nodes and edit
6:06 them and manipulate them so that the
6:07 text now bends the preview video that we
6:12 did showed this fairly clearly I’ll show
6:15 a slightly different version
6:17 of this on this circle if I take the
6:20 circle now in order to note it at this
6:23 it’s a primitive shape I’m first going
6:26 to have to convert it to a path so edit
6:31 convert to path now I can edit the nodes
6:35 on this I’m going to delete that portion
6:38 and that portion and manipulate this so
6:45 you can see that the text is following
6:48 the curve completely live as I
6:50 manipulate the curve you’ll also notice
6:53 that as I’m editing the curve the text
6:56 is not welded as soon as I let go it
7:01 does a final pass over it and welds
7:03 everything this is to improve
7:05 interactivity so that as you are
7:08 manipulating the objects the animation
7:11 is smooth we’ve done this in a few
7:14 places in lightburn most of the time
7:16 it’s not noticeable but it does help
7:19 keep the interactivity up
7:25 you can also edit some of the properties
7:29 of the text while it is attached to the
7:31 curve
7:32 you cannot scale or rotate the text for
7:35 example but I can change the size here I
7:38 can change the horizontal spacing in a
7:41 future release of light burn I would
7:43 like to add a width scale as well so
7:47 that you could fatten the text you can
7:49 also make it bold or italic that still
7:52 works change the font and so on all of
7:55 this is still live the only thing you
Tran script for LightBurn: Text On Path Tutorial
8:00 can’t do is stretch skew change the text
8:04 that way if I delete the line that the
8:08 text is anchored to it goes back to how
8:11 it was before it’s its previous shape
8:15 and its previous position hopefully that
8:19 has covered everything if you have any
8:22 questions please come to our forum at
8:25 forum lightburn software com we’d be
8:28 happy to help you there thank you
 Skip to content