0:00 calibrating a camera lens in lightburn
0:02 can be pretty tricky so in this video
0:04 we’re going to walk you through it and
0:06 highlight some common issues you’ll need
0:08 a camera and a way to hold it still i’ll
0:10 be using the lightburn camera and mount
0:12 but any usb camera should work you’ll
0:15 also need to download and print the
0:16 calibration pattern which you can find
0:18 in the lightburn documentation or
0:20 there’s a link to that in light burn
0:22 itself from the lens calibration screen
0:25 after printing the pattern card glue it
0:27 to something very flat like plywood mdf
0:30 or foam board
0:31 any curvature of the printed pattern
0:33 will be interpreted by the software as
0:35 distortion from your lens so it’s
0:37 important that the pattern card be as
0:39 flat as possible
0:41 the size of the pattern is not terribly
0:43 important it is only important that it
0:46 is the right size in the camera view and
0:48 you can change that easily by moving the
0:50 card closer or farther from the camera
0:53 make sure that the pattern you print
0:54 looks exactly the same as this one
0:56 the number and the arrangement of the
0:58 dots is important so if part of the
1:00 image is cut off it won’t work
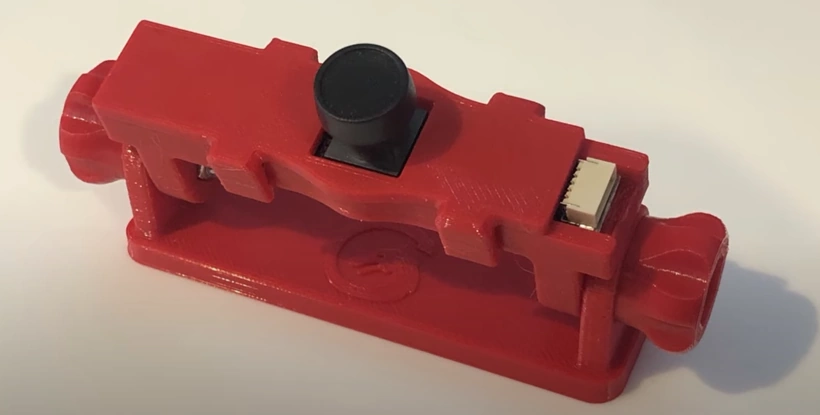
1:03 i’m going to put the camera in the mount
1:05 to hold it steady
1:07 first remove the faceplate by pressing
1:09 upward on the legs from underneath
1:11 the legs have small bumps at the bottoms
1:13 to hold the faceplate in place and once
1:15 you’re clear of those it should come off
1:17 easily
1:19 place the camera in the mount with the
1:21 white cable connector at the open end
1:23 slide the face plate partly back on and
1:26 then line up the tab on the face plate
1:27 with the slot in the mount like this and
1:30 snap it all back together
1:32 plug the cable into the camera and make
1:34 sure that it’s all firmly connected
1:37 the next step is to run lightburn we’re
1:39 going to open the camera control window
1:42 which i don’t currently have so go up to
1:45 window and make sure camera control here
1:47 has a check box next to it by clicking
1:49 it once you do that you should see the
1:51 camera window appear
1:54 then choose your camera from the drop
1:56 down list make sure that your camera
1:58 shows up
1:59 once you’ve selected the camera you
Transcript for the LightBurn Camera Calibration Process (Cont…)
2:01 should get a live video feed from it so
2:04 i can see that this is working
2:07 once you’ve verified that the camera is
2:09 actually functioning
2:10 go to tools
2:12 calibrate camera lens
2:15 and choose the camera again
2:20 now with the camera chosen
2:22 you have a couple of options if you
2:25 purchased a camera directly from
2:26 lightburn you can click here to use one
2:29 of our existing presets
2:32 you can also change between fisheye and
2:34 standard all of the cameras that
2:36 lightburn sells are fisheye lenses
2:38 you can tell
2:40 uh by looking at the camera to see if
2:42 there’s distortion so if you notice here
2:44 this is sort of the edge of my desk and
2:46 it’s curved in the camera view so
2:48 anything that is a straight line in the
2:50 real world that looks curved in the
2:51 camera view uh tells you that you have a
2:54 fisheye lens if straight lines in the
2:56 real world were also straight lines in
2:58 the camera view then you’d use standard
3:00 lens this just affects how the
3:03 calibration happens so try to choose the
3:05 correct one
3:07 when you are ready click next
3:11 and you’re presented with this screen
3:13 now this up here is a small
3:17 thumbnail to show you what lightburn is
3:19 expecting from this next capture image
3:22 what we’re going to do is we’re going to
3:23 capture this calibration card in a
3:25 couple of different positions and this
3:28 little thumbnail up top is going to show
3:30 us which positions it’s trying to
3:31 capture it’s wanting us to capture them
3:33 in
3:35 hold the camera
3:37 or the pattern card close to the camera
3:40 in
3:41 the correct orientation
3:44 and make it so that it’s approximately
3:46 the same size in this view as you see in
3:48 this view up here and click capture
3:51 now you want to hold the card very nice
3:54 and still
3:55 and you’ll see right now that i’ve got
3:57 pattern found score 88.88 try again so
Transcript for the LightBurn Camera Calibration Process (Cont…)
4:00 that’s basically telling me that
4:03 it failed and for some reason
4:06 so we’re going to try again
4:07 [Music]
4:09 that one was a little better
4:11 try
4:12 again
4:14 so i’ve intentionally chosen
4:17 the 150 degree camera because it is
4:19 probably going to be the hardest one to
4:22 calibrate and you’ll notice that this
4:24 image looks really strange right now
4:26 that’s completely fine
4:28 the only thing that you should really
4:29 care about is this score
4:32 and what we’re shooting for is any
4:33 number under 0.3 if you can get down to
4:37 0.2 or even less like 0.15 that’s great
4:41 but 0.3 or less than 0.3 is a good score
4:45 and if you get one like that you can
4:47 move on
4:48 now
4:50 where you hold this pattern card and how
4:52 you hold it relative to the camera is
4:54 actually quite important so i’m going to
4:56 try this again move the pattern card a
4:57 little bit closer
4:59 [Music]
5:00 and hold it as straight onward or
5:03 straight toward the camera as i can
5:06 hold it nice and still
5:07 click
5:08 capture so now that was terrible try it
5:12 again just move it a tiny little bit
5:14 capture
5:15 and very very small moves can
5:19 make very large changes in the score
5:22 numbers that you get so just try a
5:24 couple of different things move
5:26 backwards move forwards so there i’ve
5:28 moved backwards a little bit and i’ve
5:30 got a better score so i’m going to move
5:31 back just a touch more
5:35 i’ve got a better score still so i’ll
5:36 move back just a little bit more
5:41 angle it a little bit toward the camera
5:43 because i’m not holding it quite
5:45 straight
5:49 a little better now
5:51 i’ve done this quite a bit so
5:55 i’m actually not surprised that these
5:57 numbers are jumping all over the place
5:59 and behaving a little strangely that
Transcript for the LightBurn Camera Calibration Process (Cont…)
6:01 one’s actually not bad
6:03 let’s try this again
6:06 probably not holding it at just the
6:08 right angle because it is really really
6:10 fussy
6:16 2.3
6:20 well that’s a little better
6:27 it is really important to hold this as
6:29 still as you can
6:31 sometimes that causes problems because i
6:34 shake a little bit or
6:39 there we go so
6:42 you can tell in this one that the
6:44 capture looks really weird but that’s
6:47 okay i got a great score and you can see
6:49 that the pattern itself within that
6:52 image looks nice and rectangular and
6:54 that’s the most important part so i’m
6:56 going to click next
6:58 and now it’s telling me here i want to
7:00 capture along the bottom edge or close
7:02 to the bottom edge of the camera so i’m
7:05 going to hold it
7:06 down there
7:07 click capture
7:10 got a good score
7:12 first try that’s nice so i’ll click next
7:15 now we’re going to do one
7:17 over on this side
7:20 and for this one
7:21 you have to aim
7:23 the card toward the camera for the ones
7:25 on the sides when you’re doing fisheye
7:27 lenses you have to aim the pattern card
7:29 toward the camera to get the capture to
7:31 work properly
7:32 so i’m going to do that
7:35 again holding it nice and still
7:42 0.43
7:43 let’s try another one
7:48 0.24
7:49 that’s very good so i’m going to click
7:52 next
7:52 and now from this point forward the
7:55 captured images should actually look
7:58 decent or fairly normal
Tran script for the LightBurn Camera Calibration Process (Cont…)
8:01 so if i do a capture from this one
8:04 not found try
8:06 turning it a little bit
8:20 i’ve got
8:21 this pattern card turned slightly away
8:25 from my light source
8:27 so i might actually need to move my
8:29 light a little bit
8:33 yeah i’m going to try that so i’m going
8:35 to slide my light over
8:38 point it
8:40 down a little bit so that camera pattern
8:44 catches a little bit more light because
8:46 lighting is important
8:55 and that was all the difference so
8:58 that’s a good example of the kinds of
9:01 things that can make this process
9:03 difficult
9:04 um just me moving my light source made a
9:08 very big difference
9:10 again changing the angle that the
9:13 pattern is held at makes a big
9:15 difference
9:17 four or six
9:19 and
9:20 you’ll notice that i’ve got
9:22 not quite not a lot of border around
9:25 that pattern here so i’m just moving it
9:26 in a little bit
9:28 that helps
9:31 usually helps there we go so i’ve got a
9:33 0.33
9:34 [Music]
9:35 and just very very subtle
9:38 changes to the angle that i’m holding
9:40 the card at so if i tilt the card
9:42 backward for example
9:44 so now it’s leaned back
9:46 that number that actually got better i’m
9:48 gonna move the card back try that
9:53 0.33
9:55 0.39
9:59 tilt it forward a little bit
Transcript for the LightBurn Camera Calibration Process (Cont…)
10:02 0.29 there we go so the trick was just
10:04 tilting it forward slightly so that it
10:07 it was angled more toward the camera so
10:09 i’m going to click next and now we’ll
10:10 have one up top here so i’m angling it
10:13 downward
10:16 this one might be tricky with lighting
10:28 0.42 that’s pretty good
10:31 you also don’t have to be
10:34 right up at the edge like this you can
10:37 be down a little bit
10:42 three two that’s really close
10:48 sit my arm on something so that it’s
10:50 nice and
10:59 not steady
11:06 try this again
11:21 0.24 there we go
11:23 so
11:24 because i was able to get a capture
11:27 score of
11:29 0.3 or less
11:31 in all of these captures
11:33 i now have the option to skip so
11:35 normally
11:37 you can do captures in the corners as
11:38 well to help the calibration um
11:42 if your capture scores are good enough
11:45 you don’t have to do those you can click
11:47 skip to go through these the corner
11:49 captures with fisheye lens especially
11:51 with an extreme fisheye like the 150 are
11:54 harder i’m going to try one and see if i
11:56 can get it
12:00 better not found we’ll move in a little
Transcript for the LightBurn Camera Calibration Process (Cont…)
12:02 bit
12:05 great job okay so this one is good
12:08 you’ll notice that it’s nice and
12:09 rectangular so click next
12:16 there we go great
12:18 now i can skip
12:20 so i’m going to do so
12:24 and that’s it you’re finished
12:26 the next part of the process is running
12:28 the camera alignment wizard and for that
12:30 you have to mount the camera in the
12:32 laser itself and we’ll cover that in
12:34 another video
 Skip to content