 Skip to content
 The LightBurn Software Series
The Lightburn Software is probably the best generic laser cutting software available (I use it for almost all of my laser work). This series has tutorials, hints and tips as well as the occasional speed comparisons between it and RDWorks. In this LightBurn Tutorial Session, we are shown how to set up the the SculpFun Laser with LightBurn and walked through a starter project. My thanks to the team at Lightburn for allowing me to embed their videos.
Contents
In this video we are taken step-by-step through the process of getting a SCULPFUN Laser up and running with LightBurn on both Mac and Windows. We will also be taken through a quick first project to learn some of the basic tools and workflow within LightBurn.
Video Resource Files for Setting Up the SculpFun Laser With LightBurn
There are no resource files associated with this video.
External Resource Links for Setting Up the SculpFun Laser With LightBurn
https://lightburnsoftware.com/pages/trial-version-try-before-you-buy
There are no more external resource links associated with this video.
If you enjoyed this series of Lightburn Software Tutorials. Why not try out one of our other video series such as:
The Tangerine Tiger Series where Russ has purchased a new 500 x 300mm, 50W laser machine from eBay with a view to modifying and upgrading it. In fact, he rips out the glass laser tube and high voltage power supply and replaces them with an RF laser source and PSU from Cloudray. Find out how the expensive RF laser source compares to a glass CO2 laser tube and prepare to get your hands dirty!
The Lightblade Learning Lab is a series of videos that Russ did for Thinklaser Limited based on using the Lightblade 4060 Laser Cutting and Engraving Machine. The Lightblade 4060 has a 400 x 600mm bed size and was supplied with a 60W EFR laser tube.
The Fiber Laser Series is all about Russ’s adventures and investigations with a 30 watt fibre laser, loaned to him by Dean at Lotus Laser Systems. If you are looking for a laser solution to engrave metal, without the fuss of using coatings such as Thermark, Cermark or Molybdenum Disulphide spray, then this is the series for you.
The Top 10 Ranked RDWorks Learning Lab Videos.
The K40 Xtreeem Laser Cutter Upgrade Series is a series of 6 videos covering how Russ, strips down a generic K40 laser. He then designs and builds a number of new components and completely upgrades and overhauls the K40 into a high specification K40 Xtreeem Laser cutting and engraving machine.
Why not check out The Concise RDWorks Learning Lab Series that condenses all of Russ’s work into an easy to follow encyclopaedia of laser knowledge.
Transcript for Setting Up the SculpFun Laser With LightBurn
Click the “Show More” button to reveal the transcript, and use your browsers Find function to search for specific sections of interest.
0:02the sculpt fun s9 is a diode-based laser
0:05engraver with a work area of 410 by 420
0:08millimeters the s9 builds on the
0:10previous generation s6 engraver and
0:12features a 5.5 watt laser fixed focus
0:15for easier adjustment as well as a
0:17circular cover on the end of the laser’s
0:19head to help with filtering uv light you
0:21will still want to be sure you’re
0:22wearing appropriate laser safety glasses
0:24when operating the machine the machine
0:26is constructed of aluminum extrusions
0:27that come with easy to follow assembly
0:29instructions that should have you up and
0:30running in about 30 minutes the s9 is
0:33running grbl firmware and is compatible
0:35with lightburn in this video we’ll go
0:37through the process of getting the
0:39sculpt fun s9 set up with lightburn on
0:41windows as well as mac and we’ll go
0:43through a short tutorial project this
0:45project will help you get familiar with
0:46lightburn and show the process of
0:48running a job on a machine without limit
0:50switches timestamps will be in the
0:52description below so that you can skip
0:53around as needed
1:00the first thing you’ll need to do is
1:02download the driver for the scope fun s9
1:05and for this it’s the fairly common
1:07ch340 driver that’s used by a lot of
1:10different diode lasers we have a link to
1:12this in our documentation but i’ll also
1:14place a link in the description of this
1:16video to this direct downloads page to
1:18make sure that you are downloading the
1:20correct thing for windows there’s only
1:22one option and you will need to click on
1:24the download windows ch340 driver which
1:28will download a zip file once the zip
1:30file has been downloaded you’ll need to
1:31extract that file to do so just open up
1:34the folder that it’s been downloaded in
1:36which is typically your downloads folder
1:40and then right click on the zip file
1:43and select extract all
1:46it’ll let you choose where you want to
1:47extract it but the default location is
1:50the same location as the zip file itself
1:53once extracted it’ll open up another
1:55window that will have the executable
1:56file to install the ch340 driver so
1:59we’ll need to double click that to open
Transcript for Setting Up the SculpFun Laser LightBurn Combination (Cont…)
2:01up the driver installation window on
2:03this window all that you need to do is
2:05select install there’s only one driver
2:07option so you don’t need to make any
2:09changes
2:11it should be fairly quick and once the
2:13install is complete you’ll get a pop-up
2:15just saying that the driver install has
2:17succeeded and you are ready to move on
2:19to the next step
2:22with the driver installed we can plug
2:23the power cable into our machine
2:26followed by the included usb cable one
2:29side should go into the machine and the
2:30other should go into your computer and
2:33then we can power on the sculpt fun s9
2:36you’ll know it’s powered on because the
2:37heatsink fan will kick on and you should
2:39also see a led on the top of the laser
2:42as well now we’re ready to head over and
2:44install lightburn
2:46now that we’ve got the machine powered
2:48on and plugged in we’re ready to
2:49download lightburn to do that you’ll
2:51need to head over to the download page
2:53on our website and scroll down to where
2:55you’ll see a couple of different options
2:57for windows there’s a 64-bit version as
3:00well as a 32-bit version most modern
3:02computers are going to be running the
3:0464-bit version of windows but if you
3:06want to confirm this you can easily do
3:08so by mousing over the start menu and
3:10clicking on the start menu and then
3:12typing in sys or system which will pull
3:15up the system information app and when
3:17you click on that it’ll open up a window
3:19that will contain a lot of information
3:21about your specific computer as well as
3:24the type of operating system it’s
3:26running and as you can see here next to
3:28system type mine says 64 so i know that
3:31i am running a 64-bit system and yours
3:34will also tell you if yours is 64 or
3:36again 32-bit
3:37now that we have that information we can
3:39head back over to the downloads page and
3:41select the correct version again i have
3:44a 64-bit version of windows so i’m going
3:46to be choosing the 64-bit version of
3:48lightburn when you select that it will
3:50open up a window to allow you to save
3:52the lightburn installer which will then
3:54go ahead and download and once it’s done
3:56downloading if you click on it that will
3:58launch the lightburn installer window
Transcript for Setting Up the SculpFun Laser LightBurn Combination (Cont…)
4:01once the installer pops up it will guide
4:03you through the entire installation
4:05process there’s no special steps here
4:07and you’re just going to be installing
4:08it like you would any other program on
4:10your computer
4:12if you just select next for all of the
4:13different options that will get you to
4:15where you need to be
4:18on the final window of the installer
4:19you’ll see a couple of different options
4:21you can ignore these the ftdi driver is
4:23specifically for larger dsp machines and
4:26not a diode laser so at this window if
4:29we click finish it will launch up lightburn
4:32 the first time lightburn starts
4:34you’ll be greeted by the device window
4:35and we’ll need to add a device as you
4:37see in the device list it’s blank which
4:39is expected we need to then add the
4:41sculpt point s9 and to do this we’ll
4:44start off by heading down to the find my
4:46laser option which will open up the find
4:48my laser dialog window this window will
4:51scan our computer to see if it detects
4:53any lasers that are connected at this
4:55point again the laser should be
4:57connected via usb to your computer as
4:59well as powered on
5:01once you’ve confirmed that that’s the
5:03case click next and it will take a brief
5:05moment as it scans the system to see if
5:07it detects our machine and it did we can
5:10see here that we’ve got a grbl machine
5:12that’s got a work area of 410 by 400
5:14millimeters on com port 4 as well as
5:17that it is connected via serial and usb
5:19and it is a g-code type machine if for
5:22some reason it doesn’t detect your
5:23machine i’d recommend confirming that
5:25you installed the driver that we covered
5:27earlier in the video as well as
5:29restarting your computer the other thing
5:30to try is power cycling your machine and
5:33then unplugging and plugging in the usb
5:35cable once again because it should
5:37detect your machine
5:39when you do see your device pop up you
5:40can head down to the add device button
5:42and select that to go through the rest
5:44of the setup process
5:46the first window is going to ask you to
5:48name your machine and this is especially
5:50important if you’ve got multiple
5:52machines to be able to easily identify
5:54which one you’re selecting in this case
5:56i only have one sculpt fun s9 so i’m
5:58just going to go ahead and name this
Transcript for Setting Up the SculpFun Laser LightBurn Combination (Cont…)
6:00device the sculpt fun s9
6:03you’ll also want to confirm the work
6:04area of the machine the 410 by 400 is
6:07read directly off of the controller and
6:08that’s what i recommend leaving it at
6:10there is a slightly larger value for the
6:12work area listed on sculpt funds product
6:14page and i did confirm that you can get
6:16a few more millimeters if you really
6:18want to but with the 410 by 400 you
6:20don’t have any risk of accidentally
6:22having the head run into the extrusion
6:24so again it’s just a safe place to keep
6:25those values at
6:27the next window will ask you where the
6:29origin is for your laser which should be
6:31the front left it should automatically
6:33choose that for you but if not for the
6:35sculpt fun s9 you will want to select
6:37the front left and that’s the case for
6:38just about all g code based machines
6:41and then for the auto home your laser on
6:43startup it does have that unchecked
6:45which is what we want that’s only
6:46something you’d want enabled if you have
6:48a machine with end stops but in the case
6:50of the s9 it does not and would cause
6:52issues if it was enabled so leaving the
6:54values how they are which is front left
6:56and disabled for the auto home is going
6:59to be correct the final window is just a
7:02summary of all the different settings
7:03that we chose just to confirm that
7:05everything still looks correct which it
7:07does so we can select finish
7:09and now in our device list we’ve got the
7:11scope fun s9 which is what we want to
7:13see and it says that it is a grbl based
7:16machine
7:17at this point we can select ok in this
7:19window to close out of the device window
7:22and if everything has gone correctly in
7:24the laser window on the bottom right you
7:26should now see the status ready listed
7:30also if you look at the console window
7:33you can see that lightburn has read some
7:34values off of the controller
7:38if at some point you open lightburn and
7:40see that the laser status doesn’t read
7:42ready but it says disconnect and the
7:43machine is powered on and plugged in
7:45it’s very possible that your computer
7:47has assigned it a different com port and
7:49so to check this if we go down in that
7:51same laser window next to where it says
7:53devices there will be a drop down where
7:54we can see all of the different active
7:56com ports on our computer currently i
7:58only have com4 that’s my laser that’s
Transcript for Setting Up the SculpFun Laser LightBurn Combination (Cont…)
8:00plugged in but if you have multiple
8:02options it’s a good idea to try the
8:03different com ports and see if you’re
8:05able to reconnect to your laser
8:14before we do anything else we need to
8:16install the ch340 driver which is the
8:19most common driver used for a lot of
8:21diode lasers we have a link to this in
8:23our official documentation but i’ll also
8:25place a link to this direct page so that
8:27way you can make sure that you download
8:28the correct thing
8:30on this page if you scroll down there is
8:32a section for macintosh i recommend
8:34going with the direct download link
8:36currently as a recording the version 1.5
8:39is going to be the latest and clicking
8:41on that will download the package file
8:44once you’ve saved it and it’s downloaded
8:46clicking on it will open up the
8:47installer which will guide you through
8:49the rest of the process
8:52just go ahead and install this like you
8:54would any other program on your computer
8:57it’s a fairly quick process and it
8:59likely will have you enter in your user
9:01password
9:03once it’s installed you might get this
9:05warning or notification that a system
9:07extension was blocked that’s fine you
9:09can just click ok on this window the
9:10main thing you want to see is that it
9:12says that it was successful the
9:13installation on the primary window and
9:15once that’s done before doing anything
9:17else there’s a restart button because
9:18you will want to restart your mac
9:21now that we’ve got the driver installed
9:23you can take your included power cable
9:25and plug it into your machine as well as
9:27the included usb cable one end will need
9:29to go into the sculpt phone s9 and the
9:31other end should be going into your mac
9:34and we’ll also need to power on the
9:35machine by flipping the little rocker
9:37switch you’ll know that the machine is
9:39powered on because the heatsink fan will
9:41kick on and you’ll see a little led on
9:43top of the laser
9:46next we’re ready to download and install
9:48light burn to do this we’ll need to head
9:50over to the downloads page on the
9:52official light burn website
9:54and scroll down to the area where there
9:56are some different download options
9:58for us we’re going to be going with the
Transcript for Setting Up the SculpFun Laser LightBurn Combination (Cont…)
10:00mac os version and clicking on the mac
10:02os version link will download the
10:04package file
10:06that will then need to save
10:09once it’s completed downloading click on
10:11the downloaded file
10:12then we’ll need to drag the lightburn
10:14icon into the applications folder which
10:16will install lightburn
10:18the first time that you try to run
10:19lightburn you’ll get a notification
10:21pop-up saying that lightburn can’t be
10:23opened because apple cannot check it for
10:25malicious software this is expected and
10:28all we’ll need to do at this point is
10:29click the show and finder option this
10:31will open up a finder window with all of
10:33our applications where we’ll need to
10:35scroll down to where we see light burn
10:37and right click on lightburn
10:39and then choose open when you click open
10:42you’ll get another pop-up window that
10:44has a similar warning to the one that we
10:46previously saw but now we’ll have the
10:48ability to open the software clicking on
10:50open will let lightburn start up like
10:52normally and this is only going to
10:53happen the first time that you run it
10:55after this you can now start it from
10:58your launchpad and this will only happen
11:00again the first time you install
11:01lightburn or if you update leiper into a
11:03newer version
11:05the first time you open up lightburn
11:07you’ll be greeted by this device window
11:09and under the device list you’ll see
11:10that it’s blank which is to be expected
11:12we haven’t added anything yet and the
11:14first thing we’ll need to do is add our
11:16sculpt fun s9 to do this we’ll head down
11:18to the find my laser button and select
11:20that which will open up the device
11:22discovery wizard and at this point if
11:24you follow the steps you should have
11:25your machine both powered on and plugged
11:27into your computer which is necessary
11:29for this device discovery wizard to be
11:32able to find your laser clicking next
11:34it’s going to scan your computer to see
11:37if it detects any machines connected to
11:39it it might take a second but if all
11:40goes well you should see your machine
11:43listed if for some reason you don’t see
11:45your device listed then make sure you
11:47did install the driver that we covered
11:49earlier i would also recommend powering
11:50on and off your machine unplugging and
11:52plugging in the usb cable again and
11:55restarting lightburn as you can see
11:57lightburn did detect our machine and it
11:59was able to read some information off of
Transcript for Setting Up the SculpFun Laser LightBurn Combination (Cont…)
12:01it that it is running grbl firmware with
12:04a work envelope of 410 by 400
12:08millimeters and also that it is a g-code
12:10type machine connected via serial and
12:13usb once you see your device listed here
12:15you can go down to click add device
12:18which will take you through the rest of
12:19the setup this page is going to ask you
12:21to name your device this is especially
12:23important if you’ve got multiple
12:24machines that you’re running since i’ve
12:25only got one sculpt fun s9 i’m going to
12:28just name it the actual model number
12:30which again is the sculpt fun s9 as far
12:32as the dimensions or the work area the
12:35410 by 400 is read directly off of the
12:38controller on the skull fun website they
12:41do have a slightly larger work envelope
12:44listed and i did confirm that you can
12:46squeeze a few more millimeters out of
12:47both the x and y but to be safe and to
12:50prevent your laser’s head from bumping
12:52into the extrusions i recommend starting
12:54off with the 410 by 400. the next page
12:57is going to ask where the origin is for
12:59the laser which should be the front left
13:01and it should have that marked actually
13:02if for some reason it doesn’t then just
13:04select the front left that’s the case
13:06for this machine and that’s primarily
13:08where it is for most of the g-code based
13:10machines also there’s an option for auto
13:12home relaser on startup that’s only
13:14something that you want checked if your
13:16machine has end stops in the case of the
13:18s9 it does not so you’ll want to make
13:20sure that you leave it unchecked or red
13:22which is what it should be by default
13:24based off of the parameters it read off
13:26of your controller just a moment ago
13:29once you’ve confirmed those two things
13:31you can click next the final window
13:32contains a summary of all of the
13:34different settings we’ve chosen up until
13:36now it’s a good idea to just quickly
13:38browse through these but everything here
13:40looks great and we can go ahead and
13:41select finish
13:43now in our device list we have the
13:45sculpt fun s9 listed and it says it is a
13:48grbl based machine and we can click ok
13:52in my experience on macs it’s going to
13:54say disconnected when you are done with
13:56the process all that you’re going to
13:58have to do is close lightburn and
Transcript for Setting Up the SculpFun Laser LightBurn Combination (Cont…)
14:00quickly reopen light burn and it should
14:02automatically connect to your machine as
14:04you can see here now in the laser window
14:06it says ready and if we look up at the
14:08console we can actually see the lightburn
14:10 has read quite a bit of information
14:12off of the controller
14:14lightburns typically going to reconnect
14:16to your machine every time you open up
14:18lightburn as long as it’s powered on
14:20and plugged in but if for some reason it
14:22says disconnect it’s a good idea to go
14:23down to where it says devices in that
14:25laser window and select the drop down
14:27menu and as you can see here there’s a
14:29couple of different options for com
14:31ports i have the correct one selected
14:32which is the usb serial 1340. but if you
14:35have multiple options you can click on
14:37those and see if that will reconnect to
14:39your machine you also will want to when
14:41you choose one of these different
14:42devices close out of lightburn and then
14:44reopen it just like we did a moment ago
14:46so that way it can connect to your
14:48device
14:54next we’re going to run through a small
14:55sample project engraving some text this
14:57will teach you some of the basic tools
15:00within lightburn as well as get you
15:01familiar with the workflow of using
15:04lighturn
15:07there are a couple of different ways
15:08within light burn to position your laser
15:11head and to tell lightburn how you want
15:13to run a job the three methods are
15:15absolute coordinates current position as
15:17well as user origin we’re not going to
15:20cover all of these in this video but we
15:21will in a separate video specifically in
15:23today’s video and project we’re going to
15:25be looking at the absolute coordinates
15:27which is the best for beginners and the
15:29easiest to understand i’ll place links
15:31in the description to this documentation
15:33but i think that our documentation does
15:35a great job of explaining it and it
15:37states that the page grid you see in the
15:39main editing window represents your
15:41machine’s work area anything you place
15:43in that area will be cut on its
15:45corresponding place on your machine so
15:47essentially what you see is what you get
15:49if you place something in the center of
15:51your workspace you can expect that it’s
15:52going to be engraving in the center of
15:54your machine in the example image here
15:57as well as in our workspace within
15:59lightburn we’ll see a red and a green
Transcript for Setting Up the SculpFun Laser LightBurn Combination (Cont…)
16:01square on the bottom left corner if we
16:03have absolute coordinates selected and
16:06the green square represents the job
16:08origin and the red square represents the
16:10machine origin and that is where we are
16:12going to want to have our laser head
16:14before we start our job on a machine
16:17with end stops it would automatically
16:18home to the front left so you wouldn’t
16:20have to do it yourself but for a machine
16:22like the skull fun s9 it’s still a very
16:25simple process and we’ll just need to
16:27manually move the head of the laser to
16:29the front left using our hand before we
16:31power on the machine this is something
16:33that we’ll cover in a moment here so
16:35don’t worry about doing it yet
16:38we’ll start off by heading over to our
16:40s9 and powering off the machine and then
16:43we’ll need to grab whatever it is we’re
16:44going to be engraving i’m using a really
16:46thin piece of balsa project wood but it
16:49doesn’t matter whatever you’re using it
16:51is fine and you’ll start by placing it
16:53somewhere in your workspace next grab
16:55the head of the laser and drag it over
16:57your material before grabbing the
16:59included measurement tool
17:01we’ll need to loosen the two thumb
17:03screws located on the back side of the
17:05laser so that way we can slide it up and
17:06down and then place that measurement
17:08tool under the heat sink making sure
17:10that the head of the laser the heat sink
17:12portion is rested on the top of that
17:14piece
17:15once done use one hand to hold the head
17:17of the laser in place and your other
17:19hand to reach behind and tighten those
17:21two thumb screws this is to set the
17:23correct focal distance for this material
17:26once the head of the laser has been
17:28secured you can remove that measurement
17:30tool since we’re going to be using the
17:33absolute coordinates like we discussed
17:35we’ll need to grab the hand of the laser
17:37and move it all the way to the front
17:39left of the machine making sure it butts
17:41up against the frame the last step is
17:43just to power on our s9 and then we can
17:46hop over to lightburn and start our
17:47design
17:49absolute coordinates should be the
17:50default value for the start from in
17:52lightburn if for some reason it’s not
17:54just head over to the start from section
17:57in the laser window click the drop down
17:59and then choose absolute to switch over
Transcript for Setting Up the SculpFun Laser LightBurn Combination (Cont…)
18:02to absolute coordinates now as you can
18:04see on the bottom left of the workspace
18:06we have that green and red square the
18:08first tool we’re going to use for our
18:10project is the text tool and we’ll get
18:12to that by going over to the left
18:14toolbar and clicking on the icon of the
18:17letter a
18:18you’ll know it’s activated because the a
18:20will turn red with the text tool active
18:22we’ll head back over to our workspace
18:24and click somewhere in the center to see
18:26the text cursor pop up where we can then
18:30enter whatever word it is we want to
18:31engrave i’m going to go ahead and
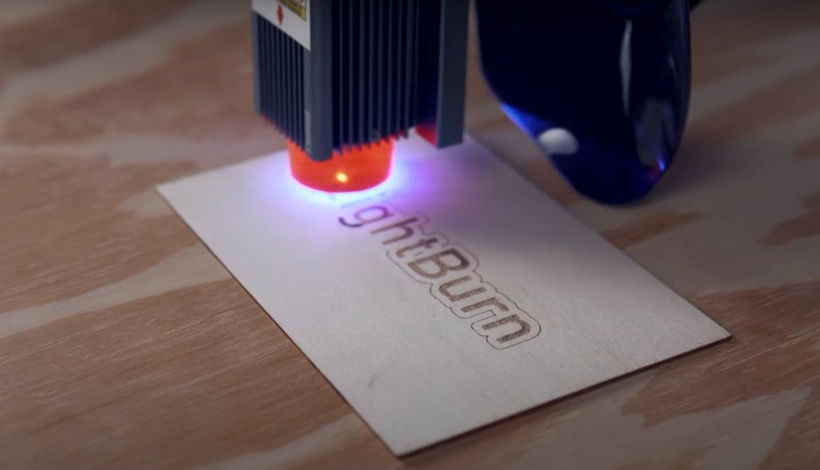
18:34engrave the word lightburn
18:36to get out of the text tool and back to
18:38the select tool which is the default
18:41mouse cursor we can either go to the top
18:43left option on that toolbar or we can
18:45hit escape to exit out of the current
18:48text we’re typing
18:49and escape one more time to get back to
18:51that select tool
18:54now that we’ve got something in our
18:55workspace if we head up to the top right
18:58cuts and layers window we’ll see that we
19:00have a layer there and there’s quite a
19:02bit of information here this corresponds
19:05to a specific layer which is going to be
19:07anything on a workspace that has been
19:09generated with the color black we can
19:12see that the mode is set to fill mode
19:14the speed is set to 2000 which is 2 000
19:18millimeters a minute the power is set to
19:2120 percent and on the bottom of that
19:23window we’ve got the ability to adjust a
19:25couple of different settings like speed
19:27power how many passes we’d like as well
19:30as the interval
19:33if your mode isn’t set to line mode
19:35we’re going to go ahead and do that we
19:36just need to click where it says fill
19:38next to the color in the layer which
19:41will open up the drop down where we can
19:43select line
19:46now we’re going to head over to the
19:47preview window and to get there we’ll
19:49head up to the top toolbar and we’ll
19:51click on the icon that looks like a
19:53computer monitor which when you do that
19:55will pop up the preview dialog window
19:59in this window we can see what the
Transcript for Setting Up the SculpFun Laser LightBurn Combination (Cont…)
20:01output of our current job will be all of
20:03the items in black are the actual
20:05portions that will be engraved and the
20:07thin red lines going between each of
20:09your letters are just showing the
20:10machine’s travel movements
20:13you can hit play on the bottom right
20:14which will actually show you what the
20:17path is that the laser will take
20:20and you can click and drag the timer
20:22back and forth to sort of quickly scrub
20:24through all of the engraving this is a
20:27really good place to get in the habit of
20:28checking before you’re running a job
20:30just to confirm that what you think is
20:32going to be happening is the correct
20:34output and what lightburn is actually
20:36going to be running
20:39next we’re going to play around with the
20:40style of our text you’ll need to make
20:42sure it’s selected by clicking on it and
20:44you’ll know it’s selected because you
20:46will see moving squiggly lines and once
20:48it is selected if you look up in the top
20:50toolbar you’ll have some options to
20:52configure or customize your text you’ve
20:55got a font drop down height the
20:57horizontal spacing vertical spacing the
20:59ability to make everything uppercase
21:01bold or italicized go ahead and go
21:03through the font menu and find a font
21:06that you like as you’re scrubbing
21:07through the different fonts you can see
21:09it update in real time which is a really
21:11nice way to make sure you like a font or
21:13that it’s going to go with a specific
21:15project
21:16when you’re happy with a font go ahead
21:18and click that to confirm and make the
21:21change to your text
21:24if at some point when you’re designing
21:26you do something that you’re just not
21:27happy with it’s really easy to undo
21:30there is both a undo arrow as well as a
21:32redo arrow in the top toolbar and you
21:35can also use the shortcut on your
21:37keyboard ctrl z to undo your last action
21:41next we’re going to change this layer
21:43from line to fill by heading up to the
21:45cuts and layers window clicking the drop
21:47down under mode and selecting the fill
21:50option
21:51once we’ve done that we’ll head back
21:53over to the preview window we were just
21:54at a moment ago to see what changes that
21:56made
21:57as you can see now by the text in all
Transcript for Setting Up the SculpFun Laser LightBurn Combination (Cont…)
22:00black it is going to be filling in the
22:02entirety of the text and not just doing
22:04an outline like the line mode and if you
22:06click the play button you can see the
22:07path that the laser is going to take as
22:09it travels back and forth filling in
22:11each of the letters
22:14now we’re going to add an outline to our
22:16text and we’re going to do this using
22:18the offset tool to activate the offset
22:20tool we’ll head over to the left toolbar
22:22and click on the offset tool which is
22:24the o roughly center of the toolbar
22:26which will open up the offset dialog
22:28window
22:29in this window we’ll have the ability to
22:31control quite a few different things
22:32like the direction of the outline do we
22:34want it to be outward inward both
22:37we also have a few different options for
22:39the corner style and we can choose the
22:42offset distance there’s not a right or
22:44wrong here so just play around and
22:46select something that you’re happy with
22:47i’m going to go ahead and choose the
22:50round corner style with the offset
22:52distance of three and as far as the
22:55opposite distance goes you can change it
22:57by typing in the text box you can also
22:59use the arrows on the right side of that
23:02text box and if you mouse over the text
23:04box and you use the scroll wheel on your
23:06mouse you can actually scrub up and down
23:09to really quickly adjust the offset
23:11distance size
23:13once you’ve found something that you’re
23:14happy with go ahead and click ok to
23:17apply the outline
23:19now we want to make sure that just the
23:20outline is selected if you have the
23:22inner text selected hit escape on the
23:24keyboard which will deselect it and then
23:26click on the outline to make it active
23:28you’ll know it’s active based off of
23:30those dashed moving lines
23:32with the outline selected head down to
23:34the colored toolbar on the very bottom
23:36and choose a different color from the
23:38color palette to change the outline as
23:40you can see now it’s blue and in the top
23:42right cuts and layers window we still
23:44have our black fill layer for the text
23:46but the outline is blue and it has been
23:48assigned a line layer which is exactly
23:51what we want the letters of our text
23:52will be filled in and then there will be
23:54just a single line that will make up the
23:56outline when we run our engraving next
23:58we’re going to adjust the power and
Transcript for Setting Up the SculpFun Laser LightBurn Combination (Cont…)
24:00 speed starting with the fill layer we’ll
24:02 need to click on it to make it active
24:04 and then in the bottom of that window
24:06 where it shows speed and power we can
24:08 make these changes these settings are
24:10 going to vary heavily based off of
24:12 whether you’re using a different
24:14 material if you’re not using wood or
24:15 again if you’re using a completely
24:17 different laser altogether but i’m going
24:19 to be starting off with a speed of 5000
24:21 millimeters per minute and the power set
24:24 to 50
24:25 for the fill layer and for the line
24:28 layer clicking it to make it active i’m
24:30 going to run that a bit slower because i
24:32 would like it to be darker than that
24:34 fill layer so i will go with 2 000
24:37 millimeters per minute on the speed with
24:39 a power of 35
24:42 one last time go up to the preview
24:44 window to take a look and make sure
24:46 everything looks correct you should see
24:48 the fill happening first followed by the
24:51 outline the goal of this is just to sort
24:53 of build those good habits from the
24:55 beginning you will never be upset that
24:57 you checked the preview window but you
24:58 will be upset if you didn’t check the
25:00 preview window and there’s an artifact
25:02 that somehow damages whatever you’re
25:03 planning on engraving so this is a
25:06 really good thing to do every time to
25:07 just make sure you are giving yourself
25:09 the best chance at success
25:12 now it’s time to get our work piece
25:14 positioned that we’re going to be
25:15 engraving we’re first going to activate
25:17 the ability to fire the laser from
25:20 within light burn this is just going to
25:21 be used to help us with more accurately
25:24 positioning the laser to do this we’ll
25:26 head up to the device settings which is
25:28 the wrench icon in the top toolbar and
25:31 clicking that will open up a dialog
25:32 window what we’re looking for is the
25:35 setting that’s labeled enable laser fire
25:37 button which is disabled by default
25:41 clicking it will enable it you’ll know
25:43 it’s enabled because the swatch will
25:44 turn green and we can click ok to exit
25:47 out of this menu
25:48 this won’t take into effect until we’ve
25:50 restarted lightburn so we will quickly
25:52 need to do that when you go to exit out
25:54 of light bird make sure that you save
25:56 your project so that way we don’t lose
25:58 all of our progress and that you can
25:59 quickly reopen it when we do open up
Transcript for Setting Up the SculpFun Laser LightBurn Combination (Cont…)
26:01 lightburn in just a moment now that
26:03 we’ve restarted lightburn if we go under
26:05 file and recent projects we can just
26:07 click the project that we closed a
26:09 moment ago which will load all of our
26:10 settings and if we head over to the move
26:13 window which will be right next to the
26:15 cuts and layers window we will see that
26:16 there is a power text box and a fire
26:19 button now available i recommend setting
26:21 this to just roughly one percent our
26:23 goal here isn’t to cut anything we just
26:26 want to be able to click the fire button
26:28 to activate the laser so that way we can
26:30 really make sure that we’ve got things
26:31 lined up correctly
26:33 as you can see here pressing the fire
26:34 button turns the laser on and pressing
26:36 it again will turn the laser off now
26:39 it’s time to run framing to help us
26:41 align our material with the correct area
26:43 it’s going to be engraving in the laser
26:44 window if we click the square framing
26:47 icon the head of the laser will move
26:48 from the front left corner it’s
26:49 currently at to the area it’s going to
26:52 be running the engraving and it will do
26:53 an outline of the entire area that
26:55 you’re graving will be inside the
26:57 process here is to run the framing
26:59 command see where it moves and then move
27:01 your piece of material until it is
27:03 completely underneath it for the
27:04 entirety of the framing if your material
27:06 is too small you can always resize your
27:09 text but you want to make sure that your
27:10 material is large enough for the entire
27:13 frame to be on top of it since we
27:15 enabled lightburn earlier to turn on our
27:17 laser if we hold down the shift key on
27:19 our keyboard and click the square
27:21 framing command it’ll run the command
27:22 again but this time the laser will be on
27:24 and this is my final step in order to
27:26 really tone in the positioning of where
27:29 the engraving is going to be
27:31 once you’re happy all that’s left to do
27:32 is to hit the start button and the job
27:35 will start to run while the laser is
27:37 running you’ll want to be close by and
27:38 it’s never recommended to leave a job
27:40 going while the machine is unattended
27:43 if you notice that the text isn’t quite
27:45 as dark as you would like it or it’s too
27:47 dark you can always go back and adjust
27:48 both the speed and the power settings in
27:50 the cuts and layers window that we
27:52 covered earlier after a few minutes you
27:54 should be greeted with your finished
27:56 engraving and this has been a great
27:57 first step and learning your machine
27:59 learning a bit about lightburn and the
Transcript for Setting Up the SculpFun Laser LightBurn Combination (Cont…)
28:01 workflow of designing something and
28:03 getting a job to run as well as aligning
28:05 your material and the next steps i’d
28:07 recommend would be to take a look at the
28:09 official lightburn documentation go over
28:11 and join the lightburn forums as well as
28:14 check out the many other tutorial videos
28:16 we have over on our youtube channel i’ll
28:18 place links down below in the
28:19 description to all of the resources
28:21 mentioned
28:23 if you’re a machine manufacturer and
28:25 would like us to make a video like this
28:26 about your machine please contact us at
28:29 [email protected]
What Next?
Did you enjoy this post? Why not check out some of our other posts:
Disclaimer
Last updated April 25, 2024
WEBSITE DISCLAIMER
The information provided by n-Deavor Limited, trading as Laseruser.com (“we,” “us” , or “our”) on (the “Site”) is for general informational purposes only. All information on the Site is provided in good faith, however we make no representation or warranty of any kind, express or implied, regarding the accuracy, adequacy, validity, reliability, availability or completeness of any information on the Site.
UNDER NO CIRCUMSTANCE SHALL WE HAVE ANY LIABILITY TO YOU FOR ANY LOSS OR DAMAGE OF ANY KIND INCURRED AS A RESULT OF THE USE OF THE SITE OR RELIANCE ON ANY INFORMATION PROVIDED ON THE SITE. YOUR USE OF THE SITE AND YOUR RELIANCE ON ANY INFORMATION ON THE SITE IS SOLELY AT YOUR OWN RISK.
EXTERNAL LINKS DISCLAIMER
The Site may contain (or you may be sent through the Site) links to other websites or content belonging to or originating from third parties or links to websites and features in banners or other advertising. Such external links are not investigated, monitored, or checked for accuracy, adequacy, validity, reliability, availability or completeness by us.
WE DO NOT WARRANT, ENDORSE, GUARANTEE, OR ASSUME RESPONSIBILITY FOR THE ACCURACY OR RELIABILITY OF ANY INFORMATION OFFERED BY THIRD-PARTY WEBSITES LINKED THROUGH THE SITE OR ANY WEBSITE OR FEATURE LINKED IN ANY BANNER OR OTHER ADVERTISING.
WE WILL NOT BE A PARTY TO OR IN ANY WAY BE RESPONSIBLE FOR MONITORING ANY TRANSACTION BETWEEN YOU AND THIRD-PARTY PROVIDERS OF PRODUCTS OR SERVICES.
AFFILIATES DISCLAIMER
The Site may contain links to affiliate websites, and we receive an affiliate commission for any purchases made by you on the affiliate website using such links. Our affiliates include the following:
- makeCNC who provide Downloadable Patterns, Software, Hardware and other content for Laser Cutters, CNC Routers, Plasma, WaterJets, CNC Milling Machines, and other Robotic Tools. They also provide Pattern Files in PDF format for Scroll Saw Users. They are known for their Friendly and Efficient Customer Service and have a comprehensive back catalogue as well as continually providing New Patterns and Content.
- Cloudray Laser: a world-leading laser parts and solutions provider, has established a whole series of laser product lines, range from CO2 engraving & cutting machine parts, fiber cutting machine parts and laser marking machine parts.
