0:00welcome to another rdworks learning lab now much as i anticipated there were a
0:06few people who did not fully understand my theory of cutting with lenses so i’m just going
0:13to very quickly go through with a modified diagram of how now
0:19i in my mind see lenses operating and i hope that will clear up exactly
0:26what i’m trying to propose it will then go out into the workshop and
0:31do some more test work that i’ve thought about but i’ve done no
0:36preparation for just as normal so we’ll just fly by the seat of our pants and see
0:41what happens this is a journey of exploration for me this is not a teaching session as some
0:48people still think that i’m doing i don’t know the answers i’m hoping to prove some of the stuff
0:54that i’m theorizing on and uh here’s a health warning it may offend
1:00some of the purists when you see some of the things that i think i’m going to be doing
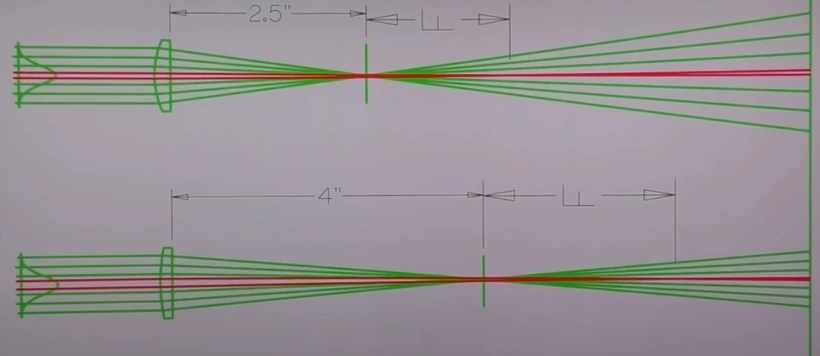
1:05well here is now the image that i carry in my mind of how lenses work previously had just
1:12been raised that light rays that crossed over at the focal point maybe not exactly the
1:20focal point because as i said last time there is a sort of a slight variation in the focus
1:25depending on whether the rays coming from the inside or the outside right that’s that’s called spherical
1:31aberration but this is an extreme version of spherical aberration in red
1:37that i’ve drawn on here so instead of the rays diverging below the focal point
1:43this very special set of rays here which are grossly exaggerated
1:49very close to the axis which i’ve missed out because the axis is only going to add confusion to the situation and i’m
1:56saying that this band of light either side of the axes is so close to the axis
Transcript For Experiments to Test the Lens Cutting Theory (Cont…)
2:02and this surface of the lens is so relatively flat such that the focal point actually
2:09doesn’t happen here the focal point happens here way below the nominal focal point
2:18okay now as we change the shape of the lens top surface the convex
2:25surface this amount of curvature that here
2:30that allowed this to happen is happening over a much smaller distance away from the center line
2:37because the curvature is falling away at a different rate than it is here here
2:43it’s very slow and here it’s getting a bit faster so for the same amount of
2:48flatness and i hesitate to use that word because some people misinterpret that but
2:53this area of flatness here over which this zone can exist that same flatness exists over a much
3:00smaller zone basically the spherical diameter gets smaller but the curvature
3:05effectively gets greater now i think i previously defined this as a hole in the lens and people took
3:11that too literally i really mean this is a property weakness
3:17of the lens that doesn’t conform to the requirements of focusing the lens
3:22into a fixed position this is so close to center that it defies the rules and the focal
3:29point projects way out here now as i said when we start changing the shape of the lens
3:35the focal point changes as you can see it’s a much shorter focal point than that one because that’s
3:41a shorter focus lens and then we go to even shorter focus lens and we get an even
3:46shorter projected focal point down here and this band here is narrower again
3:53because the flatness area is even smaller so with the one and a half inch lens
3:59this area of i said i’m reluctant to keep using this word flatness but it’s
Transcript For Experiments to Test the Lens Cutting Theory (Cont…)
4:04the best way that i can describe it through this little area of weakness here gets much smaller
4:10because the curvature is greater and so therefore the lens focuses much
4:15much quicker because of the curvature but these rays are still here you cannot
4:21ever get rid of this weakness no matter how short you make the focal length because
4:26there is always a single beam which passes through the axis which goes to infinity and then a very short distance away from
4:33the axis those crossing light rays will come in from infinity
4:38quicker and quicker and quicker depending on the shape of the lens and here we’ve got
4:43a very short projected focus and as the lens gets longer so the projected focus gets
4:49longer which is why you can cut deeper with a longer focus lens you can’t cut
4:56this 26 mil thick material with a one and a half inch lens you wouldn’t normally expect to cut this
5:0326 mil thick material even with a two and a half inch lens
5:08because you just wouldn’t think that a two and a half inch lens had got a long enough projection but in
5:14fact this two and a half inch lens that i cut this with is a gallium arsenide lens and it’s even
5:21flatter than this so it’s almost like a five inch lens
5:26because of its flatness and because of its flatness and geometry it has a huge projection beyond the
5:33focal point hence it can cut much deeper than you would normally expect a two and a half
5:39inch zinc selenide lens to cut that basically sums up what i was trying to describe to you in
5:44the last session so when i was speaking to steve apc recently i asked him about this
5:50diagram here so look you can see that the rays are crossing over and we’ve got this nominal focal point this
5:55theoretical focal point what’s this bit here the blue line
Transcript For Experiments to Test the Lens Cutting Theory (Cont…)
6:03he said well he said that’s a projection of where there are photons yeah what does that mean they’re
6:09escaping does that mean light is not traveling in straight lines look we’ve got green rays which are
6:14coming down here to a zero point and then we’ve got these red rays which
6:19are in fact not coming into a zero point here they’re not coming into a zero point till down
6:25here and so consequently they are outside the normal crossover focal point and if
6:31we look here we would say well hang on yeah we have got photons here look they’re all the way here
6:37and then they come out down here is this the reason why people are always drawing this with a
6:45wasted shape rather than a crossover shape but it’s a possible explanation as to
6:51why there are photons in the area that you wouldn’t normally expect photons
6:58but hey as i mentioned to somebody else in a comment i don’t think any manufacturer of lenses
7:04is going to admit to the fact that they’ve got something like this happening in their lens because they’re
7:10trying to produce the most perfect lens possible with everything passing through the focal point
7:16any failure to pass through the focal point is basically admission of spherical aberration
7:23and they do everything in their power not to have spherical aberration in fact there are special lenses around
7:30which we cannot get hold of for our machines because they’re just stupidly expensive
7:36if you were to order them specially and they’re certainly not commercially available and they’re called aspheric lenses
7:42they’re like a mixture of a four inch lens and a one and a half inch lens so we’ve
7:47got a little bit at the center here which is like this radius and then we
7:52get all sorts of funny shapes around the outside of this center section here trying to
7:58make sure that we don’t get any of this spherical aberration and we get perfect focus at a single point they’re very
Transcript For Experiments to Test the Lens Cutting Theory (Cont…)
8:04expensive lenses which i suspect would do wonderfully well for engraving but hang on if this is what we need for
8:11cutting it sounds like they’re going to be crap for cutting i don’t know because i’m not
8:16going to be able to get one to play with so today what we’re going to try and do is to see if we can find a way
8:23of proving this little point here that something is happening right close to
8:28the axis of the lens which gives us cutting properties now we already know
8:34that the cutting properties decrease as we change the focal distance because
8:41with a compound lens for example you’ve seen some of my penetration results they’re not very
8:48good at all and that’s because the focal distance is actually so short there is still some cutting ability as i
8:55said no matter how short how perfect the focal length of the lens is there will always be this weakness
9:02through the axis of the lens even in atmospheric lens it will still be there
9:07but it may well be very very short because it’s going to be like this one and a half inch or even a one inch lens
9:14or even a compound lens i’m going to start off by repeating our cutting of 26 millimeter
9:20oak with the two and a half inch gallium arsenide lens it’s a plano convex lens flat side
9:37i would say that that probably looks like about a 0.5 maybe 0.6 wide
9:43kerf i think there’s a few little stringers along the bottom that are holding it just a few little
9:50tags along there look now the reason why i want to do that is because i’m now going to change
9:56things very slightly i’ve got a piece of three millimetre MDF here
Transcript For Experiments to Test the Lens Cutting Theory (Cont…)
10:01i’m going to add that to the stack now i’m not going to
10:06stupidly cut through that as well set that to the same focus as it was before
10:12two millimeters above the surface and then i’m going to remove the piece of wood we’ll see what the
10:18power looks like at the bottom surface of this wood without the kerf to contain it obviously
10:24there’s obviously got to be a lot of power to cut through 26 millimeter oak
10:30so there’s going to be still a lot of residual power that i expect to find on this surface here
10:41uh yes okay now what we’re going to try and do now is to filter out some of that power
10:48by putting the speed up i can see clearly in there that the center and you saw the very very bright white light
10:54which was basically the carbon arc in the middle there it’s burnt its way right through and yeah we’ve got obviously scorching
11:02around the outside and a very deep center to that groove
11:08but it is a very wide groove what four four millimeters wide so let’s change
11:13the speed from three millimeters a second up to 53 millimeters a second
11:20you can’t really probably see that because there’s no 3d on this camera there is a very distinct
11:26deep groove v in there indicating that we’ve still got a lot of
11:32power in the center of that beam not near the center of the beam but right at the center of the beam
11:38so we now push the speed up to 100 millimeters a second several things you can note first of all
11:46the color is changing from dark to much lighter so we’re spreading out the power the
11:52exposure time is less so we’re doing less burning but you’ll also notice that very thin
11:59line right along the bottom of the groove again it’s still there we’ve got a thinner line so we’re
Transcript For Experiments to Test the Lens Cutting Theory (Cont…)
12:05gradually filtering out all the extraneous low power that we
12:11don’t need but bearing in mind this is the bottom of a 26 millimeter cut
12:16and we’ve still got power right down the center of that beam i think we’re definitely on
12:21the right track here because according to lens theory the beam is diverging
12:27and so there cannot be any concentrated power right at the center of the base
12:32certainly not 26 millimeters below the focal point now this time we’ve got a four inch
12:38zinc selenide lens tucked in the top of that lens tube so that’s one millimeter
12:55question is can we find the thinnest line you could say they’re either all quite thick or they’re all quite thin
13:00they’re all the same basically that one’s definitely not in so that’s one
13:05it’s anything between two and eight difference between two and eight well
13:12let’s choose that one there which is six so that’s seven millimeters below the nozzle seven millimeters below
13:20the nozzle i don’t like working with big gaps big air gaps i’ve made a washer three millimeters
13:26thick [Music] and without changing the focal length
13:31what that’s done that’s forced the nozzle down another three millimeters so my setting
13:37now is not seven millimeters but four millimeters so that’s four millimeters just there
13:44done we were able to perform this cutting test at three millimeters a second
13:50with the gallium arsenide two and a half inch lens we’ve now got a four inch lens which
13:57i just happen to know because i’ve already done this test once before will not perform it at three millimeters
Transcript For Experiments to Test the Lens Cutting Theory (Cont…)
14:03a second so i’m going to have to drop the speed to two millimeters a second
14:16i couldn’t get it to capture at three millimeters second at all what’s the difference between a four
14:22inch lens and a two and a half inch gallium arsenide lens let’s take a look now without any
14:29sophisticated equipment and without being an optical engineer what we’re seeing
14:34is different size reflections that one there is a two and a half inch
14:42plano convex zinc selenide that one there is a two and a half inch
14:49gallium arsenide plano convex that one there is a four inch zinc solenoid plano
14:56convex and this one here is a zinc selenide
15:02meniscus lens four inch [Music] so hang on these are both four inches
15:09but look at the images they’re completely different so the curvature on the top of that is
15:16more than the curvature on that one that’s flatter than that one this is the one that we
15:22used for doing our 26 millimeter oak test just now
15:27and that compares with this one which we used for doing the 26 millimeter oat
15:33test at the beginning we haven’t used that one but i just put that one in there as an example to show
15:38you the difference between a zinc selenide two and a half inch and a gallium arsenide two and a half inch
15:44the curvature on this is substantially flatter than the curvature on that one look at
15:50the difference in the size of the images and even when you look at this one and compare it
15:55this is a two and a half and compare it with this four inch [Music] this four inch is still smaller
Transcript For Experiments to Test the Lens Cutting Theory (Cont…)
16:03than that two and a half inch in other words this is flatter than that one and that one which is a
16:08four inch meniscus lens four inch would imply
16:13according to my thoughts that that would have a much flatter surface than a two and a
16:19half inch well you can clearly see that it hasn’t because this is a smaller image than that one so this one
16:27has got more curvature than that one even though these are the same materials
16:33but obviously there is something about the geometry of this one because it’s a meniscus lens that has to
16:39be corrected both on the top and the bottom surface now don’t get too upset this is my
16:47box of special needs lenses by virtue of the sorts of experiments
16:53that i do as you can see i often damage lenses in some way shape or form
17:00this one has had too much power through it and it just cracked this one is cracked because it had too much power through the middle this one is
17:07discolored in the middle because i think i’ve probably over stressed that one as well
17:12that one again has had too much power and it literally cracked so this is what happens when you put too
17:18much power through a lens this one well i think i accidentally dropped that one
17:24and um yeah it’s got a chip out of it but these are lenses that are already dead
17:29so like a good resurrectionist i’m going to use this dead item here and put it to
17:35further use what i don’t know is what is it well i can see that it’s a cvd plano
17:43convex uh check no it’s a meniscus lens what i don’t know is what’s its focal
17:50length so we’ll quickly just pop that in there and drop that into my little fixture
17:56and i can do a quick check and see that that is a two and a half inch lens this is an 18
Transcript For Experiments to Test the Lens Cutting Theory (Cont…)
18:01millimeter lens that obviously doesn’t fit this 20 millimeter stem i’ve taken a standard clamp ring and
18:06i’ve modified it so that it’s got an 18 millimeter recess in it so when i drop my 18 millimeter lens in there
18:12it sits central in the lens tube i also made some 18 millimeter targets and dropped one of those into the bottom
18:20there to make sure that the beam was running central to the lens so the nozzle set eight millimeters above the surface
18:27and now we’ll just run the quick focus test [Music]
18:33we’re just going to run a profiling test for this lens [Music]
18:41okay now with all that power that we’ve got here remember the 70 in the middle there the
18:47middle two millimeters if what i’m proposing is correct and there’s a lot happening
18:52right down this central axis of the lens and we should find there is a significant effect
18:58[Music] if i disrupt it just there so we’ve got
19:04the lens in there now and here i’ve got a 0.5
19:10millimeter drill there we are right in the middle there
19:15we’ve got a little teeny weeny black spot now okay let’s see what damage we’ve done
19:24well we’ve now changed the blind spot from 0.5 to 0.8 millimeters
19:30[Music] and now we’ve got 1.4 millimeter
19:36disruption in the center [Music] well i think i’ve well and truly messed
19:42up the lens now but um let’s just see what effect i’ve had
19:49i’ve messed it up but you need to see what i’ve done well as you can see i’ve managed to uh put a nice big hole
19:56right through the lens and it’s uh it’s well and truly taken away the central power of the beam but i’m afraid
Transcript For Experiments to Test the Lens Cutting Theory (Cont…)
20:03that in drilling that hole and i caused a bit of a problem at the back as well so not only have i got a
20:09hole i’ve got something fairly dramatic that’s happened as well and so it’s not surprising that the lens
20:16doesn’t work when i say it doesn’t work it does work but not very well but that in itself is
20:22an interesting point how on earth does it do that right now on the basis of what i’ve just seen
20:28i’ve created a very special lens here let’s just see how this performs
20:34[Music] well there it is and there’s no depth to
20:40those cuts but as you can see we have actually marked the surface so here is my special lens
20:50i’m afraid to disappoint you but it’s just a piece of four millimeter thick acrylic with a 1.4
20:57millimeter hole through the middle to simulate what we’ve just created with the lens was there power escaping
21:03through the center of the lens well obviously not much because if there
21:09was it would have escaped through that hole and done damage to the material so the lens is having some effect the
21:16reason why i’ve used a piece of acrylic is because i know that it is going to absorb 100 of the
21:22energy and it has done so there in the form of a sort of a mode burn on the inside of that
21:27piece of material and the rest of the power has escaped through the hole and done damage to the surface of our
21:33test piece but that leaves me with several problems to think about now how can a lens that’s so badly damaged
21:39actually still penetrate material where’s that power coming from it’s not very deep hole but it’s a
21:46conical hole it’s focused power of some sort when we look at these results here
21:53i guess many of you guys would say why don’t you give up russ this is a total failure no
Transcript For Experiments to Test the Lens Cutting Theory (Cont…)
22:00i don’t agree with you now it really depends on how you start to analyze these results
22:08bad results are often good results like this one here looks like a bad
22:14result no it’s not a bad result it’s a result that tells us something it tells us that there is not
22:22a lot of power passing through the lens in an unamplified
22:30way because if it was amplified i would have depth so the
22:37beam that is escaping through that hole and it is escaping through that hole because the rest of it is being captured
22:45is so small in its intensity its natural intensity that all it can do
22:52is damage the surface now on the other hand despite the serious disruption
22:59that that lens must be causing we’re still getting penetration
23:06because that is somehow focusing the light and increasing the intensity and
23:11allowing us to get depth on it’s on its own it doesn’t look very interesting but when we look at the
23:18results of what we’ve achieved so far the original one the normal which is
23:24unmodified is the blue one at the top and gradually as we modify the lens with a 0.5 0.8 and
23:31then a 1.4 missing center spot we are gradually degrading
23:37the cutting ability of that lens so whatever that cutting ability is is
23:43definitely coming through the central part of the lens because
23:48here we’re affecting it here we’ve grossly affected it by putting a hole and doing some damage
23:54and here when we allow the light through in an unamplified way we basically get
24:00nothing i don’t see this as failure i see this is making fairly interesting progress
Transcript For Experiments to Test the Lens Cutting Theory (Cont…)
24:05now the other thing about this pattern here that’s interesting is that i’m using a
24:12two and a half inch meniscus lens now as i described to you earlier the meniscus lens has got some
24:19rather strange geometric properties which maybe i shouldn’t be using for
24:26this test maybe i should be using a plano convex
24:31now i’ll have to go and have a look through my rogues gallery to see if i can find a plano convex
24:37to run these same tests with and perhaps if i’m a bit more careful about how i do the machining
24:42i won’t finish up with this now before we go any further i’ve put that well-destroyed uh two and
24:50a half inch meniscus lens back into there and i’m going to carry out a focus test on it
24:56because hey we might as well check everything while we’ve got the opportunity with this wonderful polo
25:02lens i’ve taken the center away have i changed the focus i mean technically the answer should be
25:08no because the most of the focus is coming in from the side and not the center
25:14previously this lens was set at 13 millimeter focus [Music]
25:24and we started off seven millimeter gap [Music]
25:31eight nine ten eleven twelve thirteen fourteen and it’s not a lot thicker than
25:37it was before it’s absolutely staggering isn’t it for such a such a disreputable lens
25:44so we’ll set that focus to 14 millimeters
25:50okay so we want it a little bit darker i can put the power up and interestingly power is having no
25:56effect on color so we need a little bit more burning time which means we will have to change
Transcript For Experiments to Test the Lens Cutting Theory (Cont…)
26:02the uh step interval from point two back to point one that will burn twice as much
26:10[Applause] it’s actually burning in quite deep
26:18wow and if i take that up to point three slight change in color
26:26i have to say i’ve got more control over that lens than i’ve ever had on an engraving lens
26:32before so hey i’ve just invented the square
26:38wheel [Music] don’t laugh square wheels have got fantastic properties
26:44you don’t need hand brakes nobody’s going to pinch your car you’re not going to believe that that engraving was done with that crap lens
26:51are you so look on camera no tricks this is not anything like this is not david copperfield or
26:58[Music]
27:04anything [Music]
27:10look there it is the nozzle is just very slightly warm
27:15so there’s a little bit of power scattering inside there but [Music]
27:22who else in the world is going to show you mad off the wall stuff like this i find it fascinating it edges towards
27:29my theory of lenses you know what’s happening on the outside is having nothing to do
27:34with the focal point but we know that that lens will not cut
27:39but it does engrave okay so technically this is what all lens manufacturers are trying to achieve
27:46a very good focus because i’ve removed the bit that goes out of
27:52focus down the center now i wouldn’t say that i’ve proved that categorically
27:57but there’s some pretty strong evidence to suggest that that lens that was
Transcript For Experiments to Test the Lens Cutting Theory (Cont…)
28:04cutting quite nicely with this blue line and then when we
28:10destroyed it it came down here so as a cutting lens
28:16it’s absolutely useless now but it’s not useless as an engraving
28:21lens i mean just look how badly damaged that lens really is not only as if i’ve
28:26got a serious chip out of one i don’t know sixth of it
28:32i also destroyed the back and it’s got no center maybe lens
28:38manufacturers ought to be making polo lenses for engraving i’ve managed to machine
28:43another inch and a half lens marginally better in that everything is
28:49uniform look i’ve had a crack away at the front there
28:54and the back it’s not too bad but again we’re going to use this lens flat side
29:00up and see what happens if we take a look here i’ve got i’ve got a a sister lens to it
29:08and this lens has got just a little bit of imperfection on the right on the center there
29:13in the uh anti-reflective coating okay so this is not a perfect lens
29:20but it obviously appears that lenses don’t have to be perfect to work so we’ve got two reasonably equivalent
29:26lenses there which we’re going to test [Music]
29:32so there’s the lens in its normal state
29:40aha so now we have categorically [Music]
29:46lost power from the center of the lens what’s it like as an engraving lens
29:58well apart from the smoke from me workshop it’s even darker so now we know how to make great
Transcript For Experiments to Test the Lens Cutting Theory (Cont…)
30:04engraving lenses just drill a hole in the middle uh honestly i would advise you not to
30:13i think if you do a little bit of reading on this material you’ll find it’s very toxic the only reason you’ll see me handling
30:19these lenses like this without gloves in that on is because they’re coated with a
30:25material that protects you from the toxicity of the base material which is zinc selenide underneath
30:31so i was very careful when i machined these and um yeah i was wearing a mask and i
30:37was also doing it very slowly and i didn’t blow the dust anywhere well as you can see
30:43it’s a lovely day spring is in the air i’m feeling a little bit smug because although i haven’t proved that
30:50my theory is right um there’s a lot of evidence there that says i’m on the right track so i’m going to
30:57leave you and the lensmakers a few things to think about after what you see me do today i’m going
31:04to catch up with you in the next session so thank you for your time and patience
 Skip to content