 Skip to content
 The Lightburn Software Series
The Lightburn Software is probably the best generic laser cutting software available (I use it for almost all of my laser work). This series has LightBurn tutorials, hints and tips as well as the occasional speed comparisons between it and RDWorks. In this Video we learn all about Lightburn Cut Settings. My thanks to the team at Lightburn for allowing me to embed their videos.
Contents
This tutorial talks about cutting, marking, vector engraving, image engraving, and shows how the various settings affect your cuts in LightBurn.
Video Resource Files
There are no resource files associated with this video.
External Resource Links for LightBurn Cut Settings
https://lightburnsoftware.com/pages/trial-version-try-before-you-buy
There are no more external resource links associated with this video.
Video Transcript for LightBurn Cut Settings
Click the “Show More” button to reveal the transcript, and use your browsers Find function to search for specific sections of interest.
0:00in this video we’re going to look at the
0:03various cut settings in light burn and
0:05how to use them to accomplish various
0:08things there’s some misinformation out
0:14there regarding various cut settings
0:17you’ll hear terms like vector engraving
0:19image engraving marking cutting they’re
0:22all just different ways of controlling
0:26the power to the beam of your laser
0:28cutting is pretty obvious cutting if
0:31this is the material that like side view
0:33of your wood for example cutting is
0:35basically firing the laser strong enough
0:38to cut all the way through it it’s
0:41pretty forgiving if you overpower it
0:44you set the laser power too high it
0:47doesn’t really matter you’ll burn your
0:48edges a little bit but it’s not that big
0:50a deal it doesn’t require a lot of
0:52finesse cutting is pretty
0:53straightforward and it’s very obvious
0:54when you’ve done it wrong if you don’t
0:56cut all the way through you can run
0:58another pass that’ll usually fix it
1:00engraving is one of those things where
1:02you’ll hear a bunch of different terms
1:04so we’ll try to break those down
1:06engraving and marking are essentially
1:09the same thing marking is cutting only
1:12partway into the surface of the material
1:14engraving is the same thing you’ll hear
1:17two different kinds of engraving one is
1:19called image and raving one is called
1:21vector engraving they are both doing
1:25basically the same thing
1:27however vector engraving is using a
1:31shape for example if I make a circle or
1:34a piece of text vector engraving would
1:38be filling this text by or this shape by
1:43scanning the laser back and forth
1:45generally speaking engraving is done by
1:48scanning the laser back and forth across
1:50your image across your vectors or shapes
1:53whatever they are and applying power
1:56where those vectors are are filled or
1:58closed so if I select these items here
Video Transcript for LightBurn Cut Settings (Cont…)
2:02and I say I want to scan these if I
2:06preview this you can see all of these
2:08shapes are now filled except for where
2:11these overlaps we’ll talk about that a
2:12little later
2:13but you remove these so these are now
2:18filled shapes the red is showing late
2:21burn moving between these shapes those
2:25are just traversal moves I turn those
2:27off this is basically what your laser is
2:29going to produce if you zoom in on this
2:31this isn’t actually filled these are
2:34lots of tiny little lines and you can
2:38see if I turn on the traversal moves the
2:42laser moves along this line turns off
2:45jumps to the next line moves down this
2:47way jumps to the next slide moves down
2:49this way and so on when it gets down
2:51here jumps across all the way over here
2:54to this letter s jumps down to this
2:56shape so on and so on and so this is
2:59called scanning raster scanning raster
3:01engraving vector engraving there’s a
3:03whole bunch of different words for it
3:05and they all mean exactly the same thing
3:07raster is a term that dates back to the
3:11beginning of television television uses
3:15what’s called a raster scanning beam or
3:17a raster scan that’s the beam that scans
3:21across the surface of the television
3:22that excites the phosphors on the front
3:27of the screen it makes them light up
3:28that’s why you’ll hear the term raster
3:30it used to describe this kind of pattern
3:34when firing your laser it’s not really a
3:38television anymore but it’s doing
3:40basically the same thing it’s scanning
3:41back and forth turning on and off as it
3:43goes to cut vector engraving is pretty
3:47much just this it’s taking a vector
3:49shape and moving the laser back and
3:53forth across the shape turning it on and
3:54off to engrave or mark the surface of
3:58your material so to do that you would
Video Transcript for LightBurn Cut Settings (Cont…)
4:00generally use high speed and low power
4:04lower medium power and this depends
4:07depending on how fast you’re making the
4:09laser go if I crank the speed all the
4:10way up to 500 millimeters a second for
4:12example I might need to turn the power
4:14up in order to cut deeply enough for
4:18this to really show well totally depends
4:22on the laser the power you’re using the
4:23ability of your hardware but generally
4:25speaking fast
4:27moving faster reduces power in the same
4:31way that lowering your power reduces
4:33power if you run the same cut at the
4:35same power setting but faster you
4:37deposit less heat on the surface of
4:40their material if you run the same power
4:43but slower you deposit more heat on the
4:46surface of your material there’s another
4:48setting that affects how these things
4:51work and that’s called
4:53interval this is also referred to as dpi
4:57or lines per inch dots per inch interval
5:01in this case is how far apart these
5:03different scan lines are so if I bring
5:05this back up in the preview the spacing
5:09of these lines how far apart each of
5:11these horizontal lines is that’s my
5:13interval if I take this number and I
5:16double it up to point two there are
5:20fewer of these vertical or horizontal
5:23lines so if you look at how many there
5:25are at the beginning of this T for
5:27example if I put this number back to
5:30where it was and preview that again you
5:35can see there are many many more of them
5:37if I lower this down to one millimeter
5:40interval so that’s one millimeter
5:42between those scan lines now it’s pretty
5:45obvious there are far fewer of them this
5:49controls the quality of the output
5:51it also affects how much heat is
5:53deposited on the material you’re cutting
5:55the lower interval setting means the
5:59lines are packed closer together it
Video Transcript for LightBurn Cut Settings (Cont…)
6:01means to get a more well-defined curved
6:03shape so for example if you look at this
6:06s if I set this to one millimeter and
6:11preview that if you look at the s it’s
6:14very very coarse there are only a few
6:16lines that are defining the shape of
6:18that mess I drop this down to 25 now
6:24there are twice as many points defining
6:26the curvature of that s I drop this down
6:28to point one and actually do it
6:35and there we go many many many more
6:39lines they’re much closer together much
6:41less or much more overlap between the
6:44individual lines so this plays into the
6:47quality of your engraving and this will
6:49affect image engraving or vector
6:51engraving
6:52it only affects things that are scanned
6:54if I say I want this cut if I want to do
6:58a light surface marking of these shapes
7:00I can use the same speeds and powers as
7:04I would use for regular engraving just
7:07say what this cut cut and mark is the
7:09same thing the only dirt the only
7:12difference between them is that one’s
7:13going to punch all the way through your
7:14material and the other one is not if I
7:17just say cut it’s going to run along the
7:20outlines of these shapes not scan fill
7:23them and you can see here if I follow
7:27the preview it’s just doing the outlines
7:30there is no difference between cutting
7:33and marking for vector objects other
7:35than your power settings or your speed
7:37depending on which one you’re using to
7:39control the image engraving is different
7:43image engraving is using a picture to
7:48drive the power setting beam as it
7:50travels over a shape so I’ll bring in an
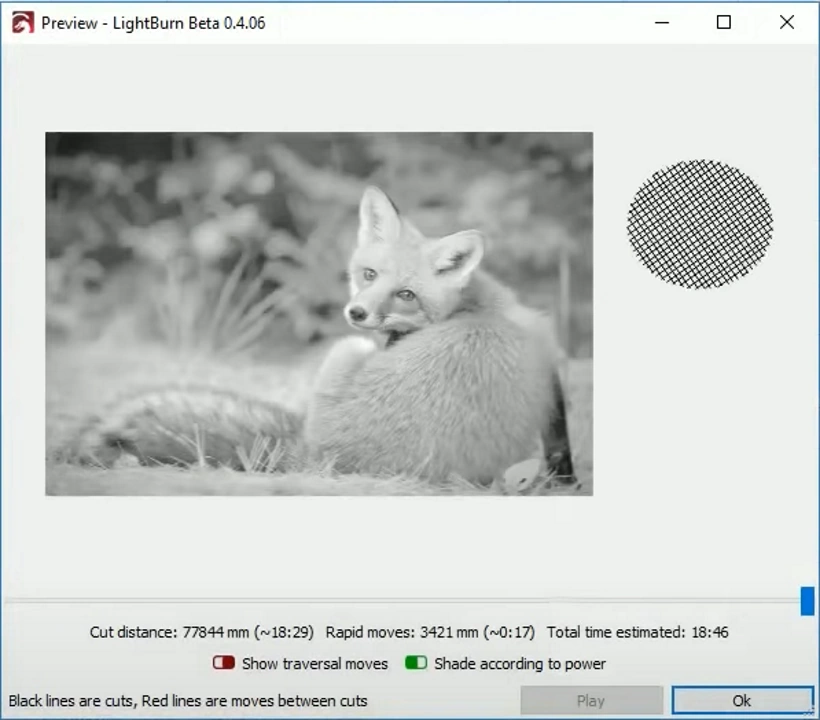
7:53image that I have so this Fox something
7:59that I use to do tests with I set this
Video Transcript for LightBurn Cut Settings (Cont…)
8:02to 100 millimeters high fits here light
8:08for automatically sets this is an image
8:10cut can’t change this because it’s image
8:13engraving it’s not vector engraving
8:16image engraving is handled in very much
8:19the same way as a Spector engraving it’s
8:22affected by line interval you also get a
8:25dpi setting here in light burn and these
8:28two are just different representations
8:31of the same number it can change the
8:33interval or the DPI setting you can see
8:35the interval changes and vice versa if I
8:38change the interval dpi setting changes
8:40so we’ll start with point 1 which is
8:44what we had before here if I preview
8:47this the preview starts off as being
8:50very very dark and that’s just because
8:51it’s not easy for me to draw lines of
8:54different thicknesses in this preview if
8:56you zoom in though you can see the
8:58details start to show up so what’s
9:01happening is in the areas of brighter
9:04portions of the picture the laser is
9:06being turned off for longer periods of
9:08time then it’s turning on and that
9:10produces light areas and conversely in
9:15dark portions of the picture the laser
9:17is being turned on for longer that it’s
9:19turned off and you end up with dark
9:21pretty straightforward this is also
9:24called dithering
9:25it’s a very common technique so if you
9:28look at the nose here lots of long lines
9:31where it’s dark compared to the brighter
9:34portions of the face where it’s left off
9:37for longer periods of time
9:39changing the interval will affect the
9:43quality of the image in the same way
9:46that it does with factory grating if I
9:48change this to 0.2 that’s now 127 dots
9:52per inch or lines per inch I preview
9:55this you can see much less detail when
Video Transcript for LightBurn Cut Settings (Cont…)
10:01you zoom in here the lines are farther
10:04apart and so there’s not as much not as
10:09many opportunities to capture shading if
10:11I change this to be say 300 or even 400
10:17dpi run that again now it’s very very
10:21dark and you have to zoom in
10:22considerably more and you can see now
10:25there’s much more detail in the face
10:27very very clearly see the nostrils here
10:30for example the pupils in the eyes and
10:33so on higher dpi generally results in a
10:38better quality output image but there is
10:40a limit your laser has a beam width and
10:44going smaller than that beam width for
10:47your interval by far is not going to
10:50affect much it’s not going to get you
10:52much
10:53better output you can do it somewhat for
10:57example if my beam is 1/10 of a
11:00millimeter wide the beam has a circular
11:03shape and so it’s not a square so if I
11:08have a square like this that is 1/10 of
11:12a millimeter wide and I put another
11:14square next to it one tenth of a
11:16millimeter away you can see that they
11:19butt up nicely against each other
11:21circles don’t work that way if I take
11:24two circles that are 1/10 of a
11:25millimeter in diameter and put them next
11:27to each other you can see there’s a lot
11:28a fair bit of area here that’s not
11:31really covered by those the power of the
11:34beam is focused in the middle and it
11:37falls off towards the edges so it’s
11:39actually okay to have a bit of overlap
11:41so if you’ve got a beam that is 1/10 of
11:46a millimeter wide you can afford to
11:48overlap them a little bit and that will
11:50get you something you can also run the
11:54beam slightly out of focus that
11:55sometimes helps with grayscale engraving
11:58there are a whole bunch of tricks that
11:59you’ll read to get various results and
Video Transcript for LightBurn Cut Settings (Cont…)
12:03various improvements so on the one that
12:07affects things the most is your interval
12:10setting so play with that if I in here
12:16and they will over scan this is
12:20something else that affects both vector
12:22and image engraving it’s a useful tool
12:25with some lasers this is handled
12:28automatically at hardware with G code
12:31based lasers it’s not so let me remove
12:34the image will preview this with scan
12:39enabled if I turn on traversal moves
12:43here so you can see the laser path
12:46itself so in this case the laser is
12:49going to start here move here turnoff
12:51right there
12:52jump over to this and reverse direction
12:55and turn on pretty much at the same time
12:57and the laser doesn’t move instantly it
13:01has to speed up and slow down so when it
13:03gets to this point it’s reversing
13:05direction it’s slow
13:06speeds up with the power-on travels
13:10along this line starts to slow down
13:12again before it gets to the end here
13:14jumps down to the next line reverses
13:16direction and so on what ends up
13:19happening is in systems that don’t have
13:20very great power control if you get over
13:23burn on these edges where you’re
13:25changing directions so particularly down
13:27here where these directions changes are
13:29like 90 degrees the laser hits here past
13:32the stop dead move down start up again
13:35you’ll end up with burn on these ends
13:39the way to stop that is with the
13:41overscan setting if I turn on over
13:45scanning I have my religious that I read
13:52it does this hardware so let me okay so
13:59I basically just changed which laser I’m
Video Transcript for LightBurn Cut Settings (Cont…)
14:02using in light burns try to ignore that
14:05for a moment my read a laser does
14:08overscan in hardware it’s not a setting
14:11I’m allowed to use with that laser with
14:13a g-code laser however doesn’t do that
14:16hardware so you get a setting here
14:18called over scale if you turn this on I
14:22preview now you can see these red lines
14:26here showing the traversal modes
14:28actually shoot out past the ends of my
14:31cuts so what’s happening is light burn
14:34is telling the laser to keep going past
14:38the end of your shape and then turn
14:42around out here start going back up
14:45again ramp up to speed in this region
14:48and basically the idea is that the laser
14:51head is already up and running and
14:52moving by the time it gets back to your
14:54shape and the beam turns on and so it’s
14:57not hovering over this area for an
14:59extended period of time while speeding
15:01up with the laser on and therefore you
15:03don’t get a concentrated burn on these
15:06edges if you have a G code-based laser
15:08user over scanning for pretty much
15:10everything it for engraving at least it
15:14may
15:14big difference it really does result in
15:16much cleaner edges it also works the
15:20same when you’re doing image engraving
15:21if you have a picture you can enable
15:26over scanning for picture engraving as
15:28well and if I preview this you can see
15:31on these edges the laser is doing
15:35exactly the same thing it’s going past
15:37the last dots of the image it goes well
15:40past the end here turning changes
15:42direction out here turns around and goes
15:44back the other way over standing is a
15:47percentage of your speed
15:50it defaults to two and a half percent
15:51you can change that number if you find
15:54that that’s not enough or if it’s too
15:55much over scanning also affects how much
15:59working area you have if I park this
Video Transcript for LightBurn Cut Settings (Cont…)
16:01image right here at my origin for
16:03example in a normal laser without
16:07overscan this is okay the laser is just
16:11going to scan back and forth and stop
16:13right at the edge of this image if you
16:16have over scan enabled however what ends
16:19up happening is the laser moves past the
16:21image turns around and moves back you
16:23may bump into your limits if you use
16:27over scan really close to the edges of
16:29your frame like this so be aware of that
16:34there are also different methods to use
16:38for image and rating the one that you’ve
16:41seen so far here is called dithering
16:45after that so dither is the default
16:48option it’s generally the best general
16:52use option if I turn off traversal moves
16:57and zoom in it’s pretty obvious what
17:00digging is doing it’s just turning the
17:02laser off and on rapidly to get you
17:05shading there’s no gray scales here it’s
17:08just on and off it’s binary it’s packing
17:12dots tightly together so that if you
17:14move back far enough away from the
17:16monitor or from the resulting burn it
17:18looks like a picture
17:20this kind of dithering which is called
17:23error diffusion dithering works really
17:26well for photographs and continuous-tone
17:29pictures it does not work well for
17:33cartoon-like images so for example if I
17:37bring in this picture and use the same
17:41setting with this image you can see
17:44these tendrils strange wavy lines in the
17:49picture what’s happening is the software
17:54remembers how wrong I was basically I
17:59only have black and white on or off to
Video Transcript for LightBurn Cut Settings (Cont…)
18:02use to generate the shading in this
18:05picture it picks one that’s closest to
18:08the original color tone of the image and
18:11it remembers how wrong it was and it
18:14takes a small amount of that error and
18:16it shifts it in the directions away from
18:19that dot and so what ends up happening
18:21is these little lines here are just that
18:24error being shuffled further and further
18:25along because there’s nowhere for it to
18:27go this image has a pure white
18:29background pure white is perfect same as
18:33black and so it’s not wrong so it gets a
18:36little bit wrong at the beginning here
18:37and then it’s just perfect all the way
18:39through and so there’s nowhere for that
18:40error to go and so it just ends up
18:42dropping random little dots along the
18:44picture the way to combat this is to use
18:48I have one of the other methods of
18:50shading so there’s ordered ordered is a
18:53more regular pattern shade you can see
18:58that here this is also called halftone
19:01shading but it’s most commonly referred
19:05to as ordered dithering it’s a simple
19:08pattern that gets applied at so you can
19:09see that here this is not subject to the
19:13same kinds of problems that diffusion
19:16dithering is but it doesn’t work as well
19:18for continuous tone pictures you also
19:21have the option to do straight thread
19:23folding which is just one or the other
19:27depending on which one’s closer
19:30for one bit images just black-and-white
19:32images literally with no shading this is
19:35actually a decent option for most other
19:37things it’s terrible so it’s generally
19:39not used if you did or something outside
19:43of light burn for example if you have
19:46photograph or you have other dithering
19:48software that produces a one bit image
19:50you will probably want to use the
19:52threshold option here and match the size
19:56and dpi setting of whatever the picture
19:59is that you brought in and that will
Video Transcript for LightBurn Cut Settings (Cont…)
20:01give you the least amount of processing
20:03on that image the last option is
20:07grayscale grayscale is harder to use but
20:12ultimately gives you the best shading we
20:14look at this with threshold it’s
20:17terrible if I change this to ordered
20:21it’s a little better still not great if
20:26I change that to dithered it’s better
20:30still but it’s still not a true
20:35grayscale image if I do grayscale
20:39engraving and we tell this to shade
20:43according to power this is actually
20:47what’s going to be output to the laser
20:49you can see these lines are varying in
20:52power and that variation in power is
20:56what’s creating the shading this is the
21:00best option for photo realistic shading
21:03that you have but it’s also the hardest
21:05to work with this requires a lot of
21:08trial and error to get right because
21:09different materials burn at different
21:11rates that darken at different rates it
21:14is not simple to make this work however
21:18the results can be well worth it so you
21:20are encouraged to try it again the same
21:24other caveats apply changing the
21:27interval or the DPI setting will help
21:32over scanning also works well with
21:35grayscale you can also increase the
21:38number of passes here often grayscale
21:41engraving works best when you
21:43slow and with low-power so setting for
21:47example of 70 millimeters a second with
21:50an overall power of 10 or 11% maybe and
21:54then do more than one pass and each
21:56subsequent pass will get a little bit
21:57darker again trial and error is key here
Video Transcript for LightBurn Cut Settings (Cont…)
22:02with grayscale grayscale is a pain there
22:05are other options as well with an image
22:09engraving you can change the scan angle
22:12so you can see I’m just changing a scan
22:15pattern here by moving the angle number
22:17this will allow you to scan vertically a
22:20scan at an angle some people find that
22:23with diode lasers for example scanning
22:25at an angle helps eliminate or reduce
22:28the effect of the oval shape of the beam
22:34your mileage may vary play with
22:36different things with vector engraving
22:39you also have a mode called crosshatch
22:43which I really like crosshatch basically
22:46does a double scan so it goes one way
22:49then goes the other way and you can do
22:51the same scan angle changes with that
22:53one
22:54and crop size can actually give you some
22:57cool results if you use a large interval
23:00so I set this to one millimeter and
23:03preview this the crosshatch pattern is
23:06kind of an interesting fill it’s a way
23:11of getting a filled shape or something
23:14that looks filled but isn’t necessarily
23:16going to cost you nearly as much time as
23:19a full vector over rave its stylized you
23:27can set that fairly high you can also
23:30use what’s called scan plus cut this
23:33basically does a scan over a shape with
23:37crosshatch or without and then runs
23:40around the outline with the settings
23:42that you see below so you get both scan
23:45speed and power settings and you get cut
23:50speed and power settings the same way
23:52you do with a regular cut this if you
23:55watch the preview
23:57does the normal raster scan of a shape
23:59and then runs the outline so it’s useful
Video Transcript for LightBurn Cut Settings (Cont…)
24:03for things where you want to do engrave
24:07and then highlight the edge or extend to
24:09accent the edge and you don’t have to
24:12use two separate cutting paths to do it
24:14it’s a useful trick
What Next?
Did you enjoy this post? Why not check out some of our other posts:
Disclaimer
Last updated April 25, 2024
WEBSITE DISCLAIMER
The information provided by n-Deavor Limited, trading as Laseruser.com (“we,” “us” , or “our”) on (the “Site”) is for general informational purposes only. All information on the Site is provided in good faith, however we make no representation or warranty of any kind, express or implied, regarding the accuracy, adequacy, validity, reliability, availability or completeness of any information on the Site.
UNDER NO CIRCUMSTANCE SHALL WE HAVE ANY LIABILITY TO YOU FOR ANY LOSS OR DAMAGE OF ANY KIND INCURRED AS A RESULT OF THE USE OF THE SITE OR RELIANCE ON ANY INFORMATION PROVIDED ON THE SITE. YOUR USE OF THE SITE AND YOUR RELIANCE ON ANY INFORMATION ON THE SITE IS SOLELY AT YOUR OWN RISK.
EXTERNAL LINKS DISCLAIMER
The Site may contain (or you may be sent through the Site) links to other websites or content belonging to or originating from third parties or links to websites and features in banners or other advertising. Such external links are not investigated, monitored, or checked for accuracy, adequacy, validity, reliability, availability or completeness by us.
WE DO NOT WARRANT, ENDORSE, GUARANTEE, OR ASSUME RESPONSIBILITY FOR THE ACCURACY OR RELIABILITY OF ANY INFORMATION OFFERED BY THIRD-PARTY WEBSITES LINKED THROUGH THE SITE OR ANY WEBSITE OR FEATURE LINKED IN ANY BANNER OR OTHER ADVERTISING.
WE WILL NOT BE A PARTY TO OR IN ANY WAY BE RESPONSIBLE FOR MONITORING ANY TRANSACTION BETWEEN YOU AND THIRD-PARTY PROVIDERS OF PRODUCTS OR SERVICES.
AFFILIATES DISCLAIMER
The Site may contain links to affiliate websites, and we receive an affiliate commission for any purchases made by you on the affiliate website using such links. Our affiliates include the following:
- makeCNC who provide Downloadable Patterns, Software, Hardware and other content for Laser Cutters, CNC Routers, Plasma, WaterJets, CNC Milling Machines, and other Robotic Tools. They also provide Pattern Files in PDF format for Scroll Saw Users. They are known for their Friendly and Efficient Customer Service and have a comprehensive back catalogue as well as continually providing New Patterns and Content.
- Cloudray Laser: a world-leading laser parts and solutions provider, has established a whole series of laser product lines, range from CO2 engraving & cutting machine parts, fiber cutting machine parts and laser marking machine parts.
