LightBurn Tutorial 07 – Basics #3: Trace Image and Weld

The Lightburn Software Series

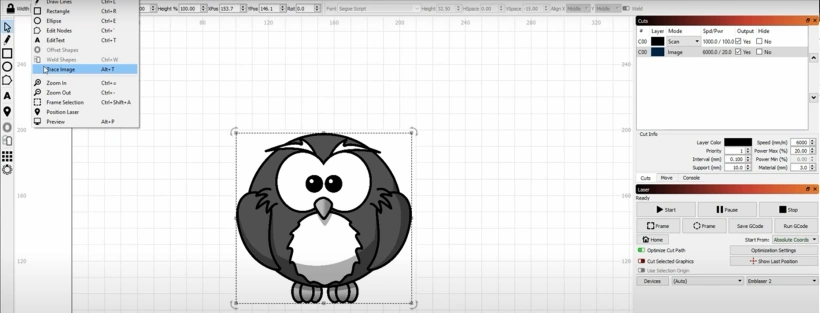
The Lightburn Software is probably the best generic laser cutting software available (I use it for almost all of my laser work). This series has tutorials, hints and tips as well as the occasional speed comparisons between it and RDWorks. In this Tutorial Session, we are shown how to trace an image and weld objectsMy thanks to the team at Lightburn for allowing me to embed their videos.

Contents

LightBurn Basics is a new set of short tutorials covering a focused set of topics for new users. This video covers the use of the Trace Image feature, and walks you through using the weld tool.

Previous VideoNext VideoSeries Menu

Resource Files for LightBurn Tutorial Basics – Trace Image and Weld

There are no resource files associated with this video.


External Resource Links for LightBurn Tutorial Basics – Trace Image and Weld

https://lightburnsoftware.com/pages/trial-version-try-before-you-buy

There are no more external resource links associated with this video.

Lightburn trace image of a picture
Lightburn Trace Image of a Picture

Transcript for LightBurn Tutorial Basics – Trace Image and Weld

Click the “Show More” button to reveal the transcript, and use your browsers Find function to search for specific sections of interest.

0:01 hey guys in this tutorial we’re going to

0:04 go over the image trace function in

0:07 lightburn and also the weld function so

0:11 to get started I’m going to focus first

0:15 on the image trace so we’ll go to import

0:19 and I’m gonna go ahead and bring in this

0:22 little owl cartoon here

0:24 now notice he’s full of colors and when

0:30 that comes in he’s various levels of

0:33 gray this is going to do some

0:36 interesting things with the image trace

0:38 tool that I wanted to demonstrate so

0:42 highlight him and we’ll go to tools and

0:47 trace image now when we trace image it’s

0:52 looking at the difference between light

0:55 and dark – I draw where our threshold is

1:01 threshold is the operation that it’s

1:03 doing and I want to get all of this

1:08 black outline here but the dark gray is

1:11 really really messing with it notice how

1:14 it’s picking up the inner is on the

1:15 light gray but as it gets to the dark

1:17 gray it can’t really differentiate

1:19 between the black and the dark gray so

1:23 we can go up and as we go up we can see

1:29 that it starts to really highlight

1:32 different areas now if I want to get a

1:37 better view of this I can click the fade

1:41 image and that will lighten up the image

1:45 so that I can see the purple lines and

1:48 the purple lines are what our vectors

1:50 are actually going to turn out to be and

1:52 we can pan and zoom in here just like we

1:55 could in normal lightburn so we can

1:58 really zoom in and see make sure that

Transcript for LightBurn Tutorial Basics – Trace Image and Weld (Cont…)

2:00 we’re getting the right image and then

2:03 if you want to see the actual vector

2:05 points that are coming in we can click

2:09 the show points and and see all of those

2:15 so I think a threshold of 200 looks

2:19 pretty good and if it’s getting too

2:25 sharp say you’ve got a really really

2:27 Jaggi image we can crank the smoothness

2:29 and it will follow the curves a little

2:36 less and really smooth out the lines as

2:41 we go down it starts to get more and

2:43 more Jaggi so I think a smoothness

2:49 around one is pretty much where I

2:51 usually like to stay we’ll click one

2:57 alright so we’ll click OK and it’s it’s

3:01 difficult to see what actually came in

3:03 but you can definitely tell something

3:05 happened because now we have an image

3:06 and a scan layer or before we just had

3:10 the image layer so if you click it had

3:14 all the geometry that we created with

3:18 the trace image function highlighted

3:20 already so now you can see we’ve got

3:22 these vectors as well as the owl now

3:28 normally I’ll just click the raster

3:30 image that we brought in and delete it

3:32 because I’m done with it and now we have

3:35 this really nice vector art that we can

3:38 edit we can move around or you know we

3:42 can cut this out or we can just scan the

3:47 outlines so if I wanted to do a preview

3:51 real quick to see how he’s going to look

3:53 I can click preview and now we see that

Transcript for LightBurn Tutorial Basics – Trace Image and Weld (Cont…)

4:03 it’s going to edge all of the Interior

4:09 here and we’re gonna get a really nice

4:12 crisp outline of what that owl looks

4:14 like by default

4:17 laybourne has the show traversal moves

4:19 turned on that’s all this red in here so

4:22 if I turn those off we can see

4:24 specifically what’s going to happen

4:27 and the slider bar is pretty handy it’ll

4:31 show us how he’s going to be created so

4:35 in my scan settings I have a set to scan

4:40 from the bottom up and we’ll go over

4:42 that in a later video it also gives me a

4:45 time estimate based on my power and

4:48 speed settings which is pretty nice so

4:53 click OK

4:54 now I want to show you guys one other

4:57 thing that I think is really neat and

4:59 shows some of the power that you can

5:01 utilize with this tool so delete the owl

5:04 and we’ll bring in some other geometry

5:08 that I downloaded and these are a couple

5:12 animal silhouettes that I found on the

5:14 Internet

5:17 so we have a walrus silhouette and a

5:19 butterfly silhouette this is kind of

5:22 goofy this is something that I have done

5:25 with Girl Scouts and younger kids as a

5:29 workshop but now we can do this directly

5:32 in a laser software and I think that’s

5:34 pretty powerful so first I’m going to

5:37 select my walrus silhouette and trace

5:42 the image this is a pretty terrible

5:45 silhouette this is one of those we’re

5:48 turning up or down the smoothness will

5:51 really change how it follows the lines

5:57 but this is good enough for our purposes

Transcript for LightBurn Tutorial Basics – Trace Image and Weld (Cont…)

6:04 so we’ll get rid of the raster image and

6:08 again with the butterfly this is a

6:12 pretty terrible image but lightburn it

6:15 does a really excellent job of following

6:18 this really really rough edge here and

6:22 if we wanted to get this a little

6:24 sharper I can turn the smooth this way

6:27 down and it starts to turn into a

6:32 sharper corner click OK get rid of a

6:38 raster image

6:39 and now what I’m going to do is I’m

6:43 going to use the weld tool to combine

6:45 these two and make a wallet fly and yeah

6:49 this is very silly but fun so the first

6:55 thing we need to do is we need to make

6:56 these guys a little closer in size to

6:59 each other so I’m gonna lock the aspect

7:01 ratio and we’ll turn this guy up to 100

7:05 millimeters and I think this size works

7:13 for right now and I’m gonna drag him

7:16 over so that he’s about where I want him

7:24 I want the wings to show up and I want a

7:28 walrus teeth to show up and the Waller

7:29 his tail but I don’t really want the

7:33 butterfly body to cut off the walrus

7:36 tail down here and I want more of the

7:38 butterflies antennae to come out so I’m

7:40 gonna turn off the aspect lock and use

7:46 the warp tools to and rotate this guy

7:53 and position him to be a little more

7:59 where I want him to be

Transcript for LightBurn Tutorial Basics – Trace Image and Weld (Cont…)

8:09 track him around

8:10 [Music]

8:26 and as you’re making these Griffins is

8:30 what we called them in the workshop it

8:32 takes a little bit of playing to get

8:33 exactly what you want but that’s half

8:37 the fun I think that’s pretty close so

8:41 now I will use ctrl a to highlight

8:45 everything in the drawing and then the

8:48 weld function in the tool bar and voix I

8:54 have my Waller fly and basically what

8:57 this does is it combines all of the

8:59 outer lines and eliminates all all of

9:02 the inner lines so if we wanted to get

9:07 rid of any of this these inner lines

9:11 here we could ungroup them and I could

9:14 delete this and this and now it’s more

9:18 of a silhouette and it could be you know

9:23 fun wallhanger or something like that

9:25 but this kind of a goofy exercise to

9:28 demonstrate the power of what vector

9:30 trace can do as well as the weld utility

9:34 so hope you guys picked something up in

9:37 this one and again like always be on the

9:40 lookout for the next lightburn tutorial

9:42 thanks

What Next?

Did you enjoy this post? Why not check out some of our other posts:

Disclaimer

Last updated August 26, 2021

WEBSITE DISCLAIMER

The information provided by n-Deavor Limited, trading as Laseruser.com (“we,” “us” , or “our”) on (the “Site”) is for general informational purposes only. All information on the Site is provided in good faith, however we make no representation or warranty of any kind, express or implied, regarding the accuracy, adequacy, validity, reliability, availability or completeness of any information on the Site.

UNDER NO CIRCUMSTANCE SHALL WE HAVE ANY LIABILITY TO YOU FOR ANY LOSS OR DAMAGE OF ANY KIND INCURRED AS A RESULT OF THE USE OF THE SITE OR RELIANCE ON ANY INFORMATION PROVIDED ON THE SITE. YOUR USE OF THE SITE AND YOUR RELIANCE ON ANY INFORMATION ON THE SITE IS SOLELY AT YOUR OWN RISK.

The Site may contain (or you may be sent through the Site) links to other websites or content belonging to or originating from third parties or links to websites and features in banners or other advertising. Such external links are not investigated, monitored, or checked for accuracy, adequacy, validity, reliability, availability or completeness by us.

WE DO NOT WARRANT, ENDORSE, GUARANTEE, OR ASSUME RESPONSIBILITY FOR THE ACCURACY OR RELIABILITY OF ANY INFORMATION OFFERED BY THIRD-PARTY WEBSITES LINKED THROUGH THE SITE OR ANY WEBSITE OR FEATURE LINKED IN ANY BANNER OR OTHER ADVERTISING.
WE WILL NOT BE A PARTY TO OR IN ANY WAY BE RESPONSIBLE FOR MONITORING ANY TRANSACTION BETWEEN YOU AND THIRD-PARTY PROVIDERS OF PRODUCTS OR SERVICES.


AFFILIATES DISCLAIMER

The Site may contain links to affiliate websites, and we receive an affiliate commission for any purchases made by you on the affiliate website using such links. Our affiliates include the following:

  • makeCNC who provide Downloadable Patterns, Software, Hardware and other content for Laser Cutters, CNC Routers, Plasma, WaterJets, CNC Milling Machines, and other Robotic Tools. They also provide Pattern Files in PDF format for Scroll Saw Users. They are known for their Friendly and Efficient Customer Service and have a comprehensive back catalogue as well as continually providing New Patterns and Content.
  • Cloudray Laser: a world-leading laser parts and solutions provider, has established a whole series of laser product lines, range from CO2 engraving & cutting machine parts, fiber cutting machine parts and laser marking machine parts.
Item added to cart.
0 items - £0.00