 Skip to content
 01 – Introduction (38:39)
The Lightblade Learning Lab with Russ Sadler
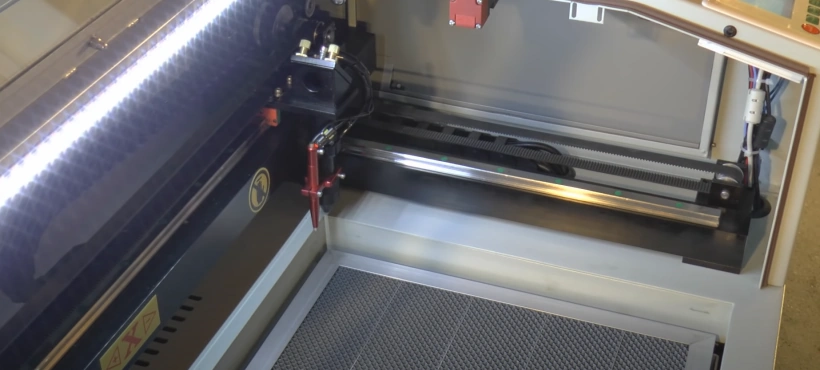
The Lightblade Learning Lab is a series of laser machine tutorial videos that Russ did for Thinklaser Limited based on using the Lightblade 4060 Laser Cutting and Engraving Machine. Thinklasers Lightblade 4060 has a 400 x 600mm bed size and was supplied with a 60W EFR laser tube. In this Laser Machine Tutorial, Russ gives an overview of his experience and Thinklasers Lightblade laser machine.

Contents
- Russ introduces himself
- The laser cutting machine
- Basic settings
- Safety
- Focusing
- The ammeter
- Controlling the machine
- Software, RDWorks and the manual (www.rdworkslab.com)
- Drawing shapes, layers, power settings
- First use of the machine
My thanks go out to Tom at Thinklaser for giving permission to embed these videos on this site. If you are looking for a new laser machine from a quality supplier, then I would suggest you check out their website: www.thinklaser.com.
| Next Video | Series Menu |
Video Resource Files

There are no resource files associated with this video.
External Resource Files
There are no more external resource links associated with this video.
Transcript For This Laser Machine Tutorial
Use the search function at the top of the page to find specific sections of interest.
00:15
Well hello to you all, my name is Russ
00:18
and I’m going to be taking you through a
00:20
series of sessions to help you learn
00:23
about this machine that I’m leaning on.
00:27
Now this machine is in fact the star of
00:30
the show.
00:30
This is a Lightblade machine supplied
00:33
by Thinklaser. Now I’m the proud owner of
00:36
this machine and I have to just
00:41
introduce myself by saying that I’m not
00:44
teacher, I’m not a laser expert but there
00:48
are several things that qualify me for
00:50
demonstrating this machine and how it
00:53
works.
00:55
Number one; over in the other corner of the
00:57
workshop, there i have a real ebay
01:00
Chinese laser machine which i bought
01:02
about 18 months ago. It took me about six
01:05
months to get it into a shape where it was
01:11
quite a reliable machine. Electrics were
01:14
flaky, the tube was absolutely beyond
01:20
any English words that i can describe,
01:22
but the mechanics were sort of ok. So with a
01:27
lot of care attention and engineering
01:29
support we managed to get into good
01:33
shape. The manual that came with the
01:35
machine was written in something which I
01:38
like to describe as Chinglish, basically a
01:41
collection of English words that were
01:43
randomized and put down in a book and
01:44
called a manual. Didn’t make any sense
01:47
at all.
01:48
So that was my experience, I had to learn
01:51
that machine from absolutely nothing
01:54
with no help. Like doing a jigsaw puzzle
01:56
without a picture on the box, so that’s
Transcript For This Laser Machine Tutorial (Cont…)
02:02
my qualification. Over the past 18 months
02:05
I’ve learned a great deal about these
02:07
Chinese machines and the technology. Now
02:10
I started off with basically a very
02:13
strong base because i had run a proper
02:16
metal cutting laser profiling business
02:19
for ten years and I understood the
02:20
technology and the machines extremely
02:22
well. Yes, this is a laser machine, but the
02:26
technology is completely different. So I
02:28
had to throw away all my beliefs and
02:30
concepts about my previous experience
02:33
and start again.
02:35
So yes, I’m an engineer,
02:38
yes I had laser experience and yes I’ve
02:42
now got 18 months of this type of laser
02:44
experience to pass on to you guys. This
02:48
machine is brand-new to me in the same way
02:51
that it is brand new to you.
02:53
So we shall be learning it together, but
02:56
I’ve got one advantage over you. I have
02:59
got 18 months of experience with that
03:00
machine over there, so that’s my VW
03:04
Beetle and this is my new Ferrari.
03:10
Well I think that’s enough of an
03:11
introduction, let’s get on and have a
03:13
look at the machine itself. Now if you’re
03:15
anything like me, you’ll be very
03:17
impatient to get on and do something with
03:19
your new machine. I’m sure that your
03:22
installation engineer will have given
03:25
you some basic instructions on how to
03:28
run this machine, how to install your
03:29
software etc. etc. So I’ll skip the very
03:33
very basics. So the first thing that we would
03:35
do is turn on this on/off button.
03:39
Oh! nothing appears to have happened, but
03:46
that’s because we failed to let the
03:51
emergency stop switch off which somebody
03:53
accidentally leaned on.
03:55
OK now I’ll just force that start
03:57
position again, because what’ll happens is
03:59
when you switch your machine on to start
Transcript For This Laser Machine Tutorial (Cont…)
04:01
with
04:02
it’s the same as pressing this reset
04:04
button and if you watch what happens to
04:05
the head, the head will go to the far
04:08
right hand back corner where it will
04:11
stop and then it will shuffle back to
04:15
somewhere, somewhere in the machine.
04:17
Now what it’s done, it’s been over to
04:19
that back left-hand corner and you can
04:21
probably see that blue sensor over there.
04:23
Well let me stop for a minute, I’ve got a
04:27
degree in beating machine safety systems.
04:32
So I’m a classified idiot!
04:35
This is nothing to do with anything that
04:38
Thinklaser would recommend, they’ve
04:40
put safety systems on this machine to
04:42
stop people like me doing this and
04:47
running the machine. Now I know how to
04:50
run the machine like this, I’ve had to do
04:53
it for the last 18 months on my other
04:55
machine, but it’s much much easier to see
04:58
what’s going on in the machine with this
05:00
lid open.
05:01
We’ve got two sensors here, we’ve got this
05:03
one and we’ve got this one at the back here.
05:08
Now those two sensors basically tell the
05:10
machine where its home position is, where
05:14
0,0 is for the Machine. Now I will
05:17
explain what 0,0 means to you in a short
05:20
period of time, because we will just go
05:22
through the way in which this machine is
05:23
basically set up, but when i press the
05:27
reset button you’ll see that the head
05:30
goes to this zero position here and the
05:33
slide (this cross-gantry) runs to this
05:37
position here. So the machine is zeroing
05:40
itself in two planes to form an axis
05:44
point
05:54
and then it returns to this position
05:58
here. Now this position here is nowhere
Transcript For This Laser Machine Tutorial (Cont…)
06:01
special,
06:02
we can move the head around by pressing
06:05
these two buttons here. We can move it
06:07
back and forwards by pressing these two
06:10
buttons here. Now it looks as though it’s
06:12
going quite fast, you can change that
06:19
speed if you go to this button here
06:21
which says “speed”. We get a number on here
06:23
which is 200 millimeters a second. I
06:25
always set my mind to something like a
06:28
hundred and ten or a hundred and eleven,
06:30
just purely because it’s a nice number
06:32
and I’ll demonstrate why it’s a nice
06:34
number in a minute. So we press the arrow
06:36
key and we can make that bar appear
06:38
under any one of those numbers, so first
06:40
of all let’s reduce that to 100 and then
06:42
we’ll move across and we’ll make it into another.
06:44
We can go up to get to the one and go up
06:48
to get to the ones that we’ve got 111 and
06:51
now we press “Enter”.
06:52
So that’s the speed of a hundred eleven,
06:54
it’s still fast enough but it’s not so
06:56
fast that you have to worry about it too
06:58
much. You get plenty time to stop and
07:00
think.
07:00
Now there are times when you need to
07:04
very accurately and precisely move the
07:07
head to a position and if you watch what
07:10
happens when I press the button just
07:12
once very quickly, the head jumps quite a
07:15
long way.
07:16
This is a very quick push so when you’re
07:20
trying to accurately position the head
07:22
somewhere, you will need to go back to
07:25
this speed position and what we’ll do, we’ll
07:28
just take the 111 and we just reduce it
07:33
to 11 “Enter” and now when I press the
07:36
button
07:37
look I get very precise small movements
07:41
and that gives me an opportunity to jog
07:44
the head to exactly where i want it. So
07:47
there’s your first,
07:48
there’s your first simple keyboard
07:49
lesson. If you leave on 11 you will get
07:52
really annoyed, so what we do is set that
07:56
back up to 111 “Enter”. Now something else i would
Transcript For This Laser Machine Tutorial (Cont…)
08:02
recommend that you do fairly early on
08:04
with the keyboard;
08:05
you’ve got two powers here, one is called
08:08
minimum power and it shows on the bottom
08:10
here. We’ve got minimum power 1 and minimum
08:13
power 2, well we don’t have 2 laser
08:16
heads on this machine so minimum power 2
08:18
means absolutely nothing. Minimum power
08:22
one is probably what you need to set and
08:26
you can set that to fifteen percent. Now
08:28
I’m not going to explain why we want to
08:30
set that to fifteen percent at the
08:31
moment, just take my word that 15
08:33
percent is a good number. When we
08:35
press the max power button again we get
08:38
max power 1 and max power 2, ignore max
08:40
power 2 for the same reason that we
08:42
ignored minimum power 2. It’s set to
08:45
eighty-five percent, 85% may be fine and
08:49
I don’t know because I haven’t checked
08:51
this tube at the moment and what its
08:53
capability is? I would start off
08:56
personally by setting that to something
08:58
closer to sixty-five percent,
09:01
so let’s just change that value to
09:05
sixty-five percent “Enter”. I feel very
09:10
comfortable with 65-percent power and all
09:13
that again I will explain to you in a bit
09:16
more detail as we go on. Because I’m
09:18
going to be running this machine with
09:20
the safety systems defeated, but as a
09:22
precaution you need to always wear
09:25
glasses. Now a laser beam is a bit like the
09:28
light coming out of this torch.
09:29
Can you see it? No you can’t.
09:33
Does it have any effect on anything? No
09:35
it doesn’t, but if you shine in your eyes,
09:38
if it went onto your retina, it would
09:42
make you blind, but that depends on the
09:45
frequency of the light.
09:46
We’re not talking about visible light,
09:48
we’re talking about light which is out
09:51
of the optical range. Now if it’s out of
09:54
the optical range up in the Ultraviolet
09:57
and the high end of the frequency, then
09:59
yes you could do lots of damage to your
Transcript For This Laser Machine Tutorial (Cont…)
10:01
eyes. Down at the infra red end of the
10:03
spectrum
10:04
we’re not talking about light that looks
10:06
like this, it’s not going to damage your
10:09
retina. Before it gets the retina, what
10:12
it’s going to do is going to burn your
10:13
cornea, so it’s going to scar the front
10:16
face of your eye. Now you’ll see me from
10:18
time to time with my head in the video,
10:20
but you always notice that I’ve got my
10:22
glasses on, these cheap glasses from the
10:26
pound store.
10:27
I mean they’re polycarbonate, you could
10:31
wear normal glasses, my non-prescription
10:33
reading glasses here are what I wear all
10:35
the time and so consequently these will
10:38
give me adequate protection.
10:40
This is a smart set of safety goggles if
10:42
you really want to look stylish, but here
10:44
we’ve got a bog-standard two or three
10:47
dollar polycarbonate safety glasses with
10:51
a side shield on you’ll notice, which is
10:54
excellent, which will give you complete
10:57
protection. You can buy rather expensive
11:01
safety glasses for working with these
11:04
lasers,
11:05
personally I wouldn’t waste my money on
11:09
it even though my eyes are very valuable.
11:10
These will give me adequate protection.
11:14
So what I’m going to do is just give you
11:16
a quick demonstration. Right, I just put my
11:19
reading glasses directly in the beam and
11:22
what I’m going to do, is just going to
11:23
pulse it so that you can see what
11:25
happens if you accidentally got your eye
11:27
in the way directly of the laser beam
11:30
(which which is a virtual impossibility)
11:32
on this machine, but just in case this is what
11:35
would happen.
11:36
OK let’s do it again, and again, and again,
11:43
if you had a fire in front of your eye, I
11:45
think you’d move out the way fairly
11:47
quickly but what saying is, it hasn’t
11:49
burned through. That’s the level of
11:52
protection you’ll get. This laser
11:53
frequency is fully absorbed by this
11:56
material, I can do exactly the same thing
11:58
with the safety glasses, polycarbonate
Transcript For This Laser Machine Tutorial (Cont…)
12:01
again so we don’t expect any different
12:04
and it still hasn’t burned through.
12:07
Now, if you wear real “glass” glasses, I will
12:10
just do the same demonstration for you
12:12
and you’ll see it’s having zero effect on
12:16
the glass because it’s being 100
12:19
percent absorbed. Well in a future
12:21
session I shall be tackling, in more
12:25
detail the risks associated with the
12:28
laser beam, what the properties of the
12:30
laser beam are.And we’ll be talking
12:33
about the laser tube itself, how it works
12:35
and how you should be careful and look
12:37
after it. Look after it well and it will
12:40
serve you well, but if you abuse it, it’ll
12:44
kick you –
12:46
in the pocket. I have just plopped a
12:49
piece of plywood in here, right now I
12:52
haven’t set this distance here to
12:56
anything special. At the moment it’s
12:58
probably something like about 50
13:00
millimeters, this thing here (I think the
13:04
system calls it a pen), but basically
13:06
it’s a microswitch, a sprung-loaded
13:08
microswitch. Basically what that
13:10
does, that goes down and it senses this
13:12
surface and will automatically set this
13:16
to the correct height above the work. Now
13:19
I’m not going to do that at the moment,
13:20
we’ll talk about that in a completely
13:22
separate session, the autofocus system. At
13:25
the moment all I’m trying to do is just
13:27
quickly do what I said, demonstrate the
13:29
machine. So i want to see it doing
13:31
something, so i’m going to press the
13:33
pulse button now. Oh dear, what did you
13:39
see? Around at the back of the machine
13:41
here, we’ve got a little air pump and I’m
13:46
just going to power that on and there we
13:49
go,
13:49
it’s not too noisy.
13:53
We’ll move the head slightly and we do the
13:57
same thing again and see if you
Transcript For This Laser Machine Tutorial (Cont…)
14:01
notice the difference.
14:04
Now that’s just a single pulse on the
14:07
button with me just going “bip” on the
14:10
button.
14:11
I just turn the air pump off again and do it
14:14
one more time. Watch this time and you
14:18
will see a stream of smoke appearing to
14:22
come out at the end of the nozzle and
14:24
down to the wood. Now turn the air on and
14:30
do the same thing again.
14:33
What you see there is one of the reasons
14:37
why you should always make sure that you
14:39
have your air assist on. When I did it
14:44
without the air on, the laser beam was
14:48
actually, or the smoke was bouncing
14:51
straight back and going up, potentially
14:53
into the nozzle where the lens is, and you
14:56
could be fogging the lens or making the
14:59
lens dirty. Which will change the
15:01
efficiency of your machine. So whenever
15:03
you run your machine please, please,
15:06
please, turn your air on. So that you can
15:10
see clearly, here one more time when I’ve
15:13
got the air on and i press this button –
15:14
can you see the smoke just disappearing
15:18
out of the way? It doesn’t go backwards
15:20
at all. Now on the machine we also have a
15:24
milliamp meter and when i press the
15:28
pulse button again I just want you to
15:30
watch what happens.
15:34
The current goes up.
15:38
Now typically for a 60 watt tube, which is
15:42
what I’ve got in this machine here, you
15:45
would not want that meter to go over
15:47
probably about 22 milliamps. I will
15:51
have to look up, because it’s a brand new
15:53
high quality tube, the manufacturer of this
15:57
tube may allow me to go up to 24 or 25
15:59
milliamps. I don’t know I shall have to
Transcript For This Laser Machine Tutorial (Cont…)
16:02
look that data up, but I know to be
16:04
absolutely certain that typically 22
16:07
milliamps is the maximum you’d want to
16:09
put through a 60 watt tube. There are
16:11
specified values for all tubes but
16:14
manufacturers, different manufacturers
16:16
may well allow you to go a little bit
16:17
more than that. Again, another important
16:21
feature that we should come onto later –
16:23
don’t overdrive the tube by going more
16:26
than the manufacturer recommends. Well
16:30
that’s I think enough of a quick look
16:32
inside the machine itself, we’ve
16:34
satisfied my curiosity and we’ve
16:36
actually burnt something and if we take a
16:39
look around the machine,
16:40
you’re clearly see that it says
16:42
everywhere; class one laser product, avoid
16:47
eye or skin contact exposure. In a future
16:50
session we’ll talk about the various
16:51
dangers of laser.
16:53
The good thing about this machine is,
16:56
you’re not exposed to any danger if you
16:59
stick within the rules that are written
17:01
down and you don’t do the silly sort of
17:03
things I’m doing, which is beating the
17:04
guard systems. Things like this door, you
17:07
need a special tool to undo the door to
17:11
get access to these various things. Now
17:14
what that does mean to say, is you could
17:16
come in here, this is not door
17:19
interlocked these panels, so you could
17:21
come in this way and get yourself
17:24
exposed to the laser beam. Again we’ll
17:27
talk further about that later. Here we
17:30
are at the back of the Machine and again
17:34
you would not normally be able to do
17:37
this, but just understanding my degree in
17:41
beating the systems, we can have a look
17:44
at the laser tube itself.
17:47
Normally if that door is open, you would
17:49
not be able to
17:50
fire the laser tube. But what I’m going to do,
17:54
is I’m going to pulse that laser so that
17:56
you can see the laser actually working.
17:59
There we go – nice pink beam. With one of the
Transcript For This Laser Machine Tutorial (Cont…)
18:05
reasons why they don’t want you coming
18:07
in this cabinet is because down the end
18:09
there is 25,000 volts DC and that’s like
18:15
lightning.
18:16
It’s well protected, but it’s still
18:21
potentially dangerous down that end of
18:23
the system. So let’s just zoom in on the
18:25
working end of the laser, which is this
18:27
end here. Then I may be able to hold that
18:31
there and do this.
18:36
Now you saw that, that was the laser
18:39
beam coming directly out the end of the
18:41
tube, burning a hole in that cardboard,
18:42
producing a flame as you saw. This is
18:44
basically a dangerous system and that’s
18:47
why it requires to be fully interlocked
18:50
to prevent you getting in there, doing
18:52
any harm to yourself. Now I’m going to
18:55
keep stressing that point because I
18:57
break the rules,
18:58
you mustn’t! That’s enough of a taster
19:00
for how the machine works and we will
19:04
get into further parts of the machine at
19:06
a later point in time, but what I’m going
19:10
to just do now, is to very quickly
19:12
introduce you to the software system
19:14
that runs this machine. Just behind the
19:17
machine you’ll see that I’ve got a
19:19
stone-age computer which is running a
19:22
Windows XP system, it’s a 32-bit system.
19:26
Perfectly powerful enough to run
19:28
this software, but the software will run
19:31
on a Windows 10 machine, 64-bit Windows
19:35
10 machine as well, so it’s a very
19:37
flexible piece of software. So there are
19:40
three ways that you can control the
19:41
Machine; you are supplied with a cable, a
19:46
USB cable which is a male – male cable,
19:49
which goes in the back of your computer
19:51
/ which goes into the back of your pc
19:53
and then goes into a socket on the side
19:56
of the Machine, a USB socket and it’s
19:59
clearly marked “data line interface” now
Transcript For This Laser Machine Tutorial (Cont…)
20:03
that’s for if you want to control the
20:07
machine from a computer. You don’t have
20:10
to run the machine from a linked up
20:13
computer.
20:15
The machine doesn’t need that computer
20:16
there to run it. Believe me I’m in a, as
20:20
you can probably sense, a fairly cold
20:23
workshop at the end of my, at the end of
20:26
my yard. Now this is not a heated
20:29
workshop, most of you guys will either be
20:32
in a laboratory, in a lovely factory
20:35
possibly in a school? Who knows where you
20:38
are, but I can guarantee it won’t be as
20:40
cold as this place. So come the winter
20:42
months
20:43
I’m not going to be sitting out here
20:45
programming, I’m going to be inside. Now
20:48
there’s two ways i can be inside, I could
20:51
if I wanted have an ethernet cable. Now down
20:55
in this cabinet here, we have the main
20:58
control system, it’s all beautifully wired
21:01
and this is the main controller for the
21:05
system. This is the Ruida controller, now
21:09
coming out of this controller we’ve got
21:12
these two sockets here, these are
21:15
extensions of these two sockets here
21:18
and there is a third socket on there –
21:20
Ethenet, so you can control this system
21:25
from a network. At the moment this
21:29
particular machine is not wired up to
21:31
take a network because I don’t need it, but
21:35
if you needed to run your system on the
21:36
network,
21:37
all you need to do is ask Thinklaser
21:39
and they will ensure that that
21:41
connection comes out somewhere where you
21:43
can plug in ethernet cable in. As i said
21:46
to you, this workshop gets rather cold in
21:49
the winter, so i’m going to go inside to
21:51
my office now and we’re going to take a
21:53
look at the programming system on my
21:55
rather nice warm indoor office.
21:58
OK welcome to the Warm Office and the
Transcript For This Laser Machine Tutorial (Cont…)
22:01
first we got to do is load RDWorks and
22:05
I want you to check up in the top
22:07
left-hand corner and you will find a
22:09
version number up there which is V 8 01
22:12
and then there’s an 18 or number after
22:16
now that’s the issue number of the
22:18
software. I would earnestly suggest that
22:22
you only get your version of software
22:24
through Thinklaser.
22:28
Check what the latest version is if you
22:30
like, on the Ruida website, but get your
22:33
version from Thinklaser and also there
22:38
will be a manual that can be obtained
22:41
from Thinklaser.
22:43
Now the manual that I had to work with
22:45
was unreadable, but through the efforts
22:50
of quite a few guys on a forum called
22:54
www.rdworkslab.com and in conjunction with
23:03
Thinklaser, they have worked together to
23:06
produce a very readable version of the
23:10
original manual. In a strange sort of way,
23:12
that almost makes my job unnecessary,
23:16
but i know that many people like to
23:18
watch rather than read and also we may
23:21
well have some more tricks here, that we
23:24
can look at rather than read about. One
23:27
thing I would like you to notice, is that
23:29
I’m speaking about Thinklaser in the
23:32
third person, that’s because I’m not I
23:36
Thinklaser employee. I have a Thinklaser
23:38
machine and I undertook to do a
23:41
series of videos for them for training
23:44
purposes, so that gives me the freedom to
23:48
provide you with completely unbiased
23:50
training and comments about the machine
23:54
that i’m using. So back to this version,
23:57
there are two ways that you can install
23:59
it; you can install it on a pc that is
Transcript For This Laser Machine Tutorial (Cont…)
24:01
hooked up to the Machine via the USB link
24:04
and in which case you will find that
24:06
some of this configuration will already
24:08
be done, because the machine is talking
24:10
to this software.
24:12
In this particular instance, because this
24:14
is a remote pc there’s no connection
24:17
between it and the Machine and so I’ve
24:19
got to configure it manually.
24:21
Now that’s not such a bad thing, to watch
24:23
me configure it manually, because you may
24:25
want to go through and check that the
24:27
configuration on your pc linked to the
24:31
machine is configured correctly as well.
24:33
The first thing i want you to notice is
24:37
that in this top left corner, we’ve got
24:39
two arrows, two blue arrows that
24:42
represents the 0,0 position that the
24:47
machine runs to when it starts up. Now as
24:51
you’ve already seen that isn’t the
24:53
position that the machine runs to for the
24:56
Lightblade machine. We need that to be
24:59
over in this top right-hand corner, now
25:03
I’m not going to explain why at this
25:05
moment in time, we’ll deal with that in
25:07
another session. But what I’m going to do
25:09
is ask you to go to the config page,
25:12
sorry system settings and here you will
25:16
find that you’ve got two controls or two
25:19
boxes called mirror. One is for the X and
25:23
one is for the Y-axis For the Lightblade
25:26
machine both should be ticked. Now
25:30
there’s one other thing you need to do
25:31
on this page and that’s make sure that
25:33
this dot is in the top left-hand corner.
25:36
Now I say make sure, let’s put it there for
25:40
the time being, you can decide where you
25:43
want it
25:44
once you understand what it does.
25:47
Close – ok. Now i want to drag your
25:50
attention down to this bottom left-hand
25:51
corner here, where you’ll find that
25:53
there’s a little green square. It always
25:56
puzzled me when I first saw it, but let’s
25:59
just show you what it does and how it
Transcript For This Laser Machine Tutorial (Cont…)
26:01
works.
26:02
First of all we go up here and we’ll place
26:05
the arrow over the ellipse tool and we’ll
26:08
click the left hand mouse button and
26:10
bring it onto the work area. Now I’ll hold the
26:13
left mouse button down and I’ll drag a shape.
26:16
It can be an ellipse, but if I, at the
26:20
same time as holding down the left mouse
26:22
button, I hold down the control key on
26:25
the keyboard and move the mouse look what
26:28
happens. I’ve constrained the ellipse into a
26:32
circle, keep the control key pressed down
26:35
and release the mouse button,
26:38
and the circle remains a circle. Hello
26:41
why is that green square sitting up
26:43
there top left-hand corner?
26:45
Let’s use the Marquee, the windows
26:48
marquee and put handles around that and
26:52
equally well by the way escape, if you
26:54
really want to be fussy you can touch on
26:56
the object itself and click and that
26:58
will put the handles on. What you’ll
27:01
notice is that the green square is
27:04
hanging on the top left handle of the
27:06
circle.
27:07
Let’s confuse the situation a little more and
27:12
we’ll put a square or rectangle in there.
27:15
Now what’s happened to the green square?
27:18
It’s not on the handle of the circle, and
27:24
it’s not on the handle of the square, but
27:27
what it is on, is a handle of an enclosing
27:32
rectangle for both objects.
27:35
Let’s not get too concerned about what
27:37
that green square actually is doing
27:39
at the moment, but i just wanted to show
27:41
you that the green square can move
27:43
around in a rather strange and erratic
27:45
way. So we’ll put rectangle on there and
27:49
we’ll delete that and will bring ourselves back
27:50
to the circle. You will notice that the
27:52
blue arrows are now top right and that
27:55
is set, so changing those two mirror
27:58
commands has set the arrows into the
Transcript For This Laser Machine Tutorial (Cont…)
28:01
right position for us. OK
28:03
top right-hand here, we’ve got a black
28:06
layer.
28:07
Now that’s because we’ve got a black
28:10
object, if I put handles around that object
28:13
and I go to the bottom here, where I’ve
28:17
got a colored toolbar. I can select for
28:20
instance the red, and that object has now
28:24
become a red layer object. And hang on,
28:29
the layer up here has changed to red as
28:31
well. Lets double click on that layer
28:34
click click
28:36
and we open up something called a layer
28:39
parameter window. Now basically, this is
28:43
how we’re going to program this circle
28:45
into a manner that can be read by the
28:49
machine to draw that circle. So let’s go
28:53
through it very quickly,
28:54
nothing very complicated at all; is
28:56
output – “yes” I’ll explain that later; speed
29:00
200 millimeters a second; we’ve got a choice
29:03
here of scanning or cutting, dotting
29:06
or pen, well we’ll just go for cut; and here
29:11
we’ve got two numbers which minimum
29:13
power and maximum power, now we can’t
29:17
ever untick that box because that means
29:20
the laser head wouldn’t work.
29:22
We’ve got one laser head and we need it
29:23
working, but on the other side here we’ve
29:26
got a little box called default. If i
29:29
tick that box look, all of a sudden I
29:32
don’t have any control over the minimum
29:35
and maximum power. Now remember 10
29:38
minutes ago, when we were out on the
29:40
machine, I set the minimum power to
29:44
fifteen percent and the maximum power to
29:46
sixty-five percent.
29:48
By choosing that default I have now opted
29:53
to let the program run at the default
29:55
values that I’ve set on the machine.
29:58
I don’t want that, i want control of
Transcript For This Laser Machine Tutorial (Cont…)
30:00
those values so i would generally urge
30:03
you to untick that default button, if it
30:06
is there and keep control yourself. Now
30:10
for cutting, generally you will have the
30:13
values set to the same value, don’t
30:16
choose different values. Generally
30:20
different values are for the scan mode
30:23
and not for the cut mode. I say generally
30:26
because there are exceptions, which again
30:29
we will touch on as we get further into
30:31
these sessions. Now there’s one other
30:33
thing down here which looks as though
30:34
it’s working, which is this fifty percent
30:37
through power, it’s not working at all
30:39
because we haven’t got it ticked. Laser
30:42
through mode, I tick it and then
30:45
un-tick it, you’ll see that it actually
30:47
disappears – it’s not working.
30:49
We’ll just say okay and that’s it, we’ve
30:52
written our program. Where’s the machine code?
30:54
I don’t care, I never see it, I don’t need
30:57
to, all we’ve got to do now is get it
30:58
from here out to the machine. We don’t
31:01
have an ethernet connection to this pc
31:03
and it’s certainly not connected up via
31:06
a USB cable. So now we’ve got to look at
31:09
the third way that i discussed when we
31:13
were out in the workshop. And the third way
31:15
is actually using a USB stick. For the very
31:20
first time, we’ve got to come down here and
31:21
we’re going to make sure that this
31:23
device is configured to USB automatic.
31:27
You can then go to this here, which is
31:29
“Save to Ufile” and we can click on
31:33
that, you’ll see that the file type is
31:36
.RD – so i’m going to save this as
31:41
“Circle” – I would advise you to make sure
31:46
that you don’t use long filenames,
31:48
because they will be truncated to about
31:52
eight characters.
31:53
Ok now I’ve saved it, it comes up with this
31:55
rubbish which looks like a warning, I
Transcript For This Laser Machine Tutorial (Cont…)
32:00
think it says have a nice day!
32:02
Ok, I’ve just saved a machine code file, I
32:07
can’t read it, I can’t do anything with
32:09
it,
32:10
I can’t reload into this system and
32:12
recreate this drawing. If I want to save
32:16
this drawing I’ve got to do just that.
32:19
Go up to the file and press “save as” and now
32:23
i can “save as” – “circle.rld” what that means
32:28
now is I can close this system down and
32:32
I can reload RDWorks, and so i can now
32:35
open up circle and there it is, we’ve got
32:37
it back again. So that’s how you save
32:41
something for future use,
32:42
but remember we’ve just saved something to a
32:46
Ufile, so let’s go ahead to the Machine
32:48
and see what we can do with that Ufile now.
32:50
Back at the Machine, memory
32:54
stick, USB, data port, we’re going to plug
32:58
that into the USB port and I’d like to
33:01
show you all of the keyboard so you can
33:03
watch the key presses, because what I’m
33:07
going to do now is press file and we get
33:10
the opportunity of all these options
33:13
down here. These are files that have
33:15
already been loaded into the Machine and
33:18
we’ve got this second one down here which
33:20
is called udisk and we get that by
33:22
pressing this key to get a highlight
33:25
across to there and then we move down to
33:27
Udisk and that’s basically going to
33:31
read this memory stick.
33:33
So we press “Enter”
33:35
and it gives me various options that I
33:37
can do to the udisk. I can delete files
33:40
from the actual memory stick itself or I
33:43
can copy the files from the, from the
33:46
disk from the memory stick into memory,
33:48
into machine memory but I can’t do
33:50
anything at the moment because I’ve got
33:52
no files. So the first thing I’ve got to
33:54
do is read what the memory stick says, so
33:56
“read files” and there we go. Now one of
Transcript For This Laser Machine Tutorial (Cont…)
34:00
the files that we find there, we can use
34:02
the arrow keys and we get down to circle
34:04
and now we’re down at circle we’ve got
34:06
to go across again, and now we’re going
34:09
to come down. A bit convoluted and then
34:11
we eventually get to “copy to memory”
34:14
“copy successful” – “Enter”
34:23
Nothing appears to have happened, press
34:25
the “Escap”e key and you’ll see that our circle
34:29
appears in this little window, press the
34:31
“Enter” key again and you’ll see that we
34:34
get our circle appearing here. Now if we
34:37
press the “Enter” key again and again, we
34:44
get an opportunity to actually modify
34:46
the cutting parameters, here on the
34:49
machine and we can do that by pressing
34:53
the Z/U button and if you watch what
34:56
happens with the Z/U button, it
34:58
will send me down and back to here, where
35:04
if I had multiple layers I could use
35:06
these keys to get different layers. But
35:08
as we’ve only got one layer we will just
35:10
step down one more time with the Z/U
35:12
button to 200 millimeters a second
35:15
and we’ll change that to 150.
35:20
Now Bear in mind, my base program back in the office
35:22
is still 200 millimeters a second, but
35:26
I’m going to edit it on the machine here
35:28
to 150
35:36
millimeters a second – “Enter”. Now I can go down
35:40
and change, we’ve got minute this is
35:42
something you need to remember, when you
35:44
look down this list its minimum power
35:46
and maximum power quite often you can
35:49
get mistaken and put maximum power
35:51
minimum power you think that’s the way
35:53
that they are so read them very
35:55
carefully. Now we’re happy to press the
35:57
escape the “Enter” button, we press the
35:59
enter button now – “setup success”. “Enter”.
Transcript For This Laser Machine Tutorial (Cont…)
36:07
Now what we need to do is to decide where
36:10
we’re going to put the program on the
36:14
table, so we will use the arrow keys at
36:17
the moment and we drive the head over
36:20
there to that rear corner….ish. It’s not
36:27
that important where it goes, but I’m
36:30
just putting it there just for the
36:32
moment. If you remember we had a green
36:35
dot, a green square and then we had the
36:40
handles around the circle. That green dot
36:48
is where this Head is, and now what I’m
36:51
going to do is to press this key here
36:53
which is the “Origin” key.
36:55
What’s that, what’s thats done is created
36:57
a new 0 start position for the job and
37:02
so now when I press the Run button in a
37:04
minute, it will run from this position
37:07
here and draw a circle. Before we get it
37:10
to run we can do a check, there’s something
37:13
here called “Frame”, now if i press the
37:15
“Frame” button we shall get basically a
37:18
preview of the enclosing rectangle or
37:22
square.
37:28
But it will always go back to that
37:30
origin, so let me just do this one more
37:33
time. I’m going to press a reset. Now,
37:35
remember that a reset sends it over to 0,0
37:43
and then after a reset it will come back
37:46
to the origin that you last used. There
37:50
we go.
37:50
So even when I switch the
37:52
Machine off it will always come back to
37:54
that last used origin.
37:56
Ok, now I’ve got this completely set out
37:58
of focus,
37:59
I’m going to be drawing a thick burn
Transcript For This Laser Machine Tutorial (Cont…)
38:01
line, it won’t be a thin burn line but it
38:04
will just be to show you what’s going
38:06
on. So i’m now going to press the bottom
38:09
right-hand button, which basically says
38:12
“start or pause”.
38:16
I’ve paused it, halfway through, and I’m
38:21
going to press it again,
38:23
and there we go so you’ve seen all sorts
38:27
of things today. We’ve burned our very
38:30
first program and I think to be honest
38:34
that’s a very convenient point to stop.
What Next?
Did you enjoy this post? Why not check out some of our other posts:
Disclaimer
Last updated April 25, 2024
WEBSITE DISCLAIMER
The information provided by n-Deavor Limited, trading as Laseruser.com (“we,” “us” , or “our”) on (the “Site”) is for general informational purposes only. All information on the Site is provided in good faith, however we make no representation or warranty of any kind, express or implied, regarding the accuracy, adequacy, validity, reliability, availability or completeness of any information on the Site.
UNDER NO CIRCUMSTANCE SHALL WE HAVE ANY LIABILITY TO YOU FOR ANY LOSS OR DAMAGE OF ANY KIND INCURRED AS A RESULT OF THE USE OF THE SITE OR RELIANCE ON ANY INFORMATION PROVIDED ON THE SITE. YOUR USE OF THE SITE AND YOUR RELIANCE ON ANY INFORMATION ON THE SITE IS SOLELY AT YOUR OWN RISK.
EXTERNAL LINKS DISCLAIMER
The Site may contain (or you may be sent through the Site) links to other websites or content belonging to or originating from third parties or links to websites and features in banners or other advertising. Such external links are not investigated, monitored, or checked for accuracy, adequacy, validity, reliability, availability or completeness by us.
WE DO NOT WARRANT, ENDORSE, GUARANTEE, OR ASSUME RESPONSIBILITY FOR THE ACCURACY OR RELIABILITY OF ANY INFORMATION OFFERED BY THIRD-PARTY WEBSITES LINKED THROUGH THE SITE OR ANY WEBSITE OR FEATURE LINKED IN ANY BANNER OR OTHER ADVERTISING.
WE WILL NOT BE A PARTY TO OR IN ANY WAY BE RESPONSIBLE FOR MONITORING ANY TRANSACTION BETWEEN YOU AND THIRD-PARTY PROVIDERS OF PRODUCTS OR SERVICES.
AFFILIATES DISCLAIMER
The Site may contain links to affiliate websites, and we receive an affiliate commission for any purchases made by you on the affiliate website using such links. Our affiliates include the following:
- makeCNC who provide Downloadable Patterns, Software, Hardware and other content for Laser Cutters, CNC Routers, Plasma, WaterJets, CNC Milling Machines, and other Robotic Tools. They also provide Pattern Files in PDF format for Scroll Saw Users. They are known for their Friendly and Efficient Customer Service and have a comprehensive back catalogue as well as continually providing New Patterns and Content.
- Cloudray Laser: a world-leading laser parts and solutions provider, has established a whole series of laser product lines, range from CO2 engraving & cutting machine parts, fiber cutting machine parts and laser marking machine parts.
